background image

34

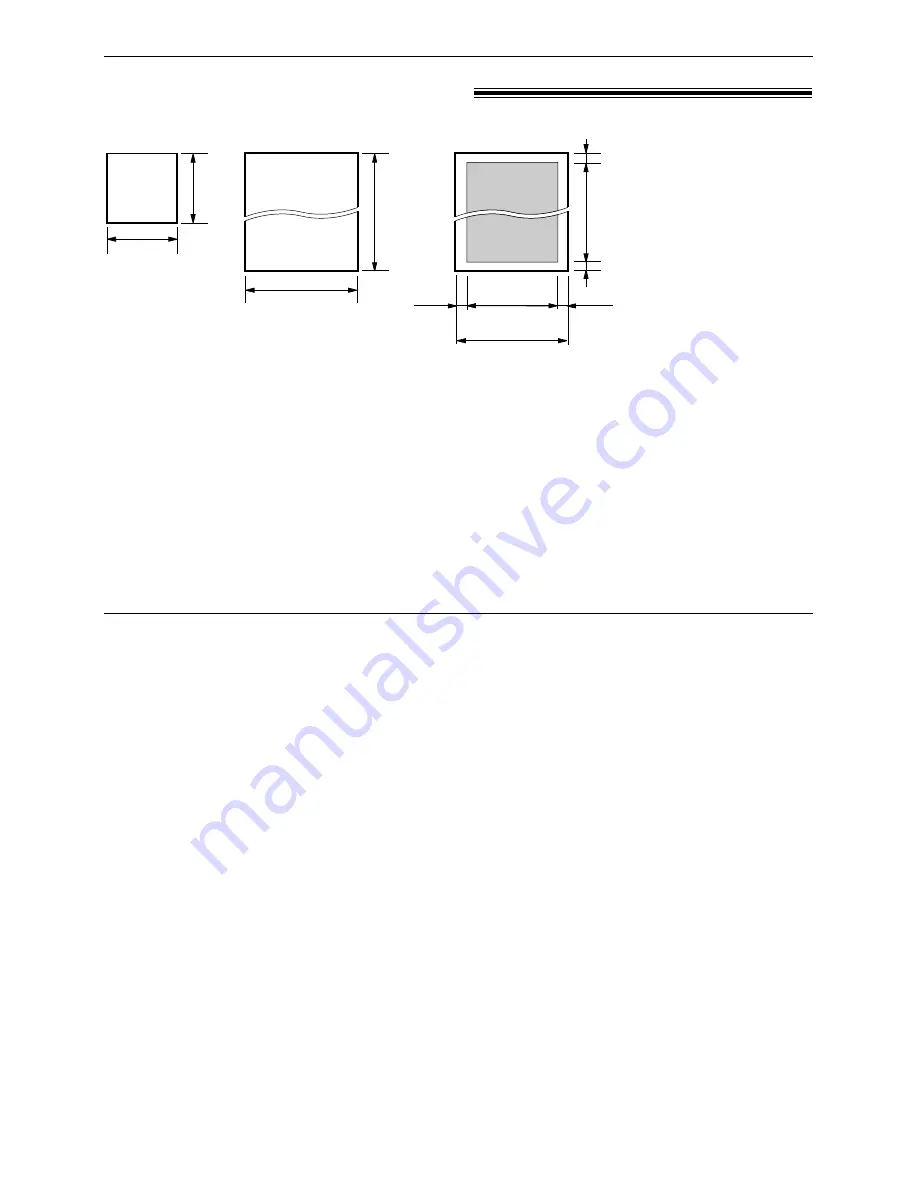
Sending Faxes

600 mm 

(23

5

8

")

Paper width

Minimum size 

128 mm

(5

" )

128 mm

(5

")

Maximum size

216 mm

(8

1

2

" ) 

208 mm (8

3

16

" ) 

Effective scanning area

 4 mm

 4 mm

 4 mm

 4 mm

Scanned

area

216 mm (8

1

2

" )

Document weight

Single sheet:

45 

g

/m

2

to 90 

g

/m

2

(12 lb. to 24 lb.)

Multiple sheets:

60 

g

/m

2

to 75 

g

/m

2

(16 lb. to 20 lb.)

Documents you can send

!

Note:

Remove clips, staples or other similar fasteners.

Check that ink, paste or correction fluid has dried.

Do not send the following types of documents. Use copies for fax transmission.
—Chemically treated paper such as carbon or carbonless duplicating paper
—Electrostatically charged paper
—Heavily curled, creased or torn paper
—Paper with a coated surface
—Paper with a faint image
—Paper with printing on the opposite side that can be seen through the front (e.g. newspaper)

To transmit more than 15 pages at a time

Insert the first 15 pages of the document. Add the extra pages (up to 15) before the last page is fed into

the unit.

Содержание KX-FL501C

Страница 1: ...unction Operating Instructions Model No KX FL501C Please read these Operating Instructions before using the unit and save for future reference For assistance please call 1 800 300 4644 or visit us at www panasonic ca PFQX1493ZA BM1100MN0 ...

Страница 2: ... licensee Kyushu Matsushita Electric Co Ltd 2000 For your future reference Date of purchase Serial number found on the rear of the unit Dealer s name and address Dealer s telephone number Caution Do not rub or use an eraser on the printed side of recording paper as the print may smear You can select English or French for the language The display will be in the selected language The default setting...

Страница 3: ...ord Install the unit where no one can step or trip on the cord 10 Do not overload wall outlets and extension cords This can result in the risk of fire or electric shock 11 Never push any objects through slots in this unit This may result in the risk of fire or electric shock Never spill any liquid on the unit 12 To reduce the risk of electric shock do not disassemble this unit Take the unit to an ...

Страница 4: ...th soap and water Drum unit Read the instructions on pages 12 and 13 before you begin installation of the drum unit After you have read them open the drum unit protection bag The drum unit contains a photosensitive drum Exposing it to light may damage the drum Once you have opened the protection bag Do not expose the drum unit to light for more than 5 minutes Do not touch or scratch the green drum...

Страница 5: ...he network interface Use caution when installing or modifying telephone lines WARNING To prevent the risk of fire or electrical shock do not expose this product to rain or any type of moisture OTHER INFORMATION Keep the unit away from electrical noise generating devices such as fluorescent lamps and motors The unit should be kept free from dust high temperature and vibration The unit should not be...

Страница 6: ...from your phone company 27 Viewing and calling back using caller information 28 Confirming caller information using the Caller s list 29 Storing caller information in ONE TOUCH DIAL and SPEED DIRECTOR 30 Voice Contact Talking to the other party after fax transmission or reception 31 Fax Sending Faxes Sending a fax manually 32 Sending a fax using ONE TOUCH DIAL and SPEED DIRECTOR 33 Documents you c...

Страница 7: ...2 No feeding or multiple feeding occurs while sending 72 Cleaning Cleaning the inside of the unit 73 General Information Printed Reports Reference lists and reports 75 Warranty Limited warranty 76 Important Important information 77 Information Specifications Technical data about this product 78 Index Index 80 Copy Copying Making a copy 50 Convenient way to make a copy 50 Programmable Features Feat...

Страница 8: ...on of the unit Part No PFJA1030Z Part No PQJA10075Z Part No PFJXE0805Z Paper tray 1 Part No PFZXFL501M Handset cord 1 Part No PFJA1029Z Operating instructions 1 Part No PFQX1493Z Accessory information Paper stacker 1 Part No PFZX1FL501M Document stacker 1 Part No PFKS1055Z For ordering information please contact your local Panasonic dealer Toner cartridge 1 complementary starter toner cartridge Th...

Страница 9: ...s 3 How to store names in the SPEED DIRECTOR directory and how to dial them 4 Help with problems sending receiving faxes 5 How to use the copier function 6 Frequently asked questions and answers 7 Explanation of error messages shown on the display 8 List of available reports 9 How to use the Call Display service 3 Press PRINTING SET CALL DISPLAY REPORTS ERRORS Q and A COPIER FAX SND RCV SPEED DIAL...

Страница 10: ...Paper tray Document entrance Speaker Left side of the unit Document guides Document stacker Handset To make or answer calls Recording paper exit Document exit Paper stacker Paper stacker extender Front cover The document stacker and paper stacker may not be shown in all illustrations ...

Страница 11: ... or reception To store a setting during programming To stop an operation or cancel programming To mute your voice to the other party during conversation Press this button again to resume conversation To confirm a stored telephone number p 26 To turn on off AUTO ANSWER p 40 41 To print a quick reference p 9 Display To select a resolution p 32 50 To make a collated copy p 51 To adjust volumes p 21 T...

Страница 12: ...ity area Do not expose the drum unit to direct sunlight 3 Slide the tab of the toner cartridge into the slot of the drum unit Tab Slot 4a Hold right side of the toner cartridge under the lip on the drum unit and 4b turn the two levers on the toner cartridge with firm pressure Levers Toner cartridge Red arrows Drum unit Hold here Green drum surface 1 Remove the toner cartridge and drum unit from th...

Страница 13: ...ront cover open button then open the front cover Front cover Front cover open button 8 Install the drum and toner unit by holding the tabs If the lower glass is dirty clean it with a soft dry cloth Drum and toner unit 9 Close the front cover until locked by pushing down on both sides Front cover Lower glass 6 Tap on the toner cartridge several times to allow the toner to fall into the drum unit Gr...

Страница 14: ... clicks into place 2 1 2 1 Paper tray Paper tray Align with the ribs on the document exit Pull the document stacker forward gently until it clicks into place 2 1 Line up the slots in the paper stacker with the pegs on the bottom of the unit then slide until locked Open the paper stacker extender when you use legal size paper The paper stacker can hold approx 100 sheets of printed paper Remove the ...

Страница 15: ...re not happy with the print quality 1 Fan the stack of paper to prevent a paper jam 2 Insert the paper into the recording paper entrance The paper should not be over the tab If the paper is not inserted correctly readjust the paper or the paper may jam Tab Recording paper entrance Side to be printed face down Stack of paper Correct Incorrect Adding paper 1 Remove all of the installed paper 2 Add p...

Страница 16: ... cord When the power is turned on for the first time the unit will print some basic information Caution When you operate this product the power outlet should be near the product and easily accessible Note The warranty does not cover damage due to power line surges or lightning For additional equipment protection we recommend the use of a surge protector For further details contact our service pers...

Страница 17: ...igits for each using the dial keypad Press to select AM or PM Example 3 15PM 1 Press 2 Press until PM is displayed TIME 03 15PM TIME 03 15AM 1 5 0 3 TIME 12 00AM SET M 08 D 10 Y 01 0 0 1 1 8 0 M 01 D 01 Y 01 SET SET DATE TIME 0 1 SYSTEM SET UP MENU 7 Press 8 Press MENU SETUP ITEM SET STOP SET MENU Display SPEED DIRECTOR To correct a mistake Press or to move the cursor to the incorrect number and m...

Страница 18: ...stake Press or to move the cursor to the incorrect character and make the correction To delete a character Move the cursor to the character you want to delete and press STOP To insert a character 1 Press or to move the cursor to the position to the right of where you want to insert the character 2 Press Insert to insert a space and enter the character HANDSET MUTE Note You can enter your logo by r...

Страница 19: ... T U V t u v 8 W X Y Z w x y z 9 0 To select characters with the dial keypad Pressing the dial keys will select a character as shown below To select characters using SPEED DIRECTOR Instead of pressing the dial keys you can select characters using SPEED DIRECTOR 1 Rotate until the desired character is displayed 2 Press to move the cursor to the next space The character displayed in step 1 is insert...

Страница 20: ...IRECTOR Note You can enter your facsimile telephone number by rotating If you use press to move the cursor The button replaces the digit with a and the button replaces it with a space Example using the dial keypad 234 5678 Press To enter a hyphen in a telephone number press Hyphen FLASH 2 4 6 7 8 3 5 SPEED DIRECTOR SPEED DIRECTOR To correct a mistake Press or to move the cursor to the incorrect nu...

Страница 21: ...irm that there are no documents in the entrance To turn the ringer off 1 Press repeatedly until the following message is displayed Display 2 Press To turn the ringer back on press While the ringer volume is set to off The display will show the following message When a call is received the unit will not ring and will display the following Handset receiver volume 5 levels high to low are available W...

Страница 22: ...e touch label card see right STOP STOP OR USE SPD DIR PRESS STATION REGISTERED SET FLASH S02 1114497 S02 SET NAME John LOWER SET DIAL MODE OR USE SPD DIR PRESS STATION DIRECTORY PROGRAM Helpful hint You can confirm the stored items on the display p 26 or on the telephone number list p 75 Note A hyphen or a space entered in a telephone number counts as two digits To correct a mistake Press or to mo...

Страница 23: ...NAME Alice NAME SPEED DIRECTOR OR USE SPD DIR PRESS STATION DIRECTORY PROGRAM Hyphen FLASH DIRECTORY PROGRAM Display SET STOP Delete SPEED DIRECTOR Helpful hint You can confirm the stored items on the display p 26 or on the telephone number list p 75 Note When the following message is displayed in step 6 you can store only 5 more items Display If there is no space to store new stations the followi...

Страница 24: ...p 5 4 Edit the name see page 19 for instructions 5 Press Example If you do not need to edit the telephone number skip to step 7 6 Edit the telephone number For further details see page 23 7 Press REGISTERED SET S01 0123456 SET NAME Mary EDIT DELETE DIRECTORY PROGRAM Mary S01 SPEED DIRECTOR Editing a stored name and number Editing and erasing a stored name and number You can edit a name or number s...

Страница 25: ... cancel erasing press 4 Press The stored name and number are deleted DELETED SET STOP YES SET NO STOP DELETE OK EDIT DELETE DIRECTORY PROGRAM Mary S01 SPEED DIRECTOR Erasing a stored station and item Display SET DIRECTORY PROGRAM STOP SPEED DIRECTOR You can erase ONE TOUCH DIAL station and SPEED DIRECTOR item ...

Страница 26: ...name has not been stored press and dial the number manually 2 Press or lift the handset The unit will start dialing automatically MONITOR STOP Lisa SPEED DIRECTOR To search for a name by initial Example Lisa 1 Rotate until any name is displayed Example 2 Press repeatedly until any name with the initial L is displayed see the character table on page 19 3 Rotate to the right until Lisa is displayed ...

Страница 27: ...rmation Consult your PBX supplier If the unit cannot receive caller information the unit will show the following The caller dialed from an area which does not provide Call Display service The caller requested not to send caller information The caller made a long distance call LONG DISTANCE PRIVATE CALLER UNAVAIL NAME NO The calling party s name or telephone number will be displayed after the first...

Страница 28: ...NO FAX START CALL DISPLAY SEARCH SPEED DIRECTOR STOP Viewing and calling back using caller information You can easily view caller information and call back Important Calling back will not be available in the following cases The telephone number includes data other than numbers i e or The caller information does not include a telephone number To edit the telephone number for calling back Press repe...

Страница 29: ...tivate feature 26 p 56 Confirming caller information using the Caller s list Printing and erasing the Caller s list 1 Press to start printing Display The display will show the following after printing 2 Press to exit the program or press to erase all of the stored caller information STOP YES SET NO STOP ALL ERASE OK PRINTING CALL DISPLAY PRINT SET STOP Display MENU CALL DISPLAY PRINT SET 1 Press t...

Страница 30: ...then press the desired ONE TOUCH DIAL key Press S06 1345678901 SET NAME WENDY ROBE LOWER S04 1345678901 SET NAME WENDY ROBE S02 1345678901 SET NAME WENDY ROBE SET DIAL MODE OR USE SPD DIR PRESS STATION DIRECTORY PROGRAM WENDY ROBERTS SPEED DIRECTOR USE SPD DIR 2 NEW CALLS CALL DISPLAY SEARCH Note You can confirm the stored items on the display p 26 or on the telephone number list p 75 You can only...

Страница 31: ...ive ring after the current page of the document has been received Note If you do not answer within 10 seconds of the distinctive ring the line will be disconnected Talking to the other party after fax transmission or reception You can talk to the other party after a fax message is completed This will save the added expense and time of making another call This feature only works when the other part...

Страница 32: ...nt up to 15 pages FACE DOWN until the unit grabs the document and a single beep is heard Display 3 If necessary press repeatedly to select the desired setting see below 4 Press or lift the handset 5 Dial the fax number Example 6 When the fax tone is heard Press and replace the handset if you are using it OR When the other party answers your call Using the handset ask them to press their start butt...

Страница 33: ...TOUCH DIAL LOWER FACE DOWN Document guides RESOLUTION STOP SPEED DIRECTOR FAX START Before using this feature program the desired names and telephone numbers into ONE TOUCH DIAL and SPEED DIRECTOR p 22 23 If your unit does not send a fax Confirm the stored telephone number on the display and check that the number dialed is answered by the other party s machine p 26 The connecting tone will be hear...

Страница 34: ...rs Check that ink paste or correction fluid has dried Do not send the following types of documents Use copies for fax transmission Chemically treated paper such as carbon or carbonless duplicating paper Electrostatically charged paper Heavily curled creased or torn paper Paper with a coated surface Paper with a faint image Paper with printing on the opposite side that can be seen through the front...

Страница 35: ...result will be erased To print manually see page 75 To print automatically after every 30 new fax communications activate feature 22 p 55 NO 01 02 03 04 05 3332222 9998765 John 555556677 00 45 00 58 00 48 02 45 03 50 MODE SND RCV RCV SND SND RCV PAGES 01 02 01 03 05 03 OK OK OK COMMUNICATION ERROR OK OK HEURE DÉBUT Mar 21 07 14AM Mar 21 08 17AM Mar 21 09 18AM Mar 22 10 35AM CODE JOURNAL REGISTRE D...

Страница 36: ...r MANUAL BROAD Enter the fax number and press Example To enter other stations repeat this step up to 20 stations 5 Press after programming all of the desired stations To program another broadcast key repeat steps 2 to 5 6 Press to exit the program STOP OR USE SPD DIR PRESS STATION REGISTERED SET DIR 3456789 01 DIR 3456789 SET 1 Press Display 2 For BROADCAST 1 2 Press the desired key Rotate to sele...

Страница 37: ... is displayed only using SPEED DIRECTOR is available Example SPEED DIRECTOR Example ONE TOUCH DIAL 2 5 Press Example To add other stations repeat steps 4 and 5 up to 20 stations 6 Press to exit the program DIRECTORY PROGRAM Nikki REGISTERED SET Peter S02 Mike SPEED DIRECTOR ADD DELETE DIRECTORY PROGRAM BROADCAST1 SPEED DIRECTOR SET DIRECTORY PROGRAM Display SPEED DIRECTOR ...

Страница 38: ...e is displayed Example SPEED DIRECTOR Example ONE TOUCH DIAL 3 To cancel erasing press 5 Press 6 Press Example To delete other stations repeat steps 4 to 6 7 Press to exit the program DIRECTORY PROGRAM Bob DELETED SET YES SET NO STOP DELETE OK SET STOP Sam S03 Dick SPEED DIRECTOR ADD DELETE DIRECTORY PROGRAM BROADCAST1 SPEED DIRECTOR SET DIRECTORY PROGRAM Display STOP SPEED DIRECTOR ...

Страница 39: ...e of the stations is busy or does not answer the station will be skipped All skipped stations will be redialed up to 2 times after all of the other stations have been called To cancel the broadcast setting 1 Press while the unit displays the following message Display The display will show the following 2 Press SET YES SET NO STOP SEND CANCELLED BROADCASTING STOP Sample of a broadcast sending repor...

Страница 40: ...ct an external telephone answering machine and set the ring count of the answering machine to less than 4 Set the ring count in FAX ONLY mode of the fax machine to 5 EXT TAM if you use with AUTO ANSWER on When receiving voice calls The answering machine will record voice messages When receiving fax calls The fax machine will disconnect the answering machine and receive documents External telephone...

Страница 41: ... p 42 Turn AUTO ANSWER off by pressing AUTO ANSWER When receiving calls You have to answer all calls manually To receive a fax document press for each fax call FAX START Ring Ring Ring Mostly voice calls TEL FAX mode If you are near the unit and want to use it to receive voice calls yourself and fax calls automatically see pages 46 and 47 OFF When the fax machine detects a call matching the select...

Страница 42: ...the receiving document to the proper size and print it If you want to print the original size set feature 37 to off p 56 STOP TEL mode answering all calls manually If the AUTO ANSWER light is on turn it off by pressing Display TEL MODE AUTO ANSWER Note If you do not answer the call within 10 rings the unit will temporarily switch to fax reception and the caller can send a document Fax reception in...

Страница 43: ... change the ring count setting rotate until the desired number is displayed and press When receiving calls the unit will automatically answer all calls and only receive fax documents SET SPEED DIRECTOR AFTER 3 RINGS PICKUP RCV FAX AUTO ANSWER Line 1 Voice calls Line 2 Fax calls Only a fax machine is connected Activating FAX ONLY mode Note If the AUTO ANSWER light is already on and you wish to chan...

Страница 44: ...ecommend you record your message around 10 seconds long and not to pause for more than 4 seconds during the message Otherwise both machines will not function correctly 4 Activate the answering machine 5 Set the receive mode of the fax machine to TEL mode p 42 or FAX ONLY mode p 43 If you set to FAX ONLY mode set the ring count in FAX ONLY mode to 5 EXT TAM feature 06 on page 53 Using FAX ONLY mode...

Страница 45: ... activated by the caller s request and will receive the document Receiving a voice message and fax document in one call The caller can leave a voice message and send a fax document during the same call Inform the caller of the following procedure beforehand 1 The caller calls your fax machine The answering machine will answer the call 2 The caller can leave a message after the greeting message 3 T...

Страница 46: ...R light is off turn it on by pressing AUTO ANSWER The fax machine will not ring TEL FAX delayed ring count See bottom of next page The call is connected Voice call Fax calling tone A call is received The fax machine will ring 3 times Silent fax recognition ring count See bottom of next page The fax machine will automatically receive documents without ringing The calling party will hear a different...

Страница 47: ...l not ring but the extension telephone will ring twice TEL FAX delayed ring count See below The call is connected Fax calling tone A call is received The extension telephone will not ring but the fax machine will ring 3 times Silent fax recognition ring count See below The fax machine will automatically receive documents without ringing The calling party will hear a different ring back tone You ca...

Страница 48: ...de firmly FAX START 1 When the extension telephone rings lift the handset of the extension telephone 2 When document reception is required a fax calling tone slow beep is heard or no sound is heard press pre selected fax activation code firmly 3 Hang up the handset The fax machine will start reception 9 Wall jack Computer Wall jack EXT Answering machine We recommend that you always connect the fax...

Страница 49: ...ber 8 Check that your pager received the pager test call 9 Press MONITOR PAGER TEST SET NO SET MODE ON SPEED DIRECTOR MODE OFF SET FAX PAGER CALL 7 0 SYSTEM SET UP MENU MONITOR Pause REDIAL PAUSE MENU Display SET SPEED DIRECTOR 5555 Pager Your pager will display the message you entered in step 6 For example 5555 When your pager receives a pager call Note If you have subscribed to a Call Display se...

Страница 50: ...lable before you start copying Resolution Reduction enlargement rate Collation sort FACE DOWN Document guides RESOLUTION STOP COPY ZOOM COPY START COLLATE Display To stop copying Press STOP Note Any transmittable document can be copied p 34 To select the resolution according to the type of document Press repeatedly to select the desired setting FINE For printed or typewritten originals with small ...

Страница 51: ...splay COLLATE ON COLLATE Original document Enlarged copy Original document Example 70 reduced copy Example 150 enlarged copy Reduced copy A B C D A B C D A B C D A B C D Example Making two copies of a 4 page original document Note The display will show the rate you selected while copying Example Reduction enlargement rate For an enlarged copy the unit will only enlarge the centre of the upper part...

Страница 52: ...layed This step may be slightly different depending on the feature 5 Press The setting you selected is set and the next feature will be displayed 6 To exit programming press MENU SET SPEED DIRECTOR SET SPEED DIRECTOR SET ADVANCED MODE SPEED DIRECTOR SPEED DIRECTOR SYSTEM SET UP MENU Programming by entering the program code number directly You can select a feature by directly entering the program c...

Страница 53: ...s setting is also available after activating FAX ONLY mode p 43 If you are using the unit with an answering machine set to 5 EXT TAM p 44 02 To set your logo YOUR LOGO Up to 30 characters Display Feature Settings How the unit operates 03 To set your facsimile telephone number YOUR FAX NO Up to 20 digits 04 To print and check the sending report for fax transmission results p 35 SENDING REPORT ERROR...

Страница 54: ...etting is in bold type If you are using the unit with an answering machine activate this feature and set the remote activation ID to secure the remote operation for the answering machine REMOTE TAM ACT To select ON and enter ID 1 Press 2 Rotate and select this feature 3 Press 4 Rotate to select ON 5 Press 6 Enter your ID from 1 to 5 digits using 0 9 and 7 Press 8 Press MENU SET SET SPEED DIRECTOR ...

Страница 55: ...ke advantage of low cost calling hours offered by your telephone company The setting can be reserved to take place up to 24 hours in advance DELAYED SEND NEXT FAX ERROR OFF ON fax no hh mm OFF The default setting is in bold type Advanced features ON The unit will print the journal report automatically after every 30 new fax communications p 35 Note Step 4 may be slightly different depending on the...

Страница 56: ...nge the number of rings when the unit detects a voice call in TEL FAX mode SILENT FAX RING 3 4 5 6 ON OFF ON The unit will fit a received document onto your recording paper OFF The unit will print the original size 37 To receive a fax document that is longer than your recording paper AUTO REDUCTION How to set menu options Advanced features cont Note Step 4 may be slightly different depending on th...

Страница 57: ...nt the stored document The beeps will stop 46 To receive a fax automatically when you answer a call and hear a fax calling tone slow beep FRIENDLY RCV ON OFF ON You do not have to press for fax reception FAX START 48 To select either English or French for the display messages LANGUAGE ENGLISH FRENCH ENGLISH English is used FRENCH French is used 40 If you use the unit with an answering machine and ...

Страница 58: ... there is static interference on the telephone line ECM SELECTION ON OFF This feature is available when the transmitting receiving stations are ECM compatible If documents are in memory clear them before making the setting p 42 Advanced features cont How to set menu options Programming table cont Note Step 4 may be slightly different depending on the feature See page 52 for more details 1 Press 2 ...

Страница 59: ...default settings SET DEFAULT YES NO See pages 46 and 47 for details 1 Follow steps 1 3 on page 58 2 Rotate to select YES 3 Press 4 Press again 5 Press MENU SET SET SPEED DIRECTOR 77 To change the receive mode in the AUTO ANSWER setting AUTO ANSWER FAX ONLY TEL FAX FAX ONLY Facsimile only mode p 43 TEL FAX Telephone Facsimile mode p 46 47 The default setting is in bold type 79 To save on toner cons...

Страница 60: ... to memory being full The document was not fed into the unit properly Reinsert the document and try again The other party s fax machine is busy or has run out of recording paper Try again The document was not fed properly Reinsert the document and try again The other party s fax machine rings too many times Send the fax manually dial the number confirm the fax tone and press The other party s mach...

Страница 61: ...N Recording paper was not fed into the unit properly Reinsert the recording paper p 71 FAILED PICK UP The unit has a document in memory See the other displayed message instructions to print out the document FAX IN MEMORY Memory is full of received documents due to a lack of recording paper or a recording paper jam Install paper or clear the jammed paper When performing memory transmission the docu...

Страница 62: ... The unit is warming up Wait for a while PLEASE WAIT The other party s fax machine is busy or has run out of recording paper Try again REDIAL TIME OUT The toner cartridge is empty Replace the toner cartridge p 68 69 TONER EMPTY A transmission error occurred Try again TRANSMIT ERROR There is no space to store new stations in the SPEED DIRECTOR directory Erase unnecessary stations p 25 SPD DIR FULL ...

Страница 63: ...of feature 13 p 54 Disconnect the unit from the telephone line and connect the line to a known working telephone If the working telephone operates properly contact our service personnel to have the unit repaired If the working telephone does not operate properly contact your telephone company The ringer volume is set to off Adjust it p 21 FAX ONLY mode is set Tell the other party the number is onl...

Страница 64: ...ain Try copying the document If the copied image is clear there may be something wrong with the other party s machine The glass or rollers are dirty Clean them p 73 74 Use the overseas transmission mode of feature 23 p 55 Add two pauses at the end of the telephone number or dial manually FAX START Cause solution I cannot send documents The other party complains that letters on their received docum...

Страница 65: ...p 59 and press to turn on the AUTO ANSWER light If you want to set TEL mode press to turn off the AUTO ANSWER light The unit is not in AUTO ANSWER mode Press to turn on the AUTO ANSWER light AUTO ANSWER AUTO ANSWER AUTO ANSWER Cause solution ON OFF ON Copying Problem You cannot make a copy during programming Make the copy after programming or stop programming The glass or rollers are dirty Clean t...

Страница 66: ...ature 12 p 54 The code may include which is used for certain features provided by telephone companies Change the code on the answering machine to another number which does not include Also change the code of the fax machine with feature 12 p 54 Your answering machine has run out of recording tape Rewind the tape to record messages You set the answering machine to only give a greeting message Cause...

Страница 67: ...wn report NO 01 FAX NOT AVAIL MODE RCV PAGES 01 MEMORY RECEIVE POWER DOWN AT COUPURE Jan 05 2001 04 30AM RESTARTED AT RÉTABLISSEMENT Jan 05 2001 04 31AM FUNCTION OTHER FACSIMILE NO MODE PAGES FONCTION CORRESPONDANT WARNING CONTENTS HAVE BEEN CLEARED DUE TO POWER DOWN FOR ADDITIONAL INFORMATION PLEASE SEE THE JOURNAL REPORT AVIS LES DONNÉES ONT ÉTÉ EFFACÉES SUITE À UNE PANNE DE COURANT POUR PLUS D ...

Страница 68: ... not expose the drum unit to direct sunlight Do not unplug the fax machine to prevent loss of fax documents in memory Do not pour any toner into the toner cartridge TONER EMPTY TONER LOW Replacing the toner cartridge and the drum unit Front cover Fuser unit Front cover open button 2 Push the front cover open button then open the front cover Caution The fuser unit gets hot Do not touch it 3 Tap on ...

Страница 69: ...e page 4 for details Do not drop the toner on the green drum surface Put the used toner cartridge into the protection bag 2 1 7 Slide the tab of the toner cartridge into the slot of the drum unit Tab Slot 8a Hold right side of the toner cartridge under the lip on the drum unit and 8b turn the two levers on the toner cartridge with firm pressure Levers 9 The toner cartridge is installed when the tr...

Страница 70: ... Caution The fuser unit gets hot Do not touch it Front cover Fuser unit Front cover open button When the recording paper has jammed in the unit 11 Install the drum and toner unit by holding the tabs If the lower glass is dirty clean it with a soft dry cloth Drum and toner unit 12 Close the front cover until locked by pushing down on both sides Waste disposal method Waste material may be dumped or ...

Страница 71: ...lay When the recording paper was not fed into the unit properly When the recording paper has jammed near the recording paper exit Remove the jammed paper by pulling it toward you Jammed paper Front cover Recording paper entrance 4 Remove the recording paper Straighten and reinsert it into the recording paper entrance 3 Close the front cover until locked by pushing down on both sides ...

Страница 72: ...ust the feeder pressure Document jams sending 1 Push the front cover open button then open the front cover Jammed document Front cover Middle guide Note Do not pull out the jammed document forcibly before opening the front cover 2 Pull down the middle guide while holding the front cover 3 Remove the jammed document carefully 4 Lift the middle guide firmly 5 Close the front cover until locked by pu...

Страница 73: ... by the other party Caution Be careful in handling the toner drum unit See the caution for the drum unit on page 68 for details Do not use paper products such as paper towels or tissues to clean the inside of the unit Caution The fuser unit gets hot Do not touch it Front cover Fuser unit Front cover open button 2 Push the front cover open button then open the front cover 3 Pull down the middle gui...

Страница 74: ...er unit by holding the two tabs Drum and toner unit Lower glass 8 Reinstall the drum and toner unit by holding the tabs 9 Close the front cover until locked by pushing down on both sides 10 Reconnect the power cord and the telephone line cord Front cover Telephone line cord Power cord ...

Страница 75: ...s p 53 59 Telephone number list provides you with names and telephone numbers which are stored in ONE TOUCH DIAL and SPEED DIRECTOR Journal report keeps records of fax transmission and reception This report will be printed automatically after every 30 fax communications p 35 Broadcast programming list provides you with items which are stored in the broadcast feature p 36 Printer test list allows y...

Страница 76: ...verage under this warranty Rechargeable batteries are warranted for ninety 90 days from date of original purchase This warranty is extended to the original end user purchaser only A purchase receipt or other proof of date of original purchase is required before warranty service is performed THIS EXPRESS LIMITED WARRANTY IS IN LIEU OF ALL OTHER WARRANTIES EXPRESS OR IMPLIED EXCLUDING ANY IMPLIED WA...

Страница 77: ...ility designated by the supplier Any repairs or alterations made by the user to this equipment or equipment malfunctions may give the telecommunications company cause to request the user to disconnect the equipment Users should ensure for their own protection that the electrical ground connections of the power utility telephone lines and internal metallic water pipe system if present are connected...

Страница 78: ...erating Environment 10 C 32 5 C 50 F 90 5 F 20 80 RH Relative Humidity Dimensions H x W x D 190 mm x 417 mm x 345 mm 71 2 x 162 5 x 133 5 Weight Approx 6 5 kg 14 3 lb Power Consumption Standby Approx 5 W Transmission Approx 25 W Reception Approx 200 W Copy Approx 200 W Maximum Approx 560 W When the fuser unit turns on Power Supply 120 V AC 60 Hz Memory Capacity Fax memory Approx 120 pages of memor...

Страница 79: ...pproximate relationship between image area and toner life for Model No KX FA76A toner cartridge Toner life varies in actual usage 5 image area 10 image area 15 image area Note The image area changes with the depth thickness and size of the characters If you change the toner save setting to on the toner cartridge will last approx 40 longer 2 000 500 1 000 1 500 0 5 10 15 sheets Toner life for KX FA...

Страница 80: ...es 61 62 Distinctive ring service Feature 31 56 Document jam 72 Document size 34 Document stacker 14 Drum life 79 Drum unit 12 68 E Error correction mode Feature 68 58 Error messages 60 62 Extension telephone 47 48 F Facsimile telephone number Feature 03 20 Fax activation code Feature 41 45 48 57 Fax auto redial 33 FAX ONLY mode 43 Fax receiving 40 41 Fax ring count Feature 06 53 Feeder pressure 7...

Страница 81: ...re 78 59 Ring detection Feature 31 56 Ringer volume 21 S Sending Broadcast 39 From memory 32 Manually 32 One touch dial 33 SPEED DIRECTOR 33 Sending report Feature 04 35 53 Set default Feature 80 59 Silent detection Feature 40 57 Silent fax recognition ring Feature 30 46 47 56 Specifications 78 SPEED DIRECTOR Making a voice call 26 Selecting characters 19 Sending faxes 33 Storing 23 Storing Broadc...

Страница 82: ...Panasonic Canada Inc 5770 Ambler Drive Mississauga Ontario L4W 2T3 www panasonic ca ...

Отзывы: