background image

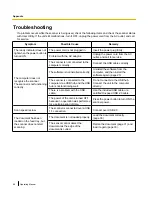
Troubleshooting

If a problem occurs while the scanner is being used, check the following items and check the scanner status
with User Utility. If the unit still malfunctions, turn it OFF, unplug the power cord from the AC outlet, and call
for service.

Symptom

Possible Cause

Remedy

The ready indicator does not
light when the power button is
turned ON.

The power cord is not plugged in.

Insert the power plug firmly.

Problem with the AC adaptor.

Unplug the power cord from the AC
outlet, and call for service.

The computer does not
recognize the scanner.
The scanner is not functioning
correctly.

The scanner is not connected to the
computer correctly.

Connect the USB cable correctly.

The software is not installed correctly.

Uninstall the software from the
computer, and then install the
software again. (page 23)

The scanner is connected to the
computer via a USB hub, and the USB
hub is not functioning well.

Do not connect via the USB hub.
Connect the unit to the computer
directly.

There is a problem with the USB
cable.

Use the included USB cable or a
certified Hi-speed USB 2.0 cable.

The power of the unit is turned OFF
because no operation was performed
for a certain period of time.

Press the power button to turn ON the
scanner power.

Scan speed is slow.

The scanner is connected over a USB
1.1 connection.

Connect over USB 2.0.

The document has been
loaded on the feed tray, but
the scanner does not start
scanning.

The document is not loaded properly.

Load the document correctly.
(page 33)

The sensor cannot detect the
document as the edge of the
document is curled.

Flatten the document (page 31) and
load it again (page 33).

56

Operating Manual

A

p

p

e

n

d

i

x

Appendix

Содержание KV-S1015C

Страница 1: ...lease read the Safety Guide and the Quick Reference Guide enclosed with this unit Please carefully read these instructions and the enclosed Safety Guide and Quick Reference Guide Keep all documentation in a safe place for future reference Model No KV S1026C KV S1015C Operating Manual Document Scanner ...

Страница 2: ... S1026C only Applications Image Capture Plus 1 Presto PageManager 9 2 KV S1015C only Presto BizCard 6 3 KV S1015C only Utilities User Utility Scan Button Setting Tool Documents 4 Operating Manual Separation Sheet 5 1 Image Capture Plus is a Panasonic original application for configuring advanced scanning settings The edition of Image Capture Plus included with KV S1015C does not support high compr...

Страница 3: ... to a USB hub it is not guaranteed to work Abbreviations Windows refers to the Microsoft Windows operating system hereafter Windows Windows XP refers to the Microsoft Windows XP operating system hereafter Windows XP Windows Vista refers to the Microsoft Windows Vista operating system hereafter Windows Vista Windows 7 refers to the Microsoft Windows 7 operating system hereafter Windows 7 The explan...

Страница 4: ...ries Presto PageManager and Presto BizCard are registered trademarks of NewSoft Technology Corporation in the United States and or other countries All other trademarks identified herein are the property of their respective owners About Consumables and Optional Accessories Consumables and optional accessories available for this scanner are as follows n Consumables Roller exchange kit Part No KV SS0...

Страница 5: ...bout Interference available from FCC local regional offices helpful FCC Warning To assure continued FCC emission limit compliance the user must use the recommended shielded interfacing cable when connecting to a host computer Also any unauthorized changes or modifications to this equipment would void the user s authority to operate this device FCC Declaration of Conformity Trade Name Panasonic Mod...

Страница 6: ...Acceptable Documents 30 Acceptable cards 30 Unacceptable Documents 31 Scanning Documents 33 Mixed Batch Card Guide 37 Installing the mixed batch card guide 37 Using the mixed batch card guide 37 Using Separation Sheets 38 About Printing Separation Sheets 39 Care and Maintenance 40 Clearing Paper Jams 40 Cleaning the Scanner 42 Outside of the Scanner 42 Inside of the Scanner 43 Cleaning the Rollers...

Страница 7: ...Index 63 Operating Manual 7 Table of Contents ...

Страница 8: ...ting the unit or plug may emit smoke or become hot to the touch When you operate this product the power outlet should be near the product and easily accessible Connect the AC adaptor firmly to the power cord and plug the power cord firmly into an AC outlet Otherwise it can cause fire or electric shock Do not use a damaged power cord or plug Use of damaged components can cause electric shock a shor...

Страница 9: ...an damage it and cause fire or electric shock Operating Safeguards If metallic materials or water gets into the unit turn the unit off and unplug the unit immediately Contact your dealer for service Operating the contaminated unit can cause fire or electric shock Do not open covers and do not attempt to repair the unit yourself Contact your dealer for service Do not alter the unit or modify any pa...

Страница 10: ...Prolonged exposure to these adverse conditions may cause fire or electric shock When moving the unit be sure to unplug the power cord from the AC outlet If the unit is moved with the power cord attached it can cause damage to the cord which could result in fire or electric shock Do not use the exit tray hanging out of a table When carrying the unit do not use the trays as handles Operating Safegua...

Страница 11: ...LUG CUT OFF AND DISPOSED OF SAFELY THERE IS A DANGER OF SEVERE ELECTRICAL SHOCK IF THE CUT OFF PLUG IS INSERTED INTO ANY 13 AMP SOCKET How to replace the fuse Open the fuse compartment with a screwdriver and replace the fuse and fuse cover FUSE OR FUSE Precautions Installation Do not place the unit in direct sunlight in a cold draft or near heating apparatus Do not place the unit near apparatus wh...

Страница 12: ... the power cord into an outlet from which you can easily unplug it Illegal Duplication It is unlawful to make duplication of certain documents Duplicating certain documents may be illegal in your country area Penalties of fines and or imprisonment may be imposed on those found guilty The following are examples of items that may be illegal to duplicate in your country area Currency Bank notes and c...

Страница 13: ...sure you have the same number of pages for important documents both before and after scanning and take care not to leave any pages in the scanner Periodically back up important data When having your computer or hard disk serviced or when disposing of your computer or hard disk completely erase any stored image data Operating Manual 13 Before You Start ...

Страница 14: ...ties Documents Safety Guide Quick Reference Guide The number of Quick Reference Guide may vary depending on the country area Please use whichever is appropriate for the country area Correction sticker When the information written on the guidance sticker page 15 has been changed you can attach a new sticker with the changed information The number of correction sticker may vary depending on the coun...

Страница 15: ...topper Exit support Used if paper curls and cannot be fed properly when scanning thin paper page 35 Control Panel For details refer to Control Panel and LED Indicators page 17 LED Red LED Green Shows the scanner s status For details see Control Panel and LED Indicators page 17 Guidance sticker You can write the information registered on the single touch scan button here Feed tray Feed extension tr...

Страница 16: ...Rear 3 1 2 Power connector Security slot Use a commercially available security cable USB connector 16 Operating Manual Installation ...

Страница 17: ... scanned and scanning will continue Start Stop button If you set Wait Key for Manual Feed Mode 1 in your application pushing this button starts scanning If the scanner is in Sleep mode press the Start Stop button to return to Ready mode first During scanning pushing this button stops scanning If you press this button when a double feed occurs the document that was detected as a double feed will no...

Страница 18: ...Blink Slow Sleep OFF Blink 2 times consecutively Double feed detected error ON OFF Error Blink Slow ON Caution 1 If no operation is performed for 30 minutes or longer the scanner will be turned OFF automatically The time until the scanner turns OFF can be changed with the User Utility 18 Operating Manual Installation ...

Страница 19: ... move the unit immediately from a cold place to a warm place It may cause dew In order to ensure proper operation install the unit maintaining the proper distances from surrounding objects as shown in the following illustration 210 mm 320 mm Top View 1 Clearance required to set the feed tray and exit tray Operating Manual 19 Installation ...

Страница 20: ...eed tray a Open the feed tray b Pull out the feed extension tray Note If the length of the document is short e g a card or a business card you may be able to scan the document without opening the feed tray 20 Operating Manual Installation ...

Страница 21: ...3 Set the exit tray a Pull out the exit tray b Open the feed extension tray c Open the exit stopper Operating Manual 21 Installation ...

Страница 22: ...et 1 2 3 AC adaptor Power cord To AC outlet Notice Use only with the power cord and the AC adaptor enclosed with the unit When the unit is not used over an extended period of time turn the unit off and unplug the power cord The scanner consumes approximately 0 3 W of electricity even when the main unit is turned off 22 Operating Manual Installation ...

Страница 23: ...s an administrator to install the software 1 Check that the scanner has been turned off Press the power button for more than one second to turn the scanner off 2 Insert the Software Manual DVD ROM into the CD DVD drive on your computer If you have a feature called Autorun activated the installation process will start automatically The setup window will appear Note If the AutoPlay dialog box is dis...

Страница 24: ...p 7 If you selected Custom continue to step 6 6 If you selected Custom for the installation type in step 5 select the item that you want to install 7 Follow the instructions on the screen 8 Connect the scanner and computer using the USB cable A 1 2 USB cable To computer Notice Be sure to use the USB cable supplied with this unit 24 Operating Manual Installation ...

Страница 25: ...follow the hardware wizard s on screen instructions to complete installation If you are using Windows Vista or Windows 7 this will be performed automatically Note Continue with the installation even if a window appears with the message Digital Signature Not Found or has not passed Windows Logo testing Operating Manual 25 Installation ...

Страница 26: ...n select Image Capture Plus Help For User Utility 1 On the Start menu point to All Programs Panasonic Scanner Tools and then select User Utility Help For Presto PageManager 9 1 On the Start menu point to All Programs NewSoft Presto PageManager 9 XX Standard 1 and then select Presto PageManager User s Manual For Presto BizCard 6 1 On the Start menu point to All Programs NewSoft Presto BizCard 6 1 a...

Страница 27: ...reen of each application 1 Open the setting screen When single touch scan button 1 3 is selected Press a button for more than 2 seconds to open the setting screen of each application If the scanner is in Sleep mode press the Start Stop button to return to Ready mode first When place to scan is selected Open the setting screen of each application manually 2 Set the scanning conditions For details a...

Страница 28: ...5 Check that the Disable device events checkbox is unchecked If the checkbox is checked uncheck it 6 Click OK 7 Restart the computer 28 Operating Manual Installation ...

Страница 29: ...e driver Panasonic Document Device Driver X XX 1 TWAIN KV S1026C KV S1015C TWAIN Driver ISIS KV S1026C ISIS Driver Image Capture Plus Image Capture Plus Presto PageManager 9 Presto PageManager 9 XX 1 Presto BizCard 6 Presto BizCard 6 1 User Utility Panasonic Scanner User Utility Manuals Panasonic Scanner Manuals 1 X XX and the number that follows a program name are the software version When you up...

Страница 30: ...ng the legal size length Recommended paper Plain paper Acceptable cards ISO format card Size 85 6 x 54 mm 3 4 x 2 1 in Thickness 0 76 mm 0 03 in Embossed card is also acceptable A maximum of 3 cards can be loaded on the feed tray The height of the total cards the total thickness including the embossing on each card should be less than 5 mm 0 2 in Additionally the embossing on each card must not ge...

Страница 31: ...frayed documents Extremely smooth shiny paper or paper that is highly textured Carbonless copy paper Transparent or partially transparent documents such as OHP sheet and tracing paper Photographs 1 1 Photographs may become scratched or damaged etc Do not scan the following types of paper Damaged or notched document card Documents out of specified size thickness and weight Documents containing hard...

Страница 32: ... limits If a paper jam or double feeding occurs try scanning again after doing the following Clean the rollers and sensors Reduce the number of sheets of paper loaded on the feed tray Scan one sheet at a time Notes about double feed detection This scanner is equipped with an ultrasonic sensor to detect double feeding 32 Operating Manual Operation ...

Страница 33: ... pages in the document Also check the condition of scanned documents Remove documents from the exit tray after they have been scanned Unsupported thin paper types may not exit at the exit slot correctly 1 Fan the documents Documents that have been stapled together or stacked together as in a file folder will need to be separated Fan the stack of documents to separate all the edges Hold both ends a...

Страница 34: ...des A slightly larger than the actual size of the documents 1 3 Carefully align the documents The documents feed better when the leading edges are aligned slantwise as shown in the illustration 1 2 34 Operating Manual Operation ...

Страница 35: ...e the documents as shown in the illustration The height of all the documents on the tray should be less than 5 mm Exceeding this height might cause paper jams or skewing When the paper is thin it may not be fed properly due to curls in the paper In that case press the front part of the exit support A to use the exit support 1 Operating Manual 35 Operation ...

Страница 36: ...lication and scan the documents For details about the application refer to the help of each application You can also start up applications automatically to scan documents Single Touch Scan For details about Single Touch Scan settings see Single Touch Scan Settings page 27 36 Operating Manual Operation ...

Страница 37: ...per documents on the feed tray and a card on the mixed batch card guide respectively The card set on the mixed batch card guide is fed after completing the paper document scanning The mixed batch card guide is suitable for the following card ISO format card Size 85 6 x 54 mm 3 4 x 2 1 in Thickness 0 76 mm 0 03 in Embossed card is also available Set the card horizontally Note When using the mixed b...

Страница 38: ...heet will be saved in a different folder Print out separation sheets from the Software Manual DVD ROM F i l e S e p a r a t i o n Documents Separation Sheet Code Documents B A Note Multiple separation sheets can be used To use separation sheet functions your scanning application must support separation sheets When using separation sheets refer to the instruction manual or the help of your scanning...

Страница 39: ... In order to print separation sheets Adobe Reader must be installed on your computer Refer to the instruction manual for your printer for details about changing print settings 1 Insert the Software Manual DVD ROM into the CD DVD drive on your computer If you have a feature called Autorun activated the installation process will start automatically The setup window will appear Note If the AutoPlay d...

Страница 40: ...e jammed sheet according to the following instructions 1 Remove all documents from the feed tray 2 Press the door open button A and open the ADF door B 1 2 3 Remove the jammed document If the document is jammed in the feed tray area pull it backwards as shown in the illustration 40 Operating Manual C a r e a n d M a i n t e n a n c e Care and Maintenance ...

Страница 41: ...cument is jammed in the exit area pull it forward as shown in the illustration 4 Close the ADF door Push both sides of the ADF door down slowly until it clicks into place Operating Manual 41 Care and Maintenance ...

Страница 42: ...aners containing abrasives or surfactants for cleaning the outside of the scanner Clean the scanner at least once a month 1 Press and hold the power button for one second or more to turn off the scanner power 2 Clean the cover with a soft cloth 42 Operating Manual Care and Maintenance ...

Страница 43: ...A and take out the roller cleaning paper A Notice Keep the roller cleaning paper out of reach of small children Do not store the roller cleaning paper in direct sunlight or in a place with temperature over 40 C 104 F Only use the roller cleaning paper to clean the rollers For details about the roller cleaning paper please refer to the Material Safety Data Sheet MSDS Please ask your Panasonic sales...

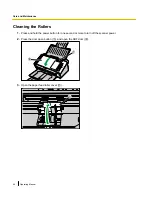
Страница 44: ... Press and hold the power button for one second or more to turn off the scanner power 2 Press the door open button A and open the ADF door B 1 2 3 Open the paper feed roller cover A 1 44 Operating Manual Care and Maintenance ...

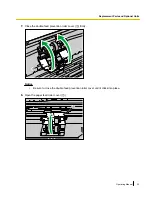
Страница 45: ...he roller surface hold the roller to prevent it from rotating Wipe the roller from one end to the other in the direction indicated by the arrow all the way around 5 Close the paper feed roller cover firmly Make sure to close both sides of the paper feed roller cover until they click into place Operating Manual 45 Care and Maintenance ...

Страница 46: ...rection of the arrow all the way around them as shown in the illustration 7 Use the roller cleaning paper to clean the surface of the conveyor rollers A and exit rollers B Wipe the rollers from one end to the other in the direction of the arrow all the way around them as shown in the illustration 2 1 46 Operating Manual Care and Maintenance ...

Страница 47: ...illustration 1 9 Close the ADF door Push both sides of the ADF door down slowly until it clicks into place 10 Reset the roller cleaning counter in User Utility to 0 Turn ON the scanner power Start User Utility and in the window click the Clear Counter button for After Clean Roller to reset to counter to 0 For details refer to the User Utility help Operating Manual 47 Care and Maintenance ...

Страница 48: ...e scanning glass reference area or double feed detectors 1 Press and hold the power button for one second or more to turn off the scanner power 2 Press the door open button A and open the ADF door B 1 2 3 Clean the scanning glass area A and reference area B using a soft and dry cloth 2 1 48 Operating Manual Care and Maintenance ...

Страница 49: ...4 Remove dust on the double feed detectors A with a cotton swab 1 5 Close the ADF door Push both sides of the ADF door down slowly until it clicks into place Operating Manual 49 Care and Maintenance ...

Страница 50: ...er Notes Replacement Parts Roller exchange kit Paper feed roller 1 piece Double feed prevention roller 1 piece KV SS058 For KV S1026C KV SS059 For KV S1015C Optional Units Roller cleaning paper KV SS03 See About the roller cleaning paper sold separately page 43 Note To purchase replacement parts or optional units please contact your dealer The scanner counter can be confirmed by using the User Uti...

Страница 51: ...ange kit and replace the double feed prevention roller and paper feed roller Replacing the Rollers 1 Press and hold the power button for one second or more to turn off the scanner power 2 Press the door open button A and open the ADF door B 1 2 3 Open the double feed prevention roller cover A 1 Operating Manual 51 Replacement Parts and Optional Units ...

Страница 52: ... out the new double feed prevention roller in the roller exchange kit 6 Install the new double feed prevention roller into the metal holder with the longer groove facing to the right side rear view 52 Operating Manual Replacement Parts and Optional Units ...

Страница 53: ...d prevention roller cover A firmly 1 Notice Be sure to close the double feed prevention roller cover until it clicks into place 8 Open the paper feed roller cover A 1 Operating Manual 53 Replacement Parts and Optional Units ...

Страница 54: ...e paper feed roller A 1 10 Take out the new paper feed roller in the roller exchange kit 11 Install the new paper feed roller with the gear on the left side 54 Operating Manual Replacement Parts and Optional Units ...

Страница 55: ...te in the feeding direction 13 Close the ADF door Push both sides of the ADF door down slowly until it clicks into place 14 Reset the roller replacing counter in User Utility to 0 Turn ON the scanner power Start User Utility and in the window click the Clear Counter button for After Replace Roller to reset the counter to 0 For details refer to the User Utility help Operating Manual 55 Replacement ...

Страница 56: ...the software from the computer and then install the software again page 23 The scanner is connected to the computer via a USB hub and the USB hub is not functioning well Do not connect via the USB hub Connect the unit to the computer directly There is a problem with the USB cable Use the included USB cable or a certified Hi speed USB 2 0 cable The power of the unit is turned OFF because no operati...

Страница 57: ... the limit mark on the document guides Paper jams occur frequently The document is wrinkled Smooth out the document The rollers are dirty Clean the rollers page 44 The document is not aligned correctly Realign the document page 33 The document set on the feed tray has too many pages Remove pages from the document until it is under the limit mark on the document guides Scanned image is skewed The d...

Страница 58: ...anning resolution settings combined with patterns within the scanned image may cause this problem Change the scanning resolution and perform scanning again When you scan short documents the sound made by paper being ejected will be higher than usual If the length of a document is less than about 148 mm feeding speed control will be activated for exiting documents this is normal behavior If you sti...

Страница 59: ...all of the original packing materials The scanner should be handled in the correct horizontal position Required Materials Original scanner carton and packing materials Shipping tape and scissors 1 Press and hold the power button for one second or more to turn off the scanner power 2 Unplug the power cord from the outlet and remove the AC adaptor and USB cable from the scanner 3 Close the feed tray...

Страница 60: ...with the AC adaptor power cord USB cable DVD ROM Safety Guide and Quick Reference Guide 3 4 5 2 1 AC adaptor USB cable Safety Guide and Quick Reference Guide Software Manual DVD ROM Power cord 60 Operating Manual Appendix ...

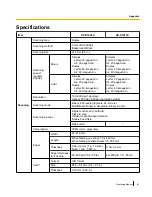
Страница 61: ...ex Letter 40 images min A4 40 images min Resolution 100 600 dpi 1 dpi step Optical 300 dpi 600 dpi Automatic switch Scanning mode Binary 256 levels grayscale 24 bit color MultiStream Binary Grayscale Binary Color Scanning function Single touch scan 3 buttons Place to scan Ultrasonic double feed detection Double Feed Skip Skip button Compression JPEG color grayscale Paper Width 48 216 mm Length Whe...

Страница 62: ...r is connected to the AC outlet Operating Environment Temperature 15 35 C Humidity 20 80 RH Storage Environment Temperature 0 40 C 32 104 F Humidity 10 80 RH 1 The scanning speed differs depending on the host computer operating system application measuring method the data quantity of the image and paper type The scanning speed was measured using a proprietary method 2 Although you can specify othe...

Страница 63: ... tray 15 Feed tray capacity 62 G Guidance sticker 15 L LED 17 LED Green 15 17 LED Red 15 17 Life 62 M Maintenance 62 Mixed batch card guide 15 O Operating Environment 62 P Paper jams 40 Power button 17 Power connector 16 Power consumption 62 Power cord 14 60 Power requirements 62 Precautions 11 R Repacking 59 Replacement parts 50 Replacing parts 51 Resolution 61 Roller cleaning paper 12 43 50 Roll...

Страница 64: ...l and electronic equipment please contact your dealer or supplier for further information Information on Disposal in other Countries outside the European Union This symbol is only valid in the European Union If you wish to discard this product please contact your local authorities or dealer and ask for the correct method of disposal Information on Disposal for India For the purpose of recycling to...

Отзывы: