42
4.6
PTZ
Note:
Before you control the PTZ, please make sure the PTZ decoder and the NVR network
connection is OK and the corresponding settings are right.
4.6.1 PTZ Settings
Cable Connection
Please follow the procedures below to go on cable connection
Connect the dome RS485 port to NVR RS485 port.
Connect dome video output cable to NVR video input port.
Connect power adapter to the dome.
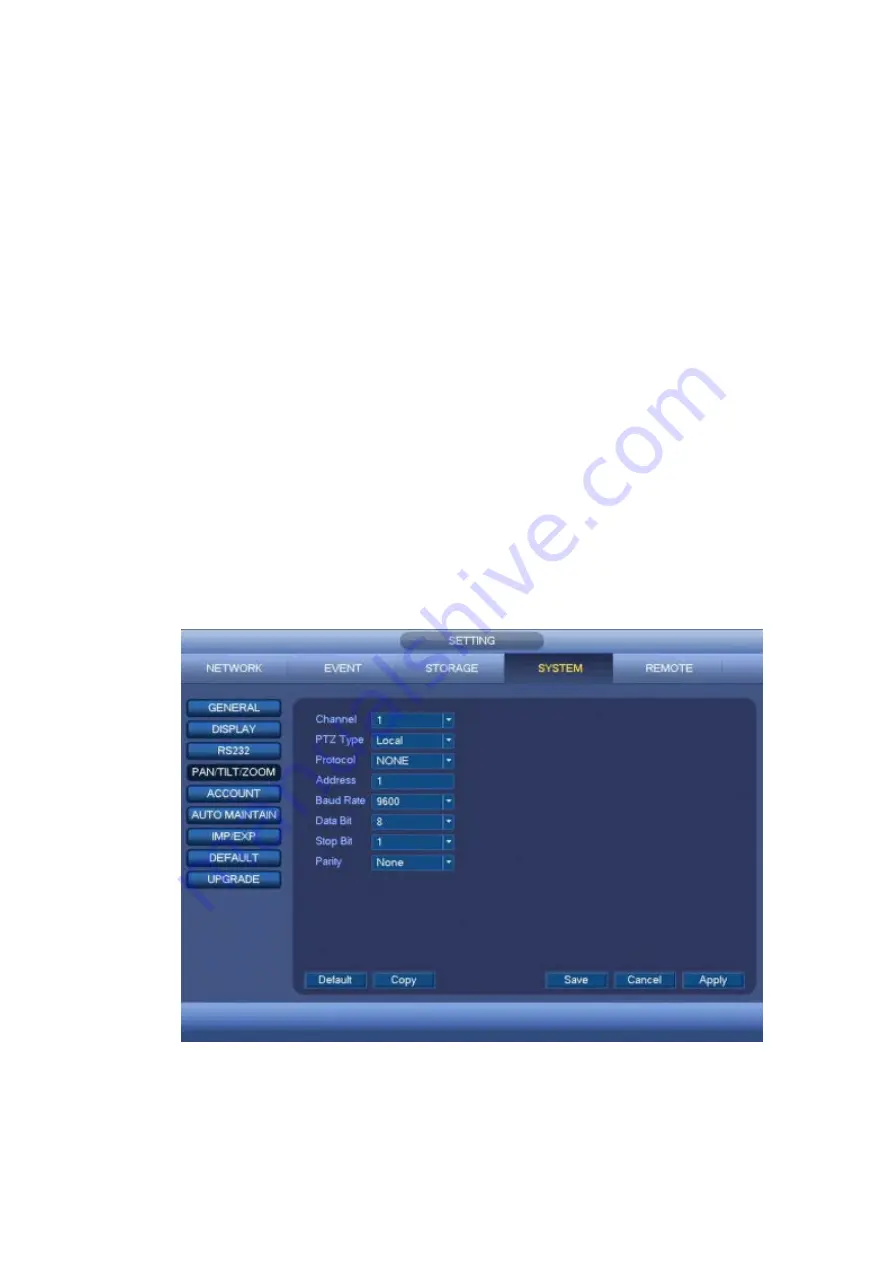
In the main menu, from SETTING->SYSTEM->PAN/TILT/ZOOM, you can see an interface is shown
as in Figure 4-26. Here you can set the following items:
Channel: Select the current camera channel.
PTZ Type: There are two types: local/remote. Please select local mode if you are connect RS485
cable to connect to the Speed dome (PTZ). Please select remote mode if you are connecting to the
network PTZ camera.
Protocol: Select corresponding PTZ protocol(such as PELCOD)
Address: Default address is 1.
Baud Rate: Select corresponding baud rate. Default value is 9600.
Data Bit: Select corresponding data bits. Default value is 8.
Stop Bit: Select corresponding stop bits. Default value is 1.
Parity: There are three options: odd/even/none. Default setup is none.
Figure 4-26
If you are connecting to network PTZ, the PTZ type shall be remote. See Figure 4-27.
Содержание k-nl308k
Страница 1: ...Network Disk Recorder User s Manual Model No K NL304K K NL308K K NL316K Version 1 0 5 ...
Страница 32: ...23 The following figure is based on our K NL316K product Figure 3 2 ...
Страница 50: ...41 Figure 4 25 ...
Страница 67: ...58 Figure 4 52 Figure 4 53 ...
Страница 88: ...79 Figure 4 71 Figure 4 72 ...
Страница 89: ...80 Figure 4 73 Figure 4 74 ...
Страница 94: ...85 Figure 4 78 Figure 4 79 ...
Страница 95: ...86 Figure 4 80 Figure 4 81 ...
Страница 96: ...87 Figure 4 82 Figure 4 83 ...
Страница 99: ...90 Figure 4 86 Figure 4 87 ...
Страница 114: ...105 send rate and receive rate at the top panel Figure 4 105 ...
Страница 116: ...107 Figure 4 107 In Figure 4 107 click one HDD item the S M A R T interface is shown as in Figure 4 108 Figure 4 108 ...
Страница 119: ...110 Figure 4 111 Figure 4 112 ...
Страница 129: ...120 Figure 4 125 Figure 4 126 ...
Страница 142: ...133 Figure 5 11 You can click this icon to display or hide the PTZ control platform 3D Intelligent Positioning Key ...
Страница 164: ...155 Figure 5 38 Figure 5 39 Figure 5 40 ...
Страница 172: ...163 Figure 5 51 Figure 5 52 Figure 5 53 Figure 5 54 ...


