background image


2.2


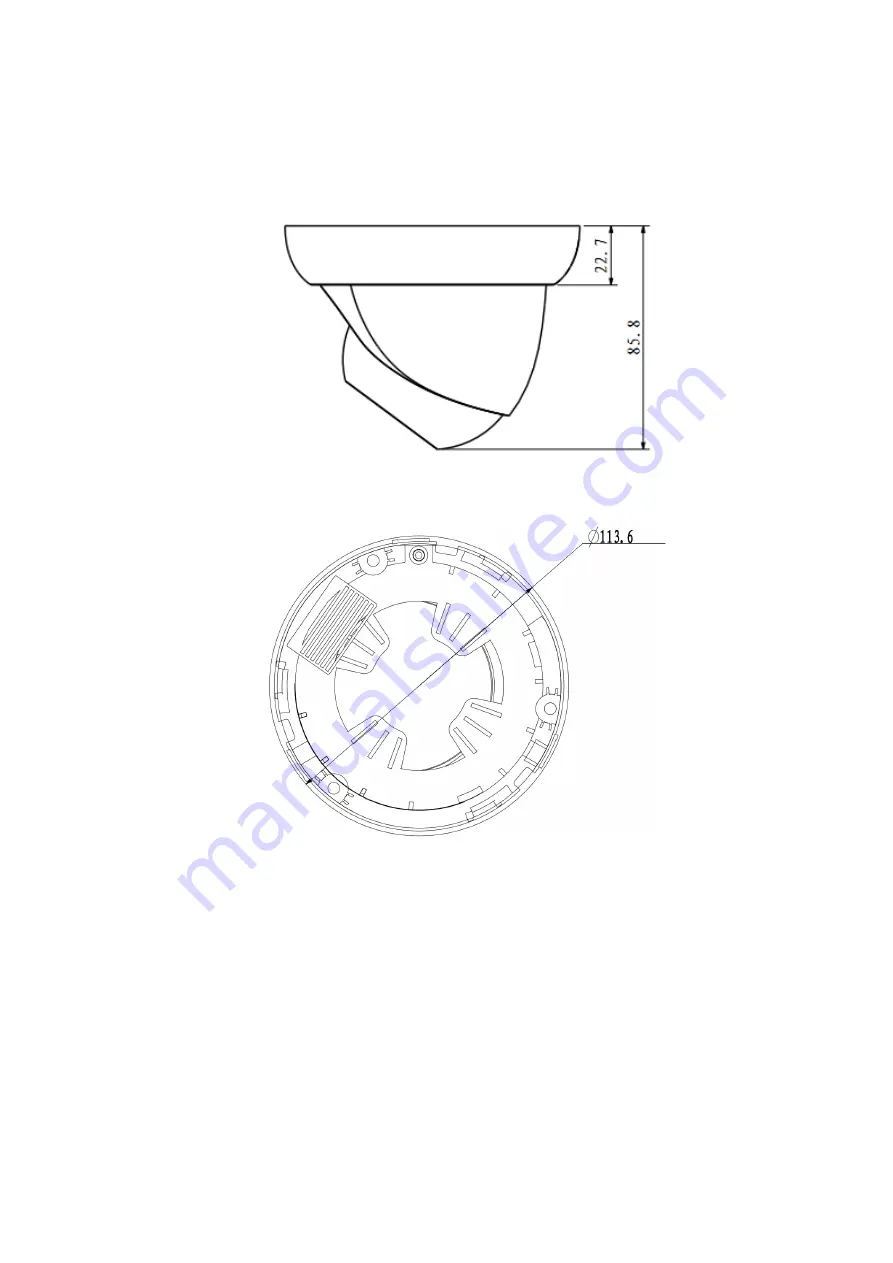
Framework and Dimension 

Please refer to the following two figures for dimension information. The unit is mm. See Figure 2-2 and 

Figure 2-3. 


Figure 2-2 Dimension illustration 1 


Figure 2-3 Dimension illustration 2 

Содержание K-EF134L03E

Страница 1: ...HD IR Weatherproof Network Dome Camera User s Manual Model No K EF134L02E K EF134L03E K EF134L06E Version 1 0 2 ...

Страница 2: ...ur Network camera This user s manual is designed to be a reference tool for your system Please read the following safeguard and warnings carefully before you use this series product Please keep this user s manual well for future reference ...

Страница 3: ...on Please install the proper power cut off device during the installation connection Always follow the instruction guide the manufacturer recommended 4 Qualified engineers needed All the examination and repair work should be done by the qualified service engineers We are not liable for any problems caused by unauthorized modifications or attempted repair 5 Environment This series network camera sh...

Страница 4: ... device or clean the enclosure when you are doing maintenance work Please use professional optical clean method to clean the enclosure Improper enclosure clean method such as use cloth may result in poor IR effect of camera with IR function 7 Accessories Be sure to use all the accessories recommended by manufacturer Before installation please open the package and check all the components are inclu...

Страница 5: ... 4 2 1 Components 4 2 2 Framework and Dimension 5 3 Device Installation 6 3 1 Installation Steps for Plastic Dome 6 3 2 Restore Factory Default Setup Introduction 8 4 Quick Configuration Tool 9 4 1 Overview 9 4 2 Operation 9 5 Web Operation 11 5 1 Network Connection 11 5 2 Login and Main Interface 11 6 FAQ 13 ...

Страница 6: ...ort central server backup function in accordance with your configuration and setup in alarm or schedule setting Support record via Web and the recorded file are storage in the client end PC Support network storage function such as FTP Data Transmission Data transmission via PoE Network Monitor Network camera supports one channel video data transmit to network terminal and then decode Delaying time...

Страница 7: ... Support day night mode switch Gain Control Manual Auto White Balance Manual Auto BLC On Off Exposure Mode Auto Low noise Low motion blur Manual It ranges from 1 3 to 1 100000 Video Compression Standard H 264 MJPEG Video Frame Rate stream 1 1280 960 30fps stream 2 704 480 30fps Video Bit Rate H 264 32Kbps 8192Kbps MJPEG adjustable and bit rate is adjustable Support customized setup Video Flip Supp...

Страница 8: ...store Default Setup Reset button IR light IR light 20M General Parameter Power DC12V power and PoE Warning Do not connect these two power supplying sources to the deviceat the same time it may result in device damage Power Consumption DC12V 330mA PoE DC48V 90mA Working Temperature 20 60 Working Humidify 95 Dimensions mm Φ113 86 Weight 290g Excluding box Installation Ceiling and wall mount Note Pan...

Страница 9: ...n cable information See Figure 2 1 Figure 2 1 Multiple function combination cable No Port Name Function Connection Note 4 LAN Network port Ethernet To connect to standard Ethernet cable 5 DC12V Power input port Power input port Input DC 12V No Component Name 1 Device lens 2 Dome body 3 Dome enclosure ...

Страница 10: ...Framework and Dimension Please refer to the following two figures for dimension information The unit is mm See Figure 2 2 and Figure 2 3 Figure 2 2 Dimension illustration 1 Figure 2 3 Dimension illustration 2 ...

Страница 11: ...e installation template label accessory to the ceiling or wall and use a pen to mark the positions of the screws and cable mounting hole in the ceiling or wall Remove the installation template label and attach the camera with 3 screws locally procured Step 3 Loosen the M3X8 cross pan head screw on pedestal and be careful do not loosen completely Now you can adjust position according to monitoring ...

Страница 12: ...stration 2 Note This series product supports two cable exits One is from the bottom and the other is from the side Please refer to the following figure for cable exit from the side information Figure 3 3 Device installation illustration 3 ...

Страница 13: ...d cover Step2 Take the dome body out and then turn the top cover hard to remove Step3 Slightly press the RESET button to complete the reset function See Figure 3 4 Step4 Turn the top cover back to the original position Please make sure it reaches the original position otherwise it may result in water leakage Step5 Put the dome back to the gland cover Please refer to step4 in chapter 3 1 to install...

Страница 14: ...n as in Figure 4 1 In the device list interface you can view device IP address port number subnet mask default gateway MAC address and etc Figure 4 1 Search interface 1 Select one IP address and then right click mouse you can see an interface is shown as in Figure 4 2 Select the Open Device Web item you can go to the corresponding web login interface Figure 4 2 Search interface 2 If you want to mo...

Страница 15: ...to login Please note the port information here shall be identical with the port value you set in TCP port in Web Network interface Otherwise you cannot login the device If you are using device background upgrade port 3800 to login other setups are all invalid Figure 4 3 Login prompt After you logged in the configuration tool main interface is shown as below See Figure 4 4 Figure 4 4 Main interface...

Страница 16: ...teway of the PC and the network camera respectively Network camera default IP address is 192 168 0 10 Subnet mask is 255 255 255 0 Gateway is 192 168 0 1 Use order ping network camera address to check connection is OK or not 5 2 Login and Main Interface Open IE and input network camera address in the address bar See Figure 5 1 Figure 5 1 IP address The login interface is shown as below See Figure ...

Страница 17: ...nstall web plug in or not after you logged in for one minute For detailed plug in installation please refer to the Web Operation Manual included in the resource CD After you logged in you can see the main window Please refer to the Web Operation Manual included in the resource CD for detailed operation instruction ...

Страница 18: ... 3800 to continue upgrade I can not login the client end or the WEB The Active X control is blocked The display card version shall be dx8 1 or higher Network connection error occurred Invalid network setup Invalid ID or PWD I can not play the download file There is no player There is no DX8 1 or higher For the MEDIA PLAYER there shall be Div X503Bundle exe plugin if you play the AVI file For Windo...

Страница 19: ... user interface All the designs and software here are subject to change without prior written notice All trademarks and registered trademarks mentioned are the properties of their respective owners If there is any uncertainty or controversy please refer to the final explanation of us ...

Отзывы: