Panasonic HDC-TM80 Скачать руководство пользователя страница 75

75

VQT3J26

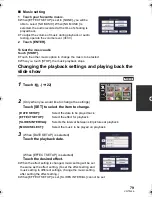
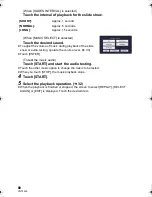
Resuming the previous playback

If playback of a scene was stopped halfway, the playback can be resumed from where it was 
stopped.

If playback of a motion picture is stopped, 

 appears on the thumbnail view of the stopped 

scene.

The memorised resume position is cleared if you turn off the unit or change the mode. (The 
setting of [RESUME PLAY] does not change.)

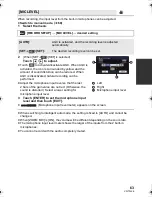
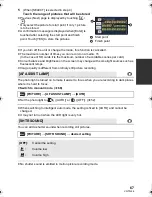
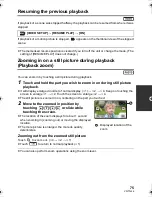
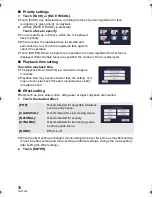
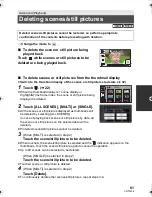
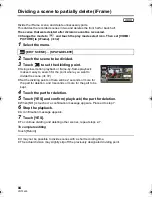
Zooming in on a still picture during playback 
(Playback zoom)

You can zoom in by touching a still picture during playback.

1

Touch and hold the part you wish to zoom in on during still picture 
playback.

It will display enlarged in order of normal display (

k

1) 

#


k

#


k

4. Keep on touching the 

screen to enlarge 

k

1

 #


k

2. Touch the screen to enlarge 

k

2

 # 

k

4.

The still picture is zoomed in on, centering on the part you touched.

2

Move to the zoomed in position by 
touching 

/

/

/

 or slide while 

touching the screen.

The location of the zoom displays for about 1 second 
when zooming in (zooming out) or moving the displayed 
location.

The more picture is enlarged, the more its quality 
deteriorates.

Zooming out from the zoomed still picture

Touch 

 to zoom out. (

k

k

k

1)

Touch 

 to return to normal playback (

k

1).

You can also perform zoom operations using the zoom lever.
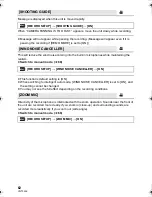
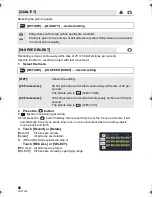
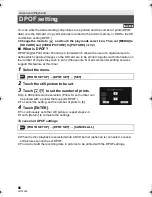
: [VIDEO SETUP] 

#

 [RESUME PLAY] 

#

 [ON]

MENU

A

Displayed location of the 
zoom

HDCSD80&TM80&HS80EB-VQT3J26_mst.book  75 ページ  2011年1月11日 火曜日 午前11時44分

Содержание HDC-TM80

Страница 1: ...Operating Instructions High Definition Video Camera Model No HDC SD80 HDC TM80 HDC HS80 Before use please read these instructions completely VQT3J26 Model number suffix EB denotes UK model...

Страница 2: ...replacement cover is obtained A replacement fuse cover can be purchased from your local dealer If a new plug is to be fitted please observe the wiring code as stated below If in any doubt please cons...

Страница 3: ...IN ANOTHER CONFINED SPACE ENSURE THE UNIT IS WELL VENTILATED TO PREVENT RISK OF ELECTRIC SHOCK OR FIRE HAZARD DUE TO OVERHEATING ENSURE THAT CURTAINS AND ANY OTHER MATERIALS DO NOT OBSTRUCT THE VENTI...

Страница 4: ...riate waste handling For more information about collection and recycling of old products and batteries please contact your local municipality your waste disposal service or the point of sale where you...

Страница 5: ...torage In order to avoid erasing data due to static electricity electromagnetic waves breakage and failures back up the data to a PC or DVD disc l 97 108 Access lamp ACCESS l 12 illuminates while the...

Страница 6: ...ates It may damage the HDD or cause a malfunction in the unit jTurn the unit off remove the battery jInsert and remove the USB cable jExpose the unit to vibrations or shock About disposing of or givin...

Страница 7: ...to use the touch screen 21 About the touch menu 22 Setting date and time 23 Basic Before recording 24 Selecting a media to record HDC TM80 HDC HS80 25 Recording motion pictures 26 Recording still pic...

Страница 8: ...ith a HDMI mini cable 92 Connecting with the AV multi cable 92 Playback using VIERA Link 93 Copy Dubbing Copying between SD card and Built in Memory HDD HDC TM80 HDC HS80 95 Connecting a DVD burner to...

Страница 9: ...44 844 3856 Order accessory and consumable items for your product with ease and confidence by phoning our Customer Care Centre Monday Thursday 9 00 a m 5 30 p m Friday 9 30 a m 5 30 p m Excluding publ...

Страница 10: ...of Jan 2011 These may be subject to change Accessories Battery pack VW VBK180 AC adaptor VSK0712 AC cable K2CT39A00002 AV multi cable K1HY12YY0008 USB cable K1HA05AD0007 Stylus pen VGQ0C14 This is us...

Страница 11: ...ns cover closing switch The lens cover will open automatically when set to motion picture recording mode or still picture recording mode l 21 When not using the unit close the lens cover to protect th...

Страница 12: ...direction 18 Battery holder l 14 19 Tripod receptacle If you attach a tripod which has 5 5 mm screw or larger it may damage this unit 20 SD card cover l 19 21 Access lamp ACCESS l 19 22 Card slot l 19...

Страница 13: ...layback mode l 33 25 Grip belt Adjust the length of the grip belt so that it fits your hand 1 Flip the belt 2 Adjust the length 3 Replace the belt 26 DC input terminal DC IN l 15 Do not use any other...

Страница 14: ...the direction shown in the figure Preparation Power supply It has been found that counterfeit battery packs which look very similar to the genuine product are made available to purchase in some marke...

Страница 15: ...nsert the plugs as far as they will go 1 Connect the AC adaptor to the DC input terminal 2 Connect the AC cable to the AC adaptor then the AC outlet The status indicator will flash red at an interval...

Страница 16: ...in HA HG HX HE 1 h 55 min 1 h iFrame 2 h 1 h VW VBK360 optional 3 6 V 3580 mAh 4 h 20 min HA HG 3 h 50 min 2 h HX HE 3 h 55 min 2 h iFrame 4 h 5 min 2 h 5 min HDC TM80 Battery model number Voltage Cap...

Страница 17: ...nal 3 6 V 1790 mAh 2 h 25 min HDD HA HG HX HE 1 h 40 min 50 min iFrame 1 h 45 min 55 min SD HA 1 h 45 min 50 min HG HX HE 1 h 45 min 55 min iFrame 1 h 50 min 55 min VW VBK360 optional 3 6 V 3580 mAh 4...

Страница 18: ...48 GB or more Memory Cards that do not have the SDXC logo are not based on SD Memory Card Specifications When the write protect switch A on SD card is locked no recording deletion or editing will be...

Страница 19: ...SB cable jExpose the unit to vibrations or shock Performing the above while the lamp is on may result in damage to data SD card or this unit Do not expose the terminals of the SD card to water garbage...

Страница 20: ...rn on the unit A The status indicator lights To turn off the unit B The status indicator goes off The unit will not turn off while recording motion pictures even if the LCD monitor is closed In the fo...

Страница 21: ...hard to operate with your fingers Touch Touch and release the touch screen to select icon or picture Touch the centre of the icon Touching the touch screen will not operate while you are touching ano...

Страница 22: ...ion icons by sliding the touch menu right or left while touching it B Touch these icons to switch pages upward or downward C Displayed only during the manual mode To display the touch menu Do not touc...

Страница 23: ...by touching the screen l 36 Touch EXIT to complete the setting The date and time function is driven by a built in lithium battery When this unit is purchased the clock is set If the time display beco...

Страница 24: ...nes with your hand etc Basic motion picture recording The unit should normally be held steady when recording If you move the unit when recording do so slowly maintaining a constant speed The zoom oper...

Страница 25: ...the media to record motion pictures or still pictures The media is selected separately to motion pictures or still pictures is highlighted in yellow 4 Touch ENTER Basic Selecting a media to record HD...

Страница 26: ...ions in the motion picture recording mode Basic Recording motion pictures T W 0h00m00s 0h00m00s 0h00m00s R 1h20m R 1h20m R 1h20m A Recording mode B Recording time elapsed Each time the unit is put int...

Страница 27: ...pictures recorded on an SD card built in memory or HDD While recording is in progress the recording will not stop even if the LCD monitor is closed Please refer to page 138 about approximate recordab...

Страница 28: ...icon when FACE RECOG is set to ON l 59 It is recommended using a photo light or tripod when recording still pictures in dark places because the shutter speed becomes slow The screen will become darke...

Страница 29: ...e intelligent auto mode portrait is used jWhen AF AE tracking is used jWhen the extra optical zoom is used jWhen the unit determines that the AF assist lamp is necessary l 67 Recording still pictures...

Страница 30: ...ode Mode Scene Effect Portrait When the object is a person Faces are detected and focused automatically and the brightness is adjusted so it is recorded clearly Scenery Recording outdoors The whole la...

Страница 31: ...ective range of automatic white balance adjustment on this unit 2 Blue sky 3 Cloudy sky rain 4 Sunlight 5 White fluorescent lamp 6 Halogen light bulb 7 Incandescent light bulb 8 Sunrise or sunset 9 Ca...

Страница 32: ...back Touch ENTER 4 Touch the scene or the still picture to be played back B is displayed when AVCHD is touched or is displayed when iFrame is touched in step 3 To display the next previous page jSlid...

Страница 33: ...Operate the volume lever to adjust the speaker during motion picture playback Towards r Increases the volume Towards s Decreases the volume Sound will be heard only during normal playback If pause pla...

Страница 34: ...ctures recorded on this unit even if the products support AVCHD or iFrame Motion pictures recorded in AVCHD and iFrame are not compatible with each other Still picture compatibility This unit is compl...

Страница 35: ...splayed by touching 4 Touch the desired item to enter the setting 5 Touch EXIT to exit the menu setting About guide display After touching touching the submenus and items will cause function descripti...

Страница 36: ...gion Touch to select your home region and touch ENTER Touch SUMMER TIME SET to set daylight saving time appears and the summer time setting is turned on the time difference from GMT is set forward by...

Страница 37: ...he screen set it by using the time difference from your home region It is possible to change the date and time display mode It is possible to change the date format You can set the display method of t...

Страница 38: ...A flashes green and the unit goes into quick start standby mode 3 Open the LCD monitor The status indicator A lights red and the unit is put into recording pause When in quick start standby mode about...

Страница 39: ...back mode When the AC adaptor is in use the LCD monitor is set to automatically When the LCD monitor is bright the recordable time with the battery will be shorter It adjusts brightness and colour den...

Страница 40: ...the medium will be erased and cannot be restored Back up important data on a PC DVD disc etc l 97 108 Please be aware that if a medium is formatted then all the data recorded on the medium will be er...

Страница 41: ...ns or shock The used space and remaining recordable time of the SD card can be checked When the mode switch is set to remaining recordable time for the selected recording mode is displayed Touch EXIT...

Страница 42: ...object to the one touched is selected 1 Touch CALIBRATION Touch ENTER 2 Touch the _ that appears on the screen with the supplied stylus pen Touch _ in sequence up left down left down right up right c...

Страница 43: ...ding the picture quality Extra optical zoom ratio varies depending on the setting of PICTURE SIZE l 65 Extra optical zoom mechanism For example when you set the picture size to 0 3M the maximum 2 6M a...

Страница 44: ...cture recording mode MODE1 The function works all the time MODE2 The function works when the button is pressed We recommend you are recording yourself or recording with a tripod in still picture recor...

Страница 45: ...n icon To cancel touch the Touch function icon again Optical image stabilizer lock is cancelled by releasing the finger touching Touch function icons An icon is displayed in the A position when the To...

Страница 46: ...e touch zoom bar It will zoom to the position you are touching It will zoom in when T side is touched and zoom out when W side is touched It is also possible to perform zoom operation by touching and...

Страница 47: ...me blinks in red and then disappears Touch a characteristic part colour etc on the object to lock onto it again When the button is pressed halfway in still picture recording mode the focus is set to t...

Страница 48: ...set the display method of the optical image stabilizer lock icon Stabilization may not be possible under strong shaking conditions To record while moving the unit quickly release optical image stabili...

Страница 49: ...1 It is not displayed in still picture recording mode 2 It is not displayed in the intelligent auto mode 3 It is not displayed in motion picture recording mode If you turn off the unit or change the m...

Страница 50: ...recorded clearly If there are extremely dark or bright parts or the brightness is insufficient the effect may not be clear This allows recording of the pictures and sound to start approximately 3 seco...

Страница 51: ...cording the face detected as a smiling face is surrounded by a green frame and are red Smile shot recording will not work in the following cases will flash j When there is no SD card inserted j When M...

Страница 52: ...by one setting in the following order ON AUTO OFF Always flashes Photo light will flash automatically by determining the ambient brightness Cancel the setting The unit automatically determines if the...

Страница 53: ...essed fully all at once the lens focuses on the subject just before recording To stop the timer midway through Touch CANCEL Setting the self timer to 2 is a good way to prevent image shake when the bu...

Страница 54: ...ize is 2 6M 0 3M 2 8M You can check if the image is level while recording or playing back motion pictures and still pictures The function can also be used to estimate the balance of the composition It...

Страница 55: ...jThe shutter speed is 1 25 jImage may get washed out when recorded in bright surrounding Advanced Recording Recording functions of menus SCENE MODE RECORD SETUP SCENE MODE desired setting OFF Cancel...

Страница 56: ...uitable for Mac iMovie 11 It is recommended for when using a Mac Recordable time using the battery l 16 This function s default setting is HG mode Please refer to page 138 about approximate recordable...

Страница 57: ...LAY SCENE COMBINE a message is displayed You will be able to perform relay recording by touching YES but you will not be able to perform the RELAY SCENE COMBINE after that Still pictures are recorded...

Страница 58: ...his case try recording the face again 3 Entering the person s name Touch the text entry icon in the centre of the screen and enter the name After entering the name touch Enter Entering text A maximum...

Страница 59: ...nge FOCUS ICON This changes the focus indication icon that appears during still picture recording Only displayed when face recognition is in use Touch the icon you wish to have displayed 3 Touch ENTER...

Страница 60: ...as orange frames Focus and adjustment of brightness will be performed against the prioritised face framing Prioritised face framing is only displayed with portrait mode in the intelligent auto mode T...

Страница 61: ...TV with the AV multi cable the TV cannot detect the digital cinema colour setting on this unit automatically We recommend connecting this unit to TVs compatible with x v Colour using an HDMI mini cab...

Страница 62: ...default setting is ON When switching to intelligent auto mode WIND NOISE CANCELLER is set to ON and the setting cannot be changed You may not see the full effect depending on the recording conditions...

Страница 63: ...Select a lower setting for microphone input level 3 Touch ENTER to set the microphone input level and then touch EXIT Microphone input level meter appears on the screen When switching to intelligent...

Страница 64: ...mode and still picture recording mode Switch to manual mode l 68 1 Select the menu 2 Touch the desired setting items 3 Touch to adjust settings 4 Touch ENTER Touch EXIT to complete the settings appea...

Страница 65: ...140 about the number of recordable pictures When the picture size is 2 6M 2 8M or 0 3M black bands may appear on the left and right of the screen The edges of still pictures recorded on this unit with...

Страница 66: ...All pictures are deleted 4 When Record is selected in step 3 Touch REC ALL or SELECT REC ALL All pictures are stored SELECT Pictures are stored by specifying range QUALITY PICTURE QUALITY desired sett...

Страница 67: ...nd brightness on the screen may change with some light sources such as fluorescent lamps Image quality is different from ordinary still picture recording The photo light is turned on to make it easier...

Страница 68: ...ween motion picture recording mode and still picture recording mode Press the iA MANUAL button to switch to manual mode appears on the screen Advanced Recording Manual recording MNL MANUAL A Manual ic...

Страница 69: ...display continues flashing the white balance cannot be set In this case use other white balance modes When the display flashes the manual white balance previously adjusted is stored Whenever recordin...

Страница 70: ...hutter speed and the iris gain value set the shutter speed and then set the iris gain value Manual shutter speed adjustment When the shutter speed is set lower than 1 12 in the still picture recording...

Страница 71: ...cus by touching The in focus area is displayed in blue The normal screen returns approximately 2 seconds after you finish bringing the subject into focus Touch FOCUS to end the adjustment When MF ASSI...

Страница 72: ...ger Slow motion playback During Pause With the playback paused continue touching is for slow rewind playback Playback is slow while touching Normal playback is restored when you touch When slow motion...

Страница 73: ...playback and frame by frame playback 2 Press the button fully Date the motion picture was recorded will be registered as date of the still picture Quality will be different from the normal still pictu...

Страница 74: ...When select FACE it will select the portion for which face recognition was performed from the scenes judged to be clearly recorded This will then be displayed as a thumbnail A portion judged to be cl...

Страница 75: ...on during still picture playback It will display enlarged in order of normal display k1 k2 k4 Keep on touching the screen to enlarge k1 k2 Touch the screen to enlarge k2 k4 The still picture is zoomed...

Страница 76: ...eparately when the number of scenes exceeds 99 1 2 are added after the date displayed on the date list Even if iFrame scenes are recorded on the same day they are grouped separately in the following c...

Страница 77: ...mode is changed Slow motion playback frame by frame playback and direct playback bar operation are not possible Scene setting 1 Touch SELECT SCENES or SELECT DATE 2 When SELECT SCENES is selected Touc...

Страница 78: ...e The playback time of AUTO is a maximum of approx 5 minutes Playback time may become shorter than the setting or it may not even play back if the part recognised as clearly recorded is short Effect s...

Страница 79: ...ide show 1 Touch l 22 2 Only when you would like to change the settings Touch SET to select the item to change 3 When DATE SETUP is selected Touch the playback date When EFFECT SETUP is selected Touch...

Страница 80: ...ume lever l 33 Touch ENTER To test the music audio Touch START and start the audio testing Touch the other music option to change the music to be tested When you touch STOP the music playback stops 4...

Страница 81: ...e scenes or still pictures on the selected date will be deleted Protected scenes still pictures cannot be deleted 3 When MULTI is selected in step 2 Touch the scene still picture to be deleted When to...

Страница 82: ...highlight playback or disc playback when connected to a DVD burner optional scenes still pictures cannot be deleted Scenes which cannot be played back the thumbnails are displayed as cannot be delete...

Страница 83: ...t steps 2 3 4 Touch Return to complete dividing Unwanted parts can be deleted l 81 To delete all the divided points The scenes that were deleted after division cannot be recovered You cannot divide a...

Страница 84: ...for the point where you want to divide the scene l 72 Set the dividing point so there will be 2 seconds or more for the part for deletion and 3 seconds or more for the part to be kept 4 Touch the par...

Страница 85: ...CEL while deleting personal information The personal information that have already been deleted when the deletion is cancelled cannot be restored During disc playback when connected to a DVD burner op...

Страница 86: ...Please note Not all commercial printing services support this feature at this time 1 Select the menu 2 Touch the still picture to be set 3 Touch to set the number of prints Up to 999 prints can be se...

Страница 87: ...ch YES Scene in the built in memory will be deleted Protected scenes in the built in memory are not deleted 4 Touch EXIT when the relay scene combining complete message is displayed The thumbnail view...

Страница 88: ...l relay information The personal information of the relayed scene in the built in memory or SD card is deleted the personal information of the combined relay scene is not recorded EDIT SCENE RELAY INF...

Страница 89: ...compatible with the terminals Image quality may vary with the connected terminals A High quality 1 HDMI terminal 2 Component terminal 3 Video terminal A HDMI mini cable optional Be sure to connect to...

Страница 90: ...with an AV multi cable The name of the channel may differ depending on the connected TV Check the input setting input switch and the audio input setting on the TV For more information please read the...

Страница 91: ...e information displayed on the screen operation icon and time code etc can be displayed not displayed on the TV OFF Not displayed SIMPLE Information partially displayed DETAIL All information displaye...

Страница 92: ...the TV Connecting with the AV multi cable AV multi connector output setting can be changed Changing the component output setting SETUP HDMI RESOLUTION AUTO 1080i 576p SETUP AV MULTI desired setting CO...

Страница 93: ...This function allows you to use your remote control for the Panasonic TV for easy operations when this unit has been connected to a VIERA Link compatible device using a HDMI mini cable optional for au...

Страница 94: ...V to turn off the power this unit also turns off Automatic input switching If you connect with a HDMI mini cable and then turn on this unit the input channel on the TV automatically switches to this u...

Страница 95: ...to an SD card is automatically divided to fit the space on the SD card If you divide the scenes l 83 and copy by scene selection it is possible to copy matching the remaining capacity of the media or...

Страница 96: ...e time it takes for copying may be longer jThe number of recorded scenes is large jThe temperature of the unit is high If some motion pictures or still pictures have already been recorded to the copy...

Страница 97: ...ically finalised to allow playback on other devices and additional copying will not be possible 2 Only DVD RAM copied with the DVD burner or HD Writer AE 3 0 can additionally copy 3 Connect this unit...

Страница 98: ...VD burner A USB connection cable supplied with DVD burner B DVD burner optional Insert the plugs as far as they will go 4 Insert the disc in the DVD burner Insert the DVD disc with the recording side...

Страница 99: ...cancel the operation When SELECT DATE is selected When touched the date is selected and surrounded by red Touch the date again to cancel the operation Up to 99 scenes 99 dates can be selected in succe...

Страница 100: ...ndard SP DVD RAM Approx 50 min to 1 h 20 min Approx 1 h 30 min to 2 h 30 min Approx 3 h to 5 h DVD RW RW Approx 35 min to 1 h 15 min DVD R R Approx 15 min to 45 min Even if the data capacity to be cop...

Страница 101: ...at has been recorded on another device may not be copied When 2 or more discs are necessary for copying the last scene copied to a disc is automatically divided to fit the space on the disc Copying ma...

Страница 102: ...a TV connect this unit to the TV l 89 2 Touch the scene or still picture to be played back and then play it back The playback operation is performed the same as when playing back motion pictures or s...

Страница 103: ...or DVD RW disc when copying motion pictures or still pictures in high definition picture quality to the disc 1 Select the menu If a disc that you copied to is inserted in another device without prote...

Страница 104: ...SD card slot High definition picture quality Insert the SD card directly l 105 Equipment with USB terminal High definition picture quality Connect with supplied USB cable l 105 Equipment without SD c...

Страница 105: ...lu ray disc recorder or high definition AVCHD compatible DVD recorder The USB function selection screen will appear on the screen of the unit 2 Touch RECORDER on the screen of this unit When you selec...

Страница 106: ...ou cannot change the mode of the unit or turn off the unit while it is connected to a Blu ray disc recorder or DVD recorder Disconnect the USB cable before performing either of these operations If the...

Страница 107: ...91 Dubbing in standard picture quality Change the video input on the video device and TV that this unit is connected to The channel set will differ depending on the terminal to which the unit is conne...

Страница 108: ...w the on screen instructions for easy copying With a PC What you can do with a PC What can be done with the HD Writer AE 3 0 Data type Copying data to a PC Motion picture and still picture Copying in...

Страница 109: ...software About Conversion assist function When you want to convert the recording quality and write to media the Conversion assist function which is a linking function between this unit and the HD Wri...

Страница 110: ...ne computer Article 5 Reverse Engineering Decompiling or Disassembly Licensee may not reverse engineer decompile or disassemble the Software except to the extent either of them is permitted under law...

Страница 111: ...remium Business Ultimate SP1 SP2 Windows XP 32 bit SP3 CPU Intel Pentium 4 2 8 GHz or higher including compatible CPU Intel Core 2 Duo 2 16 GHz or higher or AMD Athlon 64 X2 Dual Core 5200 or higher i...

Страница 112: ...ccount users only can use this software An administrative account user should install and uninstall this software To use the HD Writer AE 3 0 You will need a high performance PC depending on the funct...

Страница 113: ...dows XP 32 bit SP3 CPU Windows 7 Windows Vista 1 0 GHz or higher Windows XP Intel Pentium III 450 MHz or higher or Intel Celeron 400 MHz or higher RAM Windows 7 1 GB or more 32 bit 2 GB or more 64 bit...

Страница 114: ...the following screen is not displayed automatically select Start Computer or double click on Computer on the desktop and then double click Panasonic 2 Click Next 3 Read the End User License Agreement...

Страница 115: ...g HD Writer AE 3 0 Follow the steps below to uninstall any software applications that you no longer require 1 Select Start Control Panel Uninstall a program 2 Select HD Writer AE 3 0 then click Uninst...

Страница 116: ...ed as an external drive of the PC l 118 When you select an option other than PC reconnect the USB cable When using the battery the LCD monitor turns off after about 5 seconds Touch the screen to turn...

Страница 117: ...the status indicator flashes rapidly or when it does not light at all Charge using the AC adaptor l 15 It will take 2 or 3 times longer to charge compared to when using the AC adaptor If the status in...

Страница 118: ...storage Still pictures recorded with this unit can be copied to the PC with Explorer or other programmes 1 Double click the folder that contains the still pictures DCIM 100CDPFQ etc 2 Drag and drop t...

Страница 119: ...Panasonic HD Writer AE 3 0 HD Writer AE For details on how to use the software applications read the PDF operating instructions of the software Reading the operating instructions of the software appl...

Страница 120: ...cable When using the battery the LCD monitor turns off after about 5 seconds Touch the screen to turn the LCD monitor on 3 Double click CAM_SD displayed on the desktop For users who have CAM_SD and C...

Страница 121: ...sible status 1 HDD recording possible status 2 White Card recording possible status Green Recognising the card MNL Motion picture recording mode l 56 R 1h20m Remaining time for motion picture recordin...

Страница 122: ...l 70 White Green Focus indication l 28 High speed burst shooting l 66 AF assist lamp l 67 PRE REC AWB C Display touch menu l 22 Backlight compensation l 53 Soft skin mode l 53 Tele macro l 54 Intelli...

Страница 123: ...DPOF already set to more than 1 l 86 Protected motion pictures still pictures l 85 iFrame recorded scene l 32 AVCHD recorded scene l 32 Relay recorded scene l 57 1 Still picture recorded using smile...

Страница 124: ...ase Wait appears after this message wait a while without turning the unit off It may take time until the unit can be used CHECK CARD This card is not compatible or it cannot be recognised by the unit...

Страница 125: ...the condition of the data it may not be possible to completely repair the data If recovery fails it will not be possible to play back scenes recorded before the unit turned off When data recorded on a...

Страница 126: ...it turns off automatically if the USB connection cable is removed This unit cannot be operated though it is turned on This unit does not operate normally Remove the battery or AC adaptor wait about 1...

Страница 127: ...ata on an SD card is recommended in these places Auto focus function does not work Switch to intelligent auto mode If you are trying to record a scene which is hard to bring into focus in auto focus m...

Страница 128: ...If you take a picture with the photo light in a dark place or indoors white round spots may appear on the picture caused by the photo light reflecting of particles of dust in the air This is not a mal...

Страница 129: ...copy scenes on the SD card by connecting to other equipment with the USB cable Other equipment might have not recognised the SD card Unplug the USB cable once and reconnect it When this unit is conne...

Страница 130: ...0 or later or Adobe Reader 7 0 or later to read the PDF operating instructions for HD Writer AE 3 0 Cannot import AVCHD scenes with iMovie 11 You may not be able to import AVCHD scenes with iMovie 11...

Страница 131: ...extend the cords and the cables Do not spray insecticides or volatile chemicals onto the unit If the unit is sprayed with such chemicals its body may be marred and the surface finish may peel off Do n...

Страница 132: ...be recovered using commercially available software or the like We recommend that you physically format the built in memory or HDD before disposing of or giving away this unit To physically format the...

Страница 133: ...malfunctions To store the battery for a long period of time we recommend you charge it once every year and store it again after you have completely used up the charged capacity Dust and other matter a...

Страница 134: ...a fault in the unit battery or AC adaptor Off Charging has finished If the status indicator stays off despite the charging being unfinished there may be a fault in the unit battery or AC adaptor Refe...

Страница 135: ...ll be held in this unit and included in recorded images When the unit is serviced or given away disposed of the personal information should be deleted in the interests of protecting personal informati...

Страница 136: ...r to outside When a cold room has been warmed up quickly When cool wind from an air conditioner is directly blown onto this unit After summer afternoon showers of rain When this unit is in a very humi...

Страница 137: ...een shot s reprinted with permission from Microsoft Corporation IBM and PC AT are registered trademarks of International Business Machines Corporation of the U S Intel Core Pentium and Celeron are the...

Страница 138: ...ing mode HA HG HX HE Picture size 1920k1080 1920k1080 1920k1080 1920k1080 SD card 4 GB 30 min 40 min 1 h 1 h 30 min 16 GB 2 h 2 h 40 min 4 h 10 min 6 h 40 min 64 GB 8 h 30 min 11 h 16 h 50 min 27 h 30...

Страница 139: ...rding is paused once when the recording time for one scene exceeds 12 hours and the recording will automatically resume after a few seconds If a recording with a lot movements is recorded the recordin...

Страница 140: ...e when the picture is taken until the number of recordable pictures gets less than 99999 The memory capacity indicated on the label of an SD card is the total of the capacity for copyright protection...

Страница 141: ...ery pack lithium VW VBK360 HDMI mini cable RP CDHM15 RP CDHM30 Video DC light VW LDC103E Light bulb for video DC light VZ LL10E Shoe adaptor VW SK12E DVD burner VW BN01 Accessory kit VW ACK180EB SD SD...

Страница 142: ...sensor Total 1500 K Effective pixels Motion picture 1300 K to 1120 K 16 9 Still picture 970 K 4 3 1100 K 3 2 1300 K to 1120 K 16 9 Lens Auto Iris 34k Optical Zoom F1 8 to F4 0 Focal length 2 38 mm to...

Страница 143: ...V multi connector video output level Component video out put level Y 1 0 Vp p 75 h Pb 0 7 Vp p 75 h Pr 0 7 Vp p 75 h AV video output level 1 0 Vp p 75 h PAL system HDMI mini connector video output lev...

Страница 144: ...lied Approx 307 g with battery supplied Operating temperature 0 oC to 40 oC Operating humidity 10 RH to 80 RH Battery operation time See page 16 Recording media SD Memory Card FAT12 and FAT16 system c...

Страница 145: ...ry Card exFAT system compliant Refer to page 18 for details on SD cards usable in this unit Built in memory 16 GB HDD 120 GB Compression JPEG Design rule for Camera File system based on Exif 2 2 stand...

Страница 146: ...uilt in memory 95 From SD card to HDD 95 Creating still picture from motion picture 73 D Date and time display 37 Date and time setting 23 Delete 81 Deleting personal information 85 Demo mode 42 Digit...

Страница 147: ...ecovery 125 Red eye reduction 53 Relay information cancelling 88 Relay recording 57 Relay scene combining 87 Remaining number of still pictures 29 Remaining time left for recording 26 Repeat playback...

Страница 148: ...ursuant to at the directive 2004 108 EC article 9 2 Panasonic Testing Centre Panasonic Marketing Europe GmbH Winsbergring 15 22525 Hamburg Germany Panasonic Corporation Web site http panasonic net Pan...

Отзывы: