background image

36

VQT1N45

Recording 
(Basic)

2

Recording motion pictures

This unit records high definition images that are compatible with the AVCHD format on an SD card.
Sound is recorded with the Dolby Digital 5.1 Creator.

Use an SD card that can be used for motion picture recording. (

l

24)

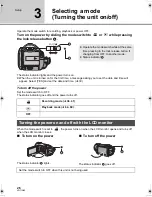
Operate the mode switch while at the same time pressing in the lock release button 

A

 if changing 

from OFF to another mode.

1

Operate the mode switch to 
select 

 and open the LCD 

monitor.

It is impossible to start recording when closing 
the LCD monitor.

2

Press the recording start/stop 
button to start recording.

While recording is in progress, the recording 
will not stop even if the LCD monitor is closed.

3

Press the recording start/stop 
button again to pause recording.

[

¥

] and [

;

] are red during recording. Do not 

move this unit until [

;

] is green.

The images recorded between pressing the recording start/stop button to start recording and 
pressing it again to pause recording become one scene.

VIDEO

0h00m00s

0h00m00s

0h00m00s

R1h20m

R1h20m

R1h20m

HG

1920

About the compatibility of the 
recorded motion pictures

They are not compatible with devices other 
than those that support AVCHD. Images 
cannot be played with equipment that does 
not support AVCHD (ordinary DVD 
recorders). Confirm that your equipment 
supports AVCHD by referring to the 
operating instructions.

There are some cases where the recorded 
motion pictures cannot be played back, 
even if the device supports AVCHD. In such 
cases, play the recorded motion picture with 
this unit instead.

HDCSD9P-VQT1N45_ENG.book  36 ページ  2007年12月26日 水曜日 午後5時57分

Содержание HDC-SD9PC

Страница 1: ...nadian assistance please call 1 800 561 5505 or visit us at www panasonic ca High Definition Video Camera Operating Instructions Model No HDC SD9P PC Before connecting operating or adjusting this prod...

Страница 2: ...CE ENSURE THE UNIT IS WELL VENTILATED TO PREVENT RISK OF ELECTRIC SHOCK OR FIRE HAZARD DUE TO OVERHEATING ENSURE THAT CURTAINS AND ANY OTHER MATERIALS DO NOT OBSTRUCT THE VENTILATION VENTS The socket...

Страница 3: ...ration between the equipment and receiver Connect the equipment into an outlet on a circuit different from that to which the receiver is connected Consult the dealer or an experienced radio TV technic...

Страница 4: ...s above the following temperatures or incinerate Button type battery 60 oC 140 oF Battery pack 60 oC 140 oF AC adaptor This AC adaptor operates on AC between 110 V and 240 V But In the U S A and Canad...

Страница 5: ...grounding prong The wide blade or the third prong are provided for your safety If the provided plug does not fit into your outlet consult an electrician for replacement of the obsolete outlet 10 Prote...

Страница 6: ...ed from a cold place to a warm place moisture may form on the SD card and inside the unit DO NOT LEAVE YOUR CAMERA OR THE POWER SUPPLY TURNED ON WHEN NOT IN USE STORAGE OF YOUR CAMERA Store and handle...

Страница 7: ...ric Industrial Co Ltd HDAVI Control is a trademark of Matsushita Electric Industrial Co Ltd x v Color is trademark LEICA is a registered trademark of Leica Microsystems IR GmbH and DICOMAR is a regist...

Страница 8: ...cording Recording Basic 1 Before recording 34 Auto Ground Directional Standby AGS 35 2 Recording motion pictures 36 Recording modes approximate recordable time 38 Quick start 39 PRE REC 40 Shooting gu...

Страница 9: ...e copied disc Formatting Auto protect Displaying disc information 91 2 Dubbing images onto other video device 92 3 With a printer PictBridge 93 With a PC Before using 1 What you can do with a PC 96 En...

Страница 10: ...before using this unit Battery pack VW VBG130 AV cable K2KC4CB00027 AC adaptor VSK0697 Component cable K2KZ9DB00004 AC cable K2CA2CA00025 USB cable K2KZ4CB00011 DC cable K2GJYYC00001 CD ROM Remote con...

Страница 11: ...Digital 5 1 Creator Since the recording method is different from an ordinary DVD video etc the data is not compatible Compatibility with other products A B With other products Available function Pict...

Страница 12: ...urn off the power set the mode switch to OFF Inserting removing an SD card 1 Set the mode switch to OFF 2 Open the SD card cover while sliding the SD CARD OPEN lever B 3 Insert remove the SD card When...

Страница 13: ...elected icon scrolls at the bottom of the screen The indication changes each time the cursor button is moved down When the help mode is used functions cannot be set To exit the Help mode Press the MEN...

Страница 14: ...t forward playback Stops the playback and shows the thumbnails Still picture playback 1 Operate the mode switch to select 2 Select still picture playback A with the cursor button 3 Select the still pi...

Страница 15: ...15 VQT1N45 Preparation Recording Playback Backup With a PC Others 16 Before using 20 Setup...

Страница 16: ...MANUAL FOCUS l 35 59 5 Reset button RESET l 118 6 Cursor button Use the cursor button to select the recording functions and playback operations and to operate the menu screen 1 Select by moving up do...

Страница 17: ...A to remove it In order to attach it place into slot B and then rotate it clockwise C When fitting the tele conversion lens VW T3714H optional or the wide conversion lens VW W3707H optional first rem...

Страница 18: ...nnel support 31 Status indicator l 26 32 Recording start stop button l 36 33 Card access lamp ACCESS l 25 34 SD card open lever SD CARD OPEN l 25 35 Card slot l 25 36 SD card cover l 25 37 Shoulder st...

Страница 19: ...explosion if battery is incorrectly replaced Replace only with the same or equivalent type recommended by the manufacturer Dispose of used batteries according to the manufacturer s instructions ZOOM S...

Страница 20: ...hasing batteries Many fake or imitation batteries have been found among those sold at unusually low prices and those which customers cannot check for themselves before purchasing When this unit is pur...

Страница 21: ...the status indicator is off before removing the battery Move the BATTERY lever in the direction indicated by the arrow and remove the battery when unlocked A Insert the battery until it clicks and loc...

Страница 22: ...VW VBG130 optional 7 2 V 1320 mAh 2 h 35 min VW VBG260 optional 7 2 V 2640 mAh 4 h 40 min VW VBG6 optional 7 2 V 5800 mAh 9 h 25 min Battery model number Voltage capacity Maximum continuously recordab...

Страница 23: ...h any other equipment as it is designed only for this unit Do not use the AC cable from other equipment with this unit 1 Connect the AC cable to the AC adaptor and the AC outlet 2 Connect the DC cable...

Страница 24: ...on another device confirm that the device supports the SDHC Memory Card Cards that you can use with this unit Card type Capacity Motion picture recording We recommend using SD cards conforming to Cla...

Страница 25: ...his unit or the SD card may damage or erase the data stored on the SD card We recommend saving the important data recorded on this unit to a PC DVD disc etc l 86 96 When the card access lamp is lit do...

Страница 26: ...off the power Set the mode switch to OFF The status indicator goes off and the power turns off When the mode switch is set to the power turns on when the LCD monitor opens and turns off when the LCD m...

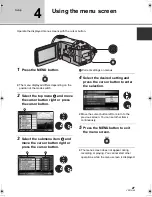
Страница 27: ...Select the submenu item B and move the cursor button right or press the cursor button C Current settings on menus 4 Select the desired setting and press the cursor button to enter the selection Move...

Страница 28: ...57 SHOOTING GUIDE l 40 Digital Cinema Color l 57 SETUP FORMAT CARD l 77 DISPLAY DATE TIME l 30 DATE FORMAT l 30 POWER SAVE QUICK START l 39 Language selection Menu list The recording lamp lights up du...

Страница 29: ...does not appear 2 Only when the disc playback tab is selected while a DVD burner optional is connected this appears This allows operations such as starting and ending recording to be signaled by a be...

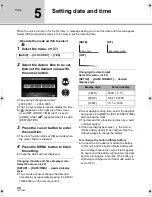
Страница 30: ...u l 27 SETUP DATE TIME desired display style You can also show or change the date and time display by repeatedly pressing the DATE TIME button on the remote control Changing the date format Select the...

Страница 31: ...me region is set for the first time the screen for selecting travel destination appears after setting the home region successively If the home region has already been set once execute the menu operati...

Страница 32: ...e image is horizontally flipped as if you see a mirror image However the image recorded is the same as a normal recording Only some indications will appear on the screen When appears return the direct...

Страница 33: ...33 VQT1N45 Preparation Recording Playback Backup With a PC Others 34 Recording Basic 47 Recording Advanced...

Страница 34: ...subject is backlit it will become dark in the recording When recording make sure your footing is stable and there is no danger of colliding with another person or object 1 Hold the unit with both hand...

Страница 35: ...tinue the recording Use the recording start stop button to pause the recording About auto mode Color balance white balance and focusing are adjusted automatically Depending on the brightness of the su...

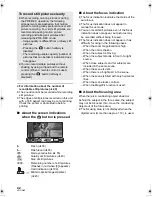
Страница 36: ...e LCD monitor is closed 3 Press the recording start stop button again to pause recording and are red during recording Do not move this unit until is green The images recorded between pressing the reco...

Страница 37: ...ion will begin when the SD card is next inserted or the power is turned back on l 112 Screen indications in the recording mode A Recording mode B Remaining time left for recording When the remaining t...

Страница 38: ...movements is recorded the recording time is reduced Recordable time using the battery l 22 Mosaic pattern noise may appear on a playback image in the following cases jWhen there is a complicated patte...

Страница 39: ...has elapsed jmode switch is set to junit is turned off In the 24p digital cinema setting the required time for the quick start operation is slightly longer than 0 6 seconds In the quick start mode it...

Страница 40: ...d operation sound may be recorded The image when pressing the recording start stop button appears in thumbnail view and it is different from the image when starting playback The messages instructing h...

Страница 41: ...cus only Focus indication appears and the unit focuses on the subject automatically Focus on a subject manually when it is not easily focused automatically If you set O I S l 45 to on then the image s...

Страница 42: ...source jWhen close subjects and far subjects are included in the same scene jWhen the scene is dark jWhen there is a bright part in the scene jWhen the scene is filled with only horizontal lines jWhen...

Страница 43: ...ack image depending on the picture content The number of recordable pictures depends on whether and are used together and on the subject being recorded The numbers shown in the table are approximation...

Страница 44: ...zoom speed does not vary when operating with the remote control When the zoom speed is high the subject may not be focused easily If the zoom magnification exceeds 10k then the digital zoom function...

Страница 45: ...GA optical image stabilizer When a tripod is used we recommend that you turn the image stabilizer off In the following cases the image stabilizer function may not work effectively jWhen the digital zo...

Страница 46: ...ed for instance wearing sunglasses jThe size of a face is small on the screen jThe subject moves quickly jWhen the hand shakes jWhen the digital zoom is used jWhen the unit is tilted In the following...

Страница 47: ...moved down The operation icon appears or disappears each time the cursor button is pressed 2 e g Intelligent contrast control Select an icon with the cursor button Select the icon again to cancel the...

Страница 48: ...etting is canceled after the image and audio have disappeared completely To select the color for fade in out Select the menu l 27 VIDEO FADE COLOR WHITE or BLACK Intelligent contrast control This brig...

Страница 49: ...picture is recorded after the 10 or 2 display and the recording lamp flashes for the time which has been set After recording the self timer is canceled In auto focus mode if the button is pressed half...

Страница 50: ...that are usually invisible can be recorded in bright colors For this reason bright dots that are usually invisible may be seen but this is not a malfunction Attach this unit to a tripod and you can re...

Страница 51: ...e of the composition A HORIZONTAL B GRID1 C GRID2 Select the menu l 27 BASIC GUIDE LINES desired setting When motion picture playback tab is selected while the mode switch is set to l 64 VIDEO SETUP G...

Страница 52: ...ctivity of the microphone is synchronized with the zoom operation Sounds near the front of the unit are recorded more clearly if you zoom in close up and surrounding sounds are recorded more realistic...

Страница 53: ...l automatically 2 Move the cursor button to adjust the microphone input level A Center B Front left C Back left D Front right E Back right F Microphone input level A gain value for each of the 5 built...

Страница 54: ...ECT Pictures in the selected range are stored DEL ALL No picture is stored Select the thumbnails on the right bottom of the screen with the cursor button and move the cursor button right to display th...

Страница 55: ...ft corner of the screen ON AUTO A OFF When AUTO is set the ambient brightness is automatically detected and the flash will activate only when necessary If the flash is not necessary the A indicator wi...

Страница 56: ...ly lit or shiny parts are displayed with diagonal lines zebra pattern Select the menu l 27 ADVANCED ZEBRA ON You can record an image with little white saturation if you manually adjust the shutter spe...

Страница 57: ...re also disabled jChanging the settings in VIDEO on the Menu jPRE REC jPressing the button halfway jDigital zoom jFade jMagicPix jLow light jBuilt in Flash jAuto slow shutter jDigital cinema color jSc...

Страница 58: ...If the flash is activated a large number of times it may take longer to charge it Red eye reduction The flash is activated 2 times Do not move until the second flash is finished Red eye phenomenon ma...

Страница 59: ...ecording under fluorescent light mercury light or sodium light because the color and brightness of the playback image may change If you record a subject illuminated with bright light or a highly refle...

Страница 60: ...set it to FOCUS position The manual focus indication MF and the icon shown in the illustration appear 3 Move the cursor button to bring the subject into focus The center of the screen is enlarged The...

Страница 61: ...e setting is complete If the display continues flashing the white balance cannot be set because it is too dark etc In this case use the automatic white balance When the display flashes the manual whit...

Страница 62: ...the AUTO MANUAL FOCUS switch to AUTO to restore to automatic adjustment When setting both the shutter speed and the iris gain value set the shutter speed and then set the iris gain value Manual shutte...

Страница 63: ...63 VQT1N45 Preparation Recording Playback Backup With a PC Others 64 Playback 72 Editing 78 With a TV...

Страница 64: ...e to be played back and press the cursor button C Thumbnail display D Previous page E Next page F Play mode select button G Scene number The selected scene is played back on the full screen and the op...

Страница 65: ...me adjustment Move the volume lever to adjust the speaker volume during playback Towards r Increases the volume Towards s Decreases the volume Fast forward rewind playback Move the cursor button right...

Страница 66: ...nd will be heard only during normal playback If pause play is continued for 5 minutes the screen returns to the thumbnails Any scenes where the thumbnails are displayed as cannot be played back An err...

Страница 67: ...owing cases jWhen the number of scenes exceeds 99 jWhen the SD card is repaired jWhen the setting of 24pDIGITAL CINEMA is changed jWhen the recording mode is changed from HA HG HX to HE or HE to HA HG...

Страница 68: ...res or edited with the easy editing function of HD Writer 2 5E the Intelligent scene selection is disabled Playback of the first scene starts after playback of the last scene finishes Select the menu...

Страница 69: ...ess the cursor button C Play mode select button D Thumbnail display E Previous page F Next page G Still picture number H Folder file name The selected still picture is played back on the full screen a...

Страница 70: ...ere the thumbnails are displayed as cannot be played back An error message appears and the screen shows the thumbnails During still picture playback the power will not turn off even if the LCD monitor...

Страница 71: ...e it to the right to select the last date of the following month 3 Select the still picture to be played back Select All scenes and press the cursor button to return to the playback of all still pictu...

Страница 72: ...or still pictures jWhen the play mode is set to All the scenes or still pictures on the selected date 3 Only when SELECT is selected in step 2 Select the scene still picture to be deleted then press...

Страница 73: ...ot open the SD card cover while deleting motion pictures or still pictures on the SD card The deletion will stop In case of ALL SCENES the deletion may take time if there are many scenes or still pict...

Страница 74: ...ed points When the confirmation message appears select YES then press the cursor button All divided points set on this unit will be canceled The scenes that were deleted after division cannot be recov...

Страница 75: ...ct the menu l 27 2 Select the scene still picture to be protected and then press the cursor button The indication appears and the scene still picture is protected Press the cursor button again to canc...

Страница 76: ...mmercial printing services support this feature at his time 1 Select the menu l 27 2 Select the still picture to be set then press the cursor button 3 Select the number of prints then press the cursor...

Страница 77: ...tion message appears select YES then press the cursor button When formatting is complete press the MENU button to exit the message screen Do not turn this unit off or remove the SD card while formatti...

Страница 78: ...d to connect the unit to the HDMI terminal 1 Connect this unit to a TV Confirm the terminals on your TV and use a cable compatible with the terminals Image quality may vary with the connected terminal...

Страница 79: ...a component cable Select the Video 2 channel with an AV cable The name of the channel may differ depending on the connected TV 3 Set the mode switch to to play back The image and audio are output on t...

Страница 80: ...n icon and time code etc can be displayed on the TV Press the button again to erase the information The screen on this unit will not change When connecting with a HDMI mini cable be sure to connect to...

Страница 81: ...on from the connected TV Output resolution 720p 1080i 1080i Others 480p 1080i This is an interlace scan method which scans 1080 scan lines to display a high definition image The 1080 available scan li...

Страница 82: ...become possible l 83 The unit cannot be connected to the optical digital cable Connect it to an AV amplifier with the HDMI terminals When this unit is connected to a TV with the component cable the o...

Страница 83: ...laying back motion pictures l 64 jPlaying back still pictures l 69 What is the VIERA Link VIERA Link is a new name for EZ Sync This function allows you to use your remote control for the Panasonic TV...

Страница 84: ...it will turn on automatically if Set has been selected for the TV s Power on link setting Depending on the HDMI terminal on the TV the input channel may not switch automatically In this case use the r...

Страница 85: ...85 VQT1N45 Preparation Recording Playback Backup With a PC Others 86 With other products...

Страница 86: ...when this unit is connected to a DVD burner 3 Connect this unit to the DVD burner with the Mini AB USB connection cable supplied with VW BN1 A Mini AB USB Connection Cable supplied with VW BN1 B DVD b...

Страница 87: ...n is turned ON while copying data l 91 1 Connect this unit to the DVD burner to prepare for copying l 86 2 Select the item and press the cursor button ALL SCENES This is for copying all scenes simulta...

Страница 88: ...necessary for copying follow the on screen instructions to switch discs After copying is complete eject the disc and disconnect the Mini AB USB Connection Cable from this unit After copying is comple...

Страница 89: ...e scenes switch About the approximate time it takes for copying to a disc To copy motion pictures to the full capacity of a disc Disc type Copy time The data is written to all areas of the disc to inc...

Страница 90: ...or motion pictures Disc playback tab B Destination disc for still pictures Disc playback tab 3 Select the scene or still picture to be played back and then play it back The playback operation is perfo...

Страница 91: ...to ON in order to prevent accidental deletion on other devices If a disc that you copied to is inserted in another device without protecting it a message may be displayed prompting you to format the...

Страница 92: ...and time display and function indication are not wanted cancel them before dubbing l 30 80 If the dubbed images are played back on a wide screen TV the images may be stretched vertically In this case...

Страница 93: ...rn on this unit This function is available in all modes A USB cable supplied Insert the plugs as far as they will go 1 Connect this unit to a printer Do not use any other USB connection cables except...

Страница 94: ...Move the cursor button down A confirmation message appears If YES is selected the number of prints set is canceled and the screen returns to step 3 If NO is selected all the settings are kept and the...

Страница 95: ...95 VQT1N45 Preparation Recording Playback Backup With a PC Others 96 Before using 101 Setup 105 Using with a PC...

Страница 96: ...tion pictures Easy editing Editing motion picture data copied on an HDD of a PC Split merge delete Converting the motion picture data to MPEG2 Creating a DVD Video disc Playing back on a PC Play back...

Страница 97: ...supplied USB cable when connecting this unit and a PC Operation is not guaranteed with any other USB cables Important Notice Do not insert a disc recorded in AVCHD format with HD Writer 2 5E in a dev...

Страница 98: ...Disassembly Licensee may not reverse engineer decompile or disassemble the Software except to the extent either of them is permitted under law or regulation of the country where Licensee resides Matsu...

Страница 99: ...ce Pack 2 Microsoft Windows XP Professional Service Pack 2 Microsoft Windows Vista Home Basic Microsoft Windows Vista Home Premium Microsoft Windows Vista Ultimate Microsoft Windows Vista Business CPU...

Страница 100: ...oftware Windows Vista DirectX 10 Windows XP 2000 DirectX 9 0c If you install the software on a PC that is not compatible with DirectX 9 0c the PC may not work properly If you are unsure whether or not...

Страница 101: ...in My Computer Computer 2 Click Next 3 Read the End User License Agreement then place a check beside I accept the terms of the license agreement if you agree to them and click Next If you do not agre...

Страница 102: ...cations that you no longer require 1 Select start Settings Control Panel Add or Remove Programs Applications or Uninstall a program 2 Select HD Writer 2 5E for HDC then click Change Remove Change or R...

Страница 103: ...ed by the PC When the unit is connected to a PC the operation mode cannot be changed and its power cannot be turned off Disconnect the USB cable before turning this unit off l 103 Do not disconnect th...

Страница 104: ...ecorded with this unit can be copied to the PC with Explorer or other programs 1 Connect this unit to the PC and then select PC CONNECT 2 Double click the folder that contains the still pictures on th...

Страница 105: ...a guest user account the software cannot be used On the PC Select start All Programs Programs Panasonic HD Writer 2 5E HD Writer The HD Writer 2 5E introductory screen is displayed If OK is clicked t...

Страница 106: ...a PC via the supplied USB cable The USB function selection screen will appear 2 Select PC CONNECT and press the cursor button 3 Double click NO_NAME or Untitled displayed on the desktop Files are stor...

Страница 107: ...107 VQT1N45 Preparation Recording Playback Backup With a PC Others 108 Indications 113 Helpful hints...

Страница 108: ...MNL AWB 90min 0h00m00s MF MEGA 3000 2 1 G1920 1 PRE REC R1h20m 1920 1920 X1920 1440 PRE REC AUTO MNL White balance l 61 Auto white balance Indoor mode recording under incandescent lamp Outdoor mode M...

Страница 109: ...g accessing the card l 42 MEGA OIS l 42 2 1 MEGA Motion picture playback Still picture playback 1 Playback l 65 70 Pause l 65 70 5 6 Fast forward rewind playback l 65 7 8 Last first scene paused 9 Ski...

Страница 110: ...920k1080 The picture size is not displayed for still pictures recorded with other products that have different picture sizes from the sizes shown above Accessing the card When connected to a PC l 103...

Страница 111: ...after repeating this several times this unit needs repair Detach the power and contact consumer support l 136 137 Do not attempt to repair it by yourself You are attempting to connect an AC adaptor n...

Страница 112: ...data on this unit or the other device If recovery fails turn the power of the unit off and on again after waiting a while If recovery fails repeatedly format an SD card on the unit Please be aware tha...

Страница 113: ...ensation When the MagicPix function is used When the iris gain is set Intelligent contrast control Low light When the MagicPix function is used When the scene mode is used When the HD hi speed burst s...

Страница 114: ...ed burst shooting mode is on Scene mode When the low light mode is used When setting the AUTO MANUAL FOCUS switch to AUTO When the MagicPix function is used When the HD hi speed burst shooting mode is...

Страница 115: ...wer back on The power will not turn off automatically when the power save function l 28 is set to OFF If you connect to a TV compatible with VIERA Link with a HDMI mini cable and turn off the power on...

Страница 116: ...lied to this unit and the SD card is correctly inserted Operate the mode switch to select No recording is possible while the SD card s write protect switch is set to LOCK l 24 If there is no more avai...

Страница 117: ...scenes still pictures where the thumbnails are displayed as cannot be deleted If the scenes still pictures are unnecessary format the SD card to erase the data l 77 Please be aware that if an SD card...

Страница 118: ...ndoors white round spots may appear on the picture caused by the flash reflecting of particles of dust in the air This is not a malfunction A characteristic of this is that the number of round spots a...

Страница 119: ...d by the USB cable this unit is not detected by the PC Use AC adaptor when connecting this unit and a PC Select another USB terminal on the PC Check the operating environment l 99 Turn the power to th...

Страница 120: ...llowing conditions are applicable When the scenes were recorded on different dates A The image will be still for several seconds wherever the date changes B The images are played back smoothly if the...

Страница 121: ...ly stops where the scenes switch between HA HG HX and HE modes B Playback is smooth if the same mode is used or the mode is switched among HA HG and HX When the settings on the 24p digital cinema chan...

Страница 122: ...t scene 1 Scene to be deleted 2 A new scene is recorded here A The image will be still for several seconds wherever a scene was deleted B The images of consecutive scenes where they are no deletions a...

Страница 123: ...dragging and dropping the scenes in the Image display area B or by clicking Copy between media button on the Start Menu Example 2 When deleting scenes was initiated by HD Writer 2 5E When a scene is d...

Страница 124: ...ls onto the unit If the unit is sprayed with such chemicals its body may be marred and the surface finish may peel off Do not leave rubber or plastic products in contact with the unit for a long time...

Страница 125: ...batteries when going out for recording Prepare batteries enough to last for 3 to 4 times the period you are planning to record for Cold places such as a ski resort can shorten the period which you ca...

Страница 126: ...om When this unit is moved from an air conditioned car to outside When a cold room has been warmed up quickly When cool wind from an air conditioner is directly blown onto this unit After summer after...

Страница 127: ...lance adjustment range use the manual white balance adjustment mode White balance adjustment White balance adjustment determines the white color under different light sources By recognizing which is t...

Страница 128: ...bjects at the beach in night views or in scenes involving fireworks or special lights Recording a subject in dark surroundings The unit cannot focus correctly because the light information that comes...

Страница 129: ...Monitor 2 7z wide LCD monitor approx 300 K pixels Microphone 5 1 channel surround microphone with a zoom microphone focus microphone function Speaker 1 round speaker 20 mm White balance adjustment Aut...

Страница 130: ...Approx 337 g Approx 0 743 lbs with battery supplied and an SD card optional Operating temperature 0 C to 40 C 32 F to 104 F Operating humidity 10 to 80 Battery operation time See page 22 Recording med...

Страница 131: ...B 8 GB 16 GB FAT32 system corresponding Compression JPEG Design rule for Camera File system based on Exif 2 2 standard DPOF corresponding Picture size 1920k1080 Refer to page 43 for the number of reco...

Страница 132: ...Ion Battery Pack VW VBG260 1 2640 mAh Rechargeable Lithium Ion Battery Pack VW VBG6 1 2 5800 mAh Rechargeable Lithium Ion Battery Pack VW VH04 Battery pack holder kit RP CDHM15 RP CDHM30 HDMI mini cab...

Страница 133: ...21 84th Avenue South Kent WA 98032 Ship To Mr Mrs Ms First Last Street Address City State Zip Phone Day Night 4 Shipping information UPS delivery requires complete street address Please photocopy this...

Страница 134: ...needs service Please include your proof of purchase Failure to do so will delay your repair To further speed your repair please provide an explanation of what is wrong with the unit and any symptom i...

Страница 135: ...non expanded standard 4 3 pictures on wide screen TV s or onscreen data in a stationary and fixed location The warranty ALSO DOES NOT COVER damages which occurred in shipment or failures which are ca...

Страница 136: ...al Park Carolina Puerto Rico 00985 Phone 787 750 4300 Fax 787 768 2910 For hearing or speech impaired TTY users TTY 1 866 605 1277 Purchase Parts Accessories and Instruction Books online for all Panas...

Страница 137: ...chase receipt or other proof of date of original purchase is required before warranty service is performed THIS EXPRESS LIMITED WARRANTY IS IN LIEU OF ALL OTHER WARRANTIES EXPRESS OR IMPLIED INCLUDING...

Страница 138: ...F Face detection AE mode 46 Fade 48 Flash 55 Focus 60 Focus microphone 52 Format 77 Frame by frame playback 66 G Gain 62 Grip belt 18 Guide line 51 H HD hi speed burst shooting mode 54 HDMI mini conn...

Страница 139: ...SD Speed Class Rating 24 SDHC Memory Card 24 Self recording 32 Self timer recording 49 Shooting guide 40 Shoulder strap fixture 18 Shutter sound 56 Shutter speed 62 Skip playback 65 Slide show 14 70 S...

Страница 140: ...dispare y se bloquee C mo encender la unidad Encienda la alimentaci n girando el interruptor del modo a o mientras pulsa el bot n de desbloqueo A Act e en el interruptor del modo mientras pulsa al mi...

Страница 141: ...NUAL FOCUS a la posici n AUTO en el modo de grabaci n Act e en el interruptor del modo para seleccionar 1 Pulse el cursor para visualizar el icono 2 Mueva el cursor hacia la derecha para seleccionar 3...

Страница 142: ...ucci n Detener la reproducci n y visualizar las miniaturas Reproducci n de fotograf as 1 Act e en el interruptor del modo para seleccionar 2 Seleccione reproducci n de fotograf as A usando el bot n cu...

Страница 143: ...143 VQT1N45...

Страница 144: ...Division of Panasonic Corporation of North America One Panasonic Way Secaucus NJ 07094 Panasonic Puerto Rico Inc Ave 65 de Infanter a Km 9 5 San Gabriel Industrial Park Carolina Puerto Rico 00985 Pana...

Отзывы: