background image

81

VQT3K06

Even if the system requirements mentioned in these operating instructions are fulfilled, 
some PCs cannot be used.

A CD-ROM drive is necessary to install the supplied software applications. (A compatible 
Blu-ray disc/DVD writer drive and media are necessary for writing to a Blu-ray disc/DVD.)

Operation is not guaranteed in the following cases.

j

When 2 or more USB devices are connected to a PC, or when devices are connected 
through USB hubs or by using extension cables.

j

Operation on an upgraded OS.

j

Operation on an OS other than the one pre-installed.

This software is not compatible with Microsoft Windows 3.1, Windows 95, Windows 98, 
Windows 98SE, Windows Me, Windows NT and Windows 2000.

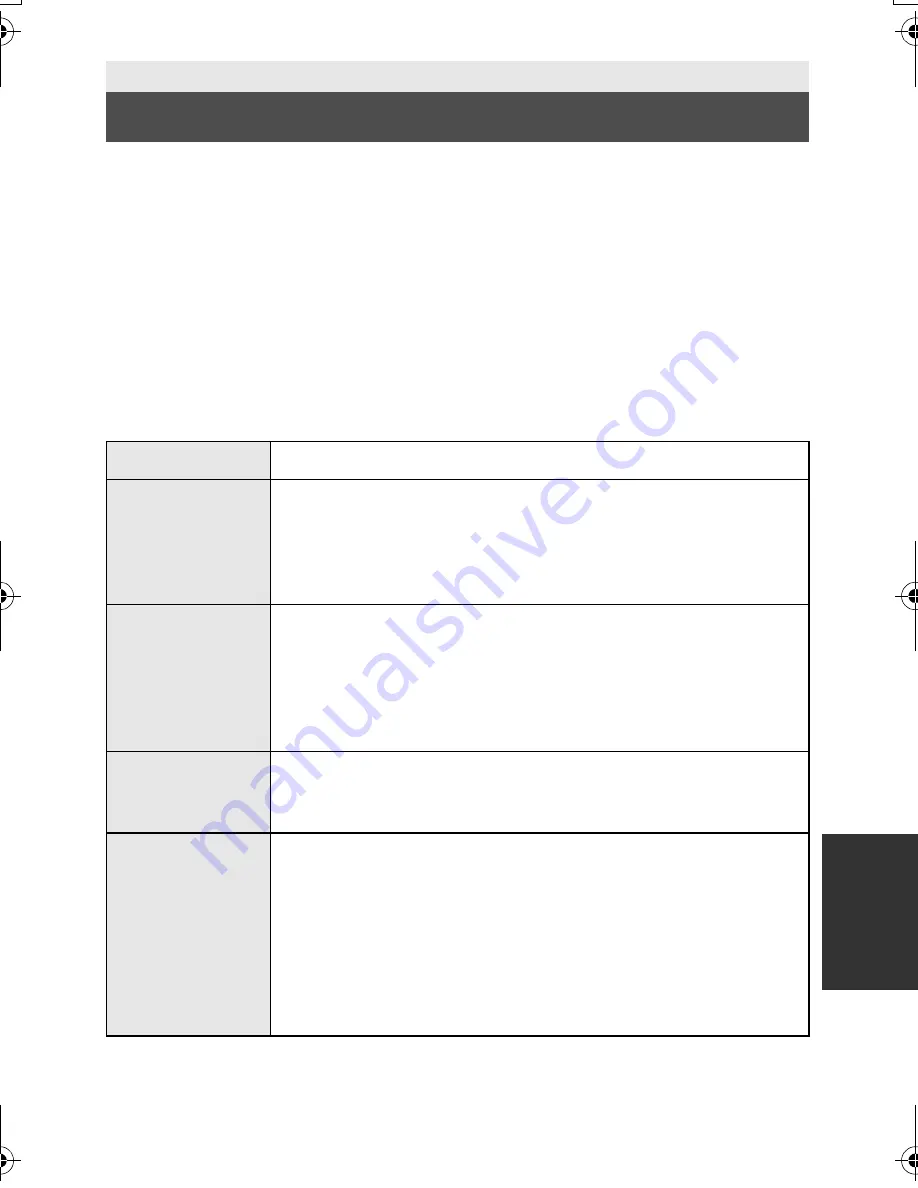
Operating environment for HD Writer LE 1.0

With a PC

Operating environment

PC

IBM PC/AT compatible PC

OS

Windows 7  (32 bit/64 bit) Starter/Home Basic/Home Premium/
Professional/Ultimate
Windows Vista (32 bit) Home Basic/Home Premium/Business/
Ultimate (SP1/SP2)
Windows XP (32 bit) (SP3)

CPU

Intel Pentium 4 2.8 GHz or higher

Intel Core 2 Duo 2.16 GHz or higher or AMD Athlon 64 X2 Dual-
Core 5200+ or higher is recommended when using playback 
function or MPEG2 output function.

Intel Core 2 Quad 2.6 GHz or higher is recommended when using 
the editing function.

RAM

Windows 7: 1 GB or more (32 bit)/2 GB or more (64 bit)
Windows Vista: 1 GB or more
Windows XP: 512 MB or more (1 GB or more recommended)

Display

High Colour (16 bit) or more (32 bit or more recommended)
Desktop resolution of 1024

k

768 pixels or more (1920

k

1080 pixels 

or more recommended)
Windows 7/Windows Vista: DirectX 9.0c compatible video card 
(DirectX 10 recommended)
Windows XP: DirectX 9.0c compatible video card
Compatible with DirectDraw overlay
PCI Express

k

16 compatible recommended

Video memory of 256 MB or more recommended

HDC-SD40&TM40EB-VQT3K06_mst.book  81 ページ  2011年2月8日 火曜日 午後6時8分

Содержание HDC-SD41

Страница 1: ...Operating Instructions High Definition Video Camera Model No HDC SD40 HDC SD41 HDC TM40 Before use please read these instructions completely VQT3K06 Model number suffix EB denotes UK model...

Страница 2: ...replacement cover is obtained A replacement fuse cover can be purchased from your local dealer If a new plug is to be fitted please observe the wiring code as stated below If in any doubt please cons...

Страница 3: ...IN ANOTHER CONFINED SPACE ENSURE THE UNIT IS WELL VENTILATED TO PREVENT RISK OF ELECTRIC SHOCK OR FIRE HAZARD DUE TO OVERHEATING ENSURE THAT CURTAINS AND ANY OTHER MATERIALS DO NOT OBSTRUCT THE VENTI...

Страница 4: ...For business users in the European Union If you wish to discard electrical and electronic equipment please contact your dealer or supplier for further information Information on Disposal in other Coun...

Страница 5: ...tery jInsert and remove the USB cable jExpose the unit to vibrations or shock About disposing of or giving away this unit l 102 Cards that you can use with this unit SD Memory Card SDHC Memory Card an...

Страница 6: ...tical image stabilizer function 41 Recording with the video light 41 Recording functions of operation icons 42 Operation icons 42 Recording functions of menus 46 Manual recording 52 White balance 52 M...

Страница 7: ...Agreement 80 Operating environment 81 Installation 84 Connecting to a PC 86 About the PC display 88 Starting HD Writer LE 1 0 89 Reading the operating instructions of the software applications 89 If...

Страница 8: ...44 844 3856 Order accessory and consumable items for your product with ease and confidence by phoning our Customer Care Centre Monday Thursday 9 00 a m 5 30 p m Friday 9 30 a m 5 30 p m Excluding publ...

Страница 9: ...ssories out of reach of children to prevent swallowing Product numbers correct as of Feb 2011 These may be subject to change Accessories Battery pack VW VBK180 AC adaptor VSK0712 AC cable K2CT39A00002...

Страница 10: ...AV multi connector l 66 77 Use the AV multi cable only the supplied cable 10 Access lamp ACCESS l 18 11 Card slot l 18 12 SD card cover l 18 13 Speaker 14 Lens cover opening closing switch When not u...

Страница 11: ...nctions and playback operations and to operate the menu screen In these operating instructions the cursor button is denoted as shown below or as 3 4 2 1 Example For pressing the down button 22 Enter b...

Страница 12: ...ever W T In recording mode l 40 Thumbnail display switch Volume lever sVOLr In playback mode l 30 27 Mode switch l 20 28 Status indicator l 19 29 DC input terminal DC IN l 14 Do not use any other AC a...

Страница 13: ...the direction shown in the figure Preparation Power supply It has been found that counterfeit battery packs which look very similar to the genuine product are made available to purchase in some marke...

Страница 14: ...sert the plugs as far as they will go 1 Connect the AC adaptor to the DC input terminal 2 Connect the AC cable to the AC adaptor then the AC outlet The status indicator will flash red at an interval o...

Страница 15: ...ttery model number Voltage Capacity minimum Charging time Recording mode Maximum continuously recordable time Actual recordable time Supplied battery VW VBK180 optional 3 6 V 1790 mAh 2 h 25 min HA HG...

Страница 16: ...en will become red If the battery discharges then will flash The remaining battery capacity is displayed when using the Panasonic battery that you can use for this unit The actual time can vary depend...

Страница 17: ...ds that do not have the SDXC logo are not based on SD Memory Card Specifications Memory cards that exceed 64 GB cannot be used When the write protect switch A on SD card is locked no recording deletio...

Страница 18: ...remove the USB cable jExpose the unit to vibrations or shock Performing the above while the lamp is on may result in damage to data SD card or this unit Do not expose the terminals of the SD card to...

Страница 19: ...nit A The status indicator lights To turn off the unit B The status indicator goes off The unit will not turn off while recording motion pictures even if the LCD monitor is closed In the following cas...

Страница 20: ...20 VQT3K06 Change the mode to recording or playback Operate the mode switch to change the mode to or Preparation Selecting a mode Recording mode l 24 Playback mode l 29 56...

Страница 21: ...ime setting by pressing the ENTER button l 33 Press the MENU button to complete the setting The date and time function is driven by a built in lithium battery When this unit is purchased the clock is...

Страница 22: ...recording The unit should normally be held steady when recording If you move the unit when recording do so slowly maintaining a constant speed The zoom operation is useful for recording subjects you c...

Страница 23: ...for recording the still pictures using 3 4 2 1 and press the ENTER button The media is selected separately to motion pictures or still pictures is highlighted in yellow Select and press the ENTER butt...

Страница 24: ...se recording About the screen indications in the motion picture recording Basic Recording motion pictures 0h00m00s 0h00m00s 0h00m00s R 1h20m R 1h20m R 1h20m A Recording mode B Approximate remaining re...

Страница 25: ...t in memory While recording is in progress the recording will not stop even if the LCD monitor is closed Please refer to page 107 for detail about the approximate recordable time Recording formats HA...

Страница 26: ...operation indicator l 92 During motion picture recording or when set to PRE REC you cannot record still pictures It is recommended using a tripod when recording still pictures in dark places because t...

Страница 27: ...certain tilts or when digital zoom is used Basic Intelligent auto mode Mode Scene Effect Portrait When the object is a person Faces are detected and focused automatically and the brightness is adjust...

Страница 28: ...ective range of automatic white balance adjustment on this unit 2 Blue sky 3 Cloudy sky rain 4 Sunlight 5 White fluorescent lamp 6 Halogen light bulb 7 Incandescent light bulb 8 Sunrise or sunset 9 Ca...

Страница 29: ...PICTURE you wish to play back then press the ENTER button Press the MENU button 4 Select the scene or the still picture to be played back using 3 4 2 1 then press the ENTER button B is displayed when...

Страница 30: ...he volume Towards s Decreases the volume Sound will be heard only during normal playback If pause play is continued for 5 minutes the screen returns to the thumbnails The elapsed time for playback ind...

Страница 31: ...recorded in AVCHD and iFrame are not compatible with each other Still picture compatibility This unit is compliant with the unified standard DCF Design rule for Camera File system established by JEIT...

Страница 32: ...screen Press 2 of the cursor button To exit the menu screen Press the MENU button About the information display Descriptions of the selected submenus and items displayed in steps 3 and 4 and messages...

Страница 33: ...ect HOME using 2 1and press the ENTER button 3 Only when setting your home region Select your home region using 2 1and press the ENTER button Press 3 to set daylight saving time appears and the summer...

Страница 34: ...e region using step 1 to 3 and close the setting by pressing the MENU button If you cannot find your travel destination in the area shown on the screen set it by using the time difference from your ho...

Страница 35: ...When in quick start standby mode about 60 of the power used in recording pause mode is being consumed so the recording time will be reduced Quick start standby mode is cancelled if jabout 5 minutes e...

Страница 36: ...itor These settings will not affect the images actually recorded 1 Select LCD SET and press the ENTER button 2 Select the item using 3 4 and press the ENTER button to set BRIGHTNESS Brightness of the...

Страница 37: ...the medium will be erased and cannot be restored Back up important data on a PC DVD disc etc l 78 1 Select FORMAT MEDIA and press the ENTER button 2 Select Built inMemory or SD CARD using 3 2 1 then p...

Страница 38: ...appears to be smaller The used space and remaining recordable time of the SD card and built in memory can be checked Pressing the ENTER button switches between SD card and built in memory display When...

Страница 39: ...cancelled However if no operations take place for approx 5 minutes the demonstration automatically starts again To stop the demonstration set DEMO MODE to OFF or insert an SD card This item is used t...

Страница 40: ...inal position move it quietly When the zoom magnification is 16 8k the subjects are focused at about 1 2 m or more When the zoom magnification is 1k this unit can focus on a subject approx 4 cm away f...

Страница 41: ...Using the colour night view function at the same time will make conditions even brighter Advanced Recording Optical image stabilizer function Advanced Recording Recording with the video light Optical...

Страница 42: ...ancelling the following functions jHelp mode l 43 jGuideline l 43 Operation icons 1 Not displayed during recording 2 It is not displayed in the intelligent auto mode If you turn off the unit or change...

Страница 43: ...cklit subject Select the desired icon using the cursor button to display an explanation on the screen To exit the help mode Press the MENU button or select END You cannot record or set functions while...

Страница 44: ...u turn the unit off jIf you start recording jAfter 3 hours have passed After setting PRE REC if recording starts in less than 3 seconds or while the PRE REC indication flashes within about 3 seconds a...

Страница 45: ...may not be clear This function allows you to record colour images in very low light situations Minimum required illumination approx 1 lx Recorded scene is seen as if frames were missed If set in a bri...

Страница 46: ...d is 1 25 jImage may get washed out when recorded in bright surrounding Night scenery jIt is recommended using a tripod Advanced Recording Recording functions of menus SCENE MODE RECORD SETUP SCENE MO...

Страница 47: ...e battery l 15 This function s default setting is HG mode Please refer to page 107 about approximate recordable time When the unit is moved a lot or moved quickly or when a fast moving subject is reco...

Страница 48: ...rtrait mode in the intelligent auto mode The white frame is for face detection only If the unit continues to be tilted upside down from the normal horizontal position while recording motion pictures i...

Страница 49: ...ay be seen as if frames are missed and afterimages may appear This is for reducing the wind noise coming into the built in microphones Switch to manual mode l 52 This function s default setting is OFF...

Страница 50: ...s fixed to AUTO and cannot be changed The microphone input level meter shows the larger of the inputs from the 2 built in microphones You cannot record with the audio completely muted Selecting the pi...

Страница 51: ...DS is a good way to prevent image shake when the button is pressed while using a tripod etc SELF TIMER is cancelled in the following cases jIf you change the mode jIf you turn the unit off jIf you sta...

Страница 52: ...tural colours depending on the scenes or lighting conditions If so you can adjust the white balance manually Press the iA MANUAL button to switch to manual mode 1 Select WB using the cursor button 2 P...

Страница 53: ...he display flashes the manual white balance previously adjusted is stored Whenever recording conditions change re set the white balance When setting both the white balance and the iris gain set the wh...

Страница 54: ...ng press the iA MANUAL button When setting both the shutter speed and the iris gain value set the shutter speed and then set the iris gain value Manual shutter speed adjustment You may see a band of l...

Страница 55: ...to switch to manual mode l 52 1 Press 4 to switch the manual icon 2 Select MF with the cursor button to change to manual focus MF appears on the screen 3 Press 2 1 to adjust the focus To restore auto...

Страница 56: ...tion play back will continue over the period that the button is pressed Normal playback is restored when you press 3 When slow motion pictures are played back in reverse they will be shown continuousl...

Страница 57: ...back 2 Press the button Date the motion picture was recorded will be registered as date of the still picture Quality will be different from the normal still picture Repeat playback Playback of the fir...

Страница 58: ...ill picture during playback Playback zoom You can zoom in on still pictures during playback 1 Move the zoom lever to side You can zoom to a maximum of 4a k1 k2 k4 2 Shift the position of the zoomed po...

Страница 59: ...es or the still pictures returns if the unit is turned off or the mode is changed Even if AVCHD scenes are recorded on the same day they are grouped separately in the following case 1 2 is added after...

Страница 60: ...d sound and press the ENTER button 4 Select START and press the ENTER button 5 Select the playback operation l 29 When the playback is finished or stopped the screen to select REPLAY SELECT AGAIN or E...

Страница 61: ...ene still picture is selected and the indication appears on the thumbnail Press the ENTER button again to cancell the operation Up to 99 scenes can be selected to be deleted 4 When SELECT is selected...

Страница 62: ...be played back the thumbnails are displayed as cannot be deleted In case of ALL SCENES the deletion may take time if there are many scenes or still pictures If you delete scenes recorded on other pro...

Страница 63: ...t to divide the scene l 56 Select YES to continue dividing the same scene To continue dividing other scenes select NO and repeat steps 2 3 4 Press the MENU button to complete dividing Unwanted parts c...

Страница 64: ...int where you want to divide the scene l 56 Set to at least 2 seconds for the portions to be deleted and least 3 seconds for the portion that is to remain 4 Select the part for deletion then press the...

Страница 65: ...e media will delete them Change the mode to 1 Select the menu 2 Select the scene still picture to be protected using the cursor button then press the ENTER button The scene still picture is selected a...

Страница 66: ...compatible with the terminals Image quality may vary with the connected terminals A High quality 1 HDMI terminal 2 Component terminal 3 Video terminal A HDMI mini cable optional Be sure to connect to...

Страница 67: ...V 3 Change the mode to to play back If you connect to a TV using an HDMI mini cable or an AV multi cable with the unit in play back mode images will not be displayed on the screen of the unit Check on...

Страница 68: ...nected adjust the aspect setting on the TV Refer to the operating instructions of the TV for details SETUP TV ASPECT 4 3 TV ASPECT setting 16 9 4 3 Refer to the following support site for information...

Страница 69: ...ons for the TV Connecting with the AV multi cable AV multi connector output setting can be changed Changing the component output setting SETUP HDMI RESOLUTION AUTO 1080i 576p SETUP AV MULTI desired se...

Страница 70: ...ol This function allows you to use your remote control for the Panasonic TV for easy operations when this unit has been connected to a VIERA Link compatible device using a HDMI mini cable optional for...

Страница 71: ...the unit off If you use the remote control for the TV to turn off the power this unit also turns off Automatic input switching If you connect with a HDMI mini cable and then turn on this unit the inpu...

Страница 72: ...on the SD card is displayed Be aware that deleted data cannot be restored 1 Change the mode to Use a sufficiently charged battery or the AC adaptor 2 Select the menu 3 Following the screen display sel...

Страница 73: ...list by date is selected Motion pictures that have been recorded on another device may not be copied Data recorded on a PC with HD Writer LE 1 0 etc cannot be copied Protection setting will be cleared...

Страница 74: ...ds or by connecting with the USB cable To dub iFrame scenes refer to page 77 Copy Dubbing Dubbing with a Blu ray disc recorder video devices etc Equipment used for dubbing Dubbing picture quality To d...

Страница 75: ...r The USB function selection screen will appear on the screen of the unit 2 Select RECORDER using the cursor button on the unit and press the ENTER button When you select an option other than RECORDER...

Страница 76: ...or DVD recorder When you connect the unit to a Blu ray disc recorder a dubbing operations screen may appear on the television connected to the Blu ray disc recorder In this case as well perform the o...

Страница 77: ...time display and function indication are not wanted cancel them before dubbing l 34 Dubbing in standard picture quality Change the video input on the video device and TV that this unit is connected t...

Страница 78: ...the on screen instructions for easy copying With a PC What you can do with a PC What can be done with the HD Writer LE 1 0 Data type Copying data to a PC Motion picture and still picture Copying in B...

Страница 79: ...ed to read motion picture Do not start the software supplied with this unit and other software at the same time Close any other software if you start the software supplied with this unit and close the...

Страница 80: ...e computer Article 5 Reverse Engineering Decompiling or Disassembly Licensee may not reverse engineer decompile or disassemble the Software except to the extent either of them is permitted under law o...

Страница 81: ...ompatible PC OS Windows 7 32 bit 64 bit Starter Home Basic Home Premium Professional Ultimate Windows Vista 32 bit Home Basic Home Premium Business Ultimate SP1 SP2 Windows XP 32 bit SP3 CPU Intel Pen...

Страница 82: ...is software To use the HD Writer LE 1 0 You will need a high performance PC depending on the functions to be used It may not properly play back or properly operate depending on the environment of the...

Страница 83: ...dows XP 32 bit SP3 CPU Windows 7 Windows Vista 1 0 GHz or higher Windows XP Intel Pentium III 450 MHz or higher or Intel Celeron 400 MHz or higher RAM Windows 7 1 GB or more 32 bit 2 GB or more 64 bit...

Страница 84: ...the following screen is not displayed automatically select Start Computer or double click on Computer on the desktop and then double click Panasonic 2 Click Next 3 Read the End User License Agreement...

Страница 85: ...HD Writer LE 1 0 Follow the steps below to uninstall any software applications that you no longer require 1 Select Start Control Panel Uninstall a program 2 Select HD Writer LE 1 0 then click Uninsta...

Страница 86: ...ternal drive of the PC l 88 When you select an option other than PC reconnect the USB cable When using the battery the LCD monitor turns off after about 5 seconds Press the cursor button to turn the L...

Страница 87: ...corder During charging the status indicator flashes You cannot charge when the status indicator flashes rapidly or when it does not light at all Charge using the AC adaptor l 14 It will take 2 or 3 ti...

Страница 88: ...C with Explorer or other programmes 1 Double click the folder that contains the still pictures DCIM 100CDPFQ etc 2 Drag and drop the still pictures onto the destination folder on the PC s HDD Do not d...

Страница 89: ...Panasonic HD Writer LE 1 0 HD Writer LE For details on how to use the software applications read the PDF operating instructions of the software Reading the operating instructions of the software appli...

Страница 90: ...nised as an external drive of Mac When you select an option other than PC reconnect the USB cable When using the battery the LCD monitor turns off after about 5 seconds Press the cursor button to turn...

Страница 91: ...PRE REC MNL 2 1 1 MF Manual focus l 55 Built in memory recording possible status motion picture White Card recording possible status motion picture Green Recognising the card motion picture Recording...

Страница 92: ...above R3000 Remaining number of still pictures l 26 White Still picture recording icon Red Recording still picture World time setting l 33 15 11 2011 Date indication l 21 12 34 Time indication l 21 2...

Страница 93: ...ppears even though motion pictures and still pictures are recorded on an SD card the card may be unstable Reinsert the SD card then turn the unit off and then on again THIS BATTERY CANNOT BE USED Use...

Страница 94: ...the condition of the data it may not be possible to completely repair the data If recovery fails it will not be possible to play back scenes recorded before the unit turned off When data recorded on...

Страница 95: ...operated though it is turned on This unit does not operate normally Remove the battery or AC adaptor wait about 1 minute and then reconnect the battery or AC adaptor Then about 1 minute later turn on...

Страница 96: ...ou are trying to record a scene which is hard to bring into focus in auto focus mode use the manual focus mode to adjust the focus l 28 55 CONDITION TOO DARK OR OPEN LENS COVER is displayed Before tur...

Страница 97: ...ideo or audio is not output even though it is connected to TV correctly The images are squeezed horizontally Please read the operating instructions of your TV and select the channel that matches the i...

Страница 98: ...not switch automatically switch the input using the TV remote control Check the VIERA Link setting on the connected device Please refer to the operating instructions of the connected device Cannot co...

Страница 99: ...ee the PDF operating instructions for HD Writer LE 1 0 You will need Adobe Acrobat Reader 5 0 or later or Adobe Reader 7 0 or later to read the PDF operating instructions for HD Writer LE 1 0 Cannot i...

Страница 100: ...recording of motion picture data that exceeds 4 GB may momentarily stop at every 4 GB of data when played back with another device It may not play back smoothly when the editing of scenes was done wi...

Страница 101: ...If the unit is sprayed with such chemicals its body may be marred and the surface finish may peel off Do not leave rubber or plastic products in contact with the unit for a long time When you use the...

Страница 102: ...sceptible to humidity and temperature and the effect increases the more the temperature rises or falls In cold areas the full charge indication may not appear or the low battery indication may appear...

Страница 103: ...ox 4 second period off for approx 2 seconds on for approx 2 seconds When the battery is over discharged or the temperature of the battery is too high or low It can be charged but it may take a few hou...

Страница 104: ...ideo light button on the screen below for about 3 seconds When the SD card data deletion screen appears select YES and then follow the on screen instructions The customer is responsible for the manage...

Страница 105: ...r to outside When a cold room has been warmed up quickly When cool wind from an air conditioner is directly blown onto this unit After summer afternoon showers of rain When this unit is in a very humi...

Страница 106: ...printed with permission from Microsoft Corporation IBM and PC AT are registered trademarks of International Business Machines Corporation of the U S Intel Core Pentium and Celeron are the registered t...

Страница 107: ...automatically resume after a few seconds If a recording with a lot movements is recorded the recording time is reduced The recordable time may be reduced if recording of short scene is repeated Use t...

Страница 108: ...above The number of recordable pictures depends on whether and are used together and on the subject being recorded The memory capacity indicated on the label of an SD card is the total of the capacit...

Страница 109: ...K180 Battery pack lithium VW VBK360 HDMI mini cable RP CDHM15 RP CDHM30 Video DC light VW LDC103E Light bulb for video DC light VZ LL10E Shoe adaptor VW SK12E Accessory kit VW ACK180EB SD SDHC SDXC Me...

Страница 110: ...8 type 1 5 8z 1MOS image sensor Total 1500 K Effective pixels Motion picture Still picture 1190 K 16 9 Lens Auto Iris 16 8k Optical Zoom F1 8 to F2 6 Focal length 2 9 mm to 48 7 mm Macro Full range AF...

Страница 111: ...AV video output level 1 0 Vp p 75 h PAL system HDMI mini connector video output level HDMI 1080i 576p AV multi connector audio output level Line 316 mV 600 h 2 ch HDMI mini connector audio output leve...

Страница 112: ...6 system compliant SDHC Memory Card FAT32 system compliant SDXC Memory Card exFAT system compliant Refer to page 17 for details on SD cards usable in this unit Built in memory 16 GB Compression MPEG 4...

Страница 113: ...rd exFAT system compliant Refer to page 17 for details on SD cards usable in this unit Built in memory 16 GB Compression JPEG Design rule for Camera File system based on Exif 2 2 standard Picture size...

Страница 114: ...E Economy 34 F Fade 43 Fade colour 43 Focus 55 Formatting 37 Frame by frame playback 56 G Gain 54 Grip belt 12 Guideline 43 H HD Writer LE 1 0 78 89 HDMI mini connector 10 66 70 HDMI resolution 69 He...

Страница 115: ...elf recording 22 Self timer recording 51 Shutter sound 51 Shutter speed 54 Slide show 30 60 Slow motion playback 56 Soft skin mode 44 Still picture compatibility 31 T Tele macro 44 Tripod receptacle 1...

Страница 116: ...rective 2004 108 EC article 9 2 Panasonic Testing Centre Panasonic Marketing Europe GmbH Winsbergring 15 22525 Hamburg Germany Panasonic Corporation Web site http panasonic net Panasonic Corporation 2...

Отзывы: