background image

31

(ENG) SQT0642

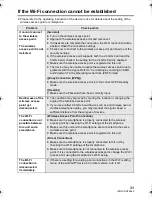
If the Wi-Fi connection cannot be established

Please refer to the operating instruction of the device in use for details about the setting of the 
wireless access point or smartphone.

Problem

Check points

It cannot connect 
to the wireless 
access point.

The wireless 
access point is not 
detected.

(General)

Turn on the wireless access point.

Approach the wireless access point and reconnect.

If it takes time to complete the connection, the Wi-Fi connection will be 
aborted. Reset the connection settings.

Check how to connect to the wireless access point and how to set the 
security settings.

If the wireless access point supports both the 2.4 GHz band and the 
5 GHz band, check if the setting for the 2.4 GHz band is enabled.

Make sure the wireless access point is registered in this unit.

The device may be unable to locate the wireless access point due to 
problems with the signal. Refer to “Connecting by entering an SSID 
and Password” in the Operating Instructions (PDF format).

([Easy Connection (WPS)])

Make sure the wireless access point is in the correct WPS standby 
mode.

([Search])

Make sure the Password have been correctly input.

Radio waves of the 
wireless access 
point get 
disconnected.

The condition may improved by moving the location or changing the 
angle of the wireless access point.

If you use another 2.4 GHz band device such as a microwave oven or 
cordless telephone nearby, you may interrupt the signal. Keep a 
sufficient distance from these types of devices.

The Wi-Fi 
connection is not 
possible between 
this unit and a 
smartphone.

(Wireless Access Point Connection)

Make sure the smartphone is properly connected to the wireless 
access point by checking the Wi-Fi settings of the smartphone.

Make sure this unit and the smartphone are connected to the same 
wireless access point.

Make sure the wireless access point is registered in this unit.

(Direct Connection)

Make sure the smartphone is properly connected to this unit by 
checking the Wi-Fi settings of the smartphone.

Make sure the smartphone is not connected to the wireless access 
point. If it is connected to the wireless access point, change the Wi-Fi 
access point using the smartphone’s Wi-Fi set up.

The Wi-Fi 
connection is 
disconnected 
immediately.

If there is a setting for avoiding poor connections in the Wi-Fi setting 
menu of the Android

 device 4.0 or later version, turn it off.

HC-W570&W570MEP&EB-SQT0642_mst.book  31 ページ  2014年12月9日 火曜日 午後4時18分

Содержание HC-W570

Страница 1: ...enotes UK model Please read these instructions carefully before using this product and save this manual for future use More detailed operating instructions are available in Operating Instructions PDF...

Страница 2: ...o not repair this unit by yourself Refer servicing to qualified service personnel CAUTION To reduce the risk of fire electric shock or product damage Do not install or place this unit in a bookcase bu...

Страница 3: ...our local municipality Penalties may be applicable for incorrect disposal of this waste in accordance with national legislation Note for the battery symbol bottom symbol This symbol might be used in c...

Страница 4: ...he cables Do not spray insecticides or volatile chemicals onto the unit If the unit is sprayed with such chemicals its body may be marred and the surface finish may peel off Do not leave rubber or pla...

Страница 5: ...t if recording or editing does not work properly Likewise the above also applies in a case where any type of repair is made to the unit including any other non built in memory related component About...

Страница 6: ...ccess method you want to check You will need Adobe Reader to browse or print the Operating Instructions PDF format You can download and install a version of Adobe Reader that you can use with your OS...

Страница 7: ...your home region for the first time 17 Basic Selecting a media to record W570M 18 Changing the Recording Mode 18 Recording motion pictures 19 Recording still pictures 20 Recording with the Sub Camera...

Страница 8: ...der accessory and consumable items for your product with ease and confidence by phoning our Customer Communications Centre Monday Friday 9 00 am 5 00 pm Excluding public holidays Or go on line through...

Страница 9: ...0002 USB cable K2KYYYY00236 HDMI mini cable K1HY19YY0021 Optional accessories EB Battery charger VW BC10EB EP Battery charger VW BC10E Battery pack lithium VW VBT190 Battery pack lithium VW VBT380 HDM...

Страница 10: ...paration Power supply It has been found that counterfeit battery packs which look very similar to the genuine product are made available to purchase in some markets Some of these battery packs are not...

Страница 11: ...ly 2 seconds approximately 1 second on approximately 1 second off indicating that charging has begun It will turn off when the charging is completed Connecting to the AC outlet It is possible to use t...

Страница 12: ...ditions such as high low temperature The actual recordable time refers to the recordable time when repeatedly starting stopping recording turning the unit on off moving the zoom lever etc Battery capa...

Страница 13: ...he first time on this unit format the SD card l 24 When the SD card is formatted all of the recorded data is deleted Once the data is deleted it cannot be restored Caution Check that the access lamp h...

Страница 14: ...con in Recording Mode this unit can be switched between Motion Picture Recording Mode and Still Picture Recording Mode Switching this unit between Recording Mode and Playback Mode Preparation Turning...

Страница 15: ...touch operation is performed for a specific period of time To display it again touch the screen If the recording start stop button is pressed in Still Picture Recording Mode or Playback Mode this uni...

Страница 16: ...Menu To display the Touch Menu Touch left side right side of on the Touch Menu to switch the operation icons It is also possible to switch the operation icons by sliding the Touch Menu right or left...

Страница 17: ...ATION The year can be set between 2000 and 2039 3 Touch ENTER Touch EXIT to complete the setting You can set your home region in SET WORLD TIME 1 Select the menu l 24 A message will be displayed Touch...

Страница 18: ...he menu l 24 3 Touch the media to record motion pictures or still pictures The media selected separately for motion pictures or still pictures is highlighted in yellow 4 Touch ENTER 1 Touch the Record...

Страница 19: ...you are in 1 2 Intelligent Auto Plus You can add manually adjusted brightness and colour balance settings to the Intelligent Auto Mode and record 1 Creative Control You can record motion pictures wit...

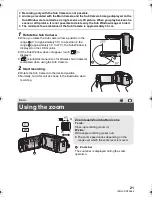
Страница 20: ...ecord two images simultaneously Twin Camera Use the Sub Camera to enjoy recording yourself a family member next to you or scenery different from that seen from the Main Camera B Sub Window The image o...

Страница 21: ...tion when recording Recording only with the Sub Camera is not possible An image recorded with the Main Camera and the Sub Camera s image displayed on the Sub Window are recorded as a single scene or s...

Страница 22: ...on will be displayed on the thumbnail screen and each thumbnail will be displayed with one of the following icons j AVCHD PH scenes recorded as Backup for Twin Camera j AVCHD HA scenes recorded as Bac...

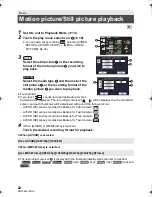
Страница 23: ...ious page j Slide the thumbnail display upward downward while touching it j Switch the Touch Menu and then touch up down on the thumbnail scroll lever 6 Select the playback operation by touching the o...

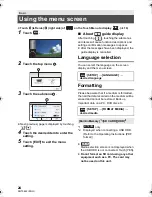
Страница 24: ...on You can select the language on the screen display and the menu screen Formatting Please be aware that if a medium is formatted then all the data recorded on the medium will be erased and cannot be...

Страница 25: ...i Fi on this unit s Sub Window and record it simultaneously with the Main Camera s image Remote Ctrl Using a smartphone you can perform record playback operations from a remote location or upload moti...

Страница 26: ...on the Wi Fi function of your smartphone Do not remove the SD card during remote operations Caution Be sure to pay special attention to the privacy the likeness rights etc of the subject when you use...

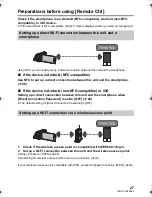
Страница 27: ...droid non NFC compatible or iOS Setting up a direct connection between this unit and the smartphone when Direct Connection Password is set to OFF l 28 The default setting for Direct Connection Passwor...

Страница 28: ...artphone on of this unit where this unit is turned off with a LCD monitor 1 Press Wi Fi button on this unit and touch Wi Fi Setup 2 Touch Direct Connection 3 On the smartphone select the SSID displaye...

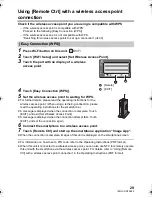
Страница 29: ...ng a tethering connection please read the operating instructions for the smartphone A message is displayed when the connection is complete Touch EXIT and exit Set Wireless Access Point A message is di...

Страница 30: ...Touch EXIT to exit Set Wireless Access Point and proceed to Step 7 6 When there is an Encryption key Password Enter the Password For information on how to enter characters refer to the Operating Instr...

Страница 31: ...e Search Make sure the Password have been correctly input Radio waves of the wireless access point get disconnected The condition may improved by moving the location or changing the angle of the wirel...

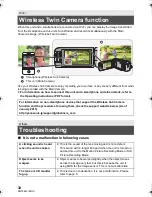
Страница 32: ...s that support the Wireless Sub Camera function and the procedures for using them check the support website below As of January 2015 http panasonic jp support global cs e_cam Others Troubleshooting A...

Страница 33: ...N AGAIN is displayed The unit has automatically detected an error Restart the unit by turning the unit off and on The unit will be turned off in about 1 minute if the unit is not turned off and on Rep...

Страница 34: ...0p Maximum 28 Mbps VBR PH Maximum 24 Mbps VBR HA Average 17 Mbps VBR HG Average 13 Mbps VBR HE Average 5 Mbps VBR MP4 iFrame 1080 Maximum 28 Mbps VBR 720 Average 9 Mbps VBR iFrame Maximum 28 Mbps VBR...

Страница 35: ...Monitor 7 5 cm 3 0z wide LCD monitor Approx 460 K dots Microphone Stereo with a Zoom Microphone Minimum required illumination Approx 4 lx 1 25 with Low Light Mode in the Scene Mode Approx 1 lx with th...

Страница 36: ...PA WPA2 WEP Access method Infrastructure mode NFC Compliance standard ISO IEC 18092 NFC F Passive Mode Image sensor 1 5 type 1 5z 1MOS image sensor Total 2000 K Lens 35 mm equivalent Motion picture 30...

Страница 37: ...rks of Google Inc The Wi Fi CERTIFIED Logo is a certification mark of Wi Fi Alliance The Wi Fi Protected Setup Identifier mark is a certification mark of Wi Fi Alliance Wi Fi is a registered trademark...

Страница 38: ...of MERCHANTABILITY or FITNESS FOR A PARTICULAR PURPOSE Refer to the detailed terms and conditions thereof which can be displayed by following the procedure described in SOFTWARE INFO under Using the S...

Страница 39: ...39 ENG SQT0642...
Страница 40: ...www panasonic com Panasonic Corporation 2014 Manufactured by Panasonic Corporation Kadoma Osaka Japan Importer for Europe Panasonic Marketing Europe GmbH Panasonic Testing Centre Winsbergring 15 22525...

Отзывы: