background image

8

VQT5J49 (ENG)

1

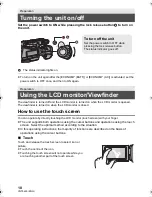
Shoulder strap fixture

2

Handle

3

Sub zoom lever [W/T] (

l

25)

This lever functions in the same manner as 
the zoom lever.

4

Sub recording start/stop button

This button functions in the same manner as 
the recording start/stop button.

5

Microphone cable holder

6

Accessory shoe

7

External microphone terminal [EXT MIC] 
(

l

13)

A compatible plug-in powered microphone 
can be used as an external microphone.

When the unit is connected with the AC 
adaptor, sometimes noise may be heard 
depending on the microphone type. In this 
case, please switch to the battery for the 
power supply and the noise will stop.

8

Photoshot button [

] (

l

23)

9

Zoom lever [W/T] (In Recording Mode) 
(

l

25)

Volume lever [

r

VOL

s

]/Thumbnail 

display switch [

/

] (In Playback 

Mode)

10 Grip belt (

l

12)

11 Status indicator (

l

18)

12 Power switch (

l

18)

13 Recording start/stop button (

l

23)

14 Charging lamp [CHG] (

l

15)

15 DC input terminal [DC IN] (

l

15)

Do not use any other AC adaptors except the 
supplied one.

16 Headphone terminal [

]

17 USB terminal [HOST]/[USB 2.0]
18 USB terminal [DEVICE]/[USB 2.0]
19 HDMI terminal [HDMI] (

l

28)

Preparation

Names and Functions of Main Parts

18 19

17

15

14

16

11

13

12

3

2

1

4 5 6

10

9

7

8

HC-MDH2&MDH2M_GN-VQT5J49_mst.book  8 ページ  2014年2月6日 木曜日 午後4時1分

Содержание HC-MDH2

Страница 1: ...Please read these instructions carefully before using this product and save this manual for future use This document explains basic operations of the unit For more detailed explanation please refer to...

Страница 2: ...other confined space Ensure this unit is well ventilated Do not obstruct this unit s ventilation openings with newspapers tablecloths curtains and similar items Do not place sources of naked flames su...

Страница 3: ...Then reinsert the battery or reconnect AC adaptor and turn this unit on Do not use this unit near radio transmitters or high voltage lines If you record near radio transmitters or high voltage lines t...

Страница 4: ...perature or humidity such as when the unit is taken from outside or a cold room to a warm room Please be careful as it may cause the lens the viewfinder or LCD monitor to become soiled moldy or damage...

Страница 5: ...e used for the Playback Mode still pictures only Scene s recorded in 1080 50p or 1080 50i AVCHD scene s Pages for reference are indicated by an arrow for example l 00 These operating instructions are...

Страница 6: ...uage selection 21 Basic Selecting a media to record 22 Formatting cards 22 Recording motion pictures 23 Recording still pictures 23 Intelligent Auto Mode 24 Using the zoom 25 Manual recording 26 Motio...

Страница 7: ...be available in some countries Accessories Battery pack VW VBD29 AC adaptor VSK0733 AC cable K2CJ2YY00052 AV cable K2KA6CA00001 USB cable K2KYYYY00201 Eye cup VYC1080 Lens cap VYK5Y52 External stereo...

Страница 8: ...be heard depending on the microphone type In this case please switch to the battery for the power supply and the noise will stop 8 Photoshot button l 23 9 Zoom lever W T In Recording Mode l 25 Volume...

Страница 9: ...FUNCTION l 26 28 Mode switch 29 Intelligent auto Manual Manual focus switch iA MANUAL FOCUS l 24 30 Cursor button 31 Optical Image Stabilizer button O I S 32 Menu button MENU l 21 33 Eyepiece correcto...

Страница 10: ...ction 36 Eye cup attachment part l 12 37 Eye cup l 12 38 Accessory shoe 39 Viewfinder l 19 Extend the viewfinder before use 40 Speaker 41 Battery release button PUSH l 14 42 Battery holder l 14 43 Vid...

Страница 11: ...rd slot 2 left l 17 48 Access lamp card 2 l 17 49 Card slot 1 right l 17 50 Access lamp card 1 l 17 51 SD card cover l 17 52 Access lamp BUILT IN MEMORY 53 Card slot l 17 54 Access lamp SD card l 17 H...

Страница 12: ...he notch of the eye cup attachment part with the protrusion at the inside of the eye cup Attaching the lens cap Protect the lens surface with the lens cap while the unit is not used 1 2 Flip the belt...

Страница 13: ...he lock ring Do not apply excessive force on the lock ring Make sure that the microphone is securely attached 2 Connect the plug to the external microphone terminal Check that the unit is turned off C...

Страница 14: ...adequately protected with internal protection to meet the requirements of appropriate safety standards There is a possibility that these battery packs may lead to fire or explosion Please be advised t...

Страница 15: ...ging starts It will turn off when the charging is completed When the charging lamp is flashing at approximately 4 second intervals off for approx 2 seconds on for approx 2 seconds the battery is over...

Страница 16: ...n the table above The actual recordable time refers to the recordable time when repeatedly starting stopping recording turning the unit on off moving the zoom lever etc The batteries heat up after use...

Страница 17: ...own in the illustration and press it straight in as far as it will go Press the centre of the SD card and then pull it straight out 2 Securely close the SD card cover Securely close it until it clicks...

Страница 18: ...touch screen with your finger The unit supports both operations using the cursor buttons and operations using the touch screen Select the optimal method according to the situation In this operating i...

Страница 19: ...h as when setting menus Do not touch on the LCD monitor with hard pointed tips such as ball point pens Viewfinder adjustment These settings will not affect the images actually recorded It adjusts the...

Страница 20: ...R using the cursor button right or left then press the button in the centre The screen may switch to the setting screen for the TIME ZONE Using cursor button and set the TIME ZONE Select EXIT then pre...

Страница 21: ...button in the centre to enter the setting 5 Select EXIT then press the button in the centre or press the MENU button to exit the menu setting About guide display After selecting and press the button i...

Страница 22: ...till pictures is highlighted in yellow 4 Select ENTER and press the button in the centre Formatting cards If you use the SD cards for the first time for recording with this unit format the cards Pleas...

Страница 23: ...ng start stop button B to start recording A When you begin recording changes to Recording will stop when you press the recording start stop button again 1 Change the mode to 2 Open the LCD monitor 3 P...

Страница 24: ...riate for the condition are set just by pointing the unit to what you want to record Basic Intelligent Auto Mode MANUAL FOCUS iA MANUAL FOCUS switch Slide the switch to change the Intelligent Auto Mod...

Страница 25: ...sic Using the zoom Zoom lever Sub zoom lever T side Close up recording zoom in W side Wide angle recording zoom out T T W W T T W W W W Ring Zoom T side Close up recording zoom in W side Wide angle re...

Страница 26: ...con is displayed in area C 2 Rotate the multi manual ring to select the setting When a manual icon is displayed operation using the multi manual ring is not possible Basic Manual recording MNL MANUAL...

Страница 27: ...in the centre Select ENTER and press the button in the centre 5 Select the scene or the still picture to be played back and press the button in the centre The recording format is displayed in the thu...

Страница 28: ...when no operation is performed for a specific period of time To display them again press the cursor button Connect this unit to a TV using an HDMI cable commercially available an AV cable supplied or...

Страница 29: ...ecording media SD Memory Card SDHC Memory Card SDXC Memory Card Refer to the operating instructions PDF format for details on SD cards usable in this unit Built in memory 32 GB HC MDH2M Image sensor 1...

Страница 30: ...l Linear PCM MIC input j60 dBV Mic sensitivity j40 dB equivalent 0 dB 1 V Pa 1 kHz Stereo mini jack USB Reader function SD card Read only No copyright protection support Built in memory Read only Hi S...

Страница 31: ...erface are trademarks or registered trademarks of HDMI Licensing LLC in the United States and other countries Other names of systems and products mentioned in these instructions are usually the regist...

Страница 32: ...Web Site http panasonic net Panasonic Corporation 2014 VQT5J49 F0214YK0...

Отзывы: