background image

5

English

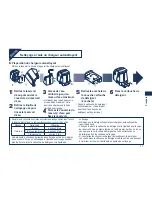
Charging with the self-cleaning recharger

Char

ge

Thoroughly wipe off any drops of water on or around the recharger so that it is dry before charging it.

2

3

1

1

Attach the detergent 
cartridge and the 
water tank to the 
self-cleaning 
recharger. 

Page 7

2

2

Insert the appliance 
plug.

3

3

Plug in the adaptor.

4

4

Remove the protective 
cap 

 and then attach 

the shaver.

Turn the shaver off before 
attaching.
Check that the outer foil is not 
deformed or damaged when you 
are attaching the shaver.
The indicators on the LCD panel 
glow and charging starts.
Charging is completed when the 
indicators on the LCD panel 
blink. 
(Max. 1 hour later)

You can keep the shaver attached to the recharger, or connected 
to the adaptor, when not using it to maintain full battery capacity. 
You cannot overcharge the shaver.
If the shape of the plug does not fit the power outlet, use an 
attachment plug adaptor of the proper configuration.

Charging without the self-cleaning recharger

You can also charge without the 
recharger.
1. Insert the appliance plug into the 

shaver.

2. Plug in the adaptor into a 

household outlet.

1

Содержание ES8249K

Страница 1: ...argeable Shaver Rasoir rechargeable Model No ES8249 N de modèle ES8249 Before operating this unit please read these instructions completely Il est recommandé de lire attentivement ce manuel avant d utiliser l appareil English 2 Français 12 Español 22 ...

Страница 2: ...e is used by on or near children or invalids 2 Use this appliance only for its intended use as described in this manual Do not use attachments not recommended by the manufacturer 3 Never operate this appliance if it has a damaged cord or plug if it is not working properly if it has been dropped or damaged or dropped into water Return the appliance to a service center for examination and repair 4 K...

Страница 3: ...oor mount position 1 1 1 Cleaning the shaver Warning Disconnect the power cord from the shaver before cleaning it to prevent electric shock Keep both the inner blades inserted If only one of the inner blades is inserted the shaver may be damaged If you clean the shaver with water do not use salt water or hot water Do not soak the shaver in water for a long period of time Wipe it with a cloth dampe...

Страница 4: ...lf cleaning recharger Operating temperature 15 35 C 59 95 F Operating humidity Less than 95 If you use the self cleaning recharger in temperatures outside the above range the following problems may occur The time it takes to charge the shaver increases The recharger stops functioning The lifespan of the rechargeable battery shortens Only when you use the recharger in lower temperatures In this cas...

Страница 5: ...eformed or damaged when you are attaching the shaver The indicators on the LCD panel glow and charging starts Charging is completed when the indicators on the LCD panel blink Max 1 hour later You can keep the shaver attached to the recharger or connected to the adaptor when not using it to maintain full battery capacity You cannot overcharge the shaver If the shape of the plug does not fit the pow...

Страница 6: ...ding on usage 10 appears and blinks A full charge will supply enough power for approx 14 shaves of 3 minutes each Using the shaver S h a v e 90 1 1 Press the OFF ON switch 2 2 Hold the shaver as illustrated above and shave Start out shaving by applying gentle pressure to your face Stretch your skin with your free hand and move the shaver back and forth in the direction of your beard You may gently...

Страница 7: ...tergent cartridge 1 Replace the HydraClean Shaving System Solution Cartridge when the status lamp is illuminated Use the below chart as a guide Shaving Cleaning Reusability 1 time day 1 time day approx 30 times 1 time 3 days approx 10 times 1 time week approx 4 times The expiration date of the cleaning liquid is 6 months after it is opened If you do not use the cleaning liquid for more than 6 mont...

Страница 8: ...e The courses start approximately 6 seconds after they are selected The course will be aborted if the power is cut off In this case perform the course again from the beginning Do not detach the detergent cartridge or the water tank as the cleaning liquid may spill causing a malfunction Course Course selection indications On shaver Course completion summary On recharger Changeable course halfway th...

Страница 9: ...ning liquid inside the water tank and then refill it with water Replace the old detergent cartridge and then restart the course When the status lamp goes out When the status lamp glows again Continue a course Contact an authorized service center Cleaning the shaver without the self cleaning recharger We recommend that you clean your shaver with the self cleaning recharger or the sonic vibration tu...

Страница 10: ...foil once every year inner blade once every two years 1 Press the system outer foil release buttons and lift the system outer foil upwards as illustrated 2 Remove the inner blades one at a time as illustrated Do not touch the edges metal parts of the inner blades to prevent injury to your hand 3 Insert the inner blades one at a time until they click as illustrated 2 3 4 Insert the system outer foi...

Страница 11: ...gs attached to the inside of the cleaning tray with a cloth or tissue paper dampened with water Clean the corners and uneven parts of the cleaning tray with a cotton swab dampened with water Do not pull hard on the rubber blade protector at the bottom of the cleaning tray The rubber may come off if you pull hard on it It is only necessary to pull it up slightly Warning Do not wash or apply water t...

Страница 12: ...sur eux ou en leur présence 2 Utilisez cet appareil uniquement pour son usage prévu comme le décrit le présent manuel N utilisez pas d accessoires qui ne sont pas recommandés par le fabricant 3 N utilisez jamais cet appareil si le cordon ou la fiche est endommagé s il ne fonctionne pas correctement s il est tombé endommagé ou tombé dans l eau Retournez l appareil à un centre de réparation pour le ...

Страница 13: ...a verticale ou sur le plancher Nettoyage du rasoir Avertissement Déconnectez le cordon d alimentation du rasoir avant de nettoyer ce dernier afin de ne pas vous électrocuter Veillez à ce que les deux lames soient insérées Si une seule lame est insérée le rasoir peut être endommagé Si vous nettoyez le rasoir à l eau n utilisez pas d eau salée ni d eau chaude Ne laissez pas tremper le rasoir dans l ...

Страница 14: ... maximum Environnement de fonctionnement du chargeur autonettoyant Température de fonctionnement 15 35 C 59 95 F Humidité de fonctionnement Inférieure à 95 Si vous utilisez le chargeur autonettoyant à des températures supérieures à la plage indiquée ci dessus les problèmes suivants risquent de se produire Le temps nécessaire au chargement augmente Le chargeur arrête de fonctionner La durée de vie ...

Страница 15: ...e lorsque vous fixez le rasoir Les indicateurs du panneau ACL s allument puis la recharge commence La recharge est terminée dès que les indicateurs du panneau ACL commencent à clignoter 1 heure après au maximum Chargement sans le chargeur autonettoyant Il est également possible de le recharger sans le chargeur 1 Insérez la prise de l appareil dans le rasoir 2 Branchez l adaptateur à la prise secte...

Страница 16: ...conditions d utilisation 10 s affiche et se met à clignoter Une pleine charge permettra d effectuer environ 14 rasages de 3 minutes chacun Utilisation du rasoir S e r a s e r 90 1 1 Appuyez sur l interrupteur de marche arrêt 2 2 Tenez le rasoir comme illustré ci dessus et rasez vous Commencez à vous raser en appuyant légèrement sur votre visage Tendez votre peau à l aide de l autre main et faites ...

Страница 17: ... la cartouche de solution du système de rasage HydraClean quand le témoin d état s allume Le tableau cidessous peut vous servir de guide Rasage Nettoyage Utilisation 1 fois jour 1 fois jour environ 30 fois 1 fois tous les 3 jours environ 10 fois 1 fois semaine environ 4 fois La date limite d utilisation du liquide de nettoyage est de 6 mois après son ouverture Si vous n utilisez pas le liquide de ...

Страница 18: ...arre environ 6 secondes après la sélection Le fonctionnement s arrête immédiatement en cas de coupure de courant Dans ce cas sélectionnez à nouveau l utilisation souhaitée Ne retirez pas la cartouche de détergent ou le réservoir d eau car cela pourrait entraîner une fuite du liquide de nettoyage et un dysfonctionnement Utilisation Indications de sélection d utilisation Sur le rasoir Récapitulatif ...

Страница 19: ...quide de nettoyage ancien du réservoir d eau puis remplissez à nouveau avec de l eau Remplacez l ancienne cartouche de détergent puis redémarrez le type d utilisation Lorsque le témoin d état s éteint Lorsque le témoin d état s allume de nouveau Continuez un type d utilisation Contactez un centre de service agréé Nettoyage du rasoir sans le chargeur autonettoyant Nous vous recommandons de nettoyer...

Страница 20: ...e de protection du système une fois par an lame intérieure du système une fois tous les deux ans 1 Appuyez sur les boutons et soulevez comme indiqué sur l illustration 2 Retirez les lames intérieures une à la fois comme indiqué sur l illustration Ne touchez pas le fil partie métallique des lames intérieures pour ne pas vous blesser les mains 3 Insérez les lames intérieures une à la fois jusqu à ce...

Страница 21: ...nt toute trace de poils collés à l intérieur du plateau de nettoyage à l aide d un chiffon ou d un mouchoir en papier humidifié avec de l eau Nettoyez les coins et les parties inégales du plateau de nettoyage à l aide d un coton tige humidifié avec de l eau Ne forcez pas en tirant sur le protecteur de lame en caoutchouc situé en bas du plateau de nettoyage Le caoutchouc pourrait se détacher si vou...

Страница 22: ...itivo solamente para el uso para el que se ha diseñado como se describe en este manual No utilice ningún accesorio no recomendado por el fabricante 3 Nunca utilice el dispositivo si tiene el cordón o el enchufe dañado si no funciona correctamente o si se ha caído dañado o mojado Devuelva el dispositivo a un centro de servicio para examinarlo y repararlo 4 Mantenga el cable alejado de las superfici...

Страница 23: ...ertical o en el suelo Limpieza de la afeitadora Advertencia Desconecte el cable de alimentación de la afeitadora antes de limpiarla para evitar descargas eléctricas Mantenga insertadas ambas láminas internas Si solamente está insertada una lámina la afeitadora podría dañarse Si limpia la afeitadora con agua no utilice agua salada ni agua caliente No moje la afeitadora con agua durante un largo per...

Страница 24: ...pieza J Línea de alimentación de agua Entorno de funcionamiento para el recargador de limpieza automática Temperatura de funcionamiento 15 35 C 59 95 F Humedad de funcionamiento Menor de 95 Si utiliza el recargador de limpieza automática en temperaturas que excedan el rango anterior pueden aparecer los siguientes problemas El tiempo de carga de la afeitadora aumenta El recargador deja de funcionar...

Страница 25: ...stá deformada ni dañada al instalar la afeitadora La carga inicia cuando los indicadores en el panel LCD se iluminan La carga se completa cuando los indicadores en el panel LCD parpadean Máx 1 hora Carga sin el recargador de limpieza automática La afeitadora puede cargarse también sin el recargador 1 Inserte el enchufe del dispositivo en la afeitadora 2 Enchufe el adaptador en una toma de corrient...

Страница 26: ...utilización 10 aparece y parpadea Una carga completa proporcionará suficiente alimentación durante 14 afeitadas de 3 minutos cada una Utilización de la afeitadora A f e i t a d o 90 1 1 Pulse el interruptor Apagado Encendido 2 2 Sujete la afeitadora como se muestra anteriormente y aféitese Comience a afeitarse aplicando una suave presión sobre la cara Estire la piel con la mano libre y mueva la af...

Страница 27: ...asiado 6 6 Instale el cartucho de detergente 1 Reemplace el Cartucho de Solución HydraClean del Sistema de Afeitado cuando se ilumine la lámpara de estado Utilice la tabla siguiente como guía Afeitado Limpieza Reutilización 1 vez día 1 vez día aprox 30 veces 1 vez 3 días aprox 10 veces 1 vez semana aprox 4 veces La fecha de caducidad del líquido de limpieza es de 6 meses una vez abierto Si no util...

Страница 28: ...enzan aproximadamente 6 segundos después de su selección El programa será abortado si se corta la energía En este caso reinicie el programa de nuevo desde el principio No retire el cartucho de detergente ni el depósito de agua ya que el líquido de limpieza podría salpicar causando averías Programa Indicaciones de selección de programa En la afeitadora Resumen al final del programa En el recargador...

Страница 29: ... el líquido de limpieza anterior del depósito de agua y a continuación rellénelo con agua Reemplace el cartucho antiguo de detergente y a continuación reinicie el programa Cuando la lámpara de estado se apaga Cuando la lámpara de estado vuelve a iluminarse Continúe con el programa Póngase en contacto con un centro de servicio autorizado Limpieza de la afeitadora sin el recargador de limpieza autom...

Страница 30: ...ma una vez al año cuchilla interna una vez cada dos años 1 Pulse los botones y levántelas hacia arriba como se muestra en la ilustración 2 Retire las cuchillas internas de una en una como se muestra en la ilustración No toque los bordes partes de metal de las cuchillas internas para evitar daños en las manos 3 Inserte las cuchillas internas de una en una hasta que hagan clic tal y como se muestra ...

Страница 31: ...r el agujero de salida con un palillo de dientes etc 1 Retirar la batería recargable interna ATENCIÓN El producto que ha comprado se alimenta con una batería de iones Litio reciclable Llame al teléfono 1 800 8 BATTERY para obtener información acerca de cómo reciclar la batería R B R C L i i o n T M ADVERTENCIA para la Batería de Litio Riesgos de Fuego explosión y severas quemaduras No prense desar...

Страница 32: ...sauga Ontario L4W 2T3 905 624 5010 En México Panasonic de México S A de C V México D F Moras No 313 Col Tlacoquemecatl del Valle Del Benito Juarez Mexico D F C P 03200 R F C PME 780907754 Tel 54 88 10 00 Service Assistance Accessories Dépannage Assistance Accessoires Call 1 800 338 0552 In USA http www panasonic com shavers http www panasonic com consumersupport Call 1 800 561 5505 In Canada Compo...

Отзывы: