background image

5

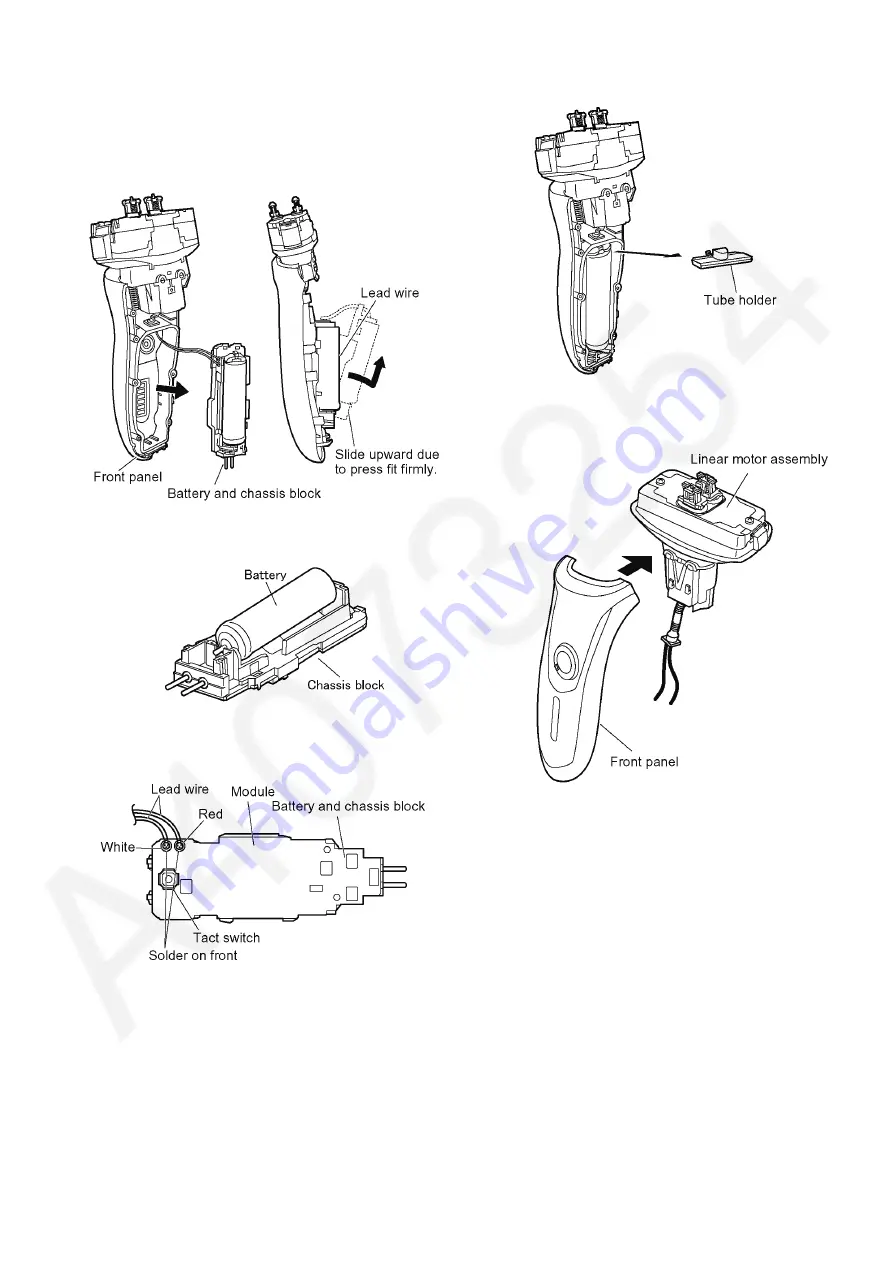
5. Pull up the battery and chassis block from the linear

motor side first.  Then, slide it upward and take it out from
the front panel.

NOTE:

Do not pull the battery and chassis block forcefully
due to connecting the linear motor by the lead wires.

6. Take out the battery from the chassis.

7. Unsolder the lead wires from the module.

8. Take out the tube holder.

9. Move gently the linear motor assembly down and unhook

it and remove the float springs from the front panel.

Содержание ES-RF41

Страница 1: ... is a violation of law Order Number SD1009U61CE E6 Rechargeable Shaver Model No ES RF41 ES RF31 America TABLE OF CONTENTS PAGE PAGE 1 Warning 2 2 Specifications 2 3 Troubleshooting Guide 3 4 Disassembly and Assembly Instructions 4 5 Schematic Diagram 7 6 Exploded View and Replacement Parts List 8 ...

Страница 2: ...ng point is 50 70 F 30 40 C higher Please use a soldering iron with temperature control and adjust it to 750 20 F 400 10 C In case of using high temperature solder ing iron please be careful not to heat too long Pb free solder will tend to splash when heated too high about 1100 F 600 C 2 Specifications ...

Страница 3: ...3 3 Troubleshooting Guide ...

Страница 4: ...2 Slide the trimmer handle and unhook the trimmer handle by inserting something like a slotted screwdriver or plastic spatula into a slit 3 How to disassemble the housing a Loosen a screw b Slide the rear panel and remove it c Loosen 8 screws d Remove the housing 4 To remove the trimmer driving bar or the slit blade driving bar press bars outward ...

Страница 5: ...el NOTE Do not pull the battery and chassis block forcefully due to connecting the linear motor by the lead wires 6 Take out the battery from the chassis 7 Unsolder the lead wires from the module 8 Take out the tube holder 9 Move gently the linear motor assembly down and unhook it and remove the float springs from the front panel ...

Страница 6: ...t covered with waterproof seal 1 Solder the lead wires with the module NOTE Make sure of the color of lead wires 2 When inserting the module and chassis block into the front panel confirm if the module does not get any dam age or deformation 3 Twist the lead wires and place them in the ribs 4 Set the trimmer driving bar and the slit blade driving bar ...

Страница 7: ...7 5 Schematic Diagram 5 1 ES RF41 5 2 ES RF31 ...

Страница 8: ...Model No ES RF41 Exploded View for ES RF41 6 Exploded View and Replacement Parts List ...

Страница 9: ...ER 1 BG 10 WES7046L0237 TUBE HOLDER 1 BG 11 WESRF41S3858 FRONT PANEL 1 BG 12 WESRF41K3068 HOUSING 1 BG 13 WES7023L6058 TAPPING SCREW 1 K2 8 BG 14 WES8176L6007 P TIGHT SCREW 1 M2 12 BG 15 WESRF41L2128 MODULE 1 BG 16 WES8176L2509 LITHIUM ION STORAGE BATTERY 1 LM ION TYPE BG 17 WESRF41K1508 TRIMMER 1 BG 18 WESRF41K3369 REAR PANEL 1 BG 19 WESRF41K3039 BODY BLOCK 1 BG 20 WESRF41K7658 CHARGING ADAPTOR 1...

Страница 10: ...Model No ES RF31 Exploded View for ES RF31 ...

Страница 11: ...27 WATERPROOF RUBBER 1 BG 10 WES7046L0237 TUBE HOLDER 1 BG 11 WESRF31S3858 FRONT PANEL 1 BG 12 WESRF41K3068 HOUSING 1 BG 13 WES7023L6058 TAPPING SCREW 1 K2 8 BG 14 WES8176L6007 P TIGHT SCREW 1 M2 12 BG 15 WESRF31L2128 MODULE 1 BG 16 WES8176L2509 LITHIUM ION STORAGE BATTERY 1 LM ION TYPE BG 17 WESRF41K1508 TRIMMER 1 BG 18 WESRF31K3369 REAR PANEL 1 BG 19 WESRF31K3039 BODY BLOCK 1 BG 20 WESRF41K7658 ...

Отзывы: