background image

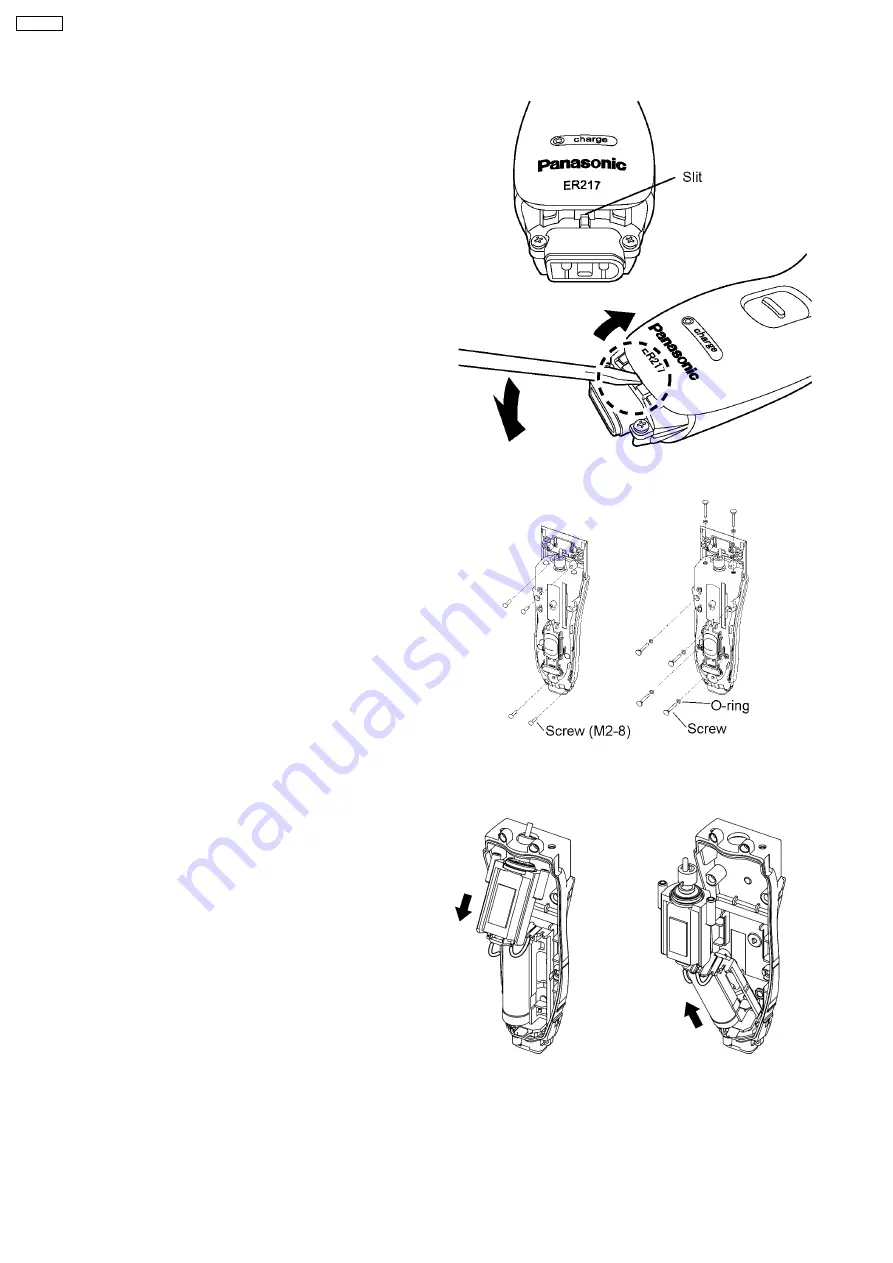
 6. To separate the housing C and B, insert a slotted-head

screw driver into the slit of housing.
Raise the housing C with the driver slightly and open the
housings with hand slowly.

NOTE: In case of the housings can not be opened,
insert the driver further (depth to the lamp cover).

 7. Loosen two screws on both top and bottom of housing A.

And remove the housing A after loosing six screws.

 8. Take out the motor, module and battery assembly from

housing A.

 9. Take out the rechargeable battery from the battery holder

and the motor from the motor holder.

4

ER217-E2

Содержание ER217-E2

Страница 1: ...TRUCTIONS 5 2006 Matsushita Electric Works Ltd All rights reserved Unauthorized copying and distribution is a violation of law ER217 E2 5 TROUBLESHOOTING GUIDE 7 6 EXPLODED VIEW 8 7 REPLACEMENT PARTS LIST 9 AC Rechargeable Beard Hair Trimmer SPECIFICATIONS CONTENTS Page Page ORDER NO SD0604E33CE ...

Страница 2: ...1 SCHEMATIC DIAGRAM 2 WIRING CONNECTION DIAGRAM 2 ER217 E2 ...

Страница 3: ...he slit of dial cover and raise it with the driver NOTE Make sure there is NO scratch or damage on the parts 4 Loosen a screw and take out the dial mounting base the trimming length indicator ring with the dial 5 Loosen two screws tightening the blade spring 3 DISASSEMBLY INSTRUCTIONS Follow the procedure below to disassemble the main body 3 ER217 E2 ...

Страница 4: ...ly NOTE In case of the housings can not be opened insert the driver further depth to the lamp cover 7 Loosen two screws on both top and bottom of housing A And remove the housing A after loosing six screws 8 Take out the motor module and battery assembly from housing A 9 Take out the rechargeable battery from the battery holder and the motor from the motor holder 4 ER217 E2 ...

Страница 5: ...rminal side first and then place the motor holder NOTE Make sure that two motor lead wires are set within the space between the battery holder and the motor holder to prevent pinching NOTE Make sure to attach the switch cam with the lowest position 3 Attach the housing O ring to the housing B 4 Set the housing A onto the housing B with tightening ten screws starting from the upper face of housing ...

Страница 6: ...the housing C firmly and tighten two screws 9 Place the dial with setting the triangle mark on top 10 Place the trimming length indicator ring with inserting the projection into the groove of the dial 11 Set the dial mounting base aligning the projection with the triangle mark on dial and tighten a screw 12 Place the dial cover 13 Attach the bottom cover with a screw 6 ER217 E2 ...

Страница 7: ...Fig 1 Fig 2 5 TROUBLESHOOTING GUIDE Refer to WIRING CONNECTION DIAGRAM 7 ER217 E2 ...

Страница 8: ...6 EXPLODED VIEW 8 ER217 E2 ...

Страница 9: ... BG 2 12 WER221L1578 CLICK SPRING BG 1 13 WES631W6057 TAPPING SCREW C K2 8 BG 6 14 WER217H3058 HOUSING A BG 1 15 WER217L1678 SWITCH CAM BG 1 16 WES7025L9707 SCREW C BG 6 17 WER217L0967 O RING B 6PCS PK BG 6 18 WER217L3577 MOTOR HOLDER BG 1 19 WER217L1008 MOTOR BG 1 20 WER217L2508 RECHARGEABLE BATTERY NI MH TYPE BG 1 21 WER217L0318 CUSHION B 2PCS PK BG 1 22 WES7025L0977 O RING AND WASHER B 2PCS PK ...

Отзывы: