background image


6

13

 Back Cover

14

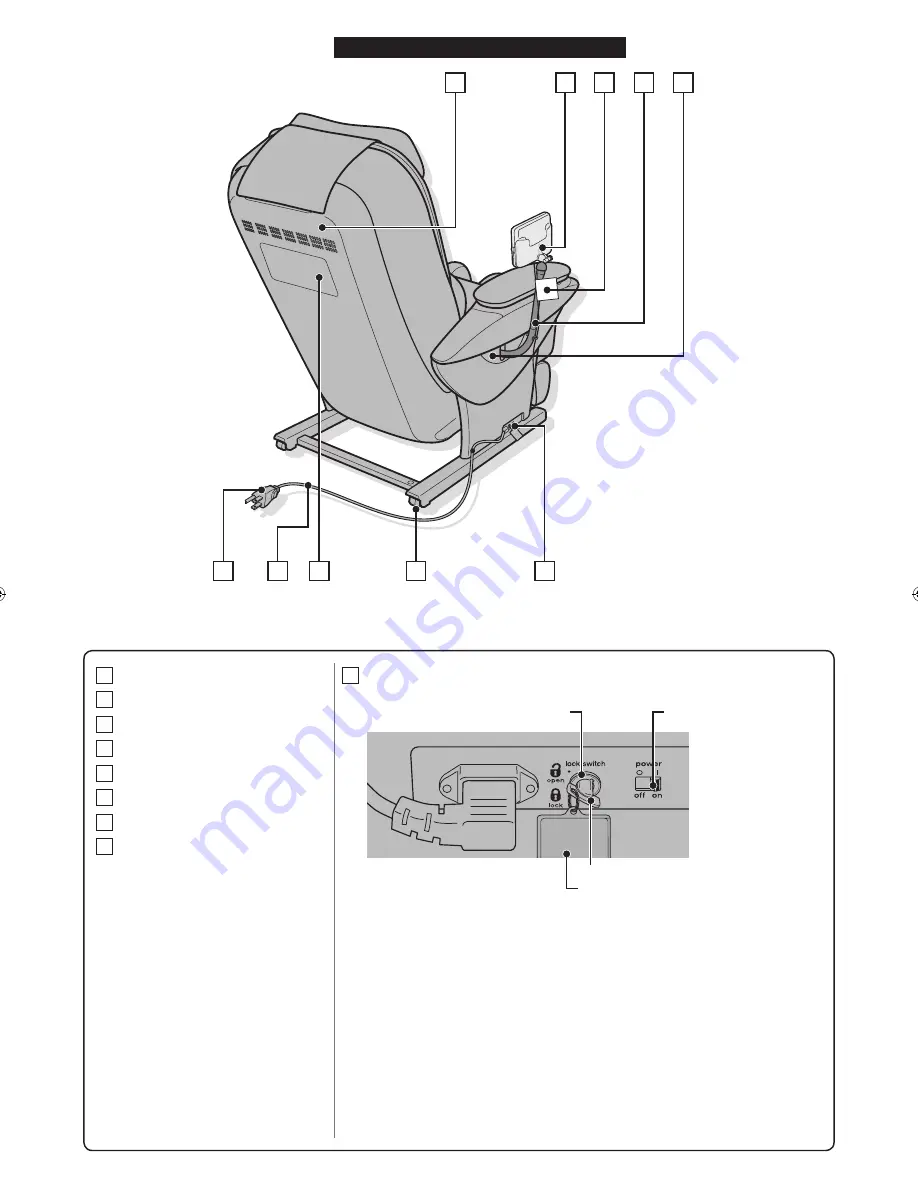
 Control Panel Holder

15

 Child Safety Decal

16

 Control Panel Stand

17

 Power Plug

18

 Power Cord

19

 Safety Precaution Label

20

 Wheels

21

 Power Supply Box

Lock Switch

Power Switch

Lock Switch Key
Lock Switch Key Tag

For preventing children from 
swallowing it by accident

16

12

13

14

15

21

20

19

18

17

Back

EP30005.indb   6

2007/07/19   13:10:24

Содержание EP30005KU

Страница 1: ...ico Model No Nº de Modelo EP30005 Operating Instructions Instrucciones de Uso Before operating this unit please read these instructions completely Antes de utilizar esta unidad lea compleatamente estas instrucciones y guárdelas para referencia futura ...

Страница 2: ...er operate the unit if it has a damaged power cord or plug Return the unit to the nearest authorized service center if it is not working properly if it has been dropped or damaged or if it has been immersed in water 9 Keep power cords away from heated surfaces Do not carry the unit by the power cord 10 Never block the air openings during operation and make sure that all air openings are kept free ...

Страница 3: ... using it You can gradually increase the duration and strength of the massage as you become used to it Do not massage any one point for more than 5 minutes at a time Excessive massaging can overstimulate the muscles and nerves and result in an adverse effect To prevent excessive massaging do not use the massager for more than a total of 15 minutes each session After approximately 15 minutes the ma...

Страница 4: ... Do not repeatedly operate any switch at short intervals Such action may cause the switch to malfunction 7 Some noise may be heard coming from the massager while in use This is due to the structure of the massager and is normal 8 Make sure there are no obstacles behind the chair before reclining it The chair can be reclined to a maximum angle of 170 If the back hits a wall or pillar the chair may ...

Страница 5: ...ction of the equipment grounding conductor can result in a risk of electric shock Check with a qualified electrician or serviceman if you are in doubt as to whether the product is properly grounded Do not modify the plug provided with the product if it will not fit the outlet have a proper outlet installed by a qualified electrician This product is for use on a nominal 120 volt circuit and has a g...

Страница 6: ... Sole massage section Includes air massage function Sole Reflexology Plates Removable Position adjustment possible 3 Legrest Slide Lever Extendable length to approx 5 in 12 cm 4 Control Panel See page 7 to 8 5 Retracted position of massage heads 6 Back Cushion 7 Pillow 8 Backrest Includes integrated massage heads 9 Seat Includes integrated air massage function 8 7 6 5 4 3 1 2 9 10 11 12 Front ...

Страница 7: ...l 16 Control Panel Stand 17 Power Plug 18 Power Cord 19 Safety Precaution Label 20 Wheels 21 Power Supply Box Lock Switch Power Switch Lock Switch Key Lock Switch Key Tag For preventing children from swallowing it by accident 16 12 13 14 15 21 20 19 18 17 Back ...

Страница 8: ...ge immediately 3 User Memory See page 38 to 40 4 Program Selection See page 18 5 Ottoman Angle Adjustment See page 34 6 Reclining Angle Adjustment See page 34 7 Display This illustration simulates when all lights are illuminated See page 8 8 Voice Guidance Volume See page 36 9 Ultra Knead Ultra Knead is the name of the massage actions See page 26 to 27 10 Repeat See page 27 11 Massage Style Select...

Страница 9: ...e 36 Off Soft Medium Loud 2 Time Remaining Display During massage After finishing massage 3 Ultra Knead Repeat Display See page 27 Ultra knead Repeat 4 User Memory Display Illuminated when operating the User Memory function See page 38 to 40 5 Pressure Display Displays the pressure applied by the massage heads 6 Massage Style Display Displays the current massage style Thumb like action Palm like a...

Страница 10: ...he right Install the unit near a power outlet Keep at least 4 10 cm away from the wall Approx 77 195 cm Width approx 33 84 cm Approx 12 30 cm Approx 14 35 cm Mat Area where legrest could touch the floor Area where unit touches the floor 2 Removing everything from the box and installing the unit Use care to prevent lower back and other injuries that could occur when lifting this heavy object approx...

Страница 11: ...Plates This is installed on the sole massage section prior to leaving the factory Operating Instructions Child Safety Instructions Yellow brochure How to transport and move Yellow brochure Notes for body scanning Pink brochure Quick Start Manual Documents including the Operating Instructions Width Approx 27 68 cm Height Approx 26 66 cm Length Approx 63 160 cm Lock Switch Keys 2 One of the lock swi...

Страница 12: ...tachment Screw M6 16 4 Black 2 Silver 2 Make sure that the seat surface is not damaged 2 Connecting the air plugs On both the right and left sides Insert the air plugs into the unit Push on the air plugs until you hear it click into place Air plug Groove Armrest 1 Align the position Main unit Pipe Right Left indication 2 Fasten the armrest with the attachment screws Attachment Screw Allen key Outs...

Страница 13: ...attachment screws Tighten the two screws for the remaining two holes lightly by hand and then tighten firmly with the allen key 2 Control panel stand 1 Insert the attachment screw in either hole and then tighten Attachment screw Allen key Use this screw Attachment Screw M6 16 3 Silver 3 Cover for Side WITH Control Panel Stand Cover for Side WITHOUT Control Panel Stand Notches Top tabs Control pane...

Страница 14: ... Performing this procedure with the allen key or a Phillips screwdriver could damage the unit 5 Raising the backrest to the upright position 1 Insert the power plug into the power outlet 2 Confirm the key lock is set to the open position 3 Confirm the power switch is set to the on position 4 Press the button on the control panel twice The backrest will rise to the upright position automatically Fl...

Страница 15: ...e the control panel cord from the cord holder groove 4 Move the control panel cord under the legrest to the left side 5 Fasten the control panel cord at two points in the cord holder groove 6 Placing the control panel into the control panel stand 1 Fit the groove on the side of the control panel to the projection on the inside of the holder Legrest Cord Holder Groove Control Panel Cord Push in Con...

Страница 16: ...ro fasteners See page 37 for a guide to the position of the pillow Pillow Velcro fasteners 2 Fasten the control panel cord using the clip Clip Control panel cord Fasten the cord so that the portion under the clip is not slack Lift the control panel to remove ...

Страница 17: ...plug into an electrical outlet 2 Turn the lock switch key to the open position 3 Slide the power switch to the on position Warning Insert the power plug firmly until it stops completely Failure to observe this precaution may result in electric shocks or fires due to heat generation Do not exceed the rated values of the plug and the wiring or use any voltage other than the rated voltage The unit ca...

Страница 18: ...ered position Failure to observe this precaution may result in accident or injury from the foot part of the legrest turning or the unit tipping over To lower the legrest Make sure the legrest has fully returned to the original position by pulling the legrest slide lever and then press the button twice 2 Make sure there is no foreign objects on the chair Caution Sit on the unit after confirming the...

Страница 19: ...ses mainly shiatsu massage to loosen up deep seated knots of tension Recommended for those with severe stiffness and tension STRETCH Uses mainly compression to slowly stretch muscles and joints Recommended when a refreshing stretch is desired DEEP Uses mainly kneading to manipulate and loosen muscles Recommended for those with mild stiffness and tension QUICK Covers all areas using a variety of ma...

Страница 20: ...ns Lifting your head from the pillow will result in incorrect determination of the shoulder position 3 Confirm that the shoulder position has been correctly determined according to the position of the soft tapping Too low Too high Correct position of the massage head The point where the tapping action should be felt When the shoulder position is incorrect adjust the shoulder position while the sof...

Страница 21: ... change the massage style see page 27 If you want to finish a massage see page 41 and 42 Caution Remove hard objects such as false fingernails wristwatches or rings when massaging the hands or arms Remove hard objects from the pockets of your trousers when massaging seat thigh Failure to do so may result in injury Adjust the length of the legrest to accommodate the position of the backs of your ca...

Страница 22: ...eading Grasp of neck Shoulder 6 Ultra knead Kneading of Lower back 7 Ultra knead Kneading Grasp of Shoulder 8 Finishing Touches Swedish Program III 1 Ultra knead Swedish from Neck to Lower back 2 Swedish on Neck Shoulder 3 Ultra knead Swedish on Back Lower back 4 Swedish on Neck Shoulder 5 Ultra knead Swedish on Back Lower back 6 Swedish from Neck to Lower back 7 Finishing Touches Stretch Program ...

Страница 23: ...back and lower back by selecting from levels 0 no massage to 3 longest and most intense 1 Press the button to turn on the power The power will turn off automatically if no operation is executed for 3 minutes without performing massage 2 Open the right cover and press the button The self program setting display on the top right of the display will flash Display ...

Страница 24: ... be set according to the settings picked by the user Fewer bars means both less time and less strength If you don t want a massage at all in an area set the bars to 0 Massage Sequence The massage starts in the area with the highest numbers of bars selected and moves successively from highest to lowest If the levels of fatigue are the same the massage will follow the sequence of NECK SHOULDER MIDDL...

Страница 25: ...orite action by selecting neck shoulder back or lower back and an action 1 Press the button to turn on the power The power will turn off automatically if no operation is executed for 3 minutes without performing massage 2 Open the right cover and press the button The manual setting display on the top right of the display will flash Display ...

Страница 26: ...anning Body scanning for Manual Operation For the Neck Shoulder Normal body scanning Back Lower back Simple body scanning The massage heads will not come up to the shoulder position To change an action in the middle of a massage Select your favorite one again in Steps 3 to 5 Press the button within approximately 30 seconds after reselecting an action in Step 3 otherwise the reselection will be can...

Страница 27: ...e the speed will increase and decrease gradually TAP 2 Adding tapping where the speed is fast and slow reciprocally REGIONAL ROLL Adding actions that move partly in the vertical direction AUTO WIDTH Adding actions that move in the horizontal direction in 1 5 3 8 cm During a massage To change off on for LEG FOOT SEAT or HAND ARM and adjust its intensity see page 30 If you want to turn the stretch m...

Страница 28: ...style For details about the massage style see page 29 Display For the Pre Program Quick Massage and Self Program It is possible to use the selected massage style only If the STYLE button is not pressed the massage style will change automatically during the massage Press the same STYLE button again to toggle that type of massage off Only the selected massage style button will turn on For Manual Ope...

Страница 29: ...on The position may not change immediately if the button is pressed in the middle of an action For the Pre Program Quick Massage and Self Program Fine adjustment is possible Maximum numbers of adjustment At some positions it is impossible to adjust twice Twice Twice Twice Twice Adjustable range Approx 0 9 2 4 cm Approx 0 5 1 2 cm Approx 0 3 0 8 cm Approx 0 9 2 4 cm Approx 0 5 1 2 cm Approx 0 2 0 4...

Страница 30: ...a fist which presses softly on the back These heads will also pivot up to 20 degrees to soften the direct massage strength Width Adjustment Limits Adjustment of range of intensity For a massage of the upper body the maximum depth and intensity of the massage heads are limited for safety reasons The intensity at Range B or C in the right figure can be set to stronger than Range A Adjustment is poss...

Страница 31: ... or on Display To execute the air massage only After turning on the power by pressing the button press the or button The power will turn off automatically if no operation is executed for 3 minutes It is possible to confirm whether the air massage is turned on or off on the display The lamp is turned on ON the lamp is turned off OFF Hand Arm Leg Sole Seat Adjusting the intensity Press the button to...

Страница 32: ... of your feet to slide the legrest out Raise the legs slightly and the legrest returns Tall people will have a better fit by lowering the legrest somewhat Press the button For those who are very tall or for those who want a complete calf massage the ottoman pivots down around the ankle Sole section For the foot reflexology plate The plate is removable Opening To insert the plate Each plate is diff...

Страница 33: ...so may result in injury Position the forearm and hand at the center of the armrest Insert the hand all the way inside Center of the armrest Raise the backrest if any difficulty is experienced when positioning the hand and forearm How to use the hand arm massage 1 Lift the hand arm massage section up 2 Insert the hand with fingers extended ...

Страница 34: ... indicate if the stretch function is turned on or off The lamp is turned on ON the lamp is turned off OFF Arm stretch Leg stretch Operations of the leg stretch 1 After grasping the legs with air the legs are stretched as the legrest is lowered approximately 10 degrees from the massage position 2 Once the legrest returns to the original angle the legrest is then lowered approximately 30 degrees to ...

Страница 35: ...button to adjust the angle Movement will continue until a beep beep beep sound is heard if the buttons are held down The legrest will start to move shortly after the backrest Approx 85 Approx 120 Approx 170 If the backrest reclines to an angle where you cannot touch the buttons on the control panel from the seat hold the control panel in your hand Approx 0 ...

Страница 36: ... the legrest slide lever The legrest will slide approximately 5 12 cm Pull the legrest slide lever back Push with soles of feet and the legrest slides out Raise legs slightly and legrest returns 2 Release the legrest slide lever when it reaches your favorite position Legrest slide lever ...

Страница 37: ...o adjust the volume Volume Display Off Soft Medium Default Setting Loud The single beep when a button is pressed and the triple beep when the adjustable setting limit is reached will always be audible Press the button to shift the volume level by one up down ...

Страница 38: ...g a massage 1 Remove the pillow 2 Adjust the height of the pillow so that the bottom edge is at ear level 3 Attach the pillow on the velcro fasteners Pillow If positioned too low the pillow may interfere with a massage of the area around the neck Lower edge of the pillow Ear level When the reclining angle changes the position of the pillow may shift In that case adjust the position again Pillow Ve...

Страница 39: ...rn on When the selected button starts flashing quickly Other settings are already saved To update with new program settings press the same button again To maintain the saved programs press a different button The operation must be executed within approximately 15 seconds after the button starts flashing quickly When you want to use your saved massage settings 1 Press the button to turn on the power...

Страница 40: ... be deleted See pages 27 to 28 for detailed functions Style The massage style that is selected last will be saved Settings for an entire program will be saved See pages 27 and 29 for detailed functions Leg stretch settings Air massage settings Self program levels Intensity of massage heads For Manual Operation Leg stretch settings Air massage settings Massage style Massage head position Speed tapp...

Страница 41: ...button corresponding to the settings you wish to delete Only the button pressed will illuminate 3 Confirm the program selection buttons flash 4 Press the same button again and hold for 3 or more seconds The pressed button will flash 5 Press the button once again while it is flashing for approximately 15 seconds The change from flashing to steady indicates that the deletion is complete ...

Страница 42: ...eads move to the retracted position The legrest lowers and the backrest rises automatically The backrest will move after the massage heads retract Pull the legrest slide lever back Raise the legs slightly and the legrest returns When the massage is complete The buttons will flash and the unit ready to save any settings that changed during the massage Not saving the settings It is not necessary to ...

Страница 43: ...ock or short circuit Unplug the power plug from the outlet when the unit is not in use Failure to observe this precaution may result in electrical fire due to deterioration of insulation caused by dust and moisture Keep the lock switch key out of reach of children Failure to observe this precaution may result in accident or injury due to accidental ingestion or children playing with the controls 1...

Страница 44: ... more quickly Since colors may transfer from clothing to the synthetic leather surface be careful when using the unit with clothing such as jeans or colored clothes Do not allow these areas to come in contact with plastic for extended periods of time as this may lead to discoloration Do not use thinners benzine or alcohol Pipe and Plastic Area 1 Wipe the unit with a cloth moistened with mild deter...

Страница 45: ...r which may lead to damage or injury Lifting the Unit Move the unit by having one person firmly hold onto the fabric section on the underside of the legrest and another person use the groove on the back cover of the backrest Please hold the groove and the legrest securely to avoid dropping the unit as it may damage the floor Fabric section Groove Place the control panel on the seat Legrest Back co...

Страница 46: ... damaging the floor Wheels Lift it no higher than waist height Hold onto the fabric section on the underside of the legrest To put the unit down on the floor Put the unit down carefully making sure your feet are clear of the base Put down the legrest by holding it with your hands until it has been set on the floor completely If you release your hands before the legrest is fully extended the legres...

Страница 47: ...top again position yourself so that your back is not completely in contact with the backrest Caution should be exercised particularly when used by persons weighing 220 lbs 100 kg or more The massage heads do not come up to the shoulder or neck If your head does not contact the pillow or your back does not contact the backrest the shoulder position may be detected as lower than the actual position ...

Страница 48: ...cm The massage heads move a total of approx 26 in 65 cm Massage area Left Right Distance between massage heads during operation massage width adjustable Neck Shoulder Back Lower back Approx 3 8 in 7 21 cm Massage area Forward back Projected amount of massage head Intensity adjustable Approx 4 in 10 cm Massage speed Tap Approx 250 450 cycles minute single side Full roll Approx 26 92 seconds both wa...

Страница 49: ...N SP Printed in China P93103Z05231 Impreso en China Panasonic Consumer Electronics Company One Panasonic Way 1H 1 Secaucus New Jersey 07094 1 800 338 0552 for questions and comments www panasonic com massage ...

Отзывы: