background image

6

RQT8431

Preparations

1

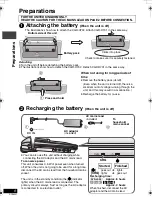
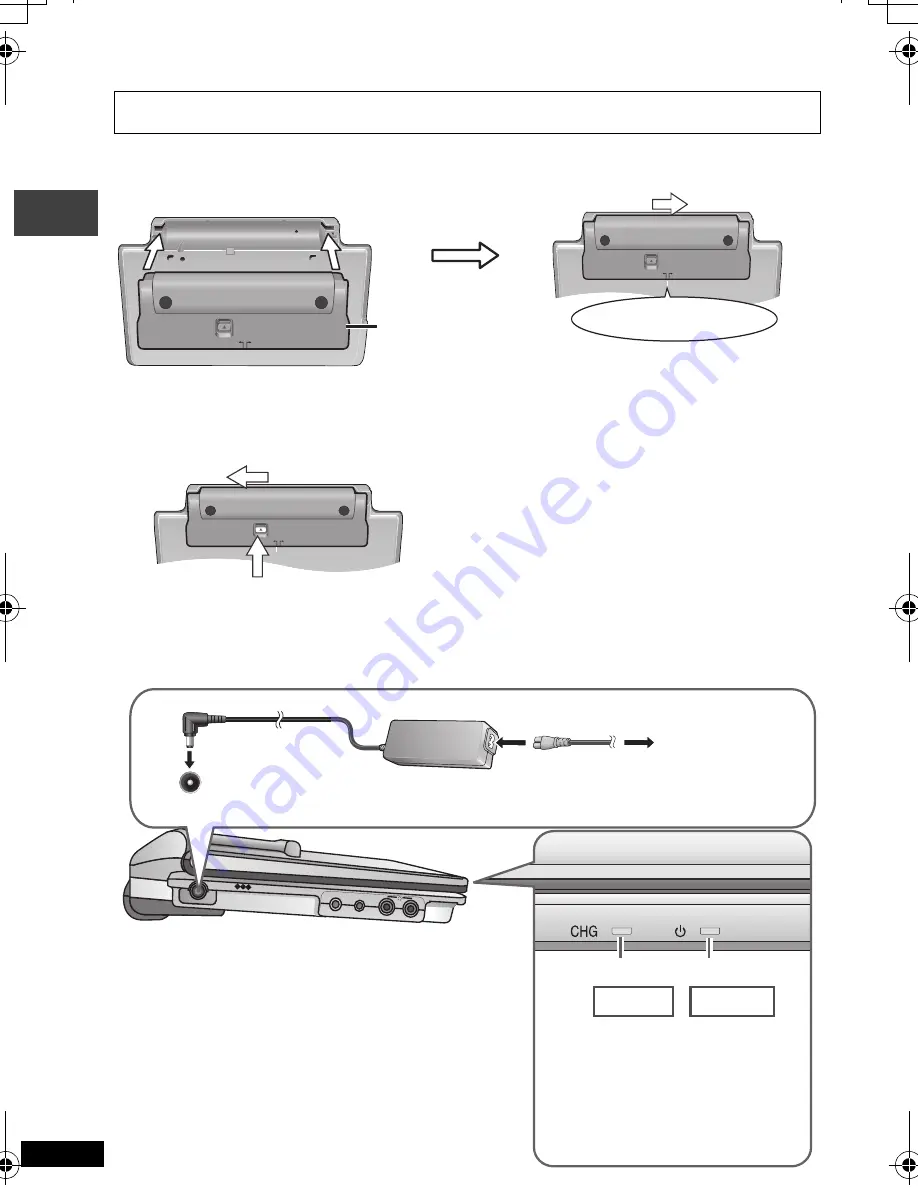
 Attaching the battery 

(When the unit is off)

The illustrations show how to attach the CGR-H702. Attach CGR-H701 in the same way.

Detaching

Turn the unit off before detaching the battery pack.

The illustrations show how to detach the CGR-H702. Detach CGR-H701 in the same way.

When not using for long periods of 
time

Remove the battery pack (

 left). 

(Even when the unit is turned off, there is a 
small amount of voltage running through the 
unit, and this may result in a malfunction.)

Recharge the battery for re-use.

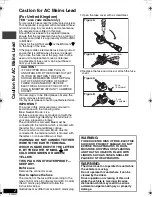
FOR THE UNITED KINGDOM ONLY
READ THE CAUTION FOR THE AC MAINS LEAD ON PAGE 2 BEFORE CONNECTION.

RELEASE

DETACH

ATTACH

Clicks into place

Check to make sure it is securely fastened.

RELEASE

DETACH

ATTACH

Bottom side of this unit

Battery pack

RELEASE

DETACH

ATTACH

1


Press and hold

2

DC IN 12V

VIDEO

AUDIO/OPT OUT

1

2

3

DC IN

DC IN 12 V

%

To 
household 
mains socket

AC adaptor 

(included)

AC mains lead 

(included)

You can also use this unit without charging while 
connecting the AC adaptor and the AC mains lead.

To conserve power

This unit consumes 0.5 W of power even when turned 
off. When the unit is not going to be used for a long time, 
disconnect the AC mains lead from the household mains 
socket.

The unit is in the standby condition (the [

Í

] indicator 

lights) when the AC mains lead is connected. The 
primary circuit is always “live” as long as the AC adaptor 
is connected to an electrical outlet.

2

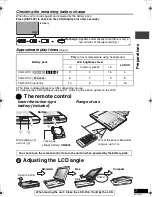
 Recharging the battery 

(When the unit is off)

 [

Í

]

 goes 

out 

➜ 

lights

 [CHG]  

lights 

➜ 

goes out

Recharging time


[DVD-LS90]

:

Approx. 8 hours

[DVD-LS87]


[DVD-LS85]

:

Approx. 4 hours

When finished, disconnect the AC 
adaptor and the AC mains lead.

Í

CHG

Started

Finished

Pre

parat

ions

P2-32 e.fm  Page 6  Thursday, August 25, 2005  3:26 PM

Содержание DVD-LS87

Страница 1: ...ded Note EB on the packaging indicates the United Kingdom Dear customer Thank you for purchasing this product For optimum performance and safety please read these instructions carefully Before connecting operating or adjusting this product please read the instructions completely Please keep this manual for future reference Operations in these instructions are described mainly with the main unit bu...

Страница 2: ...erminal which is marked with the letter L or coloured Brown or Red WARNING DO NOT CONNECT EITHER WIRE TO THE EARTH TERMINAL WHICH IS MARKED WITH THE LETTER E BY THE EARTH SYMBOL Ó OR COLOURED GREEN OR GREEN YELLOW THIS PLUG IS NOT WATERPROOF KEEP DRY Before use Remove the connector cover How to replace the fuse The location of the fuse differ according to the type of AC mains plug figures A and B ...

Страница 3: ...readily operable This product may receive radio interference caused by mobile telephones during use If such interference is apparent please increase separation between the product and the mobile telephone Marking sign is located on bottom of the unit Do not rest the unit on your lap for a long time while using it The unit can become hot and cause burns To prevent damage Avoid the following Sprayin...

Страница 4: ...e through our Internet Accessory ordering application at www panasonic co uk Most major credit and debit cards accepted All enquiries transactions and distribution facilities are provided directly by Panasonic UK Ltd It couldn t be simpler Also available through our Internet is direct shopping for a wide range of finished products take a browse on our website for further details For the United Kin...

Страница 5: ...of disc or condition of the recording Discs that cannot be played DVD Audio DVD ROM Version 1 0 of DVD RW CD ROM CDV CD G SACD DivX Video Discs and Photo CD DVD RAM that cannot be removed from their cartridges 2 6 GB and 5 2 GB DVD RAM and Chaoji VCD available on the market including CVD DVCD and SVCD that do not conform to IEC62107 DVD RAM RAM JPEG RAM Recorded with devices using Version 1 1 of t...

Страница 6: ...om side of this unit Battery pack RELEASE DETACH ATTACH 1 Press and hold 2 DC IN 12V VIDEO AUDIO OPT OUT 1 2 3 DC IN DC IN 12 V To household mains socket AC adaptor included AC mains lead included You can also use this unit without charging while connecting the AC adaptor and the AC mains lead To conserve power This unit consumes 0 5 W of power even when turned off When the unit is not going to be...

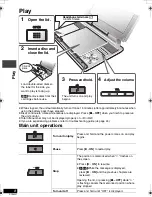
Страница 7: ...phones LCD brightness level LCD Off j5 0 factory preset i5 CGR H701 DVD LS87 DVD LS85 3 2 1 5 4 CGR H702 DVD LS90 6 4 3 8 CGR H703 optional 10 8 6 16 When moving the unit Close the LCD Don t hold by the LCD screen Recharge Appears automatically when there is only a few minutes of charge remaining Insert the button type battery included Range of use 30o 30o 3 1 2 Aim at the sensor Maximum range is ...

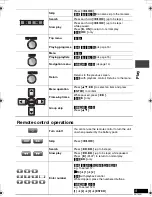
Страница 8: ...ess 1 ON to restart play Stop The position is memorized when flashes on the screen Press 1 ON to resume DVD V While the message is displayed press 1 ON and the previous chapters are reviewed Opening the lid or pressing OFF while is flashing cancels the memorized position where play stopped Turn unit off Press and hold until OFF is displayed 1 Open the lid 2 Insert a disc and close the lid Click in...

Страница 9: ... Menu operation Press 3 42 1 to select an item and press ENTER to confirm Frame by frame While paused press 2 1 VCD 1 only Group skip WMA MP3 JPEG Press 3 4 Turn on off You cannot use the remote control to turn the unit on when powered by the battery pack Skip Press 9 Search Press 6 5 up to 5 steps Slow play Press 6 5 up to 5 steps while paused Press 1 PLAY to return to normal play VCD 5 only Ente...

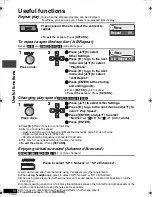
Страница 10: ...he screen Press RETURN Press several times to select the content to repeat To exit the screen Press RETURN Repeat Off Menu ENTER ENTER A B Repeat Menu DISPLAY DISPLAY 1 2 Press once 1 Press 34 to select Other Settings 2 Press 1 to go to the next menu and 34 to select Play Menu 3 Press 1 to go to the next menu and 34 to select A B Repeat 4 Press ENTER at the starting and ending points Press ENTER a...

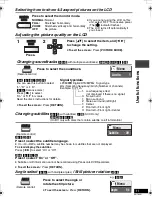
Страница 11: ... LCD turns off automatically if you close it Press to select the monitor mode PICTURE PICTURE MODE MODE ENTER ENTER 1 Press 34 to select the item and 2 1 to change the setting 2 To exit the screen Press PICTURE MODE Press Changing soundtracks DVD V with multiple soundtracks RAM DVD RW VR VCD Press to select the soundtrack RAM DVD RW VR VCD You can use this button to select L R or L R DVD V Karaoke...

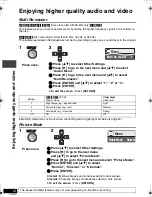
Страница 12: ...he above indicated features may not work depending on the disc s recording ENTER ENTER DISPLAY DISPLAY Press once 1 2 1 Press 34 to select Other Settings 2 Press 1 to go to the next menu and 34 to select Audio Menu 3 Press 1 to go to the next menu and 34 to select Multi Re master 4 Press ENTER and 34 to select 1 2 or 3 5 Press ENTER Menu Multi Re master 1 To exit the screen Press RETURN ENTER ENTE...

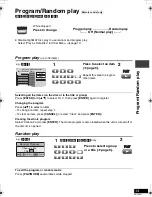
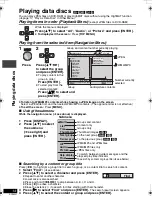
Страница 13: ...ss ENTER Clearing the whole program Select Clear all and press ENTER The whole program is also cleared when the unit is turned off or the disc lid is opened Random play To exit the program or random mode Press PLAYMODE several times while stopped PLAYMODE PLAYMODE While stopped Press to change PLAY PLAY Choose a title and chapter No Time Title Play Clear Clear all Chapter 1 1 1 Press to select an ...

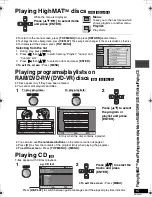
Страница 14: ...ile the menu is displayed Press 34 to select All Audio or Picture and press ENTER To display exit the screen Press TOP MENU MENU MENU 1 ENTER ENTER JPEG Group WMA MP3 Press 3421 to select the group and press ENTER To play content in the group in order Press ENTER To start play from the selected content Press 34 to select and press ENTER Press Navigation Menu DISPLAY RETURN to display the sub menu ...

Страница 15: ... PM Auto action 2 2 2 TUE 2 21 PM Cinema 3 3 3 WED 3 37 PM Music 4 4 10 THU 11 05 AM Baseball 5 Date No On Contents ENTER RETURN to select and press to exit 0 9 T i t l e To play programs ENTER ENTER 2 Press 34 to select the program or playlist and press ENTER You can also use the numbered buttons on the remote control page 9 Press 1 to show the contents of the program Only when playing the progra...

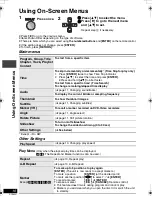
Страница 16: ...splay the current bitrate or sampling frequency Thumbnail To show thumbnail images Subtitle page 11 Changing subtitles Marker VR To recall a marker recorded on DVD Video recorders Angle page 11 Angle select Rotate Picture page 11 Still picture rotation Slideshow To turn on off slideshow To change the slideshow timing 0 to 30 sec Other Settings See below Play Speed page 10 Changing play speed Repea...

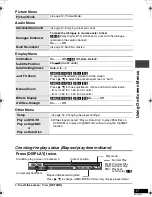
Страница 17: ... fit the screen Press 3 4 to select the preset aspect ratio or Auto Manual Zoom RAM DVD RW VR DVD V VCD Press 3 4 for fine adjustments Press and hold to alter faster from k1 00 to k1 60 in 0 01 units from k1 60 to k2 00 in 0 02 units Bitrate Display RAM DVD RW VR DVD V VCD On Off GUI See through On Off Setup page 18 Changing the player settings Play as DVD VR Play as HighMAT or Play as Data Disc W...

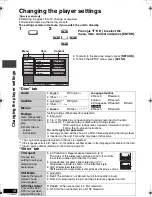
Страница 18: ...screen will be shown if a DVD Video exceeding the ratings level is inserted in the unit Follow the on screen instructions TV Aspect Choose the setting to suit your television and preference 4 3 Pan Scan Regular aspect television 4 3 The sides of the widescreen picture are cut off so it fills the screen unless prohibited by the disc 4 3 Letterbox Regular aspect television 4 3 Widescreen picture is ...

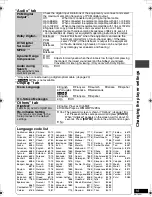
Страница 19: ...default settings Yes The password screen is shown if Ratings page 18 is set Please enter the same password and press ENTER When Initialized appears on the screen wait for about 10 seconds Press ENTER and turn the unit off and on again No Language code list Abkhazian 6566 Afar 6565 Afrikaans 6570 Albanian 8381 Ameharic 6577 Arabic 6582 Armenian 7289 Assamese 6583 Aymara 6589 Azerbaijani 6590 Bashki...

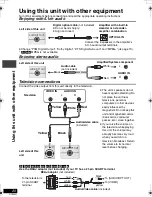
Страница 20: ...d L R Amplifier System component AUDIO IN VIDEO VIDEO AUDIO OPT OUT AUDIO OPT OUT Television AUDIO IN L R VIDEO IN Audio video cable included Yellow Black Left side of this unit Yellow White Red The unit s speakers do not have magnetic shielding Do not place the unit near televisions personal computers or other devices easily influenced by magnetism Do not keep this unit and magnetized cards bank ...

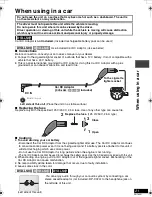
Страница 21: ...The Car DC Adaptor cannot be used to recharge the battery pack Use the AC adaptor included with this unit When starting an engine pull Car DC Adaptor out of the cigarette lighter socket Mishandling of the Car DC Adaptor can cause malfunction No responsibility will be taken for damage that occurs due to faulty installation Leave some slack in the cord DVD LS90 DVD LS87 DVD LS85 You can enjoy audio ...

Страница 22: ...a functions not supported by DCF like automatic picture rotation may not be displayed Files that have been altered edited or saved with computer picture editing software may not be displayed This unit cannot display moving pictures MOTION JPEG and other such formats still pictures other than JPEG e g TIFF or play pictures with attached audio What kind of equipment is necessary to enjoy 5 1ch audio...

Страница 23: ...ption using included AC adaptor 13 W Unit only 10 W Power consumption in Standby mode using included AC adaptor approx 0 5 W Power consumption in Recharge mode using included AC adaptor 13 W AC adaptor Power source AC 100 to 240 V 50 60 Hz Power consumption 28 W DC output 12 V 1 5 A Car DC Adaptor DVD LS90 DVD LS87 included DC input 12 V 20 W DC output 12 V 1 5 A Battery pack lithium ion CGR H702 ...

Страница 24: ...her than the ones listed in these operating instructions 5 The unit may not be operating properly due to lightning static electricity or some other external factor Turn the unit off and then back to ON Alternatively turn the unit off disconnect the power source AC or battery pack and then reconnect it Condensation has formed Wait 1 to 2 hours for it to evaporate No response when remote control but...

Страница 25: ...ark scenes and may not work depending on the type of disc Sound distorted Select Off in Advanced Surround 10 Move unit away from mobile phones Noise may occur when playing WMA files Piercing noise comes from the speakers If you have connected a digital amplifier which does not include decoder be sure to select PCM in Dolby Digital DTS Digital Surround or MPEG in Audio tab 19 Effects do not work No...

Страница 26: ...for On Screen Messages in Display tab 19 Check the disc Clean the disc Below ERROR 01 A problem has occurred with the battery pack Consult your dealer ERROR 02 The battery pack has been recharging for 12 hours but has failed to recharge for some reason Recharge again ERROR 03 You are recharging in a location that is too hot or too cold Recharge at normal temperature i5 to i35 oC H stands for a num...

Страница 27: ...s smaller than that of MP3 Information on Disposal for Users of Waste Electrical Electronic Equipment private households This symbol on the products and or accompanying documents means that used electrical and electronic products should not be mixed with general household waste For proper treatment recovery and recycling please take these products to designated collection points where they will be...

Страница 28: ...age 11 Still picture rotation page 11 Shows On Screen Menus page 16 Changes soundtracks page 11 Changes subtitles page 11 Shows a disc top menu page 9 Shows a program list page 15 program random play page 13 Clears an item page 13 Shows a disc top menu page 9 Shows a program list page 15 Shows On Screen Menus page 16 Adjusts the volume page 8 Shows a disc menu pages 9 14 Shows a playlist page 15 T...

Отзывы: