background image

Chapter 7

Subscriber Features    73

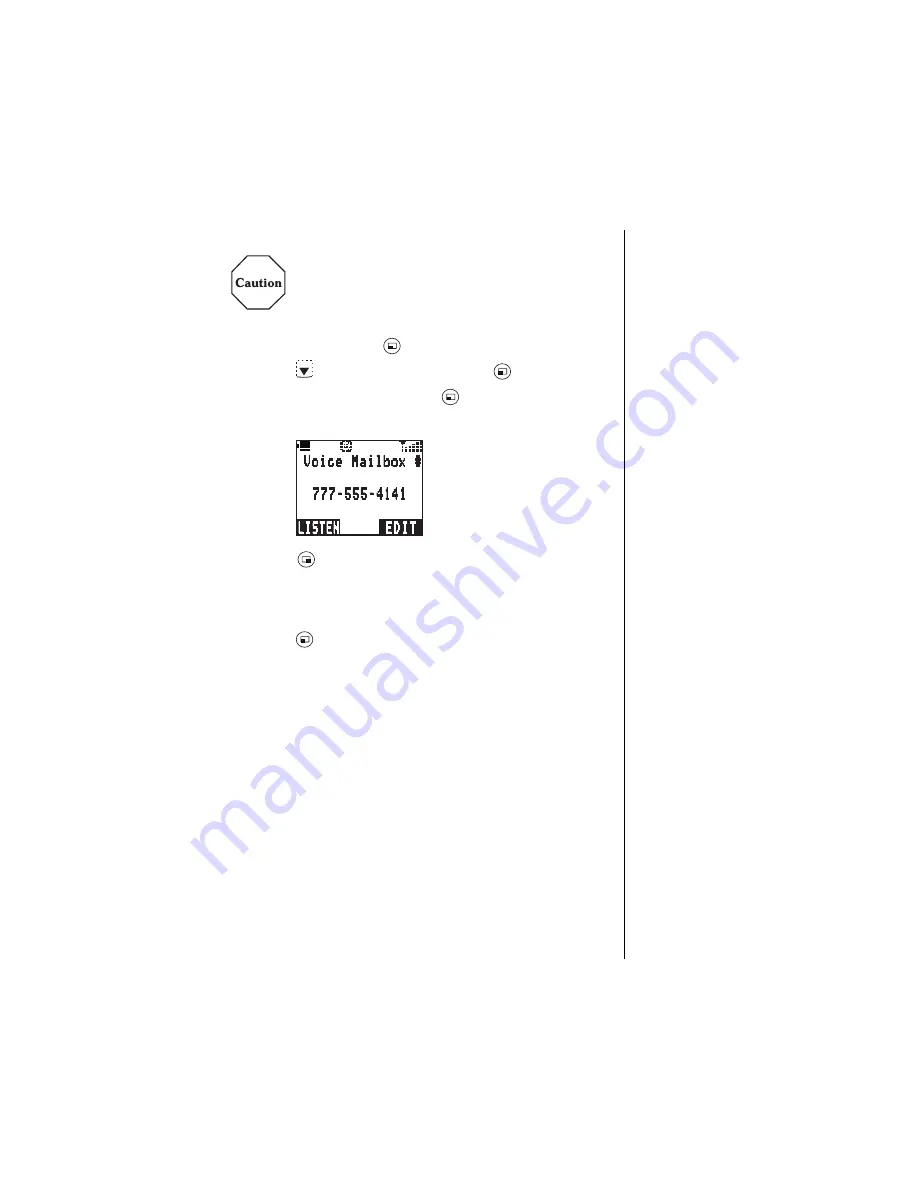
Resetting the Voice Mailbox Number

Do not reset your voice mailbox number if it is 
preprogrammed by your wireless service provider. 
Your voice mail will be inaccessible if an incorrect 
number is entered. Check with your wireless 
service provider for specific information.

1

From standby, press 

 (MENU) to enter the Main Menu.

2

Press 

 to scroll to Messages. Press 

 (OK).

3

Scroll to Voice Mail and press 

 (OK).

• Your voice mailbox phone number is displayed.

4

Press 

 (EDIT) and enter a new voice mailbox phone 

number.

• You may also program Pause and Wait times. See 

“Programming Pauses or Waits” in Chapter 3.

5

Press 

 (OK) to save the new phone number.

Содержание DuraMax EB-TX220 Series

Страница 1: ...Appendix 1 ...

Страница 2: ......

Страница 3: ...tentially Explosive Atmospheres 6 For Vehicles Equipped with an Air Bag 6 Chapter 2 Getting Started 7 Battery Use 7 Attaching the Battery to an EB TX210 Series Phone 7 Attaching the Battery to an EB TX220 Series Phone 7 Charging the Battery for an EB TX210 or EB TX220 Series Phone 9 Recharging Tips 9 EB TX210 Series Battery Specifications 10 EB TX220 Series Battery Specifications 10 Removing Batte...

Страница 4: ...tions 23 Placing Calls 23 Dialing from the Keypad 23 Phonebook Dialing Speed Dialing and Super Speed Dialing 24 Programming Pauses or Waits 24 Answering Calls 25 In Call Features 25 Voice Volume 25 Displaying Your Own Phone Number During a Call 26 Muting the Mouthpiece 26 Scratchpad 27 Speakerphone 27 Unanswered Calls 28 Answer Options 28 Voice Mail 29 Listening to New Voice Mail 29 Resetting the ...

Страница 5: ...ed Dialing 40 Speed Dialing 40 Dialing a Phonebook Entry by Scrolling 41 Dialing a Phonebook Entry from the Menu 41 Editing Deleting a Phonebook Entry 42 Selecting a Phonebook Search Method 43 Own Phone Number Review 44 Chapter 6 Advanced Operations 45 Call History 45 Last Dialed Calls 45 Unanswered Calls 46 Answered Calls 46 Deleting Call Lists 47 Call Timers 47 Tone Settings 48 Alert Mode 48 Rin...

Страница 6: ...git Limit is Selected 62 Security Lock 62 Turning On Security Lock 62 Turning Off Security Lock from Standby 63 Disabling Security Lock 63 Key Lock 64 Turning On Key Lock 64 Turning Off Key Lock 64 Chapter 7 Subscriber Features 65 Caller ID 65 Call Waiting 65 Three Way Calling 66 Text Messaging 66 Reading New Text Messages 66 Reply to a Text Message Inbox Only 68 Forward a Text Message 68 Edit a T...

Страница 7: ...ms 76 Service Priority 77 Appendix A Before Requesting Help 79 Problems and Solutions 79 System Warning Tones 84 Dropped Call Warning Tone 84 Reorder Tone 84 Intercept Tone 84 Phone Specifications 84 Appendix B Phone Accessories 85 EB TX210 Series Handset Batteries 85 EB TX220 Series Handset Battery 85 EB TX210 and EB TX220 Additional Accessories 86 EB HF210EZ and EB HF220EZ Handsfree Carmount Kit...

Страница 8: ...vi ...

Страница 9: ...Whether you are a novice or an experienced cellular user be sure to read this section before operating your phone Chapter 2 Getting Started Chapter 2 describes the basics of setting up and operating your phone From connecting and charging your battery describing the phone s keys and display icons moving through the feature menu and using the Private Handsfree Headset this is the place to turn when...

Страница 10: ...vice provider for complete information on available services Reference Information Appendix A Before Requesting Help As you begin to take advantage of your phone s features you may experience minor problems Don t panic You can fix most of these problems This chapter contains a detailed list of solutions to some of the problems you may encounter Appendix B Phone Accessories Many accessories are ava...

Страница 11: ...h these icons Caution Calls attention to information that could prevent you from damaging your phone or putting your own safety at risk Please be sure to read this information Note Information that could have direct impact on how a particular feature or function will operate Tip Points out helpful advice and time saving shortcuts Memorizing these tips can save you valuable time ...

Страница 12: ...x ...

Страница 13: ...h metallic objects 5 Do not remove the battery from the phone while the phone is powered on Settings you have changed may revert to their previous settings Charging Devices 1 Use only Genuine Panasonic charging accessories Use of attachments not recommended by Panasonic or your wireless service provider may result in fire electrical shock or injury Panasonic is not responsible for damages caused b...

Страница 14: ...ever rely solely on any wireless phone for essential communications for example medical emergencies When operating in analog mode the service area where you can place and receive calls will be smaller than with other phones Emergency 911 Service If you need to make an emergency 911 call power the phone on dial 911 and press If you have stored the numbers 911 in memory location number 9 simply pres...

Страница 15: ... for sale to the public it must be tested and certified to the FCC that it does not exceed the limit established by the government adopted requirement for safe exposure The tests are performed in positions and locations e g at the ear and worn on the body as required by the FCC for each model The highest SAR value for this model phone when tested for use at the ear is 1 49W kg and when worn on the...

Страница 16: ...e phone and may violate FCC regulations Phone Operation NORMAL POSITION Hold the phone as you would any other telephone with the antenna pointed up and over your shoulder FOR EFFICIENT OPERATION For your phone to operate most efficiently do not touch the antenna unnecessarily when the phone is in use Contact with the antenna affects call quality and may cause the phone to operate at a higher power...

Страница 17: ...ect that interference is taking place turn your phone OFF immediately Hearing Aids Some digital wireless phones may interfere with some hearing aids In the event of such interference you may want to consult your service provider Other Medical Devices If you use any other personal medical device consult the manufacturer of your device to determine if they are adequately shielded from external RF en...

Страница 18: ...ities vehicles using liquefied petroleum gas such as propane or butane areas where the air contains chemicals or particles such as grain dust or metal powders and any other area where you would normally be advised to turn off your vehicle engine For Vehicles Equipped with an Air Bag An air bag inflates with great force DO NOT place objects including both installed or portable wireless equipment in...

Страница 19: ...y not be fully charged when you remove it from the box The battery must be fully charged before using your phone for the first time Attach and charge the battery as described in this section Attaching the Battery to an EB TX210 Series Phone 1 Insert the bottom edge of the battery along the bottom back edge of phone 2 Push the top of the battery toward the phone until it clicks into place Attaching...

Страница 20: ...to battery pocket then lower the top edge of the battery toward the phone until the battery lies flat 5 Slide the battery release latch to the far right until it clicks into place The battery cover will not slide into place if the latch is incorrectly positioned 6 Slide battery cover onto phone until it clicks into place ...

Страница 21: ...he indicator light turns off and the battery icon is filled 3 To remove the AC Adapter from the phone press in both side tabs on the connector and pull gently Recharging Tips Your handset s new battery will achieve maximum performance after two or three charges Allow your battery to fully discharge at least once a month Recharge batteries in a well ventilated area between 41 F 5 C and 95 F 35 C Te...

Страница 22: ...ttery Specifications Times listed in the tables above may vary depending on usage and charging conditions Mode Battery Type Lithium Ion Talk Time Standby Time Charge Time Analog EB BS210 Standard 650 mAh Up to 60d 210 S pprox Tc0Tm0 0095 92 700 404394 d 221 3 675 Tc04 6 210 TJ 198 rs St7 ...

Страница 23: ...h on the back of phone 2 While holding the latch grasp the sides of the battery and lift Removing Battery from an EB TX220 Series Phone 1 Press down on the battery cover 2 Slide the battery cover off 3 Slide the battery release latch all the way to the left 4 Lift the battery out of the battery pocket ...

Страница 24: ...essage appears you will not be able to place or receive calls until the battery has been recharged or until you attach an AC or DC adapter If you are in a call when you hear the beep and the message appears quickly end your call or attach an AC or DC adapter Phone Description You may enter up to 32 characters by pressing the number keys The keypad is also used to enter text as described in Text En...

Страница 25: ......

Страница 26: ...sage received Digital service available Active call is in operation Voice privacy feature is on Quiet Mode is on Vibration alert is on Ring volume is set to 0 Incoming signal strength varies by the number of bars shown beside the signal icon Five bars indicates a strong signal No bars indicate a weak or no signal Display area shows numbers text and symbols Softkey functions The function changes de...

Страница 27: ...vice provider s name is displayed if you are within the coverage area Powering OFF Press and hold to power off your phone Standby Display The standby display appears when your phone is on and in an idle state You may return to the standby display at any time except during a call by pressing The backlight turns on automatically for 15 seconds when powering up the phone or when pressing any key The ...

Страница 28: ...the navigation key scroll areas or to move up or down through the menu options When an option is selected using the softkeys the display changes to offer another level of softkey options This process continues until you have responded to all display prompts and options for a particular softkey Menu Map of Shortcut Keys Many of the phone s features may be quickly accessed by pressing shortcut keys ...

Страница 29: ...Chapter 2 Getting Started 17 ...

Страница 30: ... 5 Enter the digits for the date in the format month day year 6 Press to scroll to set the time 7 Enter the digits for the time using a 12 hour clock 8 Press to select the AM PM setting 9 Press AM PM to switch between AM and PM 10 Press OK to select The display confirms that you adjusted the setting 11 Press any key or wait 3 seconds to return to standby The standby display shows the date and time...

Страница 31: ...K 3 Press to scroll to Ring Volume Press OK The display shows the current ring volume setting 4 Press and hold to increase ring volume or to decrease volume A ring tone is emitted and the display indicates the current ring volume setting If you select the lowest setting the ring volume is muted silent 5 When the desired ring volume is reached press OK The display confirms the new volume level sett...

Страница 32: ...nds to return to standby When selecting a new ring alert it is not possible to hear the sample ring if ring volume has been muted or if you are in a conversation Using the Private Handsfree Headset When the Private Handsfree Headset is plugged into the phone you can have a phone conversation without holding the phone to your ear The caller s voice is heard through the Private Handsfree Headset s e...

Страница 33: ...e 2 Attach the Private Handsfree Headset clip to your clothes 3 Insert the earphone into your ear 4 During conversation increase or decrease volume to a comfortable level by using the up and down arrows on the phone s center navigation key The use of an ear insert device while driving may violate the laws of some states provinces Be sure to check applicable state provincial laws before using this ...

Страница 34: ...Chapter 2 22 Getting Started ...

Страница 35: ...nal indication If you are in a digital service area the icon appears Dialing from the Keypad 1 From standby enter the phone number up to 32 digits 2 Press to place the call During conversation if you press and hold the speakerphone feature is activated Do not hold the phone next to your ear when speakerphone is activated If the outgoing phone number matches an entry in the Phonebook the correspond...

Страница 36: ... If you program a Pause P the entered digits are automatically transmitted during a call after a two second delay If you program a Wait W the entered digits are not transmitted during a call until you press or SEND 3 Continue to enter digits Pauses and Waits as needed In this sample display the first seven digits are the phone number to dial The W Wait indicates that the phone will wait until you ...

Страница 37: ... name appears and the backlight changes color 2 Press or any key except to answer Quickly pressing will stop the ringing and or vibration alert but not answer the call 3 When you are ready to end the call press to disconnect In Call Features You can perform several functions while you are in a call Voice Volume 1 During a call press and hold to increase the volume of the caller s voice or press to...

Страница 38: ...he voice call display returns If your phone is programmed with more than one phone number only the number currently being used is displayed If you would like to have a second phone number programmed for your phone contact your wireless service provider Muting the Mouthpiece 1 During a call press MUTE to mute the mouthpiece The display indicates when the mouthpiece is muted When the mouthpiece is m...

Страница 39: ...play OR Press SAVE to save the number into the Phonebook See Saving a Displayed Phone Number on page 39 for more information Speakerphone You can talk on your phone without having to hold the phone to your ear Do not hold the phone next to your ear when speakerphone is activated 1 During a call press MENU to enter the Main Menu Press OK to select Speakerphone OR During a call press and hold to tur...

Страница 40: ...umbers of unanswered calls are displayed only if you have subscribed to Caller ID through your wireless service provider Answer Key Options You can choose to answer calls in either of the following ways By pressing any key except Only by pressing 1 From standby press MENU to enter the Main Menu 2 Press to scroll to Phone Settings Press OK 3 Press to scroll to Answer Key Press OK The current settin...

Страница 41: ...tes the number of new voice mail messages 2 Press LISTEN to automatically dial your voice mail number OR From the standby display press and hold until it calls your voice mailbox 3 Follow the recorded instructions for your voice mail 4 Press to end your call and return to standby Resetting the Voice Mailbox Number Do not reset your voice mailbox number if it is preprogrammed by your wireless servi...

Страница 42: ...mbers You may easily redial one of the last ten 10 numbers dialed from your phone Or when a system busy signal occurs your phone can automatically redial the number you are attempting to call Redialing One of the Last Ten 10 Numbers Dialed from Your Phone 1 From standby press to view the last ten 10 dialed phone numbers If a dialed number matches an entry in the Phonebook the corresponding name is...

Страница 43: ...ause of a system busy error or some other system problem Automatic Redial does not display if the called number is busy i e the person you are calling is using the phone When your phone is connected to the Private Handsfree Headset or an optional Handsfree Carmount Kit the phone will automatically redial without prompting for an answer to Automatic Redial 2 Press YES to automatically redial the nu...

Страница 44: ...ert 1 From standby press MENU to enter the Main Menu 2 Press to scroll to Tone Settings Press OK 3 Press to scroll to Vibration Press OK The current setting is displayed with an asterisk If selected the vibration alert icon appears on the display 4 To change the setting scroll to the other option and press OK ...

Страница 45: ...hat is not commonly found in a dictionary for example names of people or places Letters are entered by pressing a key associated with a desired character once twice three times or four times until the character appears on the display Word Entry Word T9 mode allows you to quickly type text with the aid of a built in dictionary Press each key only once for each letter and the dictionary will automat...

Страница 46: ... using Letter Entry mode press a key once to enter the first letter on the key press the key twice to enter the second letter on the key etc For example press once for the letter D press twice for the letter E etc Press briefly to delete the last entered character Press and hold to delete the entire entry Press or to scroll across characters to move to the next character space or to add a blank sp...

Страница 47: ...word first should appear on the screen As letters are entered the dictionary will display probable words Several different words can appear on the display during the entering process Press briefly to delete the last entered character or an entered word Press and hold to delete the entire entry If the first word found in the dictionary and shown on the display is not the word you want to enter pres...

Страница 48: ... Each number key is associated with several symbols To select a specific symbol enter the corresponding number on the keypad To scroll through additional screens of symbols press or The table below shows the letters numbers and symbols associated with each keypad key Key Entry Table Mode Key Letter entry ABC Letterentry abc NUM SYM 1 space 1 Press to enter a space or press twice to enter a 1 1 2 A...

Страница 49: ...2 Getting Started Creating a Phonebook Entry 1 From standby press to enter the Phonebook 2 Press to scroll to Create Press OK For each entry you can enter any or all of the following information First Name Last Name W ork number H ome number C ellphone number O ther number special ring tone email address and memory location number If all memory locations are full Phonebook Full is displayed You mu...

Страница 50: ...eat steps 3 through 5 until the entry is complete 7 To save the entry into memory press to scroll to and press SELECT Press ANY to save the entry in the first available location OR To save the entry as a specific location number enter a number between 1 and 100 and press OK If you want to use Super Speed Dialing for the entry enter a location number between 1 and 9 To determine which location numb...

Страница 51: ...isplay shows Overwrite John Smith Press NO to enter a different location number Or press YES to overwrite delete the information that was previously saved in that location OR Press NO to delete your entry and return to standby Saving a Displayed Phone Number 1 When a phone number is displayed press SAVE You may save the number as a Work Phone Home Phone Cell Phone or Other 2 Press or to scroll to ...

Страница 52: ...t phone number stored in that memory location Super Speed Dialing dials only the first phone number stored in the memory location To dial another number stored at that location see Speed Dialing Speed Dialing 1 From standby enter the memory location number that contains the phone number you want to call For example to dial a number stored in location 25 press 2 Press to view the phone numbers stor...

Страница 53: ...ey that has the desired letter on it 2 When the arrow points to the desired entry press VIEW to view the saved information 3 Press or to scroll to the desired phone number and press to call Dialing a Phonebook Entry from the Menu 1 From standby press to enter the Phonebook 2 Press OK to select Search Depending on your phone s search method setting the display shows entries alphabetically by first ...

Страница 54: ...irst or last name or by memory location number To change the search method setting see Selecting a Phonebook Search Method 3 Enter the name a portion of the name or the memory location number if desired 4 Press FIND or OK 5 Press or to scroll to the desired entry to edit or delete 6 Press VIEW to display details 7 Press OPTION You have the option to edit the Prefix adding an area code or prefix nu...

Страница 55: ... and return to standby Or press NO select a new location number and press OK to return to standby OR Press NO to return to standby without saving changes Selecting a Phonebook Search Method Setting the Search Method allows you to determine how your phone searches for information stored in the Phonebook You can set your phone to search for entries by first name last name or memory location number 1...

Страница 56: ...ither phone number to make a call 1 From standby press to enter the Phonebook 2 Press to scroll to Own Number and press OK Your phone number is displayed If your phone is programmed with more than one phone number only the number currently being used is displayed See Selecting Your Phone Number NAM on page 75 for information on selecting your other phone number ...

Страница 57: ...ough the Menu and Menu Map of Shortcut Keys in Chapter 2 See the Menu Map of Shortcut Keys in Chapter 2 for a quick overview of all the Advanced feature options Call History The Call History menu allows you to view and delete information related to calls you have received and placed It also allows you to reset the timer that monitors your talk time Last Dialed Calls 1 From standby press MENU to en...

Страница 58: ...roll to Unanswered Press OK The last unanswered number is displayed Last Dialed or Answered calls can be checked by pressing or A call without caller ID will not be stored 4 Press or to scroll through the last 10 unanswered calls 5 To call a number press when the number is displayed To add a prefix to delete or to save the number press OPTION and select the desired action Answered Calls 1 From sta...

Страница 59: ...l History Press OK 3 Press to scroll to Last Dialed Unanswered or Answered Press OK 4 Press OPTION 5 Press to scroll to Delete Entry delete the selected call or Delete All delete all the calls in the list Press OK 6 Press YES to delete the selected list Call Timers The Last Call and All Calls options allow you to view the time you have spent connected on calls The Custom call option allows you to ...

Страница 60: ...e time represented on your call timer This has to do with the number of network features selected when billing begins and ends and rounding for billing Tone Settings The Tone Settings menu lets you customize your phone for use in special surroundings or set the volume and tone of the phone s ring It also allows you to select a specific alert for the text messages received Alert Mode Your phone has...

Страница 61: ...ormal Mode or Quiet Mode Press OK The display confirms the new mode setting If Quiet Mode is selected the Quiet Mode icon is displayed 5 Press any key or wait 3 seconds to return to standby Ring Volume See Setting Ring Volume in Chapter 2 Key Volume 1 From standby press MENU to enter the Main Menu 2 Press to scroll to Tone Settings Press OK 3 Press OK to select Key Volume The display indicates the...

Страница 62: ...lert in Chapter 2 Message Alert Type This setting allows you to determine what type of alert you will hear when a text message is received 1 From standby press MENU to enter the Main Menu 2 Press to scroll to Tone Settings Press OK 3 Press to scroll to Message Alert Press OK The current setting is displayed with an asterisk As you scroll through the alert types a sample alert sounds for each of th...

Страница 63: ...t Phone Settings The Phone Settings menu allows you to set specific features according to your own preferences Display Settings Backlight The backlight color can be set as green or amber If a caller s phone number matches an entry in the Phonebook the corresponding name is displayed and the backlight changes color 1 From standby press MENU to enter the Main Menu 2 Press to scroll to Phone Settings...

Страница 64: ...play can be adjusted 1 From standby press MENU to enter the Main Menu 2 Press to scroll to Phone Settings Press OK 3 Press OK to select Display 4 Press to scroll to Contrast Press OK The display indicates the current contrast setting 5 Press and hold to increase the contrast Press and hold to decrease the contrast 6 When the desired contrast is set press OK The display confirms the new contrast se...

Страница 65: ...K 4 Press to scroll to Alarm Settings Press OK 5 Alarm 1 is displayed If desired press or to scroll to a different alarm 5 alarms When the desired alarm is displayed press SELECT The display indicates if the current alarm is set on or off 6 Press or to scroll to the desired setting Press OK 7 Press or to select the alarm type Daily or One Time Press OK If you selected Daily enter the time using a ...

Страница 66: ... Chapter 4 Text Entry Operations for details about entering text 11 Once you have selected or entered the message that will display with the alarm press OK The display confirms the new alarm setting 12 Press any key or wait 3 seconds to return to standby When the time for the alarm comes the alarm alert lasts for 40 seconds To stop the alarm or clear the message from the display press any key If t...

Страница 67: ...ss OK 3 Press to scroll to Auto Answer Press OK The current setting is displayed with an asterisk 4 To change the setting scroll to the other option Press OK to select The display confirms the new Auto Answer setting 5 Press any key or wait 3 seconds to return to standby This feature works ONLY when used with the Private Handsfree Headset or with the optional Handsfree Carmount Kit This feature au...

Страница 68: ...to shorten or lengthen the time the tone is emitted DTMF tones are transmitted even when key tones are turned off 1 From standby press MENU to enter the Main Menu 2 Press to scroll to Phone Settings Press OK 3 Press to scroll to DTMF Duration Press OK The current setting is displayed with an asterisk 4 To change the DTMF setting scroll to the other option Press OK The display confirms the DTMF dur...

Страница 69: ...e current setting is displayed with an asterisk 4 To change the setting scroll to the other option Press OK to select The display confirms the Warning Tone setting 5 Press any key or wait 3 seconds to return to standby Even when Warning Tone is set to off the low battery tone will be emitted Creating a Welcome Screen You can create a personalized message up to 64 characters including spaces that d...

Страница 70: ...ur phone so that the displayed language is English Spanish or French 1 From standby press MENU to enter the Main Menu 2 Press to scroll to Phone Settings Press OK 3 Press to scroll to Language Press OK The current setting is displayed with an asterisk 4 To select another language scroll to the language of your choice and press OK The display confirms the new language setting 5 The display returns ...

Страница 71: ...received and setting your phone so that it automatically locks whenever powered off A lock code is necessary to activate these features Panasonic recommends changing the lock code to your own after your phone purchase If you ever misplace or forget your lock code and your phone is locked contact your wireless service provider Remember that emergency 911 calls can be placed from your phone even whe...

Страница 72: ... then try to memorize it This number must be entered every time you reset a security feature My lock code number is ________________________ Call Lock Call Lock allows you to determine what types of incoming or outgoing calls you want to lock or restrict 1 From standby press MENU to enter the Main Menu 2 Press to scroll to Security Press OK 3 Press to scroll to Call Lock Press OK You are given the...

Страница 73: ...r wait 3 seconds to return to standby Call Waiting will not function when Incoming Lock is On If Outgoing Lock is Selected Continued from step 4 under Call Lock You may lock and unlock all outgoing calls or you may prevent calls from being placed other than using numbers stored in the Phonebook This feature also lets you limit the number of digits dialed from your phone The current setting is disp...

Страница 74: ...he lock code Press OK The display shows the current setting 7 Press to increase the digit limit Press to decrease the digit limit The maximum digit limit is 31 8 When the desired digit limit is displayed press OK 9 Press any key or wait 3 seconds to return to standby Security Lock When this feature is on the phone will lock automatically whenever powered off and restricts unauthorized use When pow...

Страница 75: ...ily by following these instructions 1 The standby display indicates when Security Lock is activated 2 Press UNLOCK 3 Enter the lock code and press OK 4 Security Lock is temporarily turned off until you turn your phone off on again Disabling Security Lock 1 From standby press MENU to enter the Main Menu 2 Press to scroll to Security Press OK 3 Press to scroll to Security Lock Press OK The current s...

Страница 76: ...e calls by pressing any key except and you can place emergency 911 calls even when the key lock is on Turning On Key Lock 1 From standby press and hold MENU The key lock is on 2 Press any key or wait 3 seconds to return to standby Turning Off Key Lock 1 Press UNLOCK 2 When the display asks whether you would like to Unlock Keypad press YES The keypad is unlocked ...

Страница 77: ...he caller s phone number matches an entry in the Phonebook the corresponding name is also displayed Call Waiting 1 An alert sounds when you receive an incoming call during conversation The display indicates that a call is waiting If the caller s phone number matches an entry in the Phonebook the corresponding name is displayed and the backlight changes color 2 Press ACCEPT to connect with the inco...

Страница 78: ... Press to end all calls This feature may not be available in all areas Contact your wireless service provider for more information Text Messaging Reading New Text Messages 1 When a new text message is received up to 30 an alert sounds and flashes on the top of the display If you have received 30 messages the oldest read message will be overwritten when you receive a new message If the envelope ico...

Страница 79: ...reading a message press REPLY to reply to the message or press OPTION and go to step 5 5 Press or to scroll to your desired action and press OK If you selected Reply go to the following section titled Reply to a Text Message Inbox Only If you selected Forward go to the following section titled Forward a Text Message If you selected Edit Outbox Only go to the following section titled Edit a Text Me...

Страница 80: ...outbox message to make more room in the outbox Forward a Text Message Continued from step 5 under Reading New Text Messages 6 Press or to scroll to the destination source list 7 Press OK 8 Enter the destination 9 Press OK The message can be edited by pressing or 10 Press and YES to send the message Edit a Text Message Outbox Only You can edit the destination or the messages in the outbox Continued...

Страница 81: ...umber you can call that number Continued from step 5 under Reading New Text Messages 6 Press to scroll to the phone number you want to call back Phone numbers are automatically inserted To call that number go to step 7 Press OPTION to edit the Prefix adding deleting area code or Save Or select Dial Setting in Prefix to change the numbers This is useful if the phone number is incorrect 7 Press SEND...

Страница 82: ...ss or to scroll to the desired message then or to scroll through the message destination and the time After reading through a message you can select your desired action Go to Step 4 on page 67 If you selected Create go to the following section titled Create a Text Message If you selected Delete All press or to select delete all Inbox messages or to select delete all Outbox messages Press OK The di...

Страница 83: ...lect a destination from the Phonebook follow the display prompts by pressing 6 Enter a destination Press OK Note that you can switch back and forth between the destination screen and the message screen by pressing or If necessary the message can be edited by pressing EDIT and using or See Text Entry Operations Chapter 4 7 Press OPTION 8 Press or to select Send to send the message Save Message to s...

Страница 84: ...ce provider Listening to New Voice Mail 1 When a new voice mail message is received an alert sounds and appears on the top of the display The display indicates the number of new voice mail messages 2 Press LISTEN to automatically dial your voice mail number OR From the standby display press and hold until it calls your voice mailbox 3 Follow the recorded instructions for your voice mail 4 Press to...

Страница 85: ... entered Check with your wireless service provider for specific information 1 From standby press MENU to enter the Main Menu 2 Press to scroll to Messages Press OK 3 Scroll to Voice Mail and press OK Your voice mailbox phone number is displayed 4 Press EDIT and enter a new voice mailbox phone number You may also program Pause and Wait times See Programming Pauses or Waits in Chapter 3 5 Press OK t...

Страница 86: ...r wireless service provider for additional information 1 From standby press MENU to enter the Main Menu 2 Press to scroll to System Setting and press OK 3 Press OK again to select Network 4 Press OK again to select Voice Privacy The current setting is marked with an asterisk 5 To change the setting scroll to the other option and press OK The display confirms the new voice privacy setting If you se...

Страница 87: ...election and press OK NAM1 is your current phone number setting 4 If you have a second phone number NAM2 view it by pressing or 5 To select the other phone number other than the one you are currently using make sure the desired phone number NAM is displayed and press OK The display confirms the NAM setting 6 Press any key or wait 3 seconds to return to standby If you changed the NAM setting a netw...

Страница 88: ... if you use the network 1 From standby press MENU to enter the Main Menu 2 Press to scroll to System Setting and press OK 3 Press to scroll to Search and press OK The three search settings are displayed 4 Scroll to your preferred search setting and press OK If you selected Normal press any key or wait 3 seconds to return to standby If you selected Manual press to scroll to a network you use and pr...

Страница 89: ... 1 From standby press MENU to enter the Main Menu 2 Press to scroll to System Setting and press OK 3 Press to scroll to SVC Priority and press OK 4 Press to scroll to Custom and press OK The default search order is Residential 1st Private 2nd and Public 3rd 5 Press or to change the SVC Priority order 6 When your preferred order is displayed press OK The display confirms that the Service Priority w...

Страница 90: ...Chapter 7 78 Subscriber Features ...

Страница 91: ... Possible Cause s Solution s Phone will not turn on Battery is too low or not charged Battery contacts need to be cleaned was not pressed long enough Recharge the battery Or connect the AC or DC adapter Wipe the battery contacts and phone contacts with a dry cloth Try pressing and holding for at least three seconds Initialization Error xxxx or Run Time Error xxxx is displayed Your phone has detect...

Страница 92: ... it Attempt to recharge the battery It may take a few minutes for recharging to begin If the battery will not recharge replace it Replace the battery Note It s normal for a battery to slowly lose its ability to hold a charge No Service is displayed Signal is too weak Move to another location or wait a few minutes if you are traveling in an automobile If you are in a building move near a window or ...

Страница 93: ...swer Options on page 28 Contact your wireless service provider Missing incoming calls Verify that ring volume is not set to silent Set ring volume on Calls dropped disconnected inadvertently You are outside of a cellular service area Phone automatically disconnects calls when the battery level is low Check your wireless service provider s coverage map including roaming areas and try to move to a l...

Страница 94: ...Unable to access Voice Mailbox Voice Mail phone number is not programmed into phone DTMF tones may be set to short instead of long Voice Mail service is not activated Program Voice Mail phone number Refer to additional information from your wireless service provider Set DTMF tones to long See DTMF Tone Length on page 56 for details Contact your wireless service provider Keys do not work when press...

Страница 95: ...til appears above it See Text Entry Operations Chapter 4 Unable to set a subscriber feature The feature you are trying to set is not offered by your wireless service provider Contact your wireless service provider for more information It is difficult to hear the other party Your phone s earpiece volume is set too low Press during conversation You can hear the other party but the other party can t ...

Страница 96: ...complete the call Intercept Tone A rapid high low tone sounds when a call is attempted before service has been established Before placing a call confirm that you are within a wireless service provider s coverage area Phone Specifications EB TX210 EB TX220 Sizes with standard battery 4 6 x 1 7 x 8 118 mm x 42 mm x 20 7 mm N A with extended battery 4 6 x 1 7 x 1 04 118 mm x 42 mm x 26 7 mm 4 8 x 1 9...

Страница 97: ...ll 1 800 833 9626 In Canada contact your cellular dealer Using non Panasonic accessories or accessories not recommended by your wireless service provider may result in poor performance of your phone or even cause an electrical hazard EB TX210 Series Handset Batteries Standard Battery EB BS210B Blue EB BS210G Gold Li Ion 650 mAh Extended Battery EB BL210B Blue EB BL210G Gold Li Ion 1400 mAh EB TX22...

Страница 98: ...Appendix B 86 EB TX210 and EB TX220 Additional Accessories AC Adapter EB CA210 DC Adapter EB CD220 Data Cable EB RS210 Spare Battery Charger EB CV210 Private Handsfree Headset EB EM210 ...

Страница 99: ...87 EB HF210EZ and EB HF220EZ Handsfree Carmount Kits Handsfree Unit Adjustable Angle Bracket Handset Holder for EB TX210 Series Handset Handset Holder for EB TX220 Series Handset Power Supply Cable Interface Cable ...

Страница 100: ...88 EB HF210EZ and EB HF220EZ Handsfree Carmount Kits continued Microphone Speaker All Panasonic branded accessories are tested and comply with FCC RF exposure requirements Non Panasonic accessories may not comply ...

Страница 101: ...anism lower levels of RF might cause adverse health effects as well Although some research has been done to address these questions no clear picture of the biological effects of this type of radiation has emerged to date Thus the available science does not allow us to conclude that mobile phones are absolutely safe or that they are unsafe However the available scientific evidence does not demonstr...

Страница 102: ...tudies exposed the animals to the RF virtually continuously up to 22 hours per day For the past five years in the United States the mobile phone industry has supported research into the safety of mobile phones This research has resulted in two findings in particular that merit additional study 1 In a hospital based case control study researchers looked for an association between mobile phone use a...

Страница 103: ...arch recommendations and scientific oversight of new CTIA funded research based on such recommendations Two other studies of interest have been reported recently in the literature 1 Two groups of 18 people were exposed to simulated mobile phone signals under laboratory conditions while they performed cognitive function test There were no changes in the subjects ability to recall words numbers or p...

Страница 104: ...led a case control study The current case control study of brain cancers by the National Cancer Institute as well as the follow up research to be sponsored by industry will begin to generate this type of information What is FDA s role concerning the safety of mobile phones Under the law FDA does not review the safety of radiation emitting consumer products such as mobile phones before marketing as...

Страница 105: ......

Страница 106: ... information For additional information see the following websites Federal Communications Commission FCC RF Safety Program select Information on Human Exposure to RF Fields from Cellular and PCD Radio Transmitters http www fcc gov oet rfsafety ...

Страница 107: ...ng phone 4 DTMF tone length 56 E Emergency 911 calls 2 Ending a call 23 Entering numbers NUM mode 36 Entering symbols SYM mode 36 Entering text 33 using Letter Entry mode 34 using Word Entry Word T9 mode 35 F Fixing phone problems battery won t recharge 80 calls dropped inadvertently 81 difficult to hear other party 83 Initialization Error xxxx appears on display 79 other party unable to hear you ...

Страница 108: ...lock code 59 M Making a call 23 Menu map 17 Message alert type 50 Message key 13 Messages accessing 70 adding 69 calling back 69 creating 71 deleting 69 editing 68 forwarding 68 locking and unlocking 69 reading 66 replying to 68 Muting mouthpiece 26 N NAM 75 Network service voice privacy 74 Numbers entering in a text message 36 O Outgoing lock 61 P Pause key 13 Phone description 12 Phone settings ...

Страница 109: ...12 Speakerphone using 27 Speakerphone Quiet Mode key 13 Speed dialing 40 super speed dialing 40 Standby display 15 16 Standby time 10 Symbols entering in a text message 36 System setting menu searching for available systems 76 selecting your phone number NAM 75 service priority 77 T Talk time 10 Text message alert 50 Time spent on call s 47 U Unanswered calls 28 46 V Vibration alert setting 32 Vie...

Страница 110: ...s To order this manual in Spanish part number 7LB992A call our toll free number 1 800 833 9626 Si desea hacer su pedido de la versión en español No catálogo 7LB992A de este manual llame sin costo al 1 800 833 9626 ...

Страница 111: ......

Страница 112: ......

Отзывы: