background image

47

RQT8203

Recording from a video cassette recorder

[HDD]


[RAM]


[-R] [-RW‹V›]


[+R]

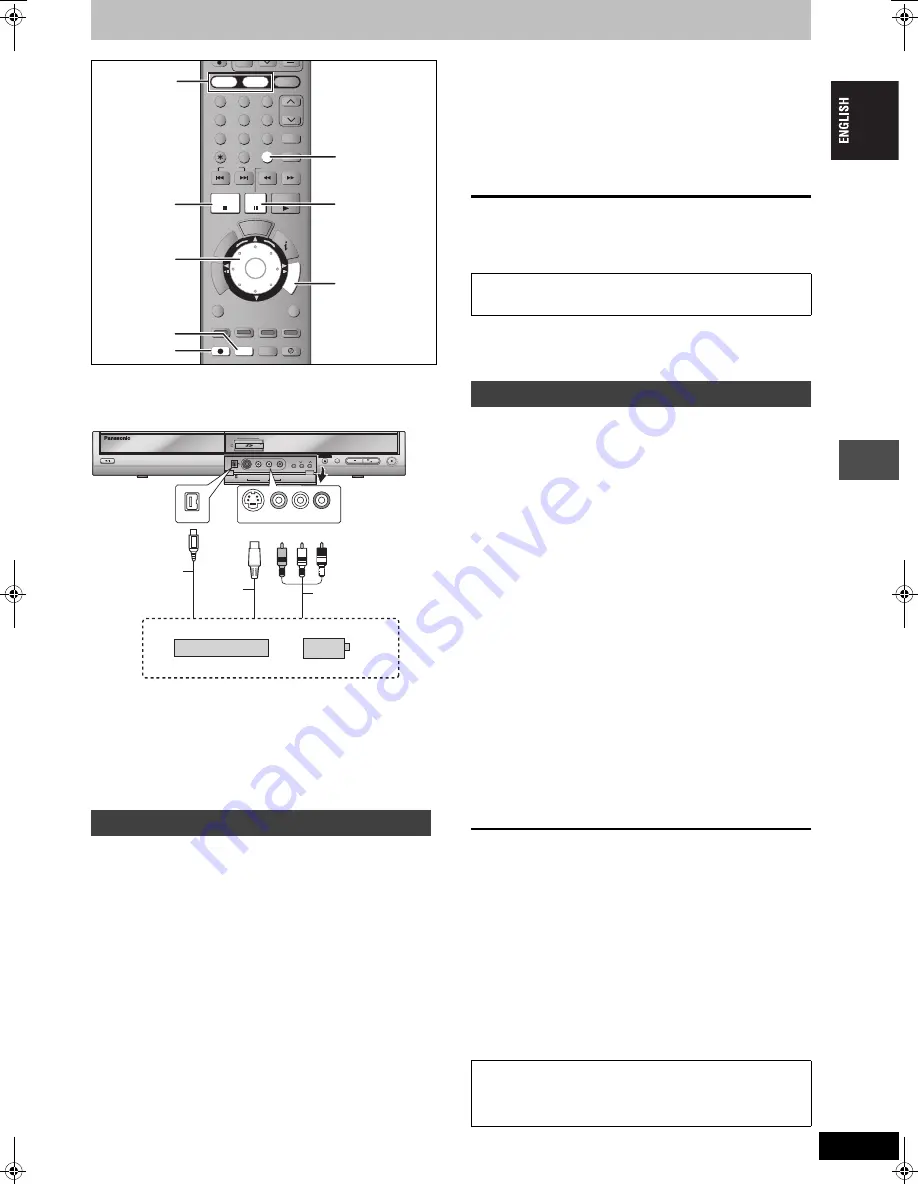
e.g., Connecting to the AV3 or DV input terminals on the front

You can also connect to the AV4 input terminals on the rear.

Turn off the unit and other video equipment before connecting.

If the audio output of the other equipment is monaural

Connect to L/MONO on the AV3 input terminals at the front.

§

The S VIDEO terminal achieves a more vivid picture than the 
VIDEO terminal.

When recording from the unit’s DV terminal

Select the type of audio recording from “Audio Mode for DV Input” in 
the SETUP menu (

56).

When recording from DV equipment (e.g., digital video camcorder), 
you can record audio/video recordings from DV tape only.

Preparation

Press [HDD] or [DVD] to select the recording drive.

When recording bilingual programmes

[HDD]


[RAM]

When both M 1 and M 2 is selected on the connected equipment, 
you can select the audio type in playback.

[-R]


[-RW‹V›]


[+R]

Select either M 1 or M 2 on the connected equipment. (Only either 
one type of M 1 or M 2 can be recorded.)

When the output signal from the external equipment is NTSC, 
change the “TV System” to “NTSC” in the SETUP menu (

61).

This unit cannot record to discs containing both PAL and NTSC 
signals. (However, both types of programmes can be recorded 
onto the HDD.) 

To reduce noise in input from a video cassette recorder, set “AV-in 
NR” to “On” in the on-screen menu (

37).

Check the time on the unit is correct.

1

While stopped

Press [INPUT SELECT] to select the 
input channel for the equipment you 
have connected.

e.g., If you have connected to AV3 input terminals, select 
“AV3”.

2

Press [REC MODE] to select the 
recording mode.

3

Start play on the other equipment.

4

When you want to start recording

Press [

¥

REC].

Recording starts.

To skip unwanted parts

Press [

;

] to pause recording. (Press again to restart recording.)

To stop recording

Press [

].

Using Flexible Recording (

24), you can record the content of a 

video cassette (approx. 1–8 hours) to a 4.7 GB disc with the best 
possible quality of recording without wasting disc space.

[HDD]


[RAM]

When the “DV AUTO REC” function is used, programmes are 
recorded as a title while at the same time chapters are created at 
each break in the images and the play list is created automatically.

Preparation

1 Turn off the main unit and DV equipment, then connect the 

equipment with the unit’s DV input terminal (

left column).

2 Turn on the main unit and DV equipment.
3 Pause play of the DV equipment at the point you want recording 

to start.

4 Press [HDD] or [DVD] to select the recording drive.

When the output signal from the external equipment is NTSC, 

change the “TV System” to “NTSC” in the SETUP menu (

61).

1

While stopped

Press [REC MODE] to select the 
recording mode.

2

Press [FUNCTIONS].

3

Press [

3

,

4

] to select “To Others” 

and press [ENTER].

4

Press [

3

,

4

] to select “DV AUTO 

REC” and press [ENTER].

5

Press [

2

,

1

] to select “Rec” and 

press [ENTER].

Recording starts.

When recording finishes

The confirmation screen appears. Press [ENTER] to finish DV 
automatic recording. 

To stop recording

Press [

].

[Note]

Only one piece of DV equipment (e.g., digital video camcorder) can 

be connected to the unit via the DV input terminal.

It is not possible to operate the unit from the connected DV equipment.

The DV input on this unit is for use with DV equipment only. (It 

cannot be connected to a computer, etc.)

The DV equipment name may not be shown correctly.

Depending on the DV equipment, the images or audio may not be 

input properly.

The date and time information on the tape of the DV equipment will 

not be recorded.

You cannot record and play simultaneously.

Manual recording

HDD

HDD

DVD

DVD

SD

SD

1

2

3

4

5

6

7

8

9

GUIDE

FU

N

C

TIO

NS

AV

PAGE

CH

ShowView

MANUAL SKIP

0

INPUT SELECT

SKIP

SLOW/SEARCH

STOP

PAUSE

PLAY/x1.3

NA

V

IG

AT

O

R

D

IR

E

C

T

PR

OG

/CH

ECK

SUB MENU

RETURN

DISPLAY STATUS

CREATE

CHAPTER

ERASE

REC

REC MODE EXT LINK

TIMER

TIME SLIP AUDIO

DUBBING

F Rec

ENTER

ENTER

CANCEL

TO

P

M

E

N

U

S

REC MODE

HDD, DVD

¥


REC

INPUT SELECT

;

3

,

4

,

2

,

ENTER

FUNCTIONS

HDD DVD SD

EXT LINK

CH

DRIVE

SELECT

REC

S VIDEO IN

VIDEO IN

L/MONO -AUDIO IN-

AV3

R

/

k

1.3

1.3

OPEN/CLOSE

DV IN

L/MONO - AUDIO IN - R

VIDEO IN

S VIDEO IN

DV IN

Audio/Video cable 

S Video

cable

§

Yellow White Red

This unit

Other video equipment

Connect to Audio/Video output terminals.

DV cable

(IEEE 1394, 4-pin)

Almost all videos and DVD-Video on sale have been treated 
to prevent illegal copying. Any software that has been so 
treated cannot be recorded using this unit.

DV automatic recording (DV AUTO REC)

If the DV automatic recording function does not work properly, 
check the connections and DV equipment settings, and turn the 
unit off and back on.

If that does not work, follow the instructions for manual 
recording (

left column).

Reco

rd

in

g

 f

ro

m

 a vi

d

e

o

 cas

set

te

 r

eco

rd

er

47

EH60.book  Page 47  Monday, June 27, 2005  8:46 PM

Содержание DMREH60 - DVD RECORDER DECK

Страница 1: ...GUIDE Plus system Region number supported by this unit Region numbers are allocated to DVD players and DVD Video according to where they are sold The region number of this unit is 2 The unit will play DVD Video marked with labels containing 2 or ALL Von diesem Gerät unterstützter Regionalcode Regionalcodes werden DVD Playern und DVD Videos entsprechend ihrem Verkaufsgebiet zugewiesen Der Regionalc...

Страница 2: ...SETZEN VORSICHT Inside of product Tuotteen sisällä Produktets innside VAROITUS LAITTEEN KÄYTTÄMINEN MUULLA KUIN TÄSSÄ KÄYTTÖOHJEESSA MAINITULLA TAVALLA SAATTAA ALTISTAA KÄYTTÄJÄN TURVALLISUUSLUOKAN 1 YLITTÄVÄLLE NÄKYMÄTTÖMÄLLE LASERSÄTEILYLLE VAROITUS TULIPALO SÄHKÖISKUVAARAN TAI TUOTETTA KOHTAAVAN MUUN VAHINGON VÄHENTÄMISEKSI EI LAITETTA SAA ALTISTAA SATEELLE KOSTEUDELLE VESIPISAROILLE TAI ROISKE...

Страница 3: ...2 Entering text 53 Child Lock 54 Changing the unit s settings 54 Common procedures 54 Summary of settings 55 Tuning 58 Clock settings 60 TV System 61 Messages 62 Frequently asked questions 63 Troubleshooting guide 64 Glossary 68 Specifications 70 Safety precautions 71 Index Back cover This DVD Recorder records high quality pictures to rapid random access capable HDD Hard disk drive and DVD RAM Thi...

Страница 4: ...de play or recording may not start right away because the HDD takes time to be re activated When not using the unit we recommend removing the disc in the tray in order to set the HDD to the SLEEP mode Setup precautions Do not place in an enclosed area so the rear cooling fan and the cooling vents on the side are covered up Place the unit on a surface that is flat and not subject to vibration or im...

Страница 5: ...ted by the environment especially temperature humidity and dust Cigarette smoke also can cause malfunction or breakdown To clean this unit wipe with a soft dry cloth Never use alcohol paint thinner or benzine to clean this unit Before using chemically treated cloth carefully read the instructions that came with the cloth Observe the following points to ensure continued listening and viewing pleasu...

Страница 6: ...t with progressive Off Factory setting 57 even if it is progressive compatible because progressive output can cause some flickering This is the same for multi system televisions using PAL mode Opening the cover Inserting the card Do not forget to close the cover right Removing the card Closing the cover Press down ADAPTER If you are using a miniSDTM card insert it into the miniSDTM card adaptor th...

Страница 7: ...4 3 aspect The main M 1 or secondary audio M 2 only can be recorded for bilingual broadcasts Playing the disc on other DVD players is not possible before finalizing DVD R DVD RW and R are collectively referred to as DVD R etc on this page Therefore follow the steps below when you use DVD R etc Record to DVD R etc 16 9 aspect programme with main and secondary audio Hello Hello M 2 M 1 The selected ...

Страница 8: ...ng to be used for a long period of time Store in a cool dark place Remote control operations 12 Note If you cannot operate the unit or television using the remote control after changing the batteries please re enter the codes 21 Use Please check and identify the supplied accessories Product numbers correct as of April 2005 These may be subject to change EUR7729KC0 1 Remote control 1 AC mains lead ...

Страница 9: ...1 and M 2 for bilingual broadcasts Y Y t Only one is recorded 56 Bilingual Audio Selection Recording 16 9 aspect picture Y Y t The picture is recorded in 4 3 aspect Entering text Y Y Y Erasing titles Y Y Y Available space does not increase after erasing Creating playlists Y Y t Disc type DVD RW DVD Video format 4 7 GB 12 cm 1 4 GB 8 cm R 4 7 GB 12 cm Logo Indicated in these instructions by RW V be...

Страница 10: ...ic discs High fidelity music discs Played on this unit in 2 channels DVD RW recorded on another DVD Recorder You can play programmes that allow One time only recording if they have been recorded to a CPRM compatible disc By formatting 51 the disc you can record to it in DVD Video format and play it on this unit RW recorded on another DVD Recorder Recorded audio and music including CD R RW CD R and...

Страница 11: ...SD card slot A miniSDTM card adaptor included with the miniSDTM card is necessary You can play and transfer dub still pictures taken on a digital camera etc 34 48 You can set the DPOF Digital Print Order Format for automatic printing on your home printer or at a photo developing store 42 68 Suitable SD Memory Cards 8 MB 16 MB 32 MB 64 MB 128 MB 256 MB 512 MB 1 GB Maximum Structure of folders displ...

Страница 12: ...Refer to the User s manual for the GUIDE Plus system for more information Note Buttons such as the REC button do not protrude as much as other buttons to stop them from being pressed accidentally If you press EXT LINK accidentally the unit turns off and switches to recording standby mode Press EXT LINK again to cancel recording standby The word button is not used in these operating instructions so...

Страница 13: ...ording 23 Rear panel terminals 15 16 2 Transferring dubbing indicator 3 Linked timer recordings with external equipment indicator 4 D MIX multi channel DVD Audio only When lit Down mixing 68 is possible When off The disc prevents down mixing so only the two front channels can be played 10 Regarding DVD Audio 5 Recording mode 6 Disc type 7 Lights when the HDD DVD or SD drive is selected 8 Main disp...

Страница 14: ...n If you connect the unit through an AV selector or video cassette recorder to the television video signal will be affected by copyright protection systems and the picture may not be shown correctly When connecting to a television with a built in VCR Connect to the input terminals on the television side if there are both television and VCR input terminals What kind of input terminal does your tele...

Страница 15: ... OUT DIGITAL AUDIO OUT PCM BITSTREAM PCM BITSTREAM S VIDEO S VIDEO AV4 IN AV4 IN AC IN VHF UHF RF IN AV OUT 1 4 4 3 2 1 To the aerial Splitter Television s rear panel Aerial cable VCR s rear panel RF coaxial cable This unit s rear panel To household mains socket AC 220 to 240 V 50 Hz Fully wired 21 pin Scart cable indicates included accessories indicates accessories not included are required conne...

Страница 16: ...anel Use a splitter if you also want to connect the aerial to your VCR AC mains lead Connect only after all other connections are complete Yellow White Red Yellow White Red COMPONENT VIDEO IN S VIDEO IN AUDIO IN R L VIDEO IN Y PB PR COMPONENT COMPONENT VIDEO VIDEO OUT OUT PROGRESSIVE PROGRESSIVE INTERLACE INTERLACE OPTICAL OPTICAL DIGITAL AUDIO OUT DIGITAL AUDIO OUT PCM BITSTREAM PCM BITSTREAM AV4...

Страница 17: ...ted equipment You cannot use DTS Digital Surround decoders not suited to DVD Even if using this connection output will be only 2 channels when playing DVD Audio Connection to a stereo amplifier Connecting a digital satellite receiver or decoder AV2 DECODER EXT AV1 TV AV4 IN AV4 IN AUD AUD VIDE VIDE R L RF OUT RF OUT RF IN RF IN AV OUT Digital receiver satellite receiver or decoder s rear panel 21 ...

Страница 18: ...des programme information from the host station displayed on the television like a TV programme magazine Setting up to record a broadcast is easy too Simply select the desired programme from the displayed list You can also search for desired programmes by displaying only the programmes in a certain category The GUIDE Plus system is available in the following countries Austria Belgium France German...

Страница 19: ... User s manual for the GUIDE Plus system If you do not want to setup the GUIDE Plus system Press 2 1 to select No and press ENTER Television picture appears Auto Setup is complete To stop partway Press RETURN If the clock setting menu appears Set the clock manually 60 To confirm that stations have been tuned correctly 58 To restart Auto Setup 59 You can also use the following method to restart Aut...

Страница 20: ...rogressive output can cause some flickering Turn off Progressive if this occurs 37 There is no output from the COMPONENT VIDEO OUT terminals if AV1 Output in the SETUP menu is set to RGB without component Set this item to either Video with component or S Video with component 57 If the unit is connected to the television through VIDEO OUT S VIDEO OUT or AV1 terminal output will be interlace irrespe...

Страница 21: ...ge the code on the remote control While pressing ENTER press and hold the numbered button 1 2 or 3 for more than 2 seconds 8 Press ENTER When the following indicator appears on the unit s display The unit s remote control code Change the code on the remote control to match the main unit s step 7 Note Executing Shipping Condition in the SETUP menu returns the main unit code to DVD 1 Change the remo...

Страница 22: ... for the unit to complete recording management information after recording finishes If a station broadcasts Teletext information The unit automatically records the programme s and station s name if the station s Title Page is correctly set 58 Note The unit may take some time in retrieving titles up to 30 minutes and may fail in some cases HDD DVD SD EXT LINK CH DRIVE SELECT REC SVIDEO IN VIDEO IN ...

Страница 23: ...nalized 52 HDD RAM R RW V R During recording Press REC on the main unit to select the recording time You can specify up to 4 hours later The unit display changes as shown below This does not work during timer recordings 26 or while using Flexible Recording 24 If you change the channel or recording mode while recording is paused the time specified to stop recording is cancelled The unit does not tu...

Страница 24: ...o DVD R DVD RW DVD Video format and R after you have recorded to the HDD If transferring dubbing a title using the high speed mode to a DVD R etc set Rec for High Speed dubbing to On before recording to the HDD However the following restrictions apply When recording bilingual broadcasts either the main or secondary audio can be recorded If you do not connect external equipment Select M 1 or M 2 in...

Страница 25: ...to a television that has the Q Link function using a fully wired 21 pin Scart cable This function allows you to immediately start recording the programme that you are viewing on the TV 1 Press HDD or DVD to select the recording drive The HDD or DVD indicator lights up on the unit 2 If you selected the DVD drive Insert a disc 22 3 Press and hold DIRECT TV REC for 1 second Recording starts To stop r...

Страница 26: ... also press HDD or DVD to select the recording drive When the recording drive is DVD and there is not enough remaining space recording automatically switches to the HDD 27 Relief Recording You can also press REC MODE to change the recording mode VPS PDC 27 ON OFF RENEW Auto Renewal Recording HDD 28 ON OFF Programme Name Press 2 1 to select Programme Name and press ENTER 53 Entering text 4 Press EN...

Страница 27: ...part at the beginning of the later programmes a few seconds when recording with HDD or DVD RAM and approximately 30 seconds when recording with DVD R DVD RW DVD Video format and R If the GUIDE Plus system is set Television programme list data is downloaded between AM2 50 and AM5 10 If you want to make timer recordings during this time set Auto Download Priority in the GUIDE Plus system setup menu ...

Страница 28: ...he programme may not be recorded completely Manually programming timer recordings l l l a Date Current date up to one month later minus one day Daily timer SUN SAT MON SAT MON FRI Weekly timer SUN SAT TIMER RECORDING 1 58 SP DVD 30 24 SP HDD Remain 12 56 00 15 7 TUE RETURN ENTER Press ENTER to store new programme Mode Stop Start No Date VPS PDC HDD DVD Name Disc space SP OK 20 00 19 00 ARD 15 7 TU...

Страница 29: ...ress EXT LINK to stop recording or to cancel linked timer recording standby In order to prevent accidental operation press EXT LINK to cancel the setting after recording is finished Note This function does not work with some equipment Refer to the equipment s operating instructions The beginnings of recordings may not be recorded correctly in some cases When Ext Link is set to Ext Link 2 this func...

Страница 30: ...tons To show other pages Press 3 4 2 1 to select Previous or Next and press ENTER Thumbnail Display only You can also press 9 to show other pages To exit the screen Press DIRECT NAVIGATOR Direct Navigator screen icons DVD HDD HDD DVD DVD SD SD 1 2 3 4 5 6 7 8 9 GUIDE F U N C T I O N S Í Í DIRECT TV REC AV CH VOLUME TV TV PAGE CH ShowView MANUAL SKIP 0 INPUT SELECT SKIP SLOW SEARCH STOP PAUSE PLAY ...

Страница 31: ... forward DVD A excluding moving picture parts CD Audio is heard during all levels of search Depending on the disc Search may not be possible Skip During play or while paused press or 9 Skip to the title chapter or track you want to play Each press increases the number of skips Starting from a selected title Press the numbered buttons Play starts from the selected title chapter or track HDD CD disc...

Страница 32: ... you press 3 4 the time increases 3 or decreases 4 by 1 minute intervals Press and hold for 10 minute intervals Press TIME SLIP to show the play images in full Note Time Slip does not work while timer recording is in standby Manual Skip HDD RAM R RW V R RW VR Press MANUAL SKIP Each time you press play restarts approximately 30 seconds later Simple editing operations during play 0 min PLAY ARD Play...

Страница 33: ...ates 32 kbps to 320 kbps Sampling frequency 16 kHz 22 05 kHz 24 kHz 32 kHz 44 1kHz 48 kHz This unit is not compatible with ID3 tags If there is a large amount of still picture data etc within a MP3 file play may not be possible DVD HDD HDD DVD DVD SD SD 1 2 3 4 5 6 7 8 9 GUIDE F U N C T I O N S Í Í DIRECT TV REC AV CH VOLUME TV TV PAGE CH ShowView MANUAL SKIP 0 INPUT SELECT SKIP SLOW SEARCH STOP P...

Страница 34: ...still pictures JPEG TIFF 1 Press RETURN 2 Press FUNCTIONS 3 Press 3 4 to select MENU and press ENTER 4 Press 3 4 to select JPEG and press ENTER Picture protected Picture in which the number of prints is set DPOF 42 68 DVD HDD HDD DVD DVD SD SD 1 2 3 4 5 6 7 8 9 GUIDE F U N C T I O N S Í Í DIRECT TV REC AV CH VOLUME TV TV PAGE CH ShowView MANUAL SKIP 0 INPUT SELECT SKIP SLOW SEARCH STOP PAUSE PLAY ...

Страница 35: ... to access DCIM Press ENTER to set Regarding still pictures JPEG TIFF HDD RAM SD Compatible formats DCF compliant Content recorded on a digital camera etc Design rule for Camera File system unified standard established by Japan Electronics and Information Technology Industries Association JEITA File format JPEG TIFF non compressed RGB chunky format Number of pixels 34k34 to 6144k4096 Sub sampling ...

Страница 36: ... DVD A Select the audio and language below Audio attribute Language VCD SVCD only Select the soundtrack number 1 2 Soundtrack numbers 1 2 are displayed even when there is only one audio type Subtitle DVD V DVD A Turn the subtitle on off and select the language below Language HDD RAM R RW V R RW VR Only discs that contain subtitle on off information Turn the subtitle on off Subtitle on off informat...

Страница 37: ...ted Reduces video tape noise while transferring dubbing Automatic Noise reduction only works on picture input from a video tape On Noise reduction works for input video Off Noise reduction is off You can record the input signal as it is Sound menu Change the sound effect V S S HDD RAM R RW V R DVD V DVD A RW VR Dolby Digital MPEG 2 channel or over only Enjoy a surround like effect if you are using...

Страница 38: ...IGATOR Title Chapter Programmes are recorded as a single title consisting of one chapter You can divide a title into multiple chapters HDD RAM 32 39 Create Chapter You can change the order of chapters and create a playlist 40 HDD RAM Titles are divided into about 5 minute chapters after finalizing 52 R RW V R Editing titles chapters and playing chapters HDD HDD DVD DVD SD SD 1 2 3 4 5 6 7 8 9 GUID...

Страница 39: ... ENTER at the point you want to divide the title 2Press 3 4 to select Exit and press ENTER 3Press 2 1 to select Divide and press ENTER To confirm the division point Press 3 4 to select Preview and press ENTER The unit plays 10 seconds before and after the division point To change the division point Restart play and press 3 4 to select Divide then press ENTER at the point where you want to divide t...

Страница 40: ...the selected scenes become the playlist To return to the previous screen Press RETURN To exit the screen Press RETURN several times You can arrange the chapters 38 to create a playlist Transferring dubbing 43 a playlist will create a title Playlists are not recorded separately so this doesn t use much capacity Editing chapters in a playlist does not modify the source titles and source chapters Cre...

Страница 41: ...Chapter View Erase Refer to Playlist operations PLAYLISTS CHAPTER VIEW 01 ARD 12 10 SUN 0 30 001 002 HDD 0 10 24 Chapter View screen Move Chapter Create Chapter Combine Chapters Erase Chapter PLAYLIST View Add Chapter Refer to Chapter operations Playlist operations Erase HDD RAM Press 2 1 to select Erase and press ENTER Once erased the playlists are lost and cannot be restored Make certain before ...

Страница 42: ...t up Protection Cancel Protection DPOF Folder EraseWhole Folder To switch to another higher folder 35 Picture and folder operation Erase Picture Erase Whole Folder HDD RAM SD Press 2 1 to select Erase and press ENTER Once erased the recorded contents are lost and cannot be restored Make certain before proceeding When erasing a folder the files not containing still pictures will also be erased if t...

Страница 43: ...erring dubbing list You can transfer dub your favorite titles and playlists to discs Transferring dubbing a playlist will create a title When you want to re edit finalized content on a DVD R etc When you want to play a transferred dubbed disc on other equipment you must finalize the disc after transferring dubbing 52 68 1Before recording to HDD set Rec for High Speed dubbing to On 24 2DVD R DVD RW...

Страница 44: ...to disc Select the audio type for recording bilingual broadcast from Bilingual Audio Selection 56 when Transferring dubbing to a DVD R DVD RW DVD Video format and R When Audio Mode for XP Recording is set to LPCM 56 and you are transferring dubbing in XP mode 1 While stopped Press FUNCTIONS 2 Press 3 4 to select DUBBING and press ENTER If you are not going to change the registered list press 4 sev...

Страница 45: ...ring dubbing Press and hold RETURN for 3 seconds If stopped partway transferring dubbing will be up to that point However in high speed mode only titles that have completed transferring dubbing at the point stopped are transferred dubbed Even if the title was not transferred dubbed to the DVD R DVD RW DVD Video format or R the amount of remaining writable disc space becomes less To return to the p...

Страница 46: ...s 3 4 to select On and press ENTER 4 Press 3 4 to select Dubbing Time and press ENTER 5 Press 2 1 to select Hour and Min and press 3 4 to set the recording time 6 Press ENTER 7 Press 2 to confirm Set a few minutes longer than the source title in order to include the operation time before play begins You can also set the recording time with the numbered buttons 6 Press 3 4 to select Start Dubbing a...

Страница 47: ...nt then connect the equipment with the unit s DV input terminal left column 2 Turn on the main unit and DV equipment 3 Pause play of the DV equipment at the point you want recording to start 4 Press HDD or DVD to select the recording drive When the output signal from the external equipment is NTSC change the TV System to NTSC in the SETUP menu 61 1 While stopped Press REC MODE to select the record...

Страница 48: ...Press 3 4 to select Create List and press 1 2 Press 3 4 to select Picture Folder and press ENTER 3 Press 3 4 to select Folder and press ENTER 4 Press 3 4 to select New item and press ENTER 5 Press 3 4 to select the folder and press ENTER To select a multiple number of items together press to add the check mark and press ENTER 49 Multiple editing To show other pages 49 To switch to another higher f...

Страница 49: ... PICTURES and press ENTER If there is a multiple number of higher folders recognizable you can switch them using 2 1 4 Press 3 4 to select Copy to and press 2 1 to select the drive 5 Press 3 4 2 1 to select Copy and press ENTER To stop transferring dubbing Press and hold RETURN for 3 seconds To return to the previous screen Press RETURN To show other pages Press 3 4 2 1 to select Previous or Next ...

Страница 50: ...a finalized DVD R DVD RW DVD Video format and R the name is displayed on the Top Menu To return to the previous screen Press RETURN To exit the screen Press RETURN several times Common procedures DVD HDD HDD DVD DVD SD SD 1 2 3 4 5 6 7 8 9 GUIDE F U N C T I O N S Í Í DIRECT TV REC AV CH VOLUME TV TV PAGE CH ShowView MANUAL SKIP 0 INPUT SELECT SKIP SLOW SEARCH STOP PAUSE PLAY x1 3 N A V I G A T O R...

Страница 51: ...ct Yes and press ENTER 6 Press 2 1 to select Start and press ENTER A message appears when formatting is finished Note Formatting normally takes a few minutes however it may take up to a maximum of 70 minutes RAM Do not disconnect the AC mains lead while formatting This can render the disc or the card unusable 7 Press ENTER Note When a disc or card has been formatted using this unit it may not be p...

Страница 52: ... on the confirmation screen approximately four times You cannot finalize discs recorded on other manufacturer s equipment If you finalize discs recorded on Panasonic equipment other than this unit the background selected as Top Menu may not be displayed Discs finalized on this unit may not be playable on other players due to the condition of the recording Visit Panasonic s homepage for more inform...

Страница 53: ...D I R E C T P R O G C HECK SUB MENU RETURN DISPLAY STATUS CREATE CHAPTER ERASE REC REC MODE EXT LINK TIMER DVD TV ENTER ENTER CANCEL T O P M E N U S 3 4 2 1 ENTER RETURN CANCEL SUB MENU 9 Numbered buttons Red Green _ Enter Name 1 2 3 4 5 A B C a D E F d G H I N O g J K L j M m 6 7 8 9 0 b c i j e f l h i fl k l O N n _ o Space Set Erase P Q R S p T U V t W X Y Z w q r s u v x y z π Title on TOP MEN...

Страница 54: ... 4 5 6 7 8 9 GUIDE F U N C T I O N S ShowView MANUAL SKIP 0 INPUT SELECT SKIP SLOW SEARCH STOP PAUSE PLAY x1 3 N A V I G A T O R D I R E C T P R O G C HECK SUB MENU RETURN DISPLAY STATUS CREATE CHAPTER ERASE REC REC MODE EXT LINK TIMER TIME SLIP AUDIO DUBBING F Rec DVD TV DVD TV ENTER ENTER CANCEL T O P M E N U S ENTER RETURN Changing the unit s settings HDD DVD SD OPEN CLOSE DRIVE SELECT REC k1 3...

Страница 55: ...h French German Italian Spanish Dutch Other Settings for recording Press ENTER to show the following settings Recording time in EP mode Select the maximum number of hours for recording in EP mode 23 Recording modes and approximate recording times EP 6 Hours You can record for 6 hours on an unused 4 7 GB disc EP 8 Hours You can record for 8 hours on an unused 4 7 GB disc The sound quality is better...

Страница 56: ... channels Note Not making the proper settings may result in noise or some trouble for digital recording Bitstream When connecting to equipment displaying the Dolby Digital logo PCM When connecting to equipment not displaying the Dolby Digital logo DTS Bitstream When connecting to equipment displaying the DTS logo PCM When connecting to equipment not displaying the DTS logo MPEG Bitstream When conn...

Страница 57: ...play is automatically set to Automatic 56 The Quick Start function does not work It is automatically turned to Off When the unit is off Pay TV programmes cannot be watched on the TV because the signal from the connected decoder is not looped through To watch them turn on the unit If Quick Start is set to On Power Save is automatically turned to Off On Power consumption is minimized when the unit i...

Страница 58: ...umber of the desired programme position and press ENTER Name To enter or change the name of a TV station Press 3 4 2 1 to enter station name and press ENTER If the station name needs a blank space select the blank between Z and Channel To enter newly available TV stations or change the channel number of an already tuned TV station Press 3 4 or the numbered buttons to enter the channel number of th...

Страница 59: ...us system Press 2 1 to select Yes and press ENTER It takes approx 2 hours to set up the GUIDE Plus system User s manual for the GUIDE Plus system If you do not want to setup the GUIDE Plus system Press 2 1 to select No and press ENTER Television picture appears Auto Setup Restart or Download from TV is complete List of TV Reception Channels Only for 8 MHz channel raster Auto Setup Restart Download...

Страница 60: ...ry it is adjusted several times every day 6 Press 3 4 to select On of Automatic and press ENTER Auto clock setting starts The following screen appears when setting is complete To stop partway Press RETURN If the unit cannot set the clock automatically set the clock manually right step 6 6 Press 3 4 to select Off of Automatic and press ENTER 7 Press 2 1 to select the item you want to change The ite...

Страница 61: ...numbered buttons Abkhazian 6566 Afar 6565 Afrikaans 6570 Albanian 8381 Ameharic 6577 Arabic 6582 Armenian 7289 Assamese 6583 Aymara 6589 Azerbaijani 6590 Bashkir 6665 Basque 6985 Bengali Bangla 6678 Bhutani 6890 Bihari 6672 Breton 6682 Bulgarian 6671 Burmese 7789 Byelorussian 6669 Cambodian 7577 Catalan 6765 Chinese 9072 Corsican 6779 Croatian 7282 Czech 6783 Danish 6865 Dutch 7876 English 6978 Es...

Страница 62: ...tands for a number The remote control and main unit are using different codes Change the code on the remote control Press and hold ENTER and the indicated number button at the same time for more than 2 seconds 21 HARD ERR If there is no change after turning the unit on and off consult the dealer where the unit was purchased HDD SLP In order to extend HDD life the HDD is in SLEEP mode Press HDD to ...

Страница 63: ... also records and plays high speed recording compatible DVD R DVD RW R discs 9 10 Please tell me about CD R and CD RW compatibility with this unit This unit plays CD R CD RW discs which have been recorded in one of the following standards CD DA Video CD SVCD conforming to IEC62107 MP3 and still pictures JPEG TIFF Close the session or finalize the disc after recording This unit can recognize up to ...

Страница 64: ...between the time displayed and the actual elapsed time e g actual one hour elapsed time may display as approximately 59 minutes 56 seconds This does not affect the recording SELF CHECK is displayed and the disc cannot be ejected The unit is carrying out the recovery process Do the following to eject the disc 1 Press Í I on the main unit to switch the unit to standby If the unit doesn t switch to s...

Страница 65: ...ol again after changing the batteries It may be necessary to set the manufacturer code again after changing the batteries The child lock function is activated 21 21 8 21 21 54 The unit is on but cannot be operated Recording drive or playback drive has not been selected properly Some operations may be prohibited by the disc The unit is hot U59 appears on the display Wait for U59 to disappear One of...

Страница 66: ... HDD disc may become unusable You will have to format the disc HDD RAM RW V or use a new disc We cannot offer any guarantee regarding lost programmes or discs 51 The programme name and the recorded title do not match There was a programme change after timer recording was set but the recorded title still has the old programme name Cannot transfer dub to a DVD R etc disc using the high speed mode Wh...

Страница 67: ...cording time doesn t increase even after erasing recordings on the disc Available recording space on the DVD R and R does not increase even after erasing previously recorded titles Disc space on a DVD RW DVD Video format increases only when the last recorded title is erased It does not increase if other titles are erased Cannot create a playlist You cannot select all the chapters at once in a titl...

Страница 68: ...res JPEG TIFF are stored Formatting Formatting is the process of making media such as DVD RAM recordable on recording equipment You can format the HDD DVD RAM DVD RW only as DVD Video format and SD Memory Card on this unit Formatting erases irrevocably all contents Frames and fields Frames refer to the single images that constitute the video you see on your television Each frame consists of two fi...

Страница 69: ...our area for details In the case of VPS PDC recording use the correct time VPS PDC time for recording the TV programmes Set VPS PDC to OFF when the recording time is not the correct time VPS PDC time VPS PDC recording is not performed when the time VPS PDC time is incorrect even if only by one minute To find out the correct time VPS PDC time consult Teletext a newspaper or magazine or other source...

Страница 70: ...lour signal 525 lines 60 fields Recording system MPEG2 Hybrid VBR Video in SECAM PAL NTSC AV1 AV2 21 pin AV3 AV4 pin jack 1 Vp p 75 termination S Video in SECAM PAL NTSC AV2 21 pin AV3 AV4 S terminal 1 Vp p 75 termination RGB in PAL AV2 21 pin 0 7 Vp p PAL 75 termination Video out PAL NTSC AV1 AV2 21 pin Video Out pin jack 1 Vp p 75 termination S Video out PAL NTSC AV1 21 pin S Video Out S termina...

Страница 71: ...ed or reconstructed by unqualified persons Extend operating life by disconnecting the unit from the power source if it is not to be used for a long time Placement Voltage AC mains lead protection Foreign matter Service Manufactured under license from Dolby Laboratories Dolby and the double D symbol are trademarks of Dolby Laboratories DTS and DTS 2 0iDigital Out are trademarks of Digital Theater S...

Страница 72: ...ip 32 Menu MP3 33 On screen 36 SETUP 54 Mode Recording 23 Still Mode 55 MP3 33 Name Disc 50 Entering text 53 Folder 42 Playlist 41 Title 26 28 39 Noise reduction NR AV in NR 37 Playback NR 37 One Touch Transfer dubbing 44 On screen Language 57 Menus 36 Status messages 37 Partial Erase 39 PCM Down Conversion 56 Picture settings 37 55 Playlist 40 Playback NR 37 Power Save 57 Progressive 6 20 37 57 6...

Страница 73: ...RQT8203 MEMO 73 ...

Страница 74: ... LÄNDERN MIT GEMÄSSIGTEM KLIMA BESTIMMT Dieses Gerät kann beim Betrieb Hochfrequenzstörungen auffangen die von einem in der Nähe verwendeten Handy verursacht werden Falls eine solche Störbeeinflussung festgestellt wird sollte das Handy in größerer Entfernung von diesem Gerät betrieben werden Das Gerät sollte in der Nähe der Netzsteckdose so aufgestellt werden dass im Störungsfall jederzeit ein unb...

Страница 75: ...cht über die Einstellungen 55 Sendertabelle 58 Uhreinstellung 60 TV System 61 Meldungen 62 Häufig gestellte Fragen 63 Fehlersuche 64 Glossar 68 Technische Daten 70 Sicherheitsmaßnahmen 71 Stichwortverzeichnis Rückwärtige Umschlagseite Dieser DVD Recorder verwendet eine Festplatte HDD und eine DVD RAM und ermöglicht hochqualitative Bildaufnahmen und einen schnellen freien Zugriff Das Gerät ist mit ...

Страница 76: ...n ist Bei Nichtverwendung des Geräts empfehlen wir die Disc aus der Lade herauszunehmen damit die Festplatte in den SLEEP Modus schaltet Wichtige Hinweise zur Aufstellung Stellen Sie das Gerät so auf dass der Lüfter auf der Rückseite und die Kühlöffnungen an der Seite frei sind Stellen Sie das Gerät auf eine ebene Fläche die keinen Vibrationen oder Stößen ausgesetzt ist Stellen Sie das Gerät nicht...

Страница 77: ...äzisionsteile in diesem Gerät reagieren empfindlich auf Umgebungseinflüsse insbesondere Temperatur Luftfeuchtigkeit und Staub Zigarettenrauch kann ebenfalls eine Funktionsstörung oder einen Ausfall verursachen Wischen Sie dieses Gerät zum Reinigen mit einem weichen trockenen Tuch ab Verwenden Sie zum Reinigen dieses Geräts auf keinen Fall Alkohol Lackverdünner oder Benzin Bevor Sie ein chemisch be...

Страница 78: ...zu und schalten Sie den Progressivmodus auf Aus werksseitige Standardeinstellung 57 selbst wenn der Fernseher progressiv tauglich ist Progressivsignale können bei solchen Fernsehern Bildzittern verursachen Das gleiche gilt für Mehrnormen Fernseher im PAL Modus Öffnen der Abdeckung Einsetzen der Karte Herausnehmen der Karte Schließen der Abdeckung Nach unten drücken ADAPTER Drücken Sie auf die Mitt...

Страница 79: ...Rs usw 16 9 Format Programme werden im 4 3 Format aufgenommen Bei Zweikanalton Programmen kann nur der Hauptton M 1 oder nur der Zusatzton M 2 aufgenommen werden Auf anderen DVD Playern kann die Disc erst nach dem Finalisieren wiedergegeben werden DVD R DVD RW und R werden auf dieser Seite als DVD R usw bezeichnet Führen Sie deshalb bei Verwendung einer DVD R usw die folgenden Schritte aus Aufnahm...

Страница 80: ...hen Nehmen Sie die Batterien heraus wenn die Fernbedienung längere Zeit nicht benutzt werden soll Lagern Sie die Batterien an einem kühlen dunklen Ort Fernbedienungsbetrieb 12 Hinweis Falls sich dieses Gerät oder das Fernsehgerät nach dem Auswechseln der Batterien nicht mit der Fernbedienung steuern lässt geben Sie die Codes neu ein 21 Gebrauch Überprüfen Sie ob die folgenden Teile mitgeliefert si...

Страница 81: ... als auch M 2 einer Zweikanalton Sendung aufnehmen Y Y t Nur ein Kanal wird aufgenommen 56 Sprachauswahl Aufnehmen im 16 9 Format Y Y t Das Bild wird im 4 3 Format aufgenommen Text eingeben Y Y Y Titel löschen Y Y Y Nach dem Löschen nimmt der verfügbare Platz nicht zu Playlisten erstellen Y Y t Disctyp DVD RW DVD Videoformat 4 7 GB 12 cm 1 4 GB 8 cm R 4 7 GB 12 cm Logo In der Anleitung gekennzeich...

Страница 82: ... VCD Verwendung Filme mit hoher Bildqualität und Musikdiscs HiFi Musikdisc Wird in diesem Gerät im 2 Kanalmodus wiedergege ben Eine mit einem anderen DVD Recorder aufgenommene DVD RW Auf einmaliges Aufnehmen beschränkte Programme können wiedergegeben werden falls sie auf eine CPRM kompatible Disc aufgenommen wurden Wenn Sie die Disc formatieren 51 können Sie sie mit diesem Gerät im DVD Videoformat...

Страница 83: ...en Der bei der miniSDTM Karte mitgelieferte miniSDTM Kartenadapter wird benötigt Mit einer Digitalkamera usw aufgenommene Standbilder können wiedergegeben und überspielt werden 34 48 Die Reihenfolge für das automatische Ausdrucken DPOF Digital Print Order Format auf Ihrem Drucker oder in einem Fotoladen kann eingestellt werden 42 68 Geeignete SD Memory Cards 8 MB 16 MB 32 MB 64 MB 128 MB 256 MB 51...

Страница 84: ... User s manual for the GUIDE Plus system Hinweis Tasten wie REC stehen weniger hervor als andere um ein versehentliches Drücken zu verhindern Wenn EXT LINK versehentlich gedrückt wird schaltet sich das Gerät aus es befindet sich dann in Aufnahme Bereitschaft Drücken Sie EXT LINK erneut um die Aufnahme Bereitschaft abzuschalten Bei den Erläuterungen wird das Wort Taste weggelassen So wird beispiels...

Страница 85: ...nungssensor 22 Angabe der Aufnahme Stoppzeit 23 Anschlüsse auf der Rückseite 15 16 2 Überspielanzeige 3 Anzeige für Timeraufnahme mit externen Geräten 4 D MIX nur Mehrkanal DVD Audio Ein Heruntermischen ist möglich 68 Erloschen Disc ermöglicht kein Heruntermischen deshalb können nur die beiden Frontkanäle wiedergegeben werden 10 Hinweis zu DVD Audio 5 Aufnahmemodus 6 Disctyp 7 Leuchtet wenn das Fe...

Страница 86: ...nseher Wenn Sie das Gerät über eine AV Schalteinheit oder einen Videocassettenrecorder an den Fernseher anschließen wird das Videosignal vom Kopierschutzsystem kontrolliert und das Bild möglicherweise nicht korrekt angezeigt Nur bei Anschluss an einen Fernseher mit eingebautem Videocassettenrecorder Nehmen Sie den Anschluss an die Eingangsbuchsen des Fernsehers vor wenn sowohl Fernseher als auch V...

Страница 87: ...HF RF IN AV OUT 1 4 4 3 2 1 An Antenne Verteiler Rückseite des Fernsehers Antennen kabel Rückseite des Videocassettenrecorders Lüfter HF Koaxialkabel Rückseite dieses Geräts An Netzsteckdose Netzstrom 220 bis 240 V 50 Hz 21 poliges Scart Kabel mit kompletter Belegung mitgeliefertes Zubehör nicht mitgeliefertes Zubehör erforderliche Anschlüsse Gehen Sie in der nummerierten Reihenfolge vor Buchse AV...

Страница 88: ...en Videocassettenrecorder anschließen wollen verwenden Sie einen Verteiler Netzkabel Erst anschließen wenn alle anderen Kabel bereits angeschlossen sind Gelb Weiß Rot Gelb Weiß Rot COMPONENT VIDEO IN S VIDEO IN AUDIO IN R L VIDEO IN Y PB PR COMPONENT COMPONENT VIDEO VIDEO OUT OUT PROGRESSIVE PROGRESSIVE INTERLACE INTERLACE OPTICAL OPTICAL DIGITAL AUDIO OUT DIGITAL AUDIO OUT PCM BITSTREAM PCM BITST...

Страница 89: ...ls nicht mitgeliefert dass der Stecker in das betreffende Gerät passt Nur DVD taugliche DTS Digital Surrounddecoder können verwendet werden Auch bei dieser Anschlussart erhält man bei der Wiedergabe von DVD Audio nur 2 Kanäle Anschluss eines Stereoverstärkers Anschluss eines Digital Satellitenreceivers oder Decoders AV2 DECODER EXT AV1 TV AV4 IN AV4 IN AUD AUD VIDE VIDE R L RF OUT RF OUT RF IN RF ...

Страница 90: ...Sender empfangenen Programminformationen auf dem Fernsehschirm in Form einer TV Programmzeitschrift an Das System erleichtert die Aufnahme Programmierung Sie brauchen lediglich das gewünschte Programm aus der angezeigten Liste auszuwählen Darüber hinaus bietet das System auch die Möglichkeit nur eine bestimmte Programmkategorie aufzulisten Das GUIDE Plus System steht in folgenden Ländern zur Verfü...

Страница 91: ...as GUIDE Plus System nicht einrichten wollen Wählen Sie mit 2 1 die die Option Nein und drücken Sie ENTER Das Fernsehbild erscheint Der automatische Einstellvorgang ist beendet So wird der Vorgang abgebrochen Drücken Sie RETURN Wenn das Uhreinstellmenü erscheint Stellen Sie die Uhr manuell ein 60 Um zu prüfen ob die Sender korrekt eingestellt worden sind 58 Zum erneuten Ausführen der Autom Einstel...

Страница 92: ...lteter Mehrnormen Fernseher an den Progressivausgang angeschlossen wird kann das Bild flimmern selbst wenn der Fernseher progressivtauglich ist Schalten Sie in einem solchen Fall Progressive aus 37 Die COMPONENT VIDEO OUT Buchsen liefern kein Ausgangssignal wenn AV1 Ausgang Scart im SETUP Menü auf RGB ohne Component eingestellt ist Stellen Sie diesen Parameter auf Video mit Component oder S Video ...

Страница 93: ...nung und drücken Sie ENTER 6 Wählen Sie mit 3 4 den Code DVD 1 DVD 2 oder DVD 3 und drücken Sie ENTER 7 Ändern des Codes an der Fernbedienung Während Sie ENTER drücken drücken Sie die Zifferntaste 1 2 oder 3 mindestens 2 Sekunden lang 8 Drücken Sie ENTER Wenn folgende Anzeige im Display des Geräts erscheint Fernbedienungscode des Geräts Stellen Sie an der Fernbedienung denselben Code ein wie am Ge...

Страница 94: ...er Aufnahme wird als ein Titel bezeichnet R RW V R Nach dem Ende der Aufnahme benötigt das Gerät etwa 30 Sekunden um Aufnahmeverwaltungsdaten aufzuzeichnen Wenn ein Sender Videotext ausstrahlt Das Gerät zeichnet automatisch den Namen des Programms und des Senders auf vorausgesetzt TV Guide ist richtig eingestellt 58 Hinweis Es kann einige Zeit bis zu 30 Minuten dauern bis der Name empfangen wird M...

Страница 95: ...M R RW V R Während der Aufnahme Drücken Sie REC am Gerät um die Aufnahmedauer zu wählen Die längste Aufnahmedauer beträgt 4 Stunden Die Anzeige im Display ändert sich wie folgt Bei der Timeraufnahme 26 und bei der flexiblen Aufnahme 24 kann der obige Vorgang nicht ausgeführt werden Wenn im Aufnahmepausenmodus der Kanal oder der Aufnahmemodus geändert wird wird die eingegebene Zeitdauer gelöscht Da...

Страница 96: ...pieren Wenn nach der Aufnahme auf die Festplatte im Hochgeschwindigkeitsmodus auf eine DVD R DVD RW DVD Videoformat oder R überspielt werden soll Soll ein Titel später von der Festplatte im Hochgeschwindigkeitsmodus auf eine DVD R usw überspielt werden müssen Sie Aufn für High Speed Kopieren vor dem Aufnehmen auf die Festplatte auf Ein stellen Es bestehen jedoch die folgenden Einschränkungen Beim ...

Страница 97: ... Zeitversetztes Wiedergeben ist nur möglich wenn dasselbe Signalsystem PAL NTSC verwendet wird Wenn ein mit Q Link Funktion ausgestatteter Fernseher über ein komplett belegtes 21 poliges Scart Kabel angeschlossen ist Die Aufnahme des momentan auf dem Fernseher zu sehenden Programms kann sofort gestartet werden 1 Drücken Sie HDD oder DVD um das Aufnahme Laufwerk zu wählen Die Festplatten oder DVD A...

Страница 98: ...ibt im Gerät gespeichert Durch Drücken von HDD oder DVD können Sie das Aufnahme Laufwerk wählen Wenn als Aufnahme Laufwerk DVD gewählt ist und der Platz nicht ausreicht wird automatisch auf HDD umgeschaltet 27 Ersatz Aufnahme Falls erwünscht können Sie durch Drücken von REC MODE den Aufnahmemodus ändern VPS PDC 27 Ein Aus RENEW Auto Erneuerung Aufnahme HDD 28 Ein Aus Titel Eingabe Wählen Sie mit 2...

Страница 99: ...den Anfang der späteren Programme nicht aufnehmen ein paar Sekunden bei Aufnahme auf die Festplatte oder eine DVD RAM und ungefähr 30 Sekunden bei Aufnahme auf eine DVD R DVD RW DVD Videoformat und R Bei Verwendung des GUIDE Plus Systems Die TV Programmliste wird nachts zwischen 2 50 und 5 10 Uhr heruntergeladen Wenn Sie während dieser Zeit aufnehmen wollen stellen Sie Auto Download Priorität im S...

Страница 100: ...stplatte nicht ausreicht wird das Programm möglicherweise nicht vollständig aufgenommen Manuelle Programmierung von Timeraufnahmen l l l l a Datum Momentanes Datum bis einen Monat später minus einen Tag Tägliche Timeraufnahme Täglich Mo bis Sa Mo bis Fr Wöchentliche Timeraufnahme So Sa TIMER RECORDING 1 58 SP DVD 30 24 SP HDD Restzeit 12 56 00 15 7 Do RETURN ENTER Neue Programme über ENTER speiche...

Страница 101: ...T LINK um die Aufnahme zu stoppen oder die Timeraufnahme Bereitschaft abzuschalten Um ein versehentliches erneutes Aufnehmen zu verhindern empfiehlt es sich am Ende der Aufnahme die Funktion durch Drücken von EXT LINK auszuschalten Hinweis Diese Funktion ist bei einigen Geräten nicht verfügbar Lesen Sie bitte auch die Bedienungsanleitung des externen Geräts In einigen Fällen wird der Anfang einer ...

Страница 102: ...n Sie mit 3 4 2 1 den gewünschten Titel aus und drücken Sie ENTER Sie können die Titel auch mit den Zifferntasten wählen So zeigen Sie andere Seiten an Wählen Sie mit 3 4 2 1 die Option Vorherige oder Nächste und drücken Sie ENTER nur Vorschau Ansicht Auch mit 9 können Sie eine andere Seite wählen So wird das Menü verlassen Drücken Sie DIRECT NAVIGATOR Symbole im Direct Navigator DVD HDD HDD DVD D...

Страница 103: ...ren Bei einigen Discs ist kein Suchbetrieb möglich Überspringen Drücken Sie im Wiedergabe oder Pausenmodus oder 9 Sprung zu einem gewünschten Titel Kapitel oder Track Bei jedem weiteren Drücken wird um eine Stelle weiter gesprungen Starten an einem bestimmten Titel Drücken Sie die Zifferntasten Die Wiedergabe startet am gewählten Titel Kapitel oder Track HDD CD Discs mit MP3 Dateien und JPEG TIFF ...

Страница 104: ... ändert sich die Zeit in 10 Minuten Schritten Drücken Sie TIME SLIP um das Wiedergabebild bildschirmfüllend anzuzeigen Hinweis Die Zeitsprungfunktion arbeitet nicht wenn sich der Timer in Aufnahmebereitschaft befindet Manuelles Überspringen HDD RAM R RW V R RW VR Drücken Sie MANUAL SKIP Bei jedem Drücken startet die Wiedergabe 30 Sekunden später Einfache Editiervorgänge während der Wiedergabe 0 mi...

Страница 105: ...t nicht mit dem Packet write Format kompatibel Dateiformat MP3 Die Dateien müssen die Erweiterung mp3 oder MP3 aufweisen Bitraten 32 kbps bis 320 kbps Abtastfrequenz 16 kHz 22 05 kHz 24 kHz 32 kHz 44 1 kHz 48 kHz Dieses Gerät ist nicht mit ID3 Tags kompatibel Falls eine große Menge an Standbilddaten usw in einer MP3 Datei enthalten sind ist die Wiedergabe unter Umständen nicht möglich DVD HDD HDD ...

Страница 106: ... MP3 Dateien und Standbildern JPEG TIFF eingelegt wird 1 Drücken Sie RETURN 2 Drücken Sie FUNCTIONS 3 Wählen Sie mit 3 4 die Option MENU und drücken Sie ENTER 4 Wählen Sie mit 3 4 die Option JPEG und drücken Sie ENTER Geschütztes Bild Bild bei dem die Anzahl der Druckexemplare festgelegt wurde DPOF 42 68 DVD HDD HDD DVD DVD SD SD 1 2 3 4 5 6 7 8 9 GUIDE F U N C T I O N S Í Í DIRECT TV REC AV CH VO...

Страница 107: ...04 103__DVD Ordner Wählen Sie den zu öffnenden Ordner DCIM Einstellungen mit ENTER übernehmen Hinweise zu Standbildern JPEG TIFF HDD RAM SD Kompatible Formate DCF entsprechend mit Digitalkamera aufgenommenes Material usw Design rule for Camera File system Einheitsstandard der Japan Electronics and Information Technology Industries Association JEITA Dateiformat JPEG TIFF unkomprimiertes RGB Chunky ...

Страница 108: ...DVD A Zur Wahl des Tons und der Sprache unten Audio Attribut Sprache VCD nur SVCD Wählen Sie die Soundtrack Nummer 1 2 Die Soundtrack Nummern 1 2 werden angezeigt selbst wenn es nur einen Audiotyp gibt Untertitel DVD V DVD A Zum Ein Ausschalten des Untertitels und zur Wahl der Sprache unten Sprache HDD RAM R RW V R RW VR Nur Discs mit Untertitel Ein Aus Information Schalten Sie die Untertitel ein ...

Страница 109: ... gewählt ist Reduziert beim Überspielen das Rauschen des Videobandes Automatisch Die Rauschreduktion beeinflusst nur Bilder von einem Videoband Ein Die Rauschreduktion beeinflusst nur den Videoeingang Aus Die Rauschreduktion ist ausgeschaltet Das Eingangssignal wird unverändert aufgenommen Audio Menü Ändern des Toneffektes V S S HDD RAM R RW V R DVD V DVD A RW VR Dolby Digital MPEG nur 2 Kanäle od...

Страница 110: ...NAVIGATOR Titel Kapitel Ein Programm wird als ein Titel aufgezeichnet der zunächst ein einziges Kapitel enthält Ein Titel kann in mehrere Kapitel unterteilt werden HDD RAM 32 39 Kapitel erstellen Die Reihenfolge der Kapitel kann geändert und eine Playliste erstellt werden 40 HDD RAM Nach dem Finalisieren werden die Titel in etwa 5 Minuten lange Kapitel unterteilt 52 R RW V R Editieren von Titeln K...

Страница 111: ...ER an dem Punkt an dem Sie den Titel unterteilen wollen 2Wählen Sie mit 3 4 die Option Beenden und drücken Sie ENTER 3Wählen Sie mit 2 1 die Option Teilen und drücken Sie ENTER Überprüfen des Unterteilungspunktes Wählen Sie mit 3 4 die Option Vorschau und drücken Sie ENTER Eine Passage 10 Sekunden vor und hinter dem Unterteilungspunkt wird wiedergegeben Ändern des Unterteilungspunktes Starten Sie ...

Страница 112: ...Quellentitel zu wählen Wiederholen Sie die Schritte 6 und 7 um noch weitere Kapitel hinzuzufügen 8 Drücken Sie RETURN Die Playliste besteht aus den gewählten Szenen So kehren Sie zum vorhergehenden Bildschirm zurück Drücken Sie RETURN So wird das Menü verlassen Drücken Sie wiederholt RETURN Aus den Kapiteln 38 können Sie eine Playliste erstellen Beim Überspielen 43 einer Playliste wird ein Titel e...

Страница 113: ... Erstellen Eigenschaften Bearbeiten Kapitelansicht Löschen Siehe Playlisten Funktionen PLAYLISTS KAPITELANSICHT 01 ARD 12 10 So 0 30 001 002 HDD 0 10 24 Kapitelansicht Bildschirm Verschieben Kapitel erstellen Kapitel zusammenf Kapitel löschen PLAYLIST Ansicht Kapitel hinzufügen Siehe Kapitel Einstellungen Playlisten Funktionen Löschen HDD RAM Wählen Sie mit 2 1 die Option Löschen und drücken Sie E...

Страница 114: ...e Element schützen Schutz aufheben DPOF Ges Ordner entf So wählen Sie einen anderen höheren Ordner 35 Bild und Ordnereinstellvorgänge Bild löschen Ges Ordner entf HDD RAM SD Wählen Sie mit 2 1 die Option Löschen und drücken Sie ENTER Das gelöschte Material ist verloren und kann nicht zurückgerufen werden Vergewissern Sie sich dass Sie das Material nicht mehr benötigen Beim Löschen eines Ordners we...

Страница 115: ...ylisten die für Sie wichtig sind können Sie auf eine Disc kopieren um sie zu archivieren Beim Kopieren einer Playliste wird ein Titel erzeugt Wenn Sie eine finalisierte DVD R usw neu editieren wollen Wenn Sie die Disc nach dem Kopieren auf einem anderen Gerät wiedergeben wollen müssen Sie sie finalisieren 52 68 1Stellen Sie Aufn für High Speed Kopieren auf Ein bevor Sie auf die Festplatte aufnehme...

Страница 116: ...rspielt werden Wenn Sie eine Zweikanalton Sendung aufnehmen wählen Sie mit Sprachauswahl 56 in folgenden Fällen den Ton Beim Überspielen auf DVD R DVD RW DVD Videoformat oder R Wenn Audiomodus für XP Aufnahme auf LPCM 56 eingestellt ist und im XP Modus überspielt wird 1 Im Stoppmodus Drücken Sie FUNCTIONS 2 Wählen Sie mit 3 4 die Option DUBBING und drücken Sie ENTER Wenn keine Änderung der registr...

Страница 117: ...stoppen Sie das Überspielen Halten Sie RETURN 3 Sekunden gedrückt Das Überspielen wird bis zur betreffenden Stelle ausgeführt und beendet Wenn Sie jedoch im Hochgeschwindigkeitsmodus in der Mitte eines Titels stoppen wird der betreffende Titel nicht aufgezeichnet Auch wenn der Titel nicht auf die DVD R DVD RW DVD Videoformat oder R überspielt wurde verringert sich die Restkapazität der Disc So keh...

Страница 118: ...cken Sie ENTER 5 Wählen Sie mit 2 1 zwischen Std und Min und stellen Sie die Aufnahmezeit mit 3 4 ein 6 Drücken Sie ENTER 7 Drücken Sie zur Bestätigung 2 Geben Sie eine um einige Minuten längere Zeit ein um die Verzögerung beim Starten der Wiedergabe zu kompensieren Sie können die Aufnahmezeit auch mit den Zifferntasten einstellen 6 Wählen Sie mit 3 4 die Option Kopie starten und drücken Sie ENTER...

Страница 119: ...d Vorbereitung 1 Schalten Sie dieses Gerät und das DV Gerät aus und schließen Sie das Gerät an die DV Eingangsbuchse an linke Spalte 2 Schalten Sie dieses Gerät und das DV Gerät ein 3 Schalten Sie das DV Gerät an der Stelle an der die Aufnahme beginnen soll auf Pause 4 Drücken Sie HDD oder DVD um das Aufnahme Laufwerk zu wählen Wenn das externe Gerät ein NTSC Signal ausgibt ändern Sie die TV Syste...

Страница 120: ...rspielliste registriert werden 4 Drücken Sie zur Bestätigung 2 Registrieren auf Ordner zu Ordner Basis 1 Wählen Sie mit 3 4 die Option Liste erstell und drücken Sie 1 2 Wählen Sie mit 3 4 die Option Bild Ordner und drücken Sie ENTER 3 Wählen Sie mit 3 4 die Option Ordner und drücken Sie ENTER 4 Wählen Sie mit 3 4 die Option Neues Element und drücken Sie ENTER 5 Wählen Sie mit 3 4 den Ordner und dr...

Страница 121: ... 3 4 die Option Weit Funktionen und drücken Sie ENTER 3 Wählen Sie mit 3 4 die Option COPY ALL PICTURES und drücken Sie ENTER Wenn mehrere übergeordnete Ordner vorhanden sind können Sie sie mit 2 1 umschalten 4 Wählen Sie mit 3 4 die Option Kopieren nach und dann mit 2 1 das Laufwerk 5 Wählen Sie mit 3 4 2 1 die Option Kopieren und drücken Sie ENTER So stoppen Sie das Überspielen Halten Sie RETURN...

Страница 122: ... erscheint im FUNCTIONS Fenster Bei einer finalisierten DVD R DVD RW DVD Videoformat und R erscheint der Name im Hauptmenü So kehren Sie zum vorhergehenden Bildschirm zurück Drücken Sie RETURN So wird das Menü verlassen Drücken Sie wiederholt RETURN Allgemeine Bedienungsverfahren DVD HDD HDD DVD DVD SD SD 1 2 3 4 5 6 7 8 9 GUIDE F U N C T I O N S Í Í DIRECT TV REC AV CH VOLUME TV TV PAGE CH ShowVi...

Страница 123: ...ion Ja und drücken Sie ENTER 6 Wählen Sie mit 2 1 die Option Start und drücken Sie ENTER Am Ende des Formatiervorgangs erscheint eine Meldung Hinweis Die Formatierung ist normalerweise nach wenigen Minuten beendet kann aber u U bis zu 70 Minuten dauern RAM Trennen Sie während des Formatierens das Netzkabel nicht ab Anderenfalls kann die Disc oder Karte unbrauchbar werden 7 Drücken Sie ENTER Hinwei...

Страница 124: ...ezeigt wird etwa viermal so lange Mit einem Gerät eines anderen Herstellers bespielte Discs können nicht finalisiert werden Wenn Sie eine mit einem anderen Panasonic Gerät bespielte Disc mit diesem Gerät finalisieren erscheint der als Top Menu festgelegte Hintergrund möglicherweise nicht Je nach Aufnahmezustand können mit diesem Gerät finalisierte Discs möglicherweise nicht mit anderen Playern wie...

Страница 125: ... SLOW SEARCH STOP PAUSE PLAY x1 3 N A V I G A T O R D I R E C T P R O G C HECK SUB MENU RETURN DISPLAY STATUS CREATE CHAPTER ERASE REC REC MODE EXT LINK TIMER DVD TV ENTER ENTER CANCEL T O P M E N U S 3 4 2 1 ENTER RETURN CANCEL SUB MENU Grün Rot 9 Zifferntasten _ Titel eingeben 1 2 3 4 5 A B C a D E F d G H I N O g J K L j M m 6 7 8 9 0 b c i j e f l h i fl k l O N n _ o Leerzeichen Übernehmen Lös...

Страница 126: ...hren Folgen Sie den jeweiligen Bildschirmanweisungen HDD DVD SD 1 2 3 4 5 6 7 8 9 GUIDE F U N C T I O N S ShowView MANUAL SKIP 0 INPUT SELECT SKIP SLOW SEARCH STOP PAUSE PLAY x1 3 N A V I G A T O R D I R E C T P R O G C HECK SUB MENU RETURN DISPLAY STATUS CREATE CHAPTER ERASE REC REC MODE EXT LINK TIMER TIME SLIP AUDIO DUBBING F Rec DVD TV DVD TV ENTER ENTER CANCEL T O P M E N U S ENTER RETURN Änd...

Страница 127: ...en Englisch Französisch Deutsch Italienisch Spanisch Niederländisch Sonstige Disc Menüs Englisch Französisch Deutsch Italienisch Spanisch Niederländisch Sonstige Aufnahmeeinstellungen Drücken Sie ENTER um eine der folgenden Einstellungen zu wählen Aufnahmezeit im EP Modus Zum Einstellen der Maximallänge in Stunden für die Aufnahme im EP Modus 23 Aufnahmemodi und ungefähre Aufnahmezeiten EP 6 Stund...

Страница 128: ...t wird Wählen Sie PCM wenn das Signal von diesem Gerät decodiert und als 2 Kanal Signal ausgegeben wird Hinweis Bei falscher Einstellung kann es zu Tonstörungen oder sonstigen Problemen bei der Digitalaufnahme kommen Bitstream Wenn ein Gerät mit Dolby Digital Logo angeschlossen wird PCM Wenn ein Gerät ohne Dolby Digital Logo angeschlossen wird DTS Bitstream Wenn ein Gerät mit DTS Logo angeschlosse...

Страница 129: ... Angaben Helligkeit des Anzeigefeldes wird automatisch auf Automatisch eingestellt 56 Die Funktion Schnellstart arbeitet nicht Es wird automatisch auf Aus geschaltet Wenn das Gerät ausgeschaltet ist können Pay TV Programme nicht auf dem Fernseher betrachtet werden da das Signal vom angeschlossenen Decoder nicht durchgeschleift wird Um solche Programme zu betrachten muss das Gerät eingeschaltet wer...

Страница 130: ...e Programmposition zu wählen und drücken Sie dann ENTER Name Zum Eingeben oder Ändern des Namens eines Fernsehsenders Geben Sie mit 3 4 2 1 den Sendernamen ein und drücken Sie ENTER Wenn eine Leerstelle in den Sendernamen eingefügt werden soll wählen Sie die Leerstelle zwischen Z und Kanal Zum Eingeben eines neuen Fernsehsenders oder zum Ändern der Kanalnummer eines bereits eingestellten Fernsehse...

Страница 131: ... Plus Systems erscheint Wenn Sie das GUIDE Plus System einrichten wollen Wählen Sie mit 2 1 die die Option Ja und drücken Sie ENTER Das Einrichten des GUIDE Plus Systems dauert etwa 2 Stunden User s manual for the GUIDE Plus system Wenn Sie das GUIDE Plus System nicht einrichten wollen Wählen Sie mit 2 1 die die Option Nein und drücken Sie ENTER Das Fernsehbild erscheint Die automatische Einstellu...

Страница 132: ...ie mit 3 4 für Automatisch die Option Ein und drücken Sie ENTER Die automatische Uhreinstellung beginnt Der folgende Bildschirm erscheint wenn die Einstellung beendet ist So wird der Vorgang abgebrochen Drücken Sie RETURN Wenn keine automatische Einstellung der Uhr möglich ist stellen Sie sie manuell ein rechts Schritt 6 6 Wählen Sie mit 3 4 für Automatisch die Option Aus und drücken Sie ENTER 7 F...

Страница 133: ...Sendertabelle Anschluss Sonstige ENTER RETURN SELECT Liste der Sprachencodes Geben Sie den Code mit den Zifferntasten ein Abchasisch 6566 Afar 6565 Afrikaans 6570 Albanisch 8381 Amharisch 6577 Arabisch 6582 Armenisch 7289 Aserbeidschanisch 6590 Assamesisch 6583 Aymara 6589 Baschkir 6665 Baskisch 6985 Belorussisch Weißrussisch 6669 Bengali Bangla 6678 Bhutani 6890 Bihari 6672 Bretonisch 6682 Bulgar...

Страница 134: ...iese Disc ist nicht korrekt formatiert Bitte über DISC MANAGEMENT formatieren Das Gerät oder die Disc verbietet den Vorgang REMOTE DVD steht für eine Nummer Fernbedienung und Gerät verwenden unterschiedliche Codes Ändern Sie den Code an der Fernbedienung Halten Sie ENTER und die angegebene Zifferntaste gleichzeitig mindestens 2 Sekunden lang gedrückt 21 HARD ERR Ist das Problem nach dem Aus und Ei...

Страница 135: ...gkeitsaufnahme kompatible DVD R DVD RW und R Discs können mit diesem Gerät bespielt und wiedergegeben werden 9 10 Ist das Gerät CD R und CD RW kompatibel Das Gerät kann CD R CD RW Discs wiedergeben die in den folgenden Normen aufgezeichnet sind CD DA Video CD SVCD die IEC62107 entsprechen MP3 und Standbilder JPEG TIFF Nach der Aufnahme muss die Session beendet oder die Disc finalisiert werden Auf ...

Страница 136: ...r Sekunde entsprechend 0 999 Sekunden Es tritt eine kleine Differenz zwischen der angezeigten und der tatsächlich verstrichenen Zeit auf beispielsweise wird bei einer tatsächlich verstrichenen Zeit von einer Stunde nur 59 Minuten 56 Sekunden angezeigt Auf die Aufnahme hat dies keinen Einfluss SELF CHECK wird angezeigt und die Disc kann nicht ausgeworfen werden Das Gerät führt den Wiederherstellung...

Страница 137: ...n ist aktiviert 21 21 8 21 21 54 Das Gerät ist eingeschaltet kann aber nicht bedient werden Das Aufnahme oder Wiedergabe Laufwerk wurde nicht richtig gewählt Bei manchen Discs sind bestimmte Bedienungsvorgänge u U gesperrt Das Gerät ist heiß U59 erscheint im Display Warten Sie bis U59 verschwindet Möglicherweise sind die Sicherheitsvorrichtungen des Geräts aktiviert worden Setzen Sie das Gerät wie...

Страница 138: ...formatieren HDD RAM RW V oder eine neue Disc verwenden Für verloren gegangene Aufnahmen oder unbrauchbar gewordene Discs wird kein Ersatz geleistet 51 Programmname und aufgenommener Titel stimmen nicht überein Nach der Timerprogrammierung wurde das Programm geändert der aufgenommene Titel besitzt jedoch noch den alten Programmnamen Es kann nicht im Hochgeschwindigkeitsmodus auf eine DVD R usw über...

Страница 139: ...erfügbare Aufnahmezeit hat nicht zugenommen obwohl Aufnahmen auf der Disc gelöscht worden sind Der verfügbare Speicherplatz auf einer DVD R und R nimmt nicht zu auch wenn Titel gelöscht werden Der Platz auf der DVD RW DVD Videoformat vergrößert sich nur wenn der als letztes aufgenommene Titel gelöscht wird Beim Löschen von anderen Titeln vergrößert sich der Platz nicht Es kann keine Playliste erst...

Страница 140: ...eren Durch das Formatieren werden Medien wie eine beschreibbare DVD RAM für den Aufnahmebetrieb vorbereitet Mit diesem Gerät können Sie die Festplatte eine DVD RAM eine DVD RW nur im DVD Videoformat und eine SD Memory Card formatieren Beim Formatieren werden alle Daten unwiderruflich gelöscht Heruntermischen Hierunter versteht man das Neuabmischen des auf einigen Discs vorhandenen Mehrkanaltons au...

Страница 141: ...glich weiterer Einzelheiten an die Sendeanstalten in Ihrem Gebiet Verwenden Sie für VPS PDC Aufnahmen von Fernsehprogrammen die korrekte Zeit VPS PDC Zeit Stellen Sie VPS PDC auf Aus ein wenn die Aufnahmezeit nicht die korrekte Zeit VPS PDC Zeit ist Wenn die Zeit VPS PDC Zeit auch nur um eine Minute abweicht wird keine VPS PDC Aufnahme durchgeführt Die korrekte Zeit VPS PDC Zeit finden Sie im Vide...

Страница 142: ...SECAM PAL NTSC AV1 AV2 21 polig AV3 AV4 Cinchbuchsen 1 Vss 75 Abschluss S Videoeingang SECAM PAL NTSC AV2 21 polig AV3 AV4 S Buchse 1 Vss 75 Abschluss RGB Eingang PAL AV2 21 polig 0 7 Vss PAL 75 Abschluss Videoausgang PAL NTSC AV1 AV2 21 polig Video Out Cinchbuchse 1 Vss 75 Abschluss S Videoausgang PAL NTSC AV1 21 polig S Videoausgang S Buchse 1 Vss 75 Abschluss RGB Ausgang PAL NTSC AV1 21 polig 0...

Страница 143: ... wird trennen Sie das Netzkabel ab und wenden Sie sich an Ihren Fachhändler oder an eine autorisierte Kundendienststelle Falls das Gerät von unqualifiziertem Personal repariert auseinandergenommen oder wieder zusammengebaut wird kann es zu einem Stromschlag oder zu Beschädigungen des Geräts kommen Wenn Sie das Gerät lange Zeit nicht verwenden ziehen Sie den Netzstecker ab um die Lebensdauer des Ge...

Страница 144: ... Ordner 42 Standbild 42 Titel 39 Manuelles Überspringen 32 Menü Bildschirmanzeige 36 MP3 33 SETUP 54 Modus Aufnahme 23 Standbild Modus 55 MP3 33 Name Disc 50 Ordner 42 Playliste 41 Text eingeben 53 Titel 26 28 39 PCM Abwärtswandlung 56 Playliste 40 Playlisten erstellen 40 Power Save 57 Progressive 6 20 37 57 68 Q Link 14 69 Quick View 31 Rauschreduzierung NR AV in NR 37 Bildschärfe 37 Reinigen Dis...

Отзывы: