background image

- 24 -

Settings

Setup menu

Change the unit’s settings if necessary. The settings 
remain intact even if you switch the unit to standby.
Some items in the Setup menu are common to 
the Option menu. You can get the same effect 
with both menus.

About Multi User Mode

 : Settings of the items with this indication are 

saved by the respective users registered in the 
HOME menu. 
Please refer to “Multi User Mode” (

>

21) for 

details about user registration and switching.

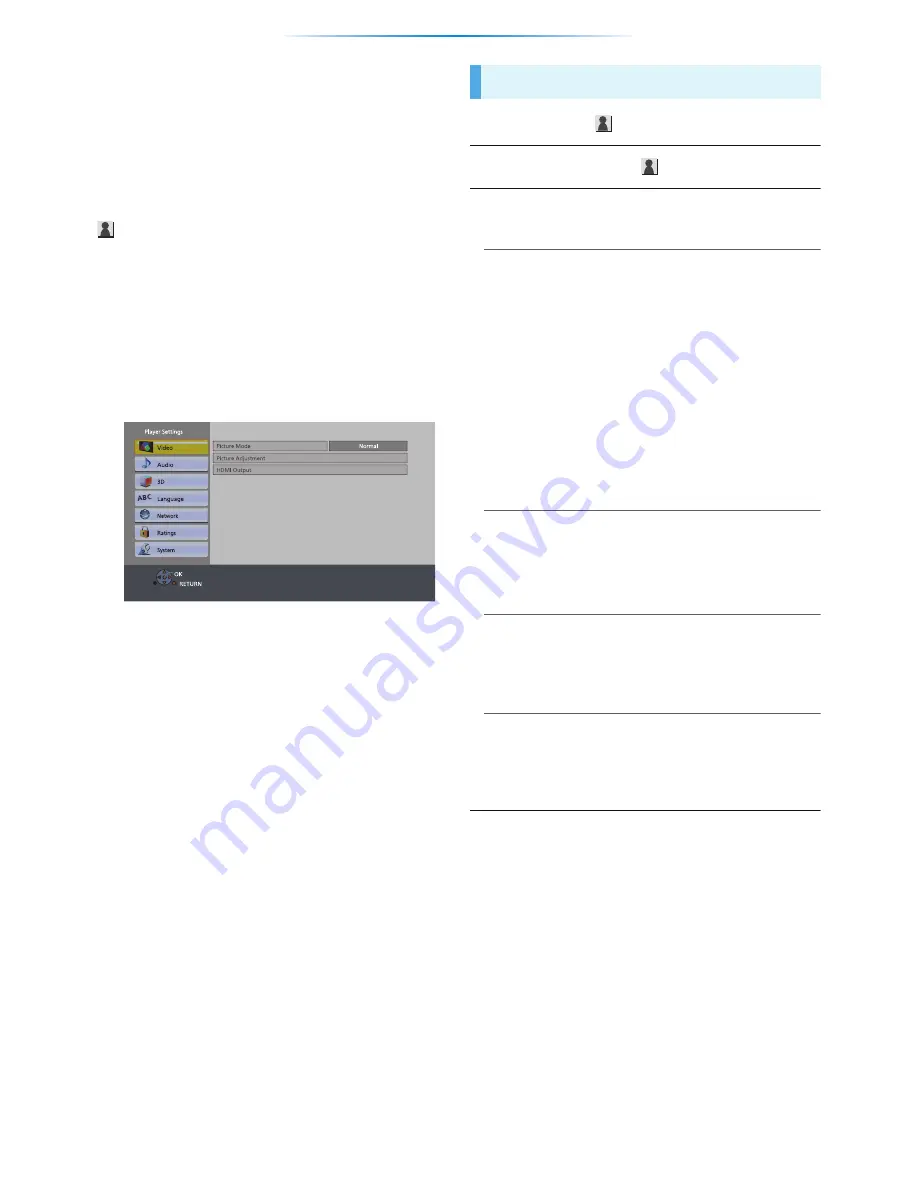
1

While displaying the HOME menu, press 

[SETTINGS].

e.g., 

[MST60]

2

Select an item and change the settings.

To exit the screen

Press [HOME].

Picture Mode 


(

>

23)

Picture Adjustment 


(

>

23)

HDMI Output

Press [OK] to show the following settings:

¾

HDMI Resolution

The items supported by the connected devices are 
indicated on the screen as “

¢

”. When any item 

without “

¢

” is selected, the images may be distorted.

If “Auto” is selected, the best suited output 
resolution to the connected TV is 
automatically selected.

To enjoy high-definition video up-converted to 
1080p, you need to connect the unit directly 
to 1080p compatible HDTV (High Definition 
TV). If this unit is connected to an HDTV 
through other equipment, the other equipment 
must also be 1080p compatible.

[MST60]

¾

HDMI Color Mode

This setting is for selecting color-space 
conversion of the image signal.

¾

Deep Color Output

This setting is for selecting whether to use Deep 
Color output when a TV that supports Deep 
Color is connected.

¾

Contents Type Flag

Depending on the playback content, the TV will 
output adjusting to the optimal method when a 
TV that supports this function is connected.

Video

Содержание DMP-MST60

Страница 1: ...Owner s Manual Detailed Information Streaming Player Model No DMP MST60 DMP MS10 Unless otherwise indicated illustrations in this Owner s Manual are of DMP MST60 チ チ VQT4X69 F0113QK0 P PC ...

Страница 2: ...ceiver 8 Connecting to the network 8 Settings 10 Playback HOME menu 13 Network Service Enjoying Netflix etc 14 Using Miracast 15 Home Network feature 16 Playing back USB devices 18 Operations during playback 19 Enjoying 3D 20 HDMI CEC 20 Multi User Mode 21 Settings Option menu 22 Setup menu 24 Reference LED indicators 28 Messages 28 Troubleshooting guide 29 Specifications 32 About Firmware updates...

Страница 3: ...media care Clean this unit with a soft dry cloth Never use alcohol paint thinner or benzine to clean this unit Before using chemically treated cloth carefully read the instructions that came with the cloth To dispose or transfer this unit The unit may keep the user settings information in the unit If you discard this unit either by disposal or transfer then follow the procedure to return all the s...

Страница 4: ...u 22 9 Colored buttons red green blue yellow Used for various purposes depending on the display 10 Transmit the remote control signal 11 Show status messages 19 12 Show Setup menu 24 13 Select audio 19 14 Show the Home screen of the Network Service 15 Exit the menu screen 16 Show Netflix screen 14 17 Show HOME menu 13 18 3 4 2 1 Move the highlight for selection OK Confirm the selection 19 Return t...

Страница 5: ...buttons red green blue yellow Used for various purposes depending on the display 11 Transmit the remote control signal 12 Show status messages 19 13 Show Setup menu 24 14 Show Home Network menu 16 15 Show the Home screen of the Network Service 16 Exit the menu screen 17 Show Netflix screen 14 18 Show HOME menu 13 19 3 4 2 1 Move the highlight for selection OK Confirm the selection 20 Return to pre...

Страница 6: ...or the LED to turn solid green before using this unit 3 INFO LED 28 LED indicators Displays the various states of this unit 4 USB port 18 5 DC IN terminal 7 6 LAN port 9 7 HDMI AV OUT terminal 7 8 Standby on switch POWER Í I 10 Press to switch the unit from on to standby mode or vice versa In standby mode the unit still consumes a small amount of power The Unit POWER INFO 4 1 2 3 MST60 MS10 5 6 7 ...

Страница 7: ...it It is recommended that you use Panasonic s HDMI cable When outputting 1080p signal please use HDMI cables 5 0 meters 16 4 ft or less A HDMI cable supplied Connecting to the AC adaptor Connect the AC adaptor after making all other connections A AC adaptor supplied B To a household AC outlet This unit consumes a small amount of AC power 32 even when turned off For the purpose of power conservatio...

Страница 8: ...fier receiver connect this unit to a TV then connect the TV and the amplifier receiver Connecting to the network The following services can be used when this unit is connected to broadband Firmware can be updated 12 You can enjoy Network Service 14 You can access other devices Home Network 16 This unit supports Wi Fi Direct and can make a wireless connection to wireless devices without router You ...

Страница 9: ...lish only For additional information about this unit refer to http www panasonic com help For U S A The unit is not compatible with public wireless LAN services provided in airports stations cafes etc See Owner s Manual Essential Information for the precautions for wireless LAN connection A LAN Cable B Broadband router etc C Internet Inserting any cable other than a LAN cable in the LAN port can d...

Страница 10: ... instructions to establish your connection settings 1 Select Wireless and press OK 2 Select Search for wireless network or WPS PUSH button method and press OK then follow the on screen instructions to continue with the settings WPS PUSH button method If you are using a wireless router that supports WPS Wi Fi Protected Setup you can easily perform the settings Easy Settings Easy Network Setting Wir...

Страница 11: ...ct Manual setting and press OK 2 Press OK to select SSID and enter your SSID If your wireless network is encrypted go to step 2 To obtain your network name SSID and encryption key password The default settings may be printed on the router If the SSID and password have been changed consult the person responsible for setting up your network For more details refer to the manual supplied with the wire...

Страница 12: ...network Transmission is possible if the SSID matches for both devices If you have more than one Panasonic player recorder and the remote control operates both products at once you will need to change the remote control code to prevent this occurrence 27 Remote Control Code Occasionally Panasonic may release updated firmware for this unit that may add or improve the way a feature operates These upd...

Страница 13: ...OK or 3 4 2 1 to select the item If there are any other items repeat this step Miracast Starting Miracast 15 Home Network USB Contents Network Service Displays the Home screen of Network Service 14 Setup To show the HOME menu Press HOME Items to be displayed may vary with the contents DLNA Client 16 Media Renderer 17 Videos Play back the contents 18 When multiple contents are recorded select the t...

Страница 14: ... accessed by pressing INTERNET In the following cases settings are possible using the Setup menu items When restricting the use of Network Service 26 Network Service Lock When correcting the displayed time 26 Time Zone DST If using slow Internet connection the video may not be displayed correctly A high speed Internet service with a speed of at least 6 Mbps is recommended Be sure to update the fir...

Страница 15: ...tphone etc supports Miracast contact the manufacturer of the device A Player B Miracast compatible device 1 Press MIRACAST 2 Operate the Miracast compatible device On the device enable Miracast and select this unit DMP MST60 or DMP MS10 as the device to be connected For details refer to the instructions supplied with the device To exit from Miracast Press HOME Depending on the device or connection...

Страница 16: ...indows Media Player or the smartphone etc Playlist of Windows Media Player can play back only the contents that are stored in the libraries 1 Press HOME 2 Select Home Network 3 Select DLNA Client The list can be updated by pressing the red button on the remote control The connection method can be switched to Wi Fi Direct by pressing the green button on the remote control 4 Select the equipment and...

Страница 17: ...ons on the screen 5 Operate the DMC compatible devices To exit from Media Renderer screen Press HOME Wi Fi Direct connection while using Home Network feature is only temporary and the network connection method returns to the original setting when exiting Depending on the contents and the connected equipment playback may not be possible Items displayed in gray on the display cannot be played back b...

Страница 18: ...yback Select an item and press the green button The following items can be set It may not be possible to play the contents in some cases due to the type of media the condition of the recording the recording method and how the files were created MKV Successive play is not possible It is not possible to play back MPEG2 videos which have been dragged and dropped or copied and pasted to the USB device...

Страница 19: ...udio channel number etc Press TOP MENU Select the item and press OK While playing press STATUS The status messages give you information about what is currently being played Each time you press STATUS the display information may change or will disappear from the screen Depending on contents the display may change or may not appear e g MP4 A Elapsed time in the title B Current position C Total time ...

Страница 20: ...not displayed press the red button to switch the view of playback contents HDMI CEC This unit supports HDMI CEC Consumer Electronics Control function See the operating instructions for connected equipment for operational details Preparation 1 Set HDMI CEC to On 27 The default setting is On 2 Set the HDMI CEC operations on the connected equipment e g TV 3 Turn on all HDMI CEC compatible equipment a...

Страница 21: ...gs according to the indications The following items can be set 4 Select Confirm and press OK To change the personalized user information Select Edit User Information from Setup menu 27 Press the colored buttons in the HOME menu to switch to the user corresponding to the button A B Personalizing a new user Input Nickname Personalize a user name Select Icon Personalize a user icon Select from Illust...

Страница 22: ...ct an item and change the settings To exit the screen Press OPTION Regarding Language 33 Soundtrack Show or change the soundtrack Audio channel Select the audio channel number Subtitle Change the subtitle settings Repeat Play Select the item that you want to repeat Select Off to cancel Shuffle Select whether or not to play random Start Slideshow Start the slideshow Status Show the status messages ...

Страница 23: ...material being played When the content is distorted change the settings from Auto to Video Reset to Default Video Settings Return video settings to the factory preset Signal Format Distance Set the amount of depth perception Pop Out Level 3D position for the Option menu etc can be adjusted during 3D playback Video Settings MST60 3D Settings Original Keep original picture format Side by side 3D pic...

Страница 24: ...lution The items supported by the connected devices are indicated on the screen as When any item without is selected the images may be distorted If Auto is selected the best suited output resolution to the connected TV is automatically selected To enjoy high definition video up converted to 1080p you need to connect the unit directly to 1080p compatible HDTV High Definition TV If this unit is conn...

Страница 25: ...messages Easy Network Setting 10 Network Settings Perform network related settings individually Press OK to show the following settings LAN Connection Mode Select the LAN connection method Select Wireless Master when you make a direct wireless connection between this unit and a Home Network device Internet connection is not available when this item is selected Wireless Settings This allows the wir...

Страница 26: ... website http panasonic jp support global cs This site is in English only Remote Device Settings 17 Press OK to show the following settings Remote Device Operation Enable to operate by DMC If On is selected Quick Start will be activated Setting Unit Name Set the name of this unit to be displayed on the connected equipment Registration Type Remote Device List Registering deregistering of the displa...

Страница 27: ...ol unit will be powered and the idle power consumption will increase compared to when set to Off About the power consumption 32 Remote Control Code Change the remote control code if other Panasonic products react to this remote control Firmware Update 12 Press OK to show the following settings Automatic Update Check When this equipment remains connected to the Internet it will check for the latest...

Страница 28: ...n IP Address DNS Settings is Set the IP Address Subnet Mask and Default Gateway Select the automatic address acquisition if necessary The current wireless network security setting is weak It is recommended to change to a stronger security setting Set a stronger network security level referring to the wireless router operating instructions INFO LED state Description Flashes 6 times The remote contr...

Страница 29: ...tandby on switch on this unit and check Remote Control which is displayed on the screen when you press a button on the remote control Press and hold OK and the displayed number for more than 5 seconds The TV tuner mode is not displayed when the TV is switched on This phenomenon may occur depending on the TV setting when Quick Start is set to On Depending on the TV this phenomenon may be prevented ...

Страница 30: ...not appear on the TV Picture is distorted An incorrect resolution is selected in HDMI Resolution Reset the setting as follows 1 Turn the unit on 2 Press and hold OK the blue button and the yellow button on the remote control at the same time for more than 5 seconds INFO LED and POWER LED start to flash 3 Press and hold 8 and the blue button on the remote control at the same time for more than 5 se...

Страница 31: ...DLNA Certified media server is not played back or video frames are dropped during playback Higher transfer rate router such as 802 11n 2 4 GHz or 5 GHz wireless router may solve the problem If you use 802 11n 2 4 GHz or 5 GHz wireless router it is necessary to set the encryption type to AES Simultaneous use with a microwave cordless telephone etc at 2 4 GHz may result in connection interruptions o...

Страница 32: ...ower source 100 V to 240 V 50 60 Hz 0 6 A DC output DC 12 V 2 A Dimensions WkHkD Approx 126 mmk29 mmk126 mm Approx 5zk1 3 16zk5z Mass Weight MST60 Approx 200 g 0 44 lbs MS10 Approx 190 g 0 418 lbs File format File format Extension Reference MP3 MP3 mp3 This unit supports ID3 tags but only titles artist names and album names can be displayed JPEG JPG jpg MOTION JPEG and Progressive JPEG are not sup...

Страница 33: ...extension AVCHD H 264 Dolby Digital mts MP4 H 264 AAC mp4 PS MPEG2 Dolby Digital Linear PCM mpg mpeg TS MPEG2 H 264 AAC Dolby Digital m2ts ts Format Example of file extension JPEG jpg Audio codec Example of file extension MP3 mp3 FLAC flac AAC m4a WMA wma Linear PCM Display languages list ENG FRA DEU ITA ESP NLD SVE NOR DAN POR RUS English French German Italian Spanish Dutch Swedish Norwegian Dani...

Страница 34: ...onic Consumer Marketing Company of North America Division of Panasonic Corporation of North America One Panasonic Way Secaucus New Jersey 07094 http www panasonic com Panasonic Canada Inc 5770 Ambler Drive Mississauga Ontario L4W 2T3 www panasonic ca p ...

Отзывы: