background image

RQT9243 or RQT9350

33

To select these options, perform steps 

1

4

 (

>

30)

When other Panasonic products respond to this remote control

Change the remote control code on the main unit and the remote control (the two must match) if you place other Panasonic products close together.

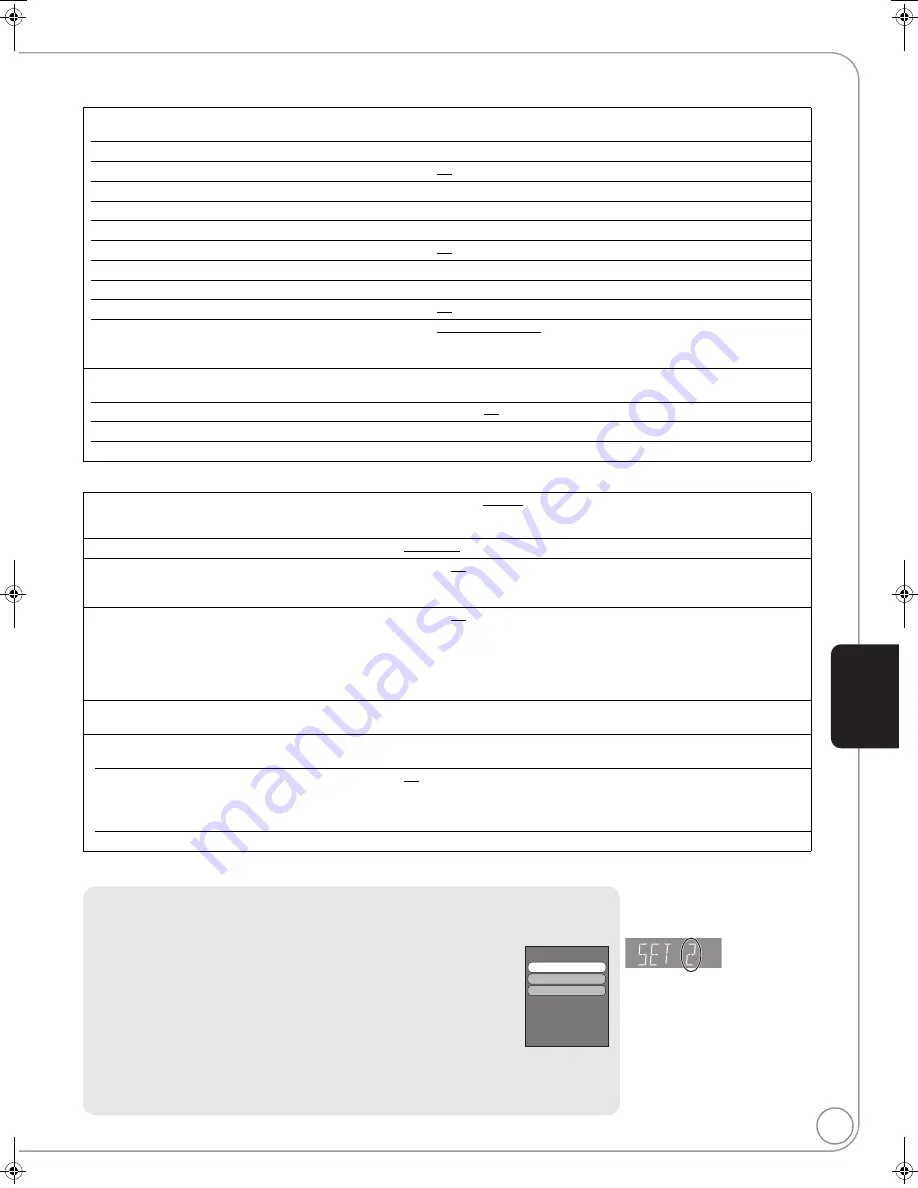
“Network”

IP Address/DNS Settings (

>

17)

Press [OK] to show the following settings.

Connection Test

— — — —

IP Address Auto Configuration (DHCP) 

On

Off

IP Address 

— — —. — — —. — — —. — — —

Subnet Mask 

— — —. — — —. — — —. — — —

Default Gateway 

— — —. — — —. — — —. — — —

DNS Auto Configuration (DHCP) 

On

Off

Primary DNS 

— — —. — — —. — — —. — — —

Secondary DNS 

— — —. — — —. — — —. — — —

Auto Detect Connection Speed 

On

Off

Connection Speed Setting

This is enabled only when “Auto Detect Connection Speed” is 
turned “Off”.

10BASE Half Duplex

10BASE Full Duplex

100BASE Half Duplex

100BASE Full Duplex

Proxy Server Settings (

>

18)

Press [OK] to show the following settings.

Reset to factory preset

Yes

No

Proxy Address

(The initial setting is blank.)

Proxy Port Number

(The initial setting is “0”.)

“Others”

Off Timer

Select how long the unit remains on when it is not being 
used.

2 Hours

6 Hours

Off

Remote Control Code

Set Code 1

Set Code 2

Set Code 3

Easy Setting

You can execute basic settings (“On-screen Language”, “TV 
Aspect”, “Analog Audio Output” 

[BD55]

).

Yes

No

Restore Default Settings

This returns all values in the Setup menu and the on-screen 
menu, except for “Remote Control Code”, “On-screen 
Language”, “IP Address/DNS Settings”, “Proxy Server 
Settings”, “DVD-Video Ratings” and “BD-Video Ratings” to 
the default settings.

Yes

No

DivX Registration 

[DivX]

 (

>

24)

You need this registration code to purchase and play DivX Video-on-Demand (VOD) content.

Firmware Update (

>

14)

Press [OK] to show the following settings.

Automatic Update Check

When this equipment remains connected to the Internet, 
it will check for the latest firmware version when it is 
turned on and you can update it if necessary.

On

Off

Update Now

You can update the firmware manually.

1

Press [SETUP]. 

2

Press [

3

,

4

] to select “Others” and press [OK].

3

Press [

3

,

4

] to select “Remote Control 

Code” and press [OK].

4

Press [

3

,

4

] to select the code (1, 2, or 3) and 

press [OK].

5

To change the code on the remote control

While pressing [OK], press and hold the 
numbered button ([1], [2] or [3]) for more than 5 seconds.

6

Press [OK].

When the following indicator 
appears on the unit’s display and 
you are unable to operate the unit

The unit’s remote control code

Press and hold [OK] and the 
indicated number button at the 
same time for more than 5 seconds.

Set Code 1 

Set Code 2 

Set Code 3 

Remote Control Code 

Press 

[

] and [OK] together

for more than 5 seconds on 
the remote.

S

e

tti

n

g

s

DMP-BD55_35PP-RQT9243_ENG.book  33 ページ  2008年8月29日 金曜日 午前10時28分

Содержание DMP-BD55K

Страница 1: ... Video marked with labels containing the region code A Example DVD Video This unit plays DVD Video marked with labels containing the region number 1 or ALL Example 2 4 1 ALL 1 For Canada only The word Participant is used in place of the word Partner As an ENERGY STAR Partner Panasonic has determined that this product meets the ENERGY STAR guidelines for energy efficiency If you have any questions ...

Страница 2: ...EL CAUTION Danger of explosion if battery is incorrectly replaced Replace only with the same or equivalent type recommended by the manufacturer Dispose of used batteries according to the manufacturer s instructions The socket outlet shall be installed near the equipment and easily accessible The mains plug of the power supply cord shall remain readily operable To completely disconnect this apparat...

Страница 3: ...h Never use alcohol paint thinner or benzine to clean this unit Before using chemically treated cloth carefully read the instructions that came with the cloth Observe the following points to ensure continued listening and viewing pleasure Dust and dirt may adhere to the unit s lens over time making it impossible to play discs Use the lens cleaner not included about once every year depending on fre...

Страница 4: ...ns with the TV VIERA LinkTM HDAVI ControlTM 26 Settings Changing settings with the on screen menu 28 Changing the unit s settings 30 Reference About MP3 JPEG DivX files 35 Messages 36 Troubleshooting guide 38 Specifications 41 Limited Warranty ONLY FOR U S A 42 Limited Warranty ONLY FOR CANADA 43 Product Service 44 Licenses 44 Referencia rápida en español Spanish Quick Reference 45 Glossary 46 Ind...

Страница 5: ...e Use If you cannot operate the unit or other equipment using the remote control after changing the batteries please re enter the codes 16 33 CAUTION Do not place objects in front of the unit The disc tray may collide with objects when it is opened and this may cause injury Please check and identify the supplied accessories Use numbers indicated in parentheses when asking for replacement parts Pro...

Страница 6: ... specifications copy control CDs etc cannot be guaranteed The digital audio content side of a DualDisc does not meet the technical specifications of the Compact Disc Digital Audio CD DA format so play may not be possible CD Type of media Logo Formats Indicated as BD RE Version 3 of the BD RE Recording Format JPEG format BD V JPEG BD R Version 2 of the BD R Recording Format BD V DVD RAM Version 1 1...

Страница 7: ...ure of folders that can be played in this unit You can play files on this unit by structure of folders as shown below However depending on the method of writing data writing software play may not be in the order you numbered the folders Folder structure created on a DVD RAM BD RE or an SD card is not displayed Folder which can be displayed with this unit Numbers XXX Letters 1 from 001 to 999 2 fro...

Страница 8: ...tion Audio and DTS HD Master Audio adopted in BD Video In order to enjoy these audio formats the following conditions are necessary Part shown in the shaded area of table given above NECESSARY CONNECTIONS HDMI AV OUT terminal Connect this unit to your amplifier receiver supporting HDMI High Bit rate Audio using a High Speed HDMI cable 11 7 1ch AUDIO OUT terminal BD55 Connect this unit to your ampl...

Страница 9: ...ing a compatible amplifier receiver using both 7 1ch AUDIO OUT 5 1ch AUDIO OUT terminals and HDMI AV OUT terminal if outputting the audio from analog terminals When connecting a compatible amplifier receiver using DIGITAL AUDIO OUT terminals and connecting a compatible television using HDMI AV OUT terminal To return to the previous screen Press RETURN To exit the screen Press SETUP BD Video Second...

Страница 10: ...ect video signals through a video recorder Due to copy guard protection the picture may not be displayed properly Highest Quality Standard Quality HDMI AV OUT 480p 720p 1080i 1080p COMPONENT VIDEO OUT BD Video 480i 480p 720p 1080i DVD Video 480i 480p VIDEO OUT 480i Highest Quality Standard Quality HDMI AV OUT DIGITAL AUDIO OUT COAXIAL BD55 OPTICAL Non HDMI compliant cables cannot be utilized Pleas...

Страница 11: ...is limited to 480p Be sure your TV supports at least 480p Set Component Video Resolution to 480p 720p or 1080i 32 If this unit is connected to an amplifier receiver etc via an HDMI cable with HDMI Video Mode set to On 32 the video will be fixed to 480i C Connecting to your TV via VIDEO OUT BD55 Analog Audio Output should be set to 2ch Downmix 5 1ch 32 Using the two analog audio channels this conne...

Страница 12: ...ble amplifier receiver using the 7 1ch AUDIO OUT terminals you can enjoy surround sound recorded with Dolby Digital Plus Dolby TrueHD or DTS HD When connecting amplifier receiver or other devices with HDMI AV OUT terminal set HDMI Audio Output to Off 32 Otherwise depending on the specifications of connected devices the audio from AUDIO OUT terminal may be output as two channels only When connectin...

Страница 13: ...set Digital Audio Output to the connection you will use coaxial or optical digital 31 When connecting a TV 11 A with HDMI AV OUT terminal set HDMI Audio Output to Off 32 Otherwise the sound may not be output with the desired audio Connect Audio cables to terminals corresponding to the speakers you have connected Back of the unit Amplifier receiver with 5 1ch AUDIO IN Multi channel speakers COAXIAL...

Страница 14: ...manually update the firmware later B below After the latest firmware is downloaded the system will be restarted and the firmware will be updated When the system is restarted the screen display disappears and START is displayed on the unit s display After the firmware is updated and the system is restarted the following screen indicates that the firmware update has been completed During the update ...

Страница 15: ...er through the unit s remote control i j VOL Adjust the volume MUTING Mute the sound AF Reproduce more natural audio 20 AG Select audio 20 AH Show FUNCTIONS menu 20 AI Selection OK Frame by frame 20 BJ Show on screen menu 28 BA Return to previous screen BB Select disc drive or SD card drive 19 BC Switch on off Secondary Audio 21 1 POWER button POWER Í I 16 Press to switch the unit from on to stand...

Страница 16: ...O VIDEO 0886 HAIER 0768 1034 HANNSPREE 1348 1351 1352 HEWLETT PACKARD 1088 1089 1101 1494 1502 HISENSE 0748 HITACHI 0016 0032 0038 0056 0095 0097 0145 0151 0173 0227 0279 0409 0413 1145 INFOCUS 0736 0738 0741 0752 0781 1164 1516 JVC 0036 0053 0069 0160 0169 0182 0731 1253 KLH 0765 0767 LG 0019 0030 0032 0106 0178 0317 0409 0442 0457 0700 0856 1178 1265 LOEWE 0136 MAGNAVOX 0020 0024 0028 0030 0036 ...

Страница 17: ... other devices such as personal computers connected via a LAN cable Assign a different number from those of other devices for the IP Address and the same number for others If a wrong number is entered then press CANCEL The numeric input range is between 0 and 255 Setting the DNS IP In most cases default settings can normally be used without making any changes When setting an assigned DNS server fr...

Страница 18: ...ws the text you have entered Using the numbered buttons to enter characters e g entering the letter F 1 Press 3 to move to the 3rd row 2 Press 3 twice to highlight F 3 Press OK Repeat this step to enter other characters Press to delete 6 Press when you complete the entry 7 Press 3 4 to select Proxy Port Number and press OK 8 Enter numbers with the numbered buttons and press OK 9 Press 2 1 to selec...

Страница 19: ...select the item and press OK Pop up menu also appears by pressing SUB MENU and selecting Pop up Menu Press POP UP MENU to exit the screen Other operations during play These functions may not work depending on the disc Stop The stopped position is memorized Resume play function Press 1 PLAY to restart from this position The position is cleared if the tray is opened or you press several times to dis...

Страница 20: ...udioLR AudioL Audio R Reproducing more natural audio Discs recorded at 48 kHz or less This feature gives you a more natural sound by adding higher frequency signals not recorded on the track Press RE MASTER to select Re master 1 Re master 2 or Re master 3 Select the one that you like best This function is effective for audio from the HDMI terminal or the DIGITAL AUDIO OUT terminal only when Dolby ...

Страница 21: ...ils refer to the instructions for the disc Formatting SD cards Deleting data Internet connectivity When discs supporting BD Live are played back the player or disc IDs may be sent to the content provider via the Internet You can restrict Internet access 30 Feature Secondary video audio PIP Virtual package Internet connectivity BD Video BD ROM version 2 Profile 1 version 1 0 BONUSVIEW BD ROM versio...

Страница 22: ...d press OK CD R RW Press 3 4 to select Pictures and press OK 2 Press 3 4 2 1 to select the album and press OK 3 Press 3 4 2 1 to select the still picture and press OK Press 2 1 to display the previous or next still picture Press 9 to show other pages To return to the previous screen Press RETURN To exit the screen Press DIRECT NAVIGATOR CD R RW SD card To switch from other menus to JPEG menu If th...

Страница 23: ...d in a random sequence Fade The image is displayed while fading in and switches to next image after fading out To repeat slideshow Press 3 4 to select Repeat Play and press 2 1 to select On or Off 3 Press 3 4 2 1 to select Set and press OK Rotate 1 While playing except for slideshows Press SUB MENU 2 Press 3 4 to select Rotate Right or Rotate Left and press OK The rotation information will be stor...

Страница 24: ...on code to purchase DivX VOD content If you use this code to purchase DivX VOD content and then play the content on this unit you will no longer be able to play any content that you purchased using the previous code If you purchase DivX VOD content using a registration code different from this unit s code you will not be able to play this content Authorization Error is displayed Regarding DivX VOD...

Страница 25: ...menu If a disc contains data in different file formats 1 Press FUNCTIONS 2 Press 3 4 to select Menu and press OK 3 Press 3 4 to select MP3 Music and press OK You can use search and skip functions 19 When the Screen Saver Function is set to On 32 the screen switches to Screen Saver mode if there is no operation for 10 minutes after starting playback Playback continues Playing a track in another fol...

Страница 26: ...ceiver beforehand so that audio will be output from the amplifier receiver Automaticinput switching When the following operations are performed the television will automatically switch the input channel and display the corresponding action When play starts on the unit When an action that uses the display screen is performed e g Direct Navigator screen Power on link When the television is off and t...

Страница 27: ...IONS menu 1 Press the button for VIERA Link on the remote control 2 Select the player The FUNCTIONS menu is displayed Using the sub menu to operate this unit By using the TV remote control you can play discs using the Control Panel and display the Top Menu for BD Video and DVD Video or Pop up Menu for BD Video 1 Press SUB MENU This can also be displayed by using the VIERA menu screen You cannot us...

Страница 28: ...t the soundtrack number Soundtrack numbers are displayed even when there is only one audio type Subtitle BD V AVCHD DVD V Turn the subtitle on off and select the language D below Language DVD VR Only discs that contain subtitle on off information Turn the subtitle on off DivX Turn the subtitle on off and select Text or the subtitle number Subtitle number is displayed even if there are not multiple...

Страница 29: ...ate 32 Integrated NR Smooths block noise and reduces the smudging that appears around contrasting sections of the picture 0 to i3 Progressive Select the method of conversion for progressive output to suit the type of material being played 46 Film and video Auto Automatically detects the film and video content and appropriately converts it Video Select when using Auto and the content is distorted 2...

Страница 30: ... French Spanish Other Menu Language English French Spanish Other BD Live Internet Access BD V 21 You can restrict Internet access when BD Live functions are used Allow ALL Internet access is permitted for all BD Live contents Allow Limited Internet access is permitted only for BD Live contents which have content owner certificates Internet access is prohibited for all BD Live contents without a ce...

Страница 31: ...utput of this unit is limited to down mixed 2ch Bitstream Select Bitstream when the connected equipment can decode the respective audio format Connect equipment supporting HDMI High Bit rate Audio and use a High Speed HDMI Cable in order to output high bit rate audio such as Dolby Digital Plus Dolby TrueHD DTS HD High Resolution Audio or DTS HD Master Audio PCM Select PCM when the connected equipm...

Страница 32: ... 480i Off Images are output in the resolution set in Component Video Resolution HDMI Resolution The items supported by the connected devices are indicated on the screen as When any item without is selected the images may be distorted Auto Automatically selects the output resolution best suited to the connected television 1080p 1080i 720p or 480p 480p 720p 1080i 1080p When the unit is connected to ...

Страница 33: ...dio Output BD55 Yes No Restore Default Settings This returns all values in the Setup menu and the on screen menu except for Remote Control Code On screen Language IP Address DNS Settings Proxy Server Settings DVD Video Ratings and BD Video Ratings to the default settings Yes No DivX Registration DivX 24 You need this registration code to purchase and play DivX Video on Demand VOD content Firmware ...

Страница 34: ...ke up for the difference If either distance A or C is less than B D below find the difference in the relevant table and change to the recommended setting 1 Press 3 4 2 1 to select the delay time box and press OK 2 Press 3 4 to select the setting and press OK Actual speaker position Ideal speaker position A B C Primary listening distance Channel balance 1 Select Test and press OK A test signal is o...

Страница 35: ...me approx 2 sec 7M pixels MOTION JPEG and Progressive JPEG is not supported File format DivX Playable media CD R 1 CD RW 1 DVD R 1 5 DVD R DL 1 5 Extension Files must have the extension DIVX divx AVI or avi Picture resolution between 32k32 and 720k576 pixels Reference Plays all versions of DivX video including DivX 6 with standard playback of DivX media files Certified to the DivX Home Theater Pro...

Страница 36: ... between the hub and the router Use the UPLINK port of the hub to connect to a router Check whether or not the hub s Link lamp lights up If it does not light up then check the cable connection LAN terminal connection cable itself a cross over cable may be used by mistake etc If the above conditions are OK then the router may not operate in DHCP mode Check the router settings and operation You may ...

Страница 37: ...6 7 U59 The unit is hot The unit switches to standby for safety reasons Wait for about 30 minutes until the message disappears Select a position with good ventilation when installing the unit Do not block the cooling fan on the rear of the unit U72 U73 The HDMI connection acts unusually The connected equipment is not HDMI compatible Please use HDMI cables that have the HDMI logo as shown on the co...

Страница 38: ...nit are using different codes Change the code on the remote control The batteries are depleted Replace them with new ones 16 16 33 33 5 The unit is on but cannot be operated Confirm the correct drive is selected One of the unit s safety devices may have been activated Reset the unit as follows 1 Press POWER Í I on the main unit to switch the unit to standby If the unit doesn t switch to standby pr...

Страница 39: ...ation is not restored after that set TV Aspect to 4 3 Pan Scan When using an HDMI cable change TV Aspect type to 16 9 29 32 32 There is a lot of after image when playing video Turn 3D NR or Integrated NR off if it is on 29 When playing DVD Video using progressive output one part of the picture momentarily appears to be doubled up When you use the HDMI AV OUT terminal for video output follow the st...

Страница 40: ... This occurs between playlist chapters or scenes AVCHD When playing a title recorded on both layers the unit automatically switches between layers and plays the title in the same way as a normal program However video and audio may momentarily cut out when the unit is switching layers Picture in picture is not played with BD Video Confirm whether the disc supports picture in picture The virtual pac...

Страница 41: ...ColorTM High Bit rate Audio This unit supports HDAVI Control 3 function SD card slot Output connector 1 system Ethernet 10BASE T 100BASE TX 1 system Optical pick up System with 2 lenses Wave length RQT9243 782 nm CDs 662 nm DVDs 405 nm BDs RQT9350 790 nm CDs 650 nm DVDs 405 nm BDs LASER Specification Class I LASER Product Wave length RQT9243 782 nm CDs 662 nm DVDs 405 nm BDs RQT9350 790 nm CDs 650...

Страница 42: ...center or other Authorized Servicer or damage that is attributable to acts of God THERE ARE NO EXPRESS WARRANTIES EXCEPT AS LISTED UNDER LIMITED WARRANTY COVERAGE THE WARRANTOR IS NOT LIABLE FOR INCIDENTAL OR CONSEQUENTIAL DAMAGES RESULTING FROM THE USE OF THIS PRODUCT OR ARISING OUT OF ANY BREACH OF THIS WARRANTY As examples this excludes damages for lost time cost of having someone remove or re ...

Страница 43: ...uct which is used commercially Dry cell batteries are also excluded from coverage under this warranty This warranty is extended to the original end user purchaser only A purchase receipt or other proof of date of original purchase is required before warranty service is performed THIS EXPRESS LIMITED WARRANTY IS IN LIEU OF ALL OTHER WARRANTIES EXPRESS OR IMPLIED INCLUDING ANY IMPLIED WARRANTIES OF ...

Страница 44: ...978 762 6 226 616 6 487 535 other U S and worldwide patents issued pending DTS is a registered trademark and the DTS logos Symbol DTS HD and DTS HD Master Audio Essential are trademarks of DTS Inc 1996 2008 DTS Inc All Rights Reserved U S Patent Nos 6 836 549 6 381 747 7 050 698 6 516 132 and 5 583 936 This product incorporates copyright protection technology that is protected by U S patents and o...

Страница 45: ...izar STOP en el visor de la unidad BD V En los discos BD Video incluidos los BD J la función de reanudación de la reproducción no funciona CD MP3 DivX BD55 La posición se borra si apaga la unidad Pausa Pulse otra vez o 1 PLAY para reiniciar la reproducción Búsqueda Cámara lenta La velocidad aumenta hasta 5 pasos Pulse 1 PLAY para recuperar la velocidad de reproducción normal Para algunos discos la...

Страница 46: ...y 96 kHz 48 kHz BD Video supports up to 7 1 channel output DTS HD Master Audio This is a lossless audio format and compatible with 96 kHz 7 1ch or less In addition faithful reproduction of the master audio is enabled using lossless audio encoding technology BD Video supports up to 7 1 channel output Dynamic range Dynamic range is the difference between the lowest level of sound that can be heard a...

Страница 47: ...of data within the network Sampling frequency Sampling is the process of converting the heights of sound wave analog signal samples taken at set periods into digits digital encoding Sampling frequency is the number of samples taken per second so larger numbers mean more faithful reproduction of the original sound Subnet mask Enables efficient network use A set of numbers which identify which part ...

Страница 48: ...hapter 22 Still picture 23 Proxy Server 18 P4HD 47 R Ratings level 30 Re master 20 29 Remote control Remote control code 33 Reprogramming the remote control 16 Using the remote control 5 Repeat play 29 Restore Default Settings 33 Resume play function 19 S SD card 7 21 Search 19 Selected playback 19 Setup menu 30 Skip 19 Slideshow 23 Slow motion 19 Soundtrack 28 Status Message 20 Still pictures 22 ...

Отзывы: