background image

21

(ENG) VQT2W83

Mode switching

Selecting the [REC] Mode

Basic

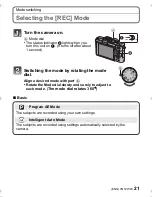
Turn the camera on.

A

Mode dial

The status indicator 

2

 lights when you 

turn this unit on 

1

. (It turns off after about 

1 second.)

Switching the mode by rotating the mode 
dial.

Align a desired mode with part 

B

.

Rotate the Mode dial slowly and surely to adjust to 
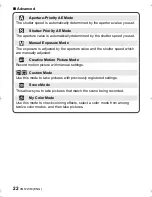
each mode. (

The mode dial rotates 360

o

)

Program AE Mode

The subjects are recorded using your own settings.

Intelligent Auto Mode

The subjects are recorded using settings automatically selected by the 
camera.

OFF

ON

DMC-LX5P-VQT2W83_eng.book  21 ページ  2010年7月1日 木曜日 午後5時31分

Содержание DMC-LX5W

Страница 1: ...instructions completely Please also refer to the Operating Instructions PDF format contained on the CD ROM supplied You can learn about advanced operation methods and check the Troubleshooting VQT2W83 For USA and Puerto Rico assistance please call 1 800 211 PANA 7262 or contact us via the web at http www panasonic com contactinfo P ...

Страница 2: ...ease note that the actual controls and components menu items etc of your Digital Camera may look somewhat different from those shown in the illustrations in these Operating Instructions Carefully observe copyright laws Recording of pre recorded tapes or discs or other published or broadcast material for purposes other than your own private use may infringe copyright laws Even for the purpose of pr...

Страница 3: ...LASHING AND THAT NO OBJECTS FILLED WITH LIQUIDS SUCH AS VASES SHALL BE PLACED ON THE APPARATUS USE ONLY THE RECOMMENDED ACCESSORIES DO NOT REMOVE THE COVER OR BACK THERE ARE NO USER SERVICEABLE PARTS INSIDE REFER SERVICING TO QUALIFIED SERVICE PERSONNEL THE SOCKET OUTLET SHALL BE INSTALLED NEAR THE EQUIPMENT AND SHALL BE EASILY ACCESSIBLE Product Location Digital camera Bottom Battery charger Bott...

Страница 4: ...aration between the equipment and receiver Connect the equipment into an outlet on a circuit different from that to which the receiver is connected Consult the dealer or an experienced radio TV technician for help FCC Caution To assure continued compliance follow the attached installation instructions and use only shielded interface cables with ferrite core when connecting to computer or periphera...

Страница 5: ...nto contact with your hands or clothes wash it off thoroughly with water If any electrolyte should come into contact with your eyes never rub the eyes Rinse eyes thoroughly with water and then consult a doctor CAUTION Danger of explosion if battery is incorrectly replaced Replace only with the same or equivalent type recommended by the manufacturer Dispose of used batteries according to the manufa...

Страница 6: ... strong magnetic fields created by speakers or large motors Electromagnetic wave radiation generated by microprocessors may adversely affect this unit disturbing the pictures and or sound If this unit is adversely affected by electromagnetic equipment and stops functioning properly turn this unit off and remove the battery or disconnect AC adaptor DMW AC5PP optional Then reinsert the battery or re...

Страница 7: ...ormation on Disposal in other Countries outside the European Union This symbol is only valid in the European Union If you wish to discard this product please contact your local authorities or dealer and ask for the correct method of disposal ...

Страница 8: ...ogram Shift 24 Taking Pictures Using the Automatic Function ñ Intelligent Auto Mode 25 Scene Detection 26 AF Tracking Function 26 Compensating the Exposure 27 Taking pictures by specifying the aperture shutter speed 28 Aperture Priority AE 28 Shutter Priority AE 28 Taking pictures by setting the exposure manually 29 Recording Motion Picture 30 Playing Back Pictures NORMAL PLAY 31 Deleting Pictures...

Страница 9: ...attery Case 9 Lens Cap A Black B White 10 Lens Cap String 11 Lens ring front A Black B White For the mounting position on the unit refer to Names of the Components 12 Hot Shoe Cover This is attached to the camera body at the time of purchase SD Memory Card SDHC Memory Card and SDXC Memory Card are indicated as card in the text The card is optional You can record or play back pictures on the built ...

Страница 10: ...VQT2W83 ENG 10 3 1 2 6 4 5 9 7 8 10 11 12 DMW BCJ13PP K1HA08AD0002 K1HA08CD0028 DE A81B VFF0671 VFC4324 VYF3287 VFC4366 VGQ0N97 VYF3361 VYF3376 VGK3662 VGK3696 ...

Страница 11: ...Focus selector switch 6 LCD monitor 7 AF AE LOCK button 8 Playback button 9 Status indicator 10 MENU SET button 11 DISPLAY button 12 Q MENU Delete button 13 Rear dial Rear dial is described as follows in these operating instructions e g Rotating left or right e g Pressing the rear dial 1 2 3 5 4 6 7 13 8 14 10 9 11 12 ...

Страница 12: ...ocket 26 Lens ring front 27 Lens barrel 3 FOCUS button 4 Function button Assign Menu to 4 button It is convenient to register a Menu that is used often FILM MODE QUALITY METERING MODE WHITE BALANCE AF MODE I EXPOSURE GUIDE LINE REC AREA REMAINING DISP FLASH AUTO BRACKET ASPECT BRACKET 2 Self timer button 1 ISO In these operating instructions the cursor buttons are described as shown in the figure ...

Страница 13: ...e Panasonic DC coupler DMW DCC7 optional and AC adaptor DMW AC5PP optional are used Always use a genuine Panasonic AC adaptor DMW AC5PP optional We recommend you use a battery with sufficient battery power or the AC adaptor when recording motion pictures If while recording motion pictures using the AC adaptor and the power supply is cut off due to a power outage or if the AC adaptor is disconnecte...

Страница 14: ...anasonic products Charging The battery is not charged when the camera is shipped Charge the battery before use Charge the battery with the charger indoors It is recommended to charge the battery in a temperature between 10 oC to 30 oC 50 oF to 86 oF The battery temperature should also be the same It has been found that counterfeit battery packs which look very similar to the genuine product are ma...

Страница 15: ...dicator flashes The battery temperature is too high or too low It is recommended to charge the battery again in an ambient temperature of between 10 oC to 30 oC 50 oF to 86 oF The terminals of the charger or the battery are dirty In this case wipe them with a dry cloth Attach the battery paying attention to the direction of the battery Connect the charger to the electrical outlet Disconnect the ch...

Страница 16: ...ter the camera is turned on When the Optical Image Stabilizer function is set to AUTO Recording once every 30 seconds with full flash every second recording Rotating the zoom lever from Tele to Wide or vice versa in every recording Turning the camera off every 10 recordings and leaving it until the temperature of the battery decreases Playback when using the LCD monitor External Live Viewfinder DM...

Страница 17: ...igher when recording motion pictures in AVCHD Lite Also use a card with SD Speed Class with Class 6 or higher when recording motion pictures in MOTION JPEG SD Speed Class is the speed standard regarding continuous writing Please confirm the latest information on the following website http panasonic jp support global cs dsc This Site is English only Note Keep the Memory Card out of reach of childre...

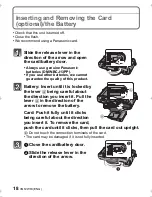
Страница 18: ... quality of this product Battery Insert until it is locked by the lever A being careful about the direction you insert it Pull the lever A in the direction of the arrow to remove the battery Card Push it fully until it clicks being careful about the direction you insert it To remove the card push the card until it clicks then pull the card out upright B Do not touch the connection terminals of the...

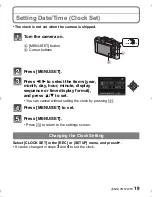
Страница 19: ...equence or time display format and press 3 4 to set You can cancel without setting the clock by pressing Press MENU SET to set Press MENU SET Press to return to the settings screen Select CLOCK SET in the REC or SETUP menu and press 1 It can be changed in steps 3 and 4 to set the clock Turn the camera on A MENU SET button B Cursor buttons Changing the Clock Setting OFF ON ...

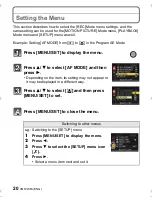
Страница 20: ...m AE Mode Press MENU SET to close the menu Press MENU SET to display the menu Press 3 4 to select AF MODE and then press 1 Depending on the item its setting may not appear or it may be displayed in a different way Press 3 4 to select š and then press MENU SET to set Switching to other menus e g Switching to the SETUP menu 1 Press MENU SET to display the menu 2 Press 2 3 Press 4 to select the SETUP...

Страница 21: ... after about 1 second Switching the mode by rotating the mode dial Align a desired mode with part B Rotate the Mode dial slowly and surely to adjust to each mode The mode dial rotates 360 o Program AE Mode The subjects are recorded using your own settings Intelligent Auto Mode The subjects are recorded using settings automatically selected by the camera OFF ON ...

Страница 22: ...e exposure is adjusted by the aperture value and the shutter speed which are manually adjusted Creative Motion Picture Mode Record motion picture with manual settings Custom Mode Use this mode to take pictures with previously registered settings Scene Mode This allows you to take pictures that match the scene being recorded My Color Mode Use this mode to check coloring effects select a color mode ...

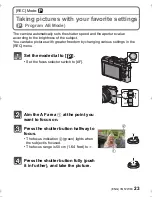
Страница 23: ... pictures with greater freedom by changing various settings in the REC menu Set the mode dial to Set the focus selector switch to AF Aim the AF area 1 at the point you want to focus on Press the shutter button halfway to focus The focus indication 2 green lights when the subject is focused The focus range is 50 cm 1 64 feet to Press the shutter button fully push it in further and take the picture ...

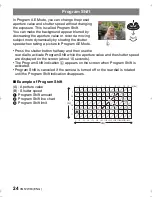
Страница 24: ... to activate Program Shift while the aperture value and the shutter speed are displayed on the screen about 10 seconds The Program Shift indication A appears on the screen when Program Shift is activated Program Shift is canceled if the camera is turned off or the rear dial is rotated until the Program Shift indication disappears Example of Program Shift A Aperture value B Shutter speed 1 Program ...

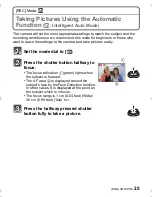
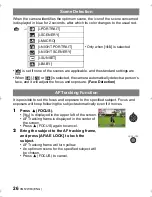
Страница 25: ...ettings to the camera and take pictures easily Set the mode dial to ñ Press the shutter button halfway to focus The focus indication 1 green lights when the subject is focused The AF area 2 is displayed around the subject s face by the Face Detection function In other cases it is displayed at the point on the subject which is in focus The focus range is 1 cm 0 04 feet Wide 30 cm 0 99 feet Tele to ...

Страница 26: ...exposure to the specified subject Focus and exposure will keep following the subject automatically even if it moves 1 Press 3 FOCUS is displayed in the upper left of the screen AF Tracking frame is displayed in the center of the screen Press 3 FOCUS again to cancel 2 Bring the subject to the AF tracking frame and press AF AE LOCK to lock the subject AF Tracking frame will turn yellow An optimum sc...

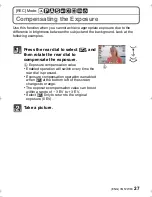
Страница 27: ...the rear dial to select È and then rotate the rear dial to compensate the exposure A Exposure compensation value Enabled operation will switch every time the rear dial is pressed Exposure compensation operation is enabled when È at the bottom left of the screen changes to orange The exposure compensation value can be set within a range of j3 EV to i3 EV Select È only to return to the original expo...

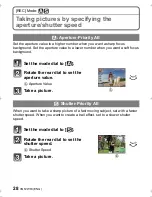
Страница 28: ... focus background Set the mode dial to Rotate the rear dial to set the aperture value A Aperture Value Take a picture When you want to take a sharp picture of a fast moving subject set with a faster shutter speed When you want to create a trail effect set to a slower shutter speed Set the mode dial to Rotate the rear dial to set the shutter speed B Shutter Speed Take a picture Aperture Priority AE...

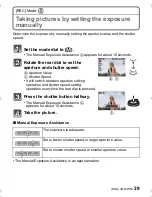
Страница 29: ...er speed B Aperture Value C Shutter Speed It will switch between aperture setting operation and shutter speed setting operation every time the rear dial is pressed Press the shutter button halfway The Manual Exposure Assistance A appears for about 10 seconds Take the picture Manual Exposure Assistance The Manual Exposure Assistance is an approximation The exposure is adequate Set to faster shutter...

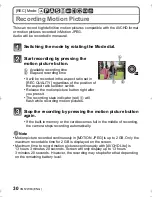
Страница 30: ...Screen will only display up to 13 hours 3 minutes 20 seconds However the recording may stop before that depending on the remaining battery level Start recording by pressing the motion picture button A Available recording time B Elapsed recording time It will be recorded in the aspect ratio set in REC QUALITY regardless of the position of the aspect ratio selector switch Release the motion picture ...

Страница 31: ...he motion picture press 3 to start playback PLAYBACK Mode Deleting Pictures Once deleted pictures cannot be recovered Pictures on the built in memory or the card that are being played back will be deleted Press Select the picture to be deleted and then press A button Press 2 to select YES and then press MENU SET ...

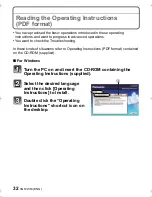
Страница 32: ...ns You want to check the Troubleshooting In these kinds of situations refer to Operating Instructions PDF format contained on the CD ROM supplied For Windows Turn the PC on and insert the CD ROM containing the Operating Instructions supplied Select the desired language and then click Operating Instructions to install Double click the Operating Instructions shortcut icon on the desktop ...

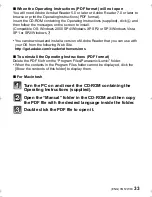
Страница 33: ... download and install a version of Adobe Reader that you can use with your OS from the following Web Site http get adobe com reader otherversions To uninstall the Operating Instructions PDF format Delete the PDF file from the Program Files Panasonic Lumix folder When the contents in the Program Files folder cannot be displayed click the Show the contents of this folder to display them For Macintos...

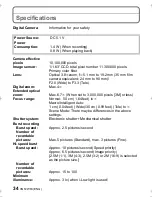
Страница 34: ... 3 000 000 pixels 3M or less Focus range Normal 50 cm 1 64 feet to Macro Intelligent Auto 1 cm 0 04 feet Wide 30 cm 0 99 feet Tele to Scene Mode There may be differences in the above settings Shutter system Electronic shutteriMechanical shutter Burst recording Burst speed Approx 2 5 pictures second Number of recordable pictures Max 5 pictures Standard max 3 pictures Fine Hi speed burst Burst speed...

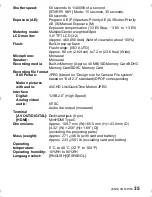
Страница 35: ...ry Approx 40 MB SD Memory Card SDHC Memory Card SDXC Memory Card Recording file format Still Picture JPEG based on Design rule for Camera File system based on Exif 2 3 standard DPOF corresponding Motion pictures with audio AVCHD Lite QuickTime Motion JPEG Interface Digital USB 2 0 High Speed Analog video audio NTSC Audio line output monaural Terminal AV OUT DIGITAL Dedicated jack 8 pin HDMI MiniHD...

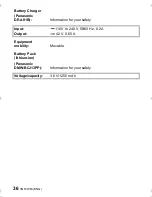
Страница 36: ...anasonic DE A81B Information for your safety Input 110 V to 240 V 50 60 Hz 0 2 A Output 4 2 V 0 65 A Equipment mobility Movable Battery Pack lithium ion Panasonic DMW BCJ13PP Information for your safety Voltage capacity 3 6 V 1250 mAh ...

Страница 37: ...BCJ13PP DMW DCC7 RP CDHM15 RP CDHM30 Battery Pack Description HDMI mini Cable Figure DMW FL220 DMW FL360 DMW FL500 Flash DMW LWA52 MC Protector ND Filter PL Filter 2 2 2 Wide Conversion Lens 2 DC Coupler 1 AC Adaptor 1 DMW LVF1 External Live Viewfinder DMW VF1 External Viewfinder DMW LA6 Lens Adapter 2 ...

Страница 38: ...aler Accessory RP SDW64GU1K RP SDW48GU1K RP SDW32GU1K RP SDW16GU1K RP SDW08GU1K RP SDW04GU1K RP SDP16GU1K RP SDP08GU1K RP SDP04GU1K RP SDP02GU1K RP SDR08GU1A RP SDR04GU1A RP SDR02GU1A Class 10 64 GB SDXC Memory Card Class 10 48 GB SDXC Memory Card Class 10 32 GB SDHC Memory Card Class 10 16 GB SDHC Memory Card Class 10 8 GB SDHC Memory Card Class 10 4 GB SDHC Memory Card Class 4 16 GB SDHC Memory ...

Страница 39: ... To Mr Mrs Ms First Last Street Address City State Zip Phone Day Night 4 Shipping information UPS delivery requires complete street address Please photocopy this form when placing an order 3 Method of payment check one Check of Money Order enclosed NO C O D SHIPMENTS VISA MasterCard Make Check or Money Order to PANASONIC ACCESSORIES Please do not send cash 2 Items Ordered Quantity Accessory Price ...

Страница 40: ...roduct with new or refurbished parts b replace it with a new or a refurbished equivalent value product or c refund your purchase price The decision to repair replace or refund will be made by the warrantor During the Labor warranty period there will be no charge for labor During the Parts warranty period there will be no charge for parts This Limited Warranty excludes both parts and labor for non ...

Страница 41: ...EDED DURING THE WARRANTY PERIOD THE PURCHASER WILL BE REQUIRED TO FURNISH A SALES RECEIPT PROOF OF PURCHASE INDICATING DATE OF PURCHASE AMOUNT PAID AND PLACE OF PURCHASE CUSTOMER WILL BE CHARGED FOR THE REPAIR OF ANY UNIT RECEIVED WITHOUT SUCH PROOF OF PURCHASE Limited Warranty Limits And Exclusions This warranty ONLY COVERS failures due to defects in materials or workmanship and DOES NOT COVER no...

Страница 42: ... OF MERCHANTABILITY ARE LIMITED TO THE PERIOD OF THE LIMITED WARRANTY Some states do not allow the exclusion or limitation of incidental or consequential damages or limitations on how long an implied warranty lasts so the exclusions may not apply to you This warranty gives you specific legal rights and you may also have other rights which vary from state to state If a problem with this product dev...

Страница 43: ... 9pm Saturday Sunday 10am 7pm EST For hearing or speech impaired TTY users TTY 1 877 833 8855 Accessory Purchases United States and Puerto Rico Purchase Parts Accessories and Instruction Books online for all Panasonic Products by visiting our Web Site at http www pstc panasonic com Or send your request by E mail to npcparts us panasonic com You may also contact us directly at 1 800 332 5368 Phone ...

Страница 44: ...m Microsoft product screen shot s reprinted with permission from Microsoft Corporation Other names company names and product names printed in these instructions are trademarks or registered trademarks of the companies concerned This product is licensed under the AVC patent portfolio license for the personal and non commercial use of a consumer to i encode video in compliance with the AVC Standard ...

Отзывы: