Panasonic DMC-GH4 Скачать руководство пользователя страница 126

126

Others

VQT5H82 (ENG) 

Reading the Operating Instructions (PDF format)

Please also refer to the “Operating Instructions for advanced features (PDF format)”, which 
describes more detailed information.

More detailed instructions on the operation of this camera are contained in 
“Operating Instructions for advanced features (PDF format)” in the supplied DVD. 
Install it on your PC to read it.

For Windows

1

Turn the PC on and insert the DVD containing the Operating 
Instructions (supplied).

2

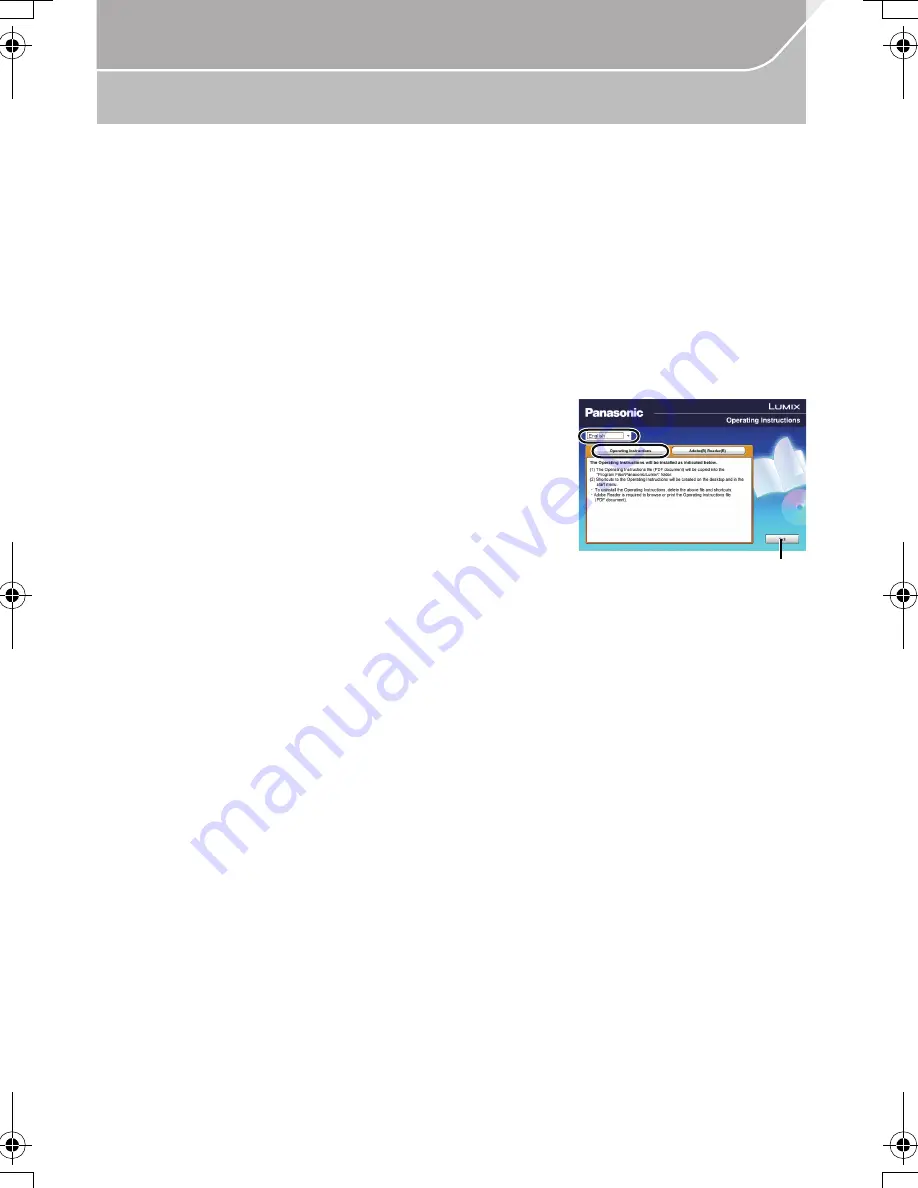
Click the [Operating Instructions].

3

Select the desired language and then click 
[Operating Instructions] to install.

A

To return to the install menu.

4

Double click the “Operating Instructions” 
shortcut icon on the desktop.

When the Operating Instructions (PDF format) will not open

You will need Adobe Acrobat Reader 5.0 or later or Adobe Reader 7.0 or later to browse or 
print the Operating Instructions (PDF format).

You can download and install a version of Adobe Reader that you can use with your OS from 
the following Web Site.

http://get.adobe.com/reader/otherversions

To uninstall the Operating Instructions (PDF format)

Delete the PDF file from the “Program Files\Panasonic\Lumix\” folder.

For Mac

1

Turn the PC on and insert the DVD containing the Operating 
Instructions (supplied).

2

Open the “Manual” folder in the DVD.

 “Manual” folder is displayed again.

3

Open the “Manual” folder in the DVD and then copy the PDF file with 
the desired language inside the folder.

4

Double click the PDF file to open it.

A

DMC-GH4H&GH4_EB-VQT5H82_eng.book  126 ページ  2014年3月24日 月曜日 午後6時18分

Содержание DMC-GH4

Страница 1: ...el No DMC GH4A DMC GH4H DMC GH4 Please read these instructions carefully before using this product and save this manual for future use More detailed instructions on the operation of this camera are co...

Страница 2: ...or other published or broadcast material for purposes other than your own private use may infringe copyright laws Even for the purpose of private use recording of certain material may be restricted I...

Страница 3: ...TTE products from our DoC server http www doc panasonic de Contact to Authorized Representative Panasonic Marketing Europe GmbH Panasonic Testing Centre Winsbergring 15 22525 Hamburg Germany This pro...

Страница 4: ...pictures and or sound on this unit may be disrupted by electromagnetic wave radiation Do not use this unit near cell phones because doing so may result in noise adversely affecting the pictures and o...

Страница 5: ...or breakdown of the camera or the card We recommend storing important data on a PC etc Do not format the card on your PC or other equipment Format it on the camera only to ensure proper operation The...

Страница 6: ...nes iHandheld Night Shot 31 Combining pictures into a single picture with rich gradation iHDR 32 Taking a picture with a blurred background Defocus Control 32 Recording images by changing the brightne...

Страница 7: ...ple screens Multi Playback 71 Displaying Pictures by Recording Date Calendar Playback 71 Deleting Pictures 72 Using the Playback Menu 73 RAW Processing 73 Video Divide 74 Wi Fi NFC Wi FiR function NFC...

Страница 8: ...cket caps and terminal covers are securely closed Make sure that you are in a dry and secure place when changing the battery lens or memory card After changing make sure their protective doors are sec...

Страница 9: ...r the interface unit connector 3 1 This is referred to as lens in these operating instructions 2 This is attached to the interchangeable lens at the time of purchase 3 This is attached to the camera b...

Страница 10: ...15 16 7 8 9 DMW BLF19E DMW BTC10E K1HY08YY0031 VFC5122 VFW0107 VYF3522 VYK6T25 VKF5108 VKF5289 VKF5104 K2CT3YY00034 VKF4971 DMC GH4H DMC GH4 1 2 3 4 5 VFC4605 VKF4971 VYF3514 VYC1119 H FS14140 DMC GH4...

Страница 11: ...tton P22 14 Flash P57 15 Stereo microphone P104 Be careful not to cover the microphone with your finger Doing so may make sound difficult to record 16 Hot shoe Hot shoe cover Keep the Hot Shoe Cover o...

Страница 12: ...lete Cancel button P72 Fn4 button P87 52 Tripod mount A tripod with a screw length of 5 5 mm 0 22 inch or more may damage this unit if attached 53 Cover for the interface unit connector Keep the cover...

Страница 13: ...n ENG VQT5H82 Lens H HS12035 H FS14140 1 Lens surface 2 Tele 3 Focus ring P40 4 Zoom ring P20 5 Wide 6 O I S switch P27 7 Contact point 8 Lens fitting mark P18 9 Lens mount rubber 3 2 4 1 6 5 7 8 9 1...

Страница 14: ...o the website The available flash range etc differs depending on the aperture value of the lens you are using The focal length noted on the lens in use is equivalent to double when converted to the 35...

Страница 15: ...or details refer to P60 Please confirm the latest information on the following website http panasonic jp support global cs dsc This Site is English only SD Memory Card 8 MB to 2 GB SDHC Memory Cards a...

Страница 16: ...ntion to the direction of the battery The CHARGE indicator A lights up and charging begins About the CHARGE indicator The CHARGE indicator turns on The CHARGE indicator is turned on during charging Th...

Страница 17: ...and then check that it is locked by lever A Pull the lever A in the direction of the arrow to remove the battery Push it securely all the way until you hear a click while being careful about the dire...

Страница 18: ...e lens toward the arrow until it stops and then remove At the time when this camera is purchased the monitor is stowed in the camera body Bring out the monitor as shown below 1 Open the monitor Maximu...

Страница 19: ...nute and press 3 4 to set 4 Press MENU SET Confirmation screen is displayed Press MENU SET A message prompting you to set Home in World Time will be displayed Press MENU SET 5 Press 2 1 to select the...

Страница 20: ...not to move the camera when you press the shutter button Be sure to remove the lens cap when recording Free angle shooting The monitor can be rotated to suit your needs This is convenient as it allows...

Страница 21: ...ge playback if you press the shutter button halfway you can instantly set the camera ready for recording Press the motion picture button to start and stop recording a motion picture Start recording by...

Страница 22: ...perture value and shutter speed set by the camera Aperture Priority AE Mode P52 The shutter speed is automatically determined by the aperture value you set Shutter Priority AE Mode P52 The aperture va...

Страница 23: ...dial is illustrated as below in these operating Instructions Example When rotating the control dial to the left or right Pressing the cursor button Selection of items or setting of values etc is perf...

Страница 24: ...ttings can be adjusted directly by touching each of the items displayed on the screen If you set Guide Line in the Custom menu the guide lines are displayed P105 If no operation is performed part of t...

Страница 25: ...N Press LVF to switch between the Monitor and Viewfinder A Eye sensor Press LVF The monitor viewfinder will switch as follows 3 If Eye Sensor AF in the Custom menu is set to ON the camera automaticall...

Страница 26: ...urface lightly with a dry soft cloth Touch panel of this unit is capacitive Touch the panel directly with your bare finger Touch To touch and release the touch screen When selecting features using the...

Страница 27: ...he features that can be adjusted using Quick Menu are determined by the mode or a display style the camera is in 1 Press Q MENU to display the Quick Menu 2 Rotate the front dial to select the menu ite...

Страница 28: ...lect a menu item next and set it Rec P101 This menu lets you set the aspect ratio number of pixels and other aspects of the pictures you are recording Motion Picture P103 This menu lets you set the Re...

Страница 29: ...gs and the Setup Custom settings It is executed when Yes is selected The folder number and the clock setting are not changed The unit can be set up to prevent unnecessary battery consumption Select th...

Страница 30: ...t to Intelligent Auto Plus Mode P31 2 Align the screen with the subject When the camera identifies the optimum scene the icon of the scene concerned is displayed in blue for 2 seconds after which its...

Страница 31: ...s to be used P57 Switching between Intelligent Auto Plus Mode and Intelligent Auto Mode The Intelligent Auto Mode adjusts the settings of the main functions automatically allowing you to record images...

Страница 32: ...en will cancel the setting This mode enables you to change the brightness and colour tone to your preferred settings from the ones set by the camera 1 Press 2 Rotate the rear dial to adjust brightness...

Страница 33: ...set Switching the image effect filter selection screen display Press DISP to switch the monitor screen When the image effect selection screen display is set to the guide display description of the se...

Страница 34: ...t and take the picture automatically To cancel the Touch Shutter function Touch Taking pictures using the Touch Shutter function Applicable modes 1 Touch 2 Touch Icon will change to and taking a pictu...

Страница 35: ...of the face Cancelling the Touch AE function Touch Easily Optimising the Brightness for a Specified Area Touch AE Applicable modes 1 Touch 2 Touch The setting screen for the brightness optimisation po...

Страница 36: ...S AFF AFS Auto Focus Single Subject is still Scenery anniversary photograph etc Focus is set automatically when the shutter button is pressed halfway Focus will be fixed while it is pressed halfway AF...

Страница 37: ...Focus and exposure will keep on following the subject even if it moves Dynamic tracking P38 49 Area Up to 49 AF areas can be focused This is effective when a subject is not in the centre of the screen...

Страница 38: ...fer to the Operating Instructions for advanced features PDF format which describes more detailed information Position and size of the AF area can be changed 1 Press 2 Select or and press 4 AF area set...

Страница 39: ...Pad AF in Touch Settings P106 in the Custom menu you can move the AF area displayed on the viewfinder by touching the monitor If you touch the monitor when the Auto Focus Mode is set to Custom Multi s...

Страница 40: ...can check whether the point of focus is to the near side or to the far side MF Guide P105 You can perform the following operations 5 Press the shutter button halfway The assist screen will close The...

Страница 41: ...tton is pressed only one picture is recorded Burst P41 Recordings are made in succession while the shutter button is pressed Auto Bracket P42 Each time the shutter button is pressed recordings are mad...

Страница 42: ...Self timer 1 Set the drive mode dial to 2 Press the shutter button halfway to focus and then press it fully to take the picture Focus and exposure will be set when the shutter button is pressed halfwa...

Страница 43: ...operates as usual displaying the menu screen 3 Press MENU SET 4 Select Mode with 3 4 and then press MENU SET 5 Select Time Lapse Shot with 3 4 and then press MENU SET 6 Press 3 4 to select the item a...

Страница 44: ...e a selection screen asking you to resume or end will be displayed Pressing the shutter button fully will also enable you to resume from the pause Confirmation screen for creating a motion picture is...

Страница 45: ...ET 7 Press the shutter button halfway The recording screen will be displayed You can also perform the same operation by pressing and holding until the recording screen is displayed 8 Press the shutter...

Страница 46: ...o select OK and then press MENU SET Confirmation screen is displayed It is executed when Yes is selected Changing the settings of Stop Motion Animation You can change the settings in Time Lapse Animat...

Страница 47: ...ll be fixed to S when Burst Rate is set to SH Setting the aspect ratio of pictures Applicable modes Rec Aspect Ratio 4 3 Aspect Ratio of a 4 3 TV 3 2 Aspect Ratio of a 35 mm film camera 16 9 Aspect Ra...

Страница 48: ...ompression rate of pictures Quality Applicable modes Rec Quality Settings File format Description of settings A JPEG A JPEG image in which image quality was given priority A standard image quality JPE...

Страница 49: ...low will be selectable in Creative Video Mode AUTO 200 to 6400 When Electronic Shutter is set to ON the lSO sensitivity can be set up to ISO3200 Applicable modes AUTO The ISO sensitivity is automatica...

Страница 50: ...select the White Balance 3 Press to set You can also press the shutter button halfway to set It will operate as AWB during motion picture recording Applicable modes AWB Automatic adjustment V When tak...

Страница 51: ...y the aperture value and shutter speed turn red and blink In Programme AE Mode you can change the preset aperture value and shutter speed without changing the exposure This is called Programme Shift 1...

Страница 52: ...dial A Aperture value When you set the shutter speed the camera automatically optimises the aperture value for the brightness of the subject 1 Set the mode dial to 2 Set the shutter speed by rotating...

Страница 53: ...not appear This cannot be used when Electronic Shutter is set to ON It can only be used with Manual Exposure Mode 1 Set a function button to Preview P87 The following step is an example in which Prev...

Страница 54: ...g Brightness Metering Mode Type of optical measurement to measure brightness can be changed Applicable modes Applicable modes Rec Metering Mode Multiple This is the method in which the camera measures...

Страница 55: ...et after pressing the shutter button halfway to focus press the shutter button fully Setting the functions of AF AE LOCK Maintaining not maintaining the lock when AF AE LOCK is released Applicable mod...

Страница 56: ...cannot be muted Be sure to pay special attention to the privacy the likeness rights etc of the subject when you use this function Use at your own risk Taking Pictures with No Shutter Sound Electronic...

Страница 57: ...Electronic Shutter is set to ON When HDR is set to ON When Silent Mode is set to ON Set the built in flash to match the recording 1 Select the menu P28 2 Press 3 4 to select the item and then press ME...

Страница 58: ...ding state indicator red C will flash while recording motion pictures If no operation is performed part of the information on the screen will gradually become darker after approximately 10 seconds has...

Страница 59: ...s 4 GB However the recorded content has to be played back as multiple files Maximum time to record motion pictures continuously with MP4 LPCM MOV is 29 minutes 59 seconds Though a MP4 LPCM MOV motion...

Страница 60: ...m Frequency P69 Exit the menu after it is set Recording motion pictures in 4K Applicable modes Setting the format size and recording frame rate Applicable modes Motion Picture Rec Format AVCHD This da...

Страница 61: ...tem frequency Size Recording frame rate Sensor output 2 Bit rate 59 94Hz NTSC 50 00Hz PAL 24 00Hz CINEMA FHD 28M 60p 1 1920k1080 59 94p 59 94 28 Mbps FHD 28M 50p 1 1920k1080 50 00p 50 00 28 Mbps FHD 1...

Страница 62: ...record motion pictures continuously is 29 minutes 59 seconds You can continuously record a motion picture with its size set to 4K in MP4 without a pause even if the motion picture exceeds 4 GB However...

Страница 63: ...s 4K 100M 24p 1 3840k2160 24 00p 24 00 100 Mbps 3840k2160 23 98p 23 98 100 Mbps FHD ALL I 2 200M 60p 1920k1080 59 94p 59 94 200 Mbps FHD 100M 60p 1920k1080 59 94p 59 94 100 Mbps FHD 50M 60p 1920k1080...

Страница 64: ...d then press MENU SET The operation for changing the aperture value or shutter speed is the same as the operation for setting the mode dial to or 4 Start recording Press the motion picture button or t...

Страница 65: ...cture menu to ON 1 Start recording 2 Touch 3 Touch icon 4 Drag the slide bar to set The speed of the operation varies depending on the position you touch 5 Stop recording Minimising operational sounds...

Страница 66: ...turated areas we recommend compensating the exposure towards negative P54 referring to the histogram P105 and then taking the picture Displayed zebra patterns will not be recorded Luminance Level Appl...

Страница 67: ...is ideal for monitoring the image on the external monitor while recording it 4 2 2 10bit Allows you to output the image through the HDMI connection in high picture quality This option is ideal for sa...

Страница 68: ...iable frame rate is not possible Auto Focus does not work Audio is not recorded 1 Select the menu P28 2 Press 3 4 to select an item and then press MENU SET Items available for recording with a variabl...

Страница 69: ...ing system different from that of your region images may not be played back correctly on the TV If you are not familiar with broadcasting systems or will not be creating any motion pictures for films...

Страница 70: ...ss 3 to play back A Motion picture recording time Operations during Motion Picture Playback The fast forward rewind speed increases if you press 1 2 again If you press MENU SET during a pause you can...

Страница 71: ...tate the rear dial left 1 screen 12 screens 30 screens Calendar screen display If the rear dial is rotated to the right the previous playback screen will be displayed It is possible to switch the play...

Страница 72: ...press MENU SET Delete All Confirmation screen is displayed Pictures are deleted by selecting Yes It is possible to delete all pictures except the ones set as favourite when All Delete Except Favorite...

Страница 73: ...is selected the comparison screen cannot be displayed If you touch the picture twice the picture will be enlarged If you touch the picture twice when it is enlarged it will be reduced to the original...

Страница 74: ...divided in two It is recommended for when you want to divide a part you need with a part you do not need Dividing a motion picture is permanent Decide before you divide 1 Select the menu P28 2 Press 2...

Страница 75: ...y or interference Do not use the camera in areas with magnetic fields static electricity or interference such as near microwave ovens These may cause the interruption of the radio waves Using the came...

Страница 76: ...If you use the HDMI output during recording with Bit Mode in HDMI Rec Output set to 4 2 2 10bit the Wi Fi function will be disabled About the Wi Fi button Pressing and holding Wi Fi before connecting...

Страница 77: ...t which describes more detailed information Terminate the Connection Change the Destination Change Settings for Sending Images Register the Current Destination to Favorite Network Address Controlling...

Страница 78: ...communication fees may be incurred depending on the details of your contract You can also set up a connection by entering a password directly For details refer to P81 When terminating the connection r...

Страница 79: ...AGE APP A message will be displayed on the browser If the smartphone tablet is locked with a passcode enter the passcode to unlock the smartphone tablet 6 Press the home button to close the browser 7...

Страница 80: ...he camera select Yes 4 Touch the smartphone to of the camera again Steps 3 through 4 are not required from the second time on For information on the operation and settings of NFC compatible smartphone...

Страница 81: ...nter it 5 On the smartphone tablet start Image App After use terminate the connection to the smartphone 1 Press Wi Fi on the camera P77 2 On the smartphone close Image App For both iOS devices iPhone...

Страница 82: ...be saved as 2D pictures JPEG format Taking images via a smartphone tablet remote recording 1 Select 2 Record an image The recorded images are saved in the camera Some settings are not available Playin...

Страница 83: ...sing the NFC function the image will be saved via the Wi Fi connection 1 Connect to a smartphone P78 2 Operate the smartphone The function can be assigned to the top bottom left or right according to...

Страница 84: ...mation Operate the smartphone Finish recording the location information Operate the smartphone Sending and writing location information 1 Connect to a smartphone P78 2 Operate the smartphone Cautions...

Страница 85: ...TUDIO For Windows Supported OS Windows XP Windows Vista Windows 7 Windows 8 Windows 8 1 Example Windows 7 1 Select a folder you intend to use for receiving then right click 2 Select Properties then en...

Страница 86: ...ppears enter the one you set on your PC When the computer name NetBIOS name for Apple Mac computers contains a space blank character etc it may not be recognised correctly If a connection attempt fail...

Страница 87: ...the bottom row you can replace an existing item with a new select item by selecting the existing item To cancel the setting move to the bottom row by pressing 4 and select an item to cancel and then...

Страница 88: ...he settings you have registered using Cust Set Mem Set the mode dial to or The custom set will be called up If you set the mode dial to the custom set you used last time or will be called up To change...

Страница 89: ...is set to a broadcasting system different from that of your region images may not be played back correctly Read the operating instructions for the TV Preparations Turn this unit and the TV off To con...

Страница 90: ...software where that draws out the full power of your PC Creating videos is as easy as organizing cards on top of a desk Use your music picture and video files to create videos to share with your frie...

Страница 91: ...vironment For details on SILKYPIX Developer Studio please read the support site given on P90 2 Insert the DVD with the supplied software 3 Click on the Applications on the install menu If the automati...

Страница 92: ...USBC1 optional 2 Press 3 4 to select PC and then press MENU SET If USB Mode P107 is set to PC in the Setup menu in advance the camera will be automatically connected to the PC without displaying the U...

Страница 93: ...it is as follows For Windows A drive LUMIX is displayed in Computer For Mac A drive LUMIX is displayed on the desktop Card DCIM Images 1 Folder number 2 Colour space P sRGB _ AdobeRGB 3 File number 4...

Страница 94: ...uality P60 98 98 98 200 00 200 200 60 60 60 3 5 3 5 3 5 AFS AFS AFS L 4 3 0 0 AEL AEL AEL LMT OFF LMT OFF LMT OFF BKT BKT BKT AWB AWB AWB FHD MOV 24p P C3 1 EXPS EXPS WL MOV FHD 24p MOV FHD 24p Record...

Страница 95: ...4 3 0 0 AEL AEL AEL LMT OFF LMT OFF LMT OFF BKT BKT BKT AWB AWB AWB FHD MOV 24p AFS AFF AFC MF AFL Battery Grip Picture Mode Still picture priorities P103 Optical Image Stabiliser 3 P27 Jitter alert R...

Страница 96: ...Microphone Mic level display P104 Mic Level Limiter OFF P104 TC 00 00 00 00 Time Code P103 AE Lock P55 Metering Mode P54 Programme Shift P51 3 5 Aperture value P21 60 Shutter speed P21 11d Shutter sp...

Страница 97: ...Fn6 Function button P87 Fn7 Function button P87 Fn8 Function button P87 Fn9 Function button P87 Fn10 Function button P87 Colour P32 AE Fn6 Fn7 Fn8 Fn9 Fn10 Defocus control function P32 Brightness P32...

Страница 98: ...0 0 0 Fn ISO AUTO Wi Fi L 4 3 AFS AFS C1 EXPS EXPS ISO AUTO 0 0 WL 3 Single P41 Burst P41 Auto Bracket P42 Self timer P42 Time Lapse Shot P43 Stop Motion Animation P45 Focus Mode P36 40 AF Mode P36 A...

Страница 99: ...his unit on again and if it is still displaying contact the dealer Memory Card Error This memory card cannot be used Use a card compatible with this unit P15 Insert SD card again Try another card An e...

Страница 100: ...that are connected to the wireless access point and devices that use the 2 4 GHz band No picture to send This is displayed when there is no image to transmit due to the restriction of the destination...

Страница 101: ...e burst recording compensation range and recording sequence for Auto Bracket recording Self Timer Sets the manner in which the self timer works Time Lapse Animation Makes the recording settings for Ti...

Страница 102: ...tivity can be set up to minimum ISO100 Long Shtr NR You can eliminate the noise caused by recording with a slower shutter speed Shading Comp If the screen periphery darkens as a result of lens charact...

Страница 103: ...hich focus has been achieved Metering Mode Sets the light metering method for measuring brightness Highlight Shadow You can adjust the brightness of bright and dark portions on an image while checking...

Страница 104: ...during motion picture recording SS Gain Operation You can switch the units of shutter speed values and gain sensitivity values Color Bars Displays colour bars which are convenient for adjusting the pi...

Страница 105: ...djusted manually Histogram This allows you to set either to display or not display the histogram Guide Line This will set the pattern of guide lines displayed when taking a picture Center Marker Displ...

Страница 106: ...ting the eye sensor sensitivity and the method for switching between the monitor and viewfinder Touch Settings Enables disables the Touch operation Touch Scroll This allows you to set the speed of con...

Страница 107: ...he last used menu item for each menu Menu Background Set the background colour for the menu screen Menu Information Descriptions of menu items or their settings are displayed on the menu screen Langua...

Страница 108: ...motion picture in two Time Lapse Video Creates a motion picture from a set of group pictures recorded with the Time Lapse Shot Stop Motion Video Creates a motion picture from the Stop Motion Animatio...

Страница 109: ...function may not work properly when taking pictures especially in dark places We recommend holding the camera firmly with both hands when taking pictures P20 We recommend using a tripod and the self t...

Страница 110: ...at the time of motion picture recording the screen may be blacked out momentarily or the unit may record noise due to static electricity or powerful electromagnetic waves radio towers high voltage pow...

Страница 111: ...Did you remove the battery immediately after picture taking or did you take the picture using a battery with a low remaining charge To delete such pictures make a backup of the data and format the ca...

Страница 112: ...wireless access point Change the direction of this unit Change the location and orientation of the wireless access point Perform the Manual Input It may not display even if the radio waves exist depen...

Страница 113: ...ase create one Is the size of the image too large Reduce the image size at Size and then send Transmit after dividing the motion picture with Video Divide P74 File format of the motion picture that ca...

Страница 114: ...V and then turn it back to On Refer to the operating instructions of the TV for details Check System Frequency setting P69 It is a sound of lens movement or aperture operation when this unit is turned...

Страница 115: ...soft cloth When the camera is soiled badly it can be cleaned by wiping the dirt off with a wrung wet cloth and then with a dry cloth Wipe off any dirt or dust on the zoom ring and the focus ring with...

Страница 116: ...xcessive force Do not leave the camera with the lens facing the sun as rays of light from the sun may cause it to malfunction Also be careful when placing the camera outside or near a window When ther...

Страница 117: ...me of the battery becomes shorter in low temperature conditions such as at a ski resort When you travel do not forget to bring the battery charger supplied and the AC mains lead supplied so that you c...

Страница 118: ...17 200 000 pixels Primary colour filter Digital Zoom Max 4k Extra Tele Conversion When taking still pictures Max 2k When a picture size of S 4 M aspect ratio of 4 3 is selected When recording motion p...

Страница 119: ...cond Motion picture 1 30th of a second to 1 16000th of a second When System Frequency is set to 59 94 Hz NTSC 1 25th of a second to 1 16000th of a second When System Frequency is set to 50 00 Hz PAL 1...

Страница 120: ...c Slow Sync Red Eye Reduction Forced OFF Flash synchronisation speed Equal to or smaller than 1 250th of a second Microphone Stereo Speaker Monaural Recording media SD Memory Card SDHC Memory Card SDX...

Страница 121: ...p 10 Mbps 640k480 25 00p 4 Mbps MP4 LPCM MOV When System Frequency is set to 59 94 Hz NTSC 3840k2160 29 97p 100 Mbps IPB 3840k2160 23 98p 100 Mbps IPB 1920k1080 59 94p 200 Mbps ALL Intra 1920k1080 59...

Страница 122: ...sive AVCHD MP4 MOV Audio compression AVCHD DolbyR Digital 2 ch MP4 AAC 2 ch MP4 LPCM MOV LPCM 2 ch Interface Digital USB 2 0 High Speed Data from the PC can not be written to the camera using the USB...

Страница 123: ...Interchangeable lens H HS12035 card and battery Approx 825 g 1 82 lb with the Interchangeable lens H FS14140 card and battery Operating temperature 0 oC to 40 oC 32 oF to 104 oF Operating humidity 10...

Страница 124: ...m the focus distance reference line 0 3 m 0 98 feet to from the focus distance reference line focal length 14 mm to 21 mm 0 5 m 1 6 feet to from the focus distance reference line focal length 22 mm to...

Страница 125: ...www panasonic co uk Direct Sales at Panasonic UK Order accessory and consumable items for your product with ease and confidence by phoning our Customer Communications Centre Monday Friday 9 00 am 5 0...

Страница 126: ...ick the Operating Instructions shortcut icon on the desktop When the Operating Instructions PDF format will not open You will need Adobe Acrobat Reader 5 0 or later or Adobe Reader 7 0 or later to bro...

Страница 127: ...ion and other countries Four Thirds and Four Thirds Logo marks are trademarks or registered trademarks of Olympus Imaging Corporation in Japan the United States the European Union and other countries...

Страница 128: ...aiwan Inc QR Code is a registered trademark of DENSO WAVE INCORPORATED Other names of systems and products mentioned in these instructions are usually the registered trademarks or trademarks of the ma...

Отзывы: