background image

1.4.2. INITIAL SETTINGS:

When you replace the Main C.B.A. be sure to perform the initial settings after achieving the Adjustment, by ordering the following
procedure in accordance with model suffix.


·


Step 1. The temporary cancellation of factory setting:

Set the mode dial to “ P ”.
While keep pressing Optical Image Sttabilizer and “ UP of Cross key” simultaneously, turn the Power on.


·


Step 2. The cancellation of factory setting:

Set the mode dial to “ Playback ”.
While keep pressing Optical Image Sttabilizer and “ UP of Cross key” simultaneously, turn the Power off.


·


Step 3. Turn the Power on:

Set the mode dial to “ P ”, and then turn the Power on.


·


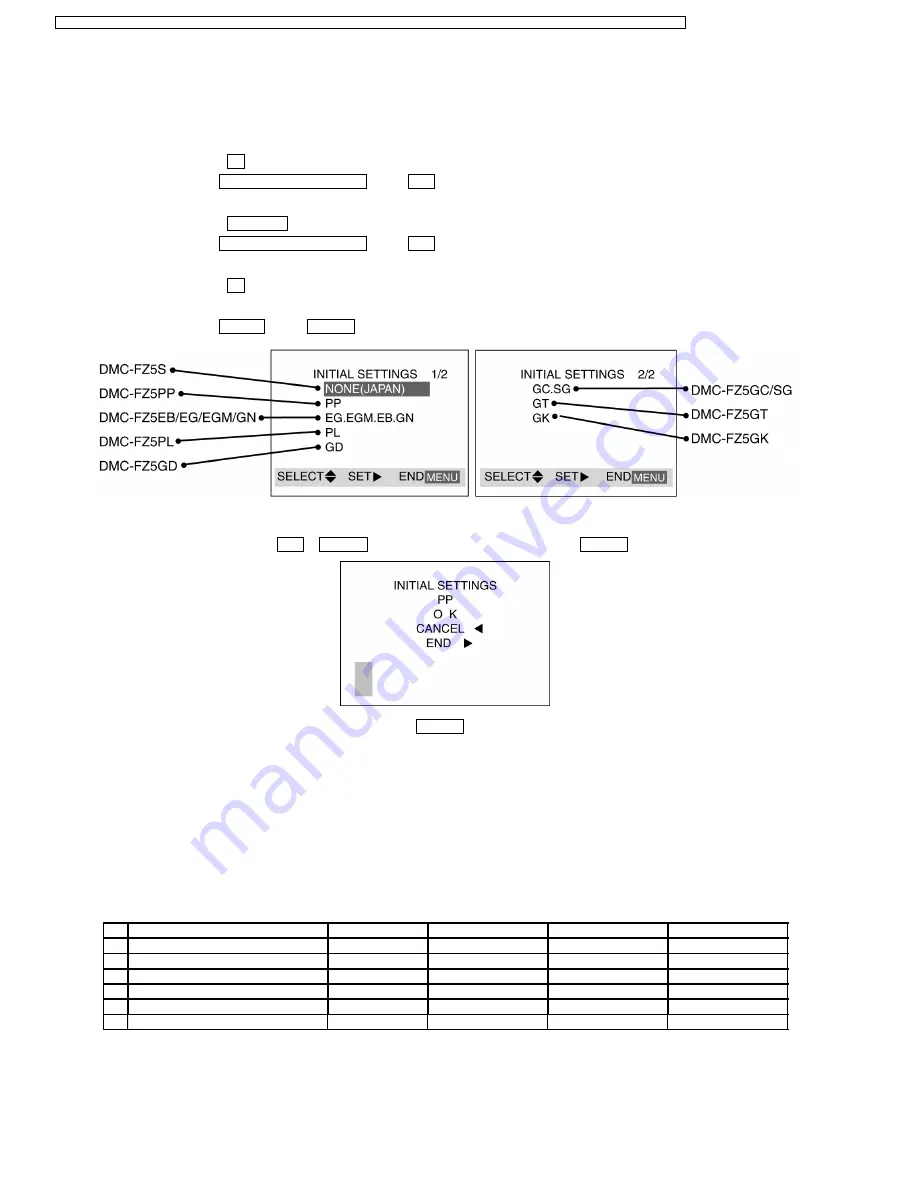
Step 4. Display the INITIAL SETTING:

While keep pressing MENU and “ RIGHT of Cross key” simultaneously, turn the Power off.


·


Step 5. Set the INITIAL SETTING:

Select the area with pressing “ UP / DOWN of Cross key”, and then press the “ RIGHT of Cross key”.

The only set area is displayed, and then press the “ RIGHT

of Cross key” after confirmation. (The unit is powered off

automatically.)
Confirm the display of “PLEASE SET THE CLOCK” in English when the unit is turned on again.


·


Step 6. CONFIRMATION:

The display shows “PLEASE SET THE CLOCK” when turn the Power on again.
Connect the unit to PC with USB cable and is detected as removable media.
(For China and Taiwan marker, the display shows “PLEASE SET THE CLOCK” in Chinese.)

1) As for your reference Default setting condition is given in the following table.


·


Default setting (After “INITIAL SETTINGS”)

MODEL

VIDEO OUTPUT

LANGUAGE

DATE

REMARKS

a) DMC-FZ5S

NTSC

Japanese

Year/Month/Date

b) DMC-FZ5PP/PL

NTSC

English

Month/Date/Year

c) DMC-FZ5EB/EG/EGM/GC/GN/SG

PAL

English

Date/Month/Year

d) DMC-FZ5GK

PAL

Chinese (simplified)

Year/Month/Date

e) DMC-FZ5GT

NTSC

Chinese (traditional)

Year/Month/Date

f) DMC-FZ5GD

NTSC

English

Year/Month/Date

6

DMC-FZ5PP / DMC-FZ5PL / DMC-FZ5EB / DMC-FZ5EG / DMC-FZ5EGM / DMC-FZ5GC / DMC-FZ5GD / DMC-FZ5GK / DMC-FZ5GN / DMC-FZ5GT / DMC-FZ5SG

Содержание DMC-FZ5EG

Страница 1: ...served Unauthorized copying and distribution is a violation of law DMC FZ5PP DMC FZ5PL DMC FZ5EB DMC FZ5EG DMC FZ5EGM DMC FZ5GC DMC FZ5GD DMC FZ5GK DMC FZ5GN DMC FZ5GT DMC FZ5SG Vol 1 Colour S Silver Type K Black Type Digital Camera ORDER NO DSC0503003C0 B26 ...

Страница 2: ...SG 9 5 1 INFORMATION FOR YOUR SAFETY 9 5 2 CAUTION FOR AC MAINS LEAD 9 6 HOW TO REPLACE THE LITHIUM BATTERY 10 6 1 REPLACEMENT PROCEDURE 10 7 OPERATING GUIDE 12 8 SERVICE NOTES 15 8 1 WHEN REPLACING THE MAIN C B A 15 8 2 SERVICE POSITION 15 8 3 HOW TO DISCHARGE THE CAPACITOR UNIT 17 8 4 CLEANING LENS VIEWFINDER AND LCD PANEL 17 8 5 NOTE FOR SCHEMATIC DIAGRAM 17 9 ADJUSTMENT PROCEDURES 18 9 1 SERVI...

Страница 3: ...MATIC DIAGRAM 39 13 6 REAR OPERATION SCHEMATIC DIAGRAM 40 13 7 LENS FLEX SCHEMATIC DIAGRAM 40 14 CIRCUIT BOARD ASSEMBLIES 41 14 1 CCD C B A 41 14 2 LENS FLEX C B A 42 15 EXPLODED VIEWS 43 15 1 FRAME CASING SECTION 43 15 2 PACKING PARTS ACCESSORIES SECTION 45 16 REPLACEMENT PARTS LIST 46 16 1 MECHANICAL REPLACEMENT PARTS LIST 46 16 2 ELECTRICAL REPLACEMENT PARTS LIST 48 3 DMC FZ5PP DMC FZ5PL DMC FZ...

Страница 4: ...370 10 C Pb free solder will tend to splash when heated too high about 1100 F 600 C When soldering or unsoldering please completely remove all of the solder on the pins or solder area and be sure to heat the soldering points with the Pb free solder until it melts enough 1 3 IMPORTANT NOTICE 1 Other than U S A and Canadian Market 1 The service manual does not contain the following information becau...

Страница 5: ... stored in Flash ROM mounted on Main C B A 1 4 1 Defining methods To define the model suffix to be serviced refer to the name plate which is putted on the bottom side of the Unit NOTE After replacing the MAIN C B A be sure to achieve adjustment The adjustment instruction is available at software download on the Support Information from NWBG PAVC web site in TSN system together with Maintenance sof...

Страница 6: ...e RIGHT of Cross key The only set area is displayed and then press the RIGHT of Cross key after confirmation The unit is powered off automatically Confirm the display of PLEASE SET THE CLOCK in English when the unit is turned on again Step 6 CONFIRMATION The display shows PLEASE SET THE CLOCK when turn the Power on again Connect the unit to PC with USB cable and is detected as removable media For ...

Страница 7: ... Unplug the AC cord and connect a jumper between the two prongs on the plug 2 Measure the resistance value with an ohmmeter between the jumpered AC plug and each exposed metallic cabinet part on the equipment such as screwheads connectors control shafts etc When the exposed metallic part has a return path to the chassis the reading should be between 1 MΩ and 5 2 MΩ When the exposed metal does not ...

Страница 8: ...ices 4 Use only an antistatic solder removal device Some solder removal devices not classified as antistatic ESD protected can generate electrical charge sufficient to damage ES devices 5 Do not use freon propelled chemicals These can generate electrical charges sufficient to damage ES devices 6 Do not remove a replacement ES device from its protective package until immediately before you are read...

Страница 9: ...A replacement fuse cover can be purchased from your local Panasonic Dealer If the fitted moulded plug is unsuitable for the socket outlet in your home then the fuse should be removed and the plug cut off and disposed of safety There is a danger of severe electrical shock if the cut off plug is inserted into any 13 ampere socket If a new plug is to be fitted please observe the wiring code as shown ...

Страница 10: ...to excessive heat or discharge It must therefore only be fitted in requirement designed specifically for its use Replacement batteries must be of same type and manufacture They must be fitted in the same manner and location as the original battery with the correct polarity contacts observed Do not attempt to re charge the old battery or re use it for any other purpose It should be disposed of in w...

Страница 11: ...NOTE Above caution is applicable for a battery pack which is for DMC FZ5 series as well 11 DMC FZ5PP DMC FZ5PL DMC FZ5EB DMC FZ5EG DMC FZ5EGM DMC FZ5GC DMC FZ5GD DMC FZ5GK DMC FZ5GN DMC FZ5GT DMC FZ5SG ...

Страница 12: ...7 OPERATING GUIDE 12 DMC FZ5PP DMC FZ5PL DMC FZ5EB DMC FZ5EG DMC FZ5EGM DMC FZ5GC DMC FZ5GD DMC FZ5GK DMC FZ5GN DMC FZ5GT DMC FZ5SG ...

Страница 13: ...13 DMC FZ5PP DMC FZ5PL DMC FZ5EB DMC FZ5EG DMC FZ5EGM DMC FZ5GC DMC FZ5GD DMC FZ5GK DMC FZ5GN DMC FZ5GT DMC FZ5SG ...

Страница 14: ...14 DMC FZ5PP DMC FZ5PL DMC FZ5EB DMC FZ5EG DMC FZ5EGM DMC FZ5GC DMC FZ5GD DMC FZ5GK DMC FZ5GN DMC FZ5GT DMC FZ5SG ...

Страница 15: ...on Form 1 VFK1582A1225 FP9003 MAIN TOP OPERATION UNIT 12PIN 0 5 FFC 2 FP9002 MAIN REAR OPERATION UNIT 12PIN 0 5 FFC 3 VFK1576DC202 P9001 MAIN SPEAKER 2PIN CABLE 4 P9003 MAIN LCD BACKLIGHT 2PIN CABLE 5 P9007 MAIN FLASH UNIT 2PIN CABLE 6 P9008 MAIN FLASH UNIT 2PIN CABLE 7 VFK1576DSC03 P9006 MAIN FLASH UNIT 2PIN CABLE 8 VFK1284 FP9004 MAIN LCD MODULE 24PIN 0 5 FFC 9 VFK1282 FP9005 MAIN EVF UNIT 22PIN...

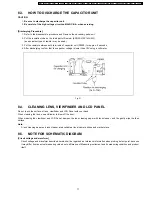
Страница 16: ...tor voltage is not lowered soon even if the AC Cord is unplugged or the battery is removed 2 Be careful of the high voltage circuit on MAIN C B A 3 DO NOT allow other parts to touch the high voltage circuit on MAIN C B A 16 DMC FZ5PP DMC FZ5PL DMC FZ5EB DMC FZ5EG DMC FZ5EGM DMC FZ5GC DMC FZ5GD DMC FZ5GK DMC FZ5GN DMC FZ5GT DMC FZ5SG ...

Страница 17: ...ANEL Do not touch the surface of lens viewfinder and LCD Panel with your hand When cleaning the lens use air Blower to blow off the dust When cleaning the viewfinder and LCD Panel dampen the lens cleaning paper with lens cleaner and the gently wipe the their surface Note A lens cleaning paper and lens cleaner are available at local camera shops and market place 8 5 NOTE FOR SCHEMATIC DIAGRAM Circu...

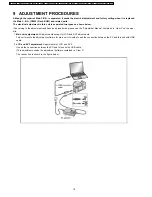
Страница 18: ...n View 3 on the web site 1 Main unit adjustment All adjustments except for LCD and EVF adjustments This unit mounts the adjustment software for main unit it wouldn t need the connection between the PC and this unit with USB cable 2 LCD and EVF adjustment Adjustments for LCD and EVF It need the connection between the PC and this unit with USB cable This adjustments needs the adjustment software con...

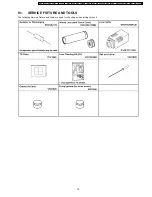
Страница 19: ...XTURE AND TOOLS The following Service Fixture and tools are used for checking and servicing this unit 19 DMC FZ5PP DMC FZ5PL DMC FZ5EB DMC FZ5EG DMC FZ5EGM DMC FZ5GC DMC FZ5GD DMC FZ5GK DMC FZ5GN DMC FZ5GT DMC FZ5SG ...

Страница 20: ...ical Image Stabilizer and UP of Cross key simultaneously and hold them turn the Power on 2 The display of error code Press Optical Image Stabilizer MENU and LEFT of Cross key simultaneously with the step 1 condition The display is changed as shown below when the above buttons is pressed simultaneously Normal display Error code display Operation history display Normal display Example of Error Code ...

Страница 21: ...21 DMC FZ5PP DMC FZ5PL DMC FZ5EB DMC FZ5EG DMC FZ5EGM DMC FZ5GC DMC FZ5GD DMC FZ5GK DMC FZ5GN DMC FZ5GT DMC FZ5SG ...

Страница 22: ...ine or IC6001 VENUS2 0030 ENC1 detect error Zoom encoder detect error FP9001 36 signal line or IC6001 VENUS2 0040 ENC2 detect error Zoom encoder detect error FP9001 39 signal line or IC6001 VENUS2 Focus 0001 HP Low detect error Focus encoder always Low detect error FP9001 17 signal line or IC6001 VENUS2 0002 HP High detect error Focus encoder always High detect error FP9001 17 signal line or IC600...

Страница 23: ...800 0001 Camera task finish process time out Communication between Lens system and IC6001 VENUS2 0002 Camera task invalid code error IC6001 VENUS2 0100 File time out error in recording motion image IC6001 VENUS2 0002 File data send error in recording motion image IC6001 VENUS2 Monitor 1000 AF frame movement check time out IC6001 VENUS2 Memory Built in memory 3900 0005 Built in memory format error ...

Страница 24: ...Y to switch to LCD with indication Fig A 2 Press Optical Image Stabilizer and DOWN of Cross key simultaneously No need to keep pressing The version information is displayed on the LCD with light blue colour letters Fig B CAUTION The version information does not display if the LCD has switched to LCD with indication already In this case press DISPLAY to switch to LCD with indication Point The firmw...

Страница 25: ...12 2 C B A LOCATION 12 DISASSEMBLY PROCEDURE 12 1 DISASSEMBLY FLOW CHART 25 DMC FZ5PP DMC FZ5PL DMC FZ5EB DMC FZ5EG DMC FZ5EGM DMC FZ5GC DMC FZ5GD DMC FZ5GK DMC FZ5GN DMC FZ5GT DMC FZ5SG ...

Страница 26: ...tery Frame Unit Fig D6 P9004 Connector P9006 Connector P9007 Connector P9008 Connector P9009 Connector FP9001 Flex FP9005 Flex FP9008 Flex 1 Screw G Capacitor Unit for charging Fig D7 2 Screws H 3 Locking tabs Main C B A Unit Battery Frame Unit 6 Jack Door Unit Fig D8 1 Screw I Jack Door Unit 7 CCD Unit Fig D9 3 Screws J CCD Unit 8 EVF Unit Fig D10 1 Screw K EVF Unit 9 Flash Unit Fig D11 1 Screw L...

Страница 27: ...g D2 12 3 2 Removal of the Top Operation Unit Fig D3 12 3 3 Removal of the LCD Unit Fig D4 27 DMC FZ5PP DMC FZ5PL DMC FZ5EB DMC FZ5EG DMC FZ5EGM DMC FZ5GC DMC FZ5GD DMC FZ5GK DMC FZ5GN DMC FZ5GT DMC FZ5SG ...

Страница 28: ...on Unit and Speaker Fig D5 12 3 5 Removal of the Main C B A Unit Capacitor Unit for charging and Battery Frame Unit Fig D6 28 DMC FZ5PP DMC FZ5PL DMC FZ5EB DMC FZ5EG DMC FZ5EGM DMC FZ5GC DMC FZ5GD DMC FZ5GK DMC FZ5GN DMC FZ5GT DMC FZ5SG ...

Страница 29: ...Fig D7 12 3 6 Removal of the Jack Door Unit Fig D8 29 DMC FZ5PP DMC FZ5PL DMC FZ5EB DMC FZ5EG DMC FZ5EGM DMC FZ5GC DMC FZ5GD DMC FZ5GK DMC FZ5GN DMC FZ5GT DMC FZ5SG ...

Страница 30: ...eing entered do not remove the CCD Unit except for servicing Fig D9 12 3 8 Removal of the EVF Unit Fig D10 12 3 9 Removal of the Flash Unit Fig D11 30 DMC FZ5PP DMC FZ5PL DMC FZ5EB DMC FZ5EG DMC FZ5EGM DMC FZ5GC DMC FZ5GD DMC FZ5GK DMC FZ5GN DMC FZ5GT DMC FZ5SG ...

Страница 31: ...nd dirt perform the following procedures with the CCD unit is installing Disassembling procedures for the CCD unit refer to item 12 3 7 2 Take care that the dust and dirt are not entered into the lens In case of the dust is putted on the lens blow off them by airbrush 3 Do not touch the surface of lens 4 Use lens cleaning KIT BK VFK1900BK 5 Apply the grease VKF1829 to the point where is shown to G...

Страница 32: ...val of the 3rd Lens Frame 4th Lens Frame Drive Frame Unit 12 4 3 Removal of the Master Flange Unit 32 DMC FZ5PP DMC FZ5PL DMC FZ5EB DMC FZ5EG DMC FZ5EGM DMC FZ5GC DMC FZ5GD DMC FZ5GK DMC FZ5GN DMC FZ5GT DMC FZ5SG ...

Страница 33: ...12 4 4 Removal of the Cam Frame 12 4 5 Removal of the Focus Motor Unit 33 DMC FZ5PP DMC FZ5PL DMC FZ5EB DMC FZ5EG DMC FZ5EGM DMC FZ5GC DMC FZ5GD DMC FZ5GK DMC FZ5GN DMC FZ5GT DMC FZ5SG ...

Страница 34: ...12 4 6 Removal of the 4th Lens Frame Unit 12 4 7 Removal of the 3rd Lens Frame Unit 34 DMC FZ5PP DMC FZ5PL DMC FZ5EB DMC FZ5EG DMC FZ5EGM DMC FZ5GC DMC FZ5GD DMC FZ5GK DMC FZ5GN DMC FZ5GT DMC FZ5SG ...

Страница 35: ...12 4 8 Removal of the 2nd Lens Frame Unit 35 DMC FZ5PP DMC FZ5PL DMC FZ5EB DMC FZ5EG DMC FZ5EGM DMC FZ5GC DMC FZ5GD DMC FZ5GK DMC FZ5GN DMC FZ5GT DMC FZ5SG ...

Страница 36: ...36 DMC FZ5PP DMC FZ5PL DMC FZ5EB DMC FZ5EG DMC FZ5EGM DMC FZ5GC DMC FZ5GD DMC FZ5GK DMC FZ5GN DMC FZ5GT DMC FZ5SG ...

Страница 37: ...001 VIDEO OUT SHUTTER OIS UNIT IC7202 SHUTTER DRIVE IC7002 AF ZOOM IRIS DRIVE OIS DRIVE PRE PROCESS IC6001 VENUS2 CAMERA PROCESS J PEG COMP EX PANDS MEDIA I F USB I F MAIN MICROPROCESSOR FLASH TOP OPERATION UNIT EVF MONITOR X9101 IC1003 POWER IC9101 SYSTEM IC IC6002 FLASH ROM 16M bit OIS CONTROL LENS DRIVE DIGITAL AV OUT IRIS 32 768 kHz OVERALL BLOCK DIAGRAM DMC FZ5PP PL EB EG EGM GC GD GK GN GT S...

Страница 38: ...8 NC P9004 FP9008 CCD GND 1 R 2 H2 3 H1 4 HL 5 SUB 6 SUBSW 7 VL 8 CCD GND 9 V6 10 V5B 11 V5A 12 V4 13 V3B 14 V3A 15 V2 16 V1 17 CCDOUT 18 CCD GND 19 VH 20 12 11 10 9 7 6 5 4 3 1 8 MENU POWER LED A DISPLAY EVF LCD SEL DELETE POWER LED K AD1 D GND NC A3R1V POWER ON EXPOSURE FP9002 2 12 11 10 9 7 6 5 4 3 1 8 SHUTTER 1 D GND NC AD2 A3R1V AD3 S B REC OIS SW WIDE TELE NC SHUTTER 0 FP9003 2 1 2 SP SP P90...

Страница 39: ...L SUB SUBSW V5B V5A C3101 1 C3103 10 CCD GND 9 R3106 0 R3107 0 CCD SCHEMATIC DIAGRAM POSITIVE VOLTAGE LINE NEGATIVE VOLTAGE LINE DMC FZ5PP PL EB EG EGM GC GD GK GN GT SG CCD SCHEMATIC DIAGRAM TO MAIN SENSOR CIRCUIT P9008 13 5 TOP OPERATION SCHEMATIC DIAGRAM A B C 1 2 3 4 5 W T WIDE 6 TELE 5 D GND 4 SHUTTER 0 1 SHUTTER 1 2 NC 11 OIS SW 7 S B REC 8 AD3 9 A3R1V 10 AD2 12 HALF FULL S B 8200 4300 2400 ...

Страница 40: ... 25 Y VO 26 Y VH 27 X VH 28 X VO 29 X VH 30 ZM 31 ZM 32 ZM 33 ZM 34 T1ENC VCC 35 T1ABS 36 T1LED CONT 37 T2ENC VCC 38 T2ABS 39 FS FAP 4 FS FBN 3 FS FAN 2 FS FBP 1 T2LED CONT 40 STEPPING MOTOR FOCUS MOTOR UNIT A1 A2 A3 A A4 PHOTO SENSOR CAM ENCODER B2 B1 B B3 C2 C1 H3 H2 H1 G3 G2 G1 F2 F1 E12 E11 E10 E9 E8 E7 E6 E5 E4 E3 E2 E1 D3 D2 D1 C6 C5 C4 C3 DC SOLENOID SHUTTER SHUTTER UNIT STEPPING MOTOR IRIS...

Страница 41: ...R3105 R3106 R3107 C 2 C 3 C 3 A 2 C 3 B 3 Q3101 C 2 Transistor Resistor Capacitor Integrated Circuit CCD C B A ADDRESS INFORMATION DMC FZ5PP PL EB EG EGM GC GD GK GN GT SG CCD C B A FOIL SIDE 41 DMC FZ5PP DMC FZ5PL DMC FZ5EB DMC FZ5EG DMC FZ5EGM DMC FZ5GC DMC FZ5GD DMC FZ5GK DMC FZ5GN DMC FZ5GT DMC FZ5SG ...

Страница 42: ...ODER D3 D FOCUS MOTOR UNIT A2 A SUTTER UNIT C B3 B2 B1 CAM ENCODER G B G3 ZOOM ENCODER 1 G1 G2 H H3 ZOOM ENCODER 1 H1 H2 ZOOM MOTOR F1 F F2 A3 A1 A4 C2 C3 C4 C5 C6 C1 E4 E3 E2 E1 E5 E6 E7 E8 E9 E11E10 E12 OIS UNIT E 42 DMC FZ5PP DMC FZ5PL DMC FZ5EB DMC FZ5EG DMC FZ5EGM DMC FZ5GC DMC FZ5GD DMC FZ5GK DMC FZ5GN DMC FZ5GT DMC FZ5SG ...

Страница 43: ...15 EXPLODED VIEWS 15 1 FRAME CASING SECTION 43 DMC FZ5PP DMC FZ5PL DMC FZ5EB DMC FZ5EG DMC FZ5EGM DMC FZ5GC DMC FZ5GD DMC FZ5GK DMC FZ5GN DMC FZ5GT DMC FZ5SG ...

Страница 44: ...44 DMC FZ5PP DMC FZ5PL DMC FZ5EB DMC FZ5EG DMC FZ5EGM DMC FZ5GC DMC FZ5GD DMC FZ5GK DMC FZ5GN DMC FZ5GT DMC FZ5SG ...

Страница 45: ...15 2 PACKING PARTS ACCESSORIES SECTION 45 DMC FZ5PP DMC FZ5PL DMC FZ5EB DMC FZ5EG DMC FZ5EGM DMC FZ5GC DMC FZ5GD DMC FZ5GK DMC FZ5GN DMC FZ5GT DMC FZ5SG ...

Страница 46: ...FILTER AVC SPC 63 VMX3437 CUSHION RUBBER AVC SPC 64 VEK0H61 CCD C B A AVC SPC 65 VXP2483 1ST LENS FRAME UNIT AVC SPC SILVER 65 VXP2484 1ST LENS FRAME UNIT AVC SPC BLACK 66 VXW0711 LENS UNIT AVC SPC SILVER 66 VXW0714 LENS UNIT AVC SPC BLACK 67 B3NAA0000074 PHOTO SENSOR AVC SPC 68 B3NAA0000074 PHOTO SENSOR AVC SPC 69 B3NAA0000074 PHOTO SENSOR AVC SPC 70 B3NAA0000074 PHOTO SENSOR AVC SPC 71 VMS7580 F...

Страница 47: ...T0Q38 INSTRUCTION BOOK CHINESE SIMPLIFIED AVC SPC DMC FZ5GK 110 VQT0Q36 INSTRUCTION BOOK CHINESE TRADITIONAL AVC SPC DMC FZ5GT 111 VQT0L73 INSTRUCTION BOOK APPLICATION ENGLISH CHINESE TRADITIONAL AVC SPC DMC FZ5SG GC 111 VQT0L75 INSTRUCTION BOOK APPLICATION ARABIC RUSSIAN AVC SPC DMC FZ5SG GC 111 VQT0L70 INSTRUCTION BOOK APPLICATION ENGLISH AVC SPC DMC FZ5PP 111 VQT0L76 INSTRUCTION BOOK APPLICATIO...

Страница 48: ... DISCHARGE ESD TO ELECTROSTATICALLY SENSITIVE ES DEVICES section Definition of Parts supplier 1 Parts marked with MBI in the remarks column are supplied from Matsushita Battery Industrial co ltd 2 Parts marked with AVC SPC in the remarks column are supplied from AVC COMPANY CS AVC SPC Others are supplied from MKE SAIJYO MKE Ref No Part No Part Name Description Remarks PRINTED CIRCUIT BOARD ASSEMBL...

Отзывы: