background image

Co

nve

n

ien

t func

tions

VQT2J58

75

Changing the unit’s settings

You can change the unit’s settings using the Setup 
menu.

The settings remain intact even if you switch the unit 

to standby.

1

While stopped

Press [FUNCTION MENU].

2

Select “Others”, then press [OK].

3

Select “Setup”, then press [OK].

4

Select the menu, then press [OK].

5

Select the item, then press [OK].

6

Select the option, then press [OK].

Follow the instruction on the screen if the 

operation method is different. 

Depending on the connection or the status of 

this unit some items cannot be selected or 
changed.

About the PIN

PIN is required to change the following settings. Enter 
the 4-digit PIN following the on-screen instructions.

The PIN is common for the following items.

– Child Lock 
– DVD-Video Parental Control
– Lock (Internet Content Settings)

PIN can be changed via the PIN Entry. (

>

86)

1

Select the number, then press [

1

].

You can also use the number buttons.

2

Repeat step

1

 to enter 4-digit PIN.

3

Press [OK] to confirm.
e.g., PIN Entry

Make a note of PIN in case you forget it.

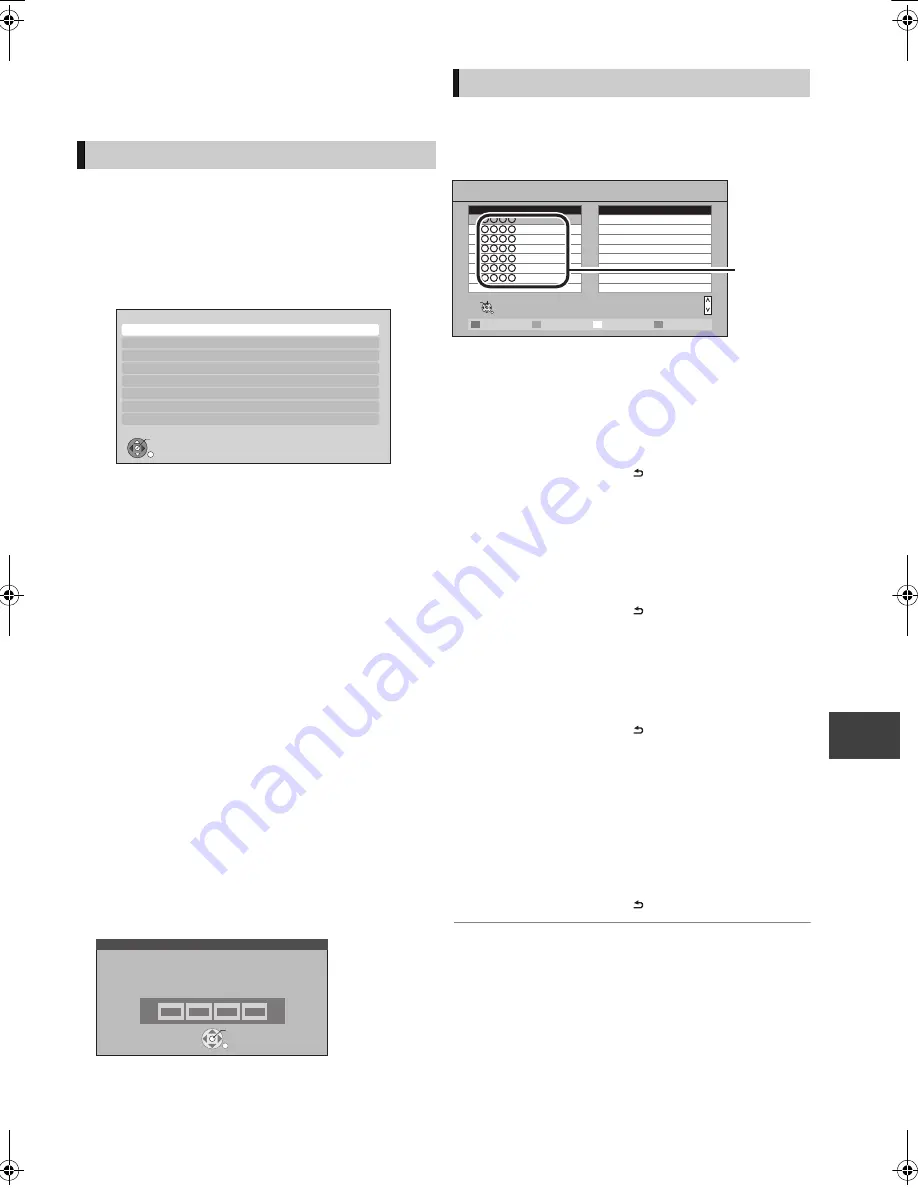
Favourites Edit

You can create Favourites of channels for making 
viewing and recording easier.

To add channels to the Favourites list

1

Select the channel in the “All DVB Channels” 
column, then press [OK].

Repeat this step.

“Green”: Select “Favourites”.

“Yellow”: Add all channels.

2

Press [BACK/RETURN

].

3

Press [OK] to save the Favourites.

To change the order of the channels list

1

Select the channel in the “Favourites” column to 
move, then press the “Green” button.

2

Select the new position, then press the “Green” 
button.

3

Press [BACK/RETURN

].

4

Press [OK] to save the Favourites.

To delete channels

1

Select the channel in the “Favourites” column, then 
press [OK].

“Yellow”: Delete all the channels.

2

Press [BACK/RETURN

].

3

Press [OK] to save the Favourites.

To change the name of the Favourites list 

1

Press the “Red” button in the “Favourites” column.

2

Press [

3

,

4

,

2

,

1

] to select a character, then 

press [OK].
Repeat this step.

“Red”: Delete a character.

“Blue”: Delete all characters.

3

Press [BACK/RETURN

].

Common procedures

Setup

OK

RETURN

Tuning
HDD / Disc
Picture
Sound
Display
Connection
Network
Others

OK

Remember the PIN.

PIN Entry

0

0

0

0

Tuning

DVB Favourites Editor

Add all

Select favourites

RETURN

Add 

Select channel

All DVB Channels

Favourites1 

Page up

Page down

CH

1
2
3

5

7

6

4

Channel 
names

DMRXW380EB-VQT2J58_eng.book  75 ページ  2010年4月8日 木曜日 午後3時54分

Содержание DIGA DMR-XW380

Страница 1: ...ep this manual for future reference This DVD Recorder is for viewing and recording free to to view channels only It does not receive pay TV or encrypted channels DVB and the DVB logos are trademarks of the DVB Project DVD Recorder Model No DMR XW380 Region management information This unit plays DVD Video marked with labels containing the region number 2 or ALL Example 2 ALL 3 5 2 Model number suff...

Страница 2: ...f this unit can be controlled by the remote control of the TV VIERA by connecting with the HDMI cable to the TV VIERA Owner ID 86 Owner ID is an anti theft function Entering the PIN number and owner s personal information will help the Police to determine the owner in the case of theft Please check and identify the supplied accessories Product numbers correct as of March 2010 These may be subject ...

Страница 3: ...fying the terminals in your plug proceed as follows The wire which is coloured Blue must be connected to the terminal which is marked with the letter N or coloured Black or Blue The wire which is coloured Brown must be connected to the terminal which is marked with the letter L or coloured Brown or Red WARNING DO NOT CONNECT EITHER WIRE TO THE EARTH TERMINAL WHICH IS MARKED WITH THE LETTER E BY TH...

Страница 4: ...tle Playing 48 Copying HD Video AVCHD format from HDD 48 Copying a finalised disc 49 Still pictures Playing still pictures 50 Start Slideshow 51 Still picture play option 51 Editing still pictures 52 Still pictures operation 53 Copying still pictures 54 Copying automatically 54 Copying using the copying list 54 Music Playing music Copying music to HDD 56 Playing music recorded on HDD 57 Operations...

Страница 5: ...ing timer recording and copying 94 Play 95 Edit 96 Still pictures 96 Music 96 USB 96 TV Guide 96 Broadcast 97 VIERA Link 97 Network 97 To reset this unit 97 Reference HDD and media information 98 Unit care 102 Media handling 103 Recording modes and recording contents 104 Operations that can be performed simultaneously 105 Structure of folders displayed by this unit 106 Specifications 107 Licenses ...

Страница 6: ...functions Show digital text 18 Show subtitles 18 Create chapter 42 Skip the specified time 36 Transmit the remote control signal A TV operation area 88 B Channel select 16 Change pages in the TV Guide system etc 19 C Show VIERA CAST 65 D Input select 16 21 62 E Show Timer Recording screen 28 F Exit the menu screen G Show the TV Guide screen 19 H Show FUNCTION MENU window 15 I Return to previous sc...

Страница 7: ...t recording 21 Specify a time to stop recording 21 Stop Start play Rear panel terminals 8 9 10 89 1 Disc indicator 2 Copying indicator 3 USB port indicator 4 SD card slot indicator 5 EXT LINK indicator 6 Timer recording indicator This indicator lights up when the timer recording standby is activated 7 Drive HDD DVD or SD indicator 8 Main display section indicator Current time playback counter vari...

Страница 8: ...Required setting Set HDMI Video Mode and HDMI Audio Output to On 83 The default setting is On After completing the connections proceed to Easy setting 11 Keep the RF coaxial cables as far away as possible from other cables Do not roll up the RF coaxial cables HDMI IN AV RF IN HDMI AV OUT AV1 TV RF IN RF OUT AC IN HDMI cable 21 pin Scart cable Aerial cable RF Coaxial cable supplied AC mains lead su...

Страница 9: ...own mixed About a 21 pin Scart cable You can use a variety of Q Link functions by connecting the unit to a Q Link compatible TV Set AV1 Output 83 If the 21 pin Scart cable and HDMI cable are connected with a TV you can use Direct TV Recording 23 or PAUSE LIVE TV programme 20 function when watching a programme via TV s tuner When the unit is not to be used for a long time To save power unplug it fr...

Страница 10: ...vice Use only category 5 straight LAN cables STP when connecting to peripheral devices Inserting any cable other than a LAN cable in the LAN terminal can damage the unit Please be aware that if you connect to a network without encryption a third party may illegitimately intervene and eavesdrop on the transmissions and data such as personal information confidential information etc may be leaked Net...

Страница 11: ... press OK 3 Repeat step 2 4 Press BACK RETURN TIMESLIP DISPLAY STATUS DIRECTTVREC AD 10s 60s RECMODE REC TEXT STTL CHAPTER F U N C T I O N M E N U D I R E C T N A V I G A T O R GUIDE BACK RETURN PLAY x1 3 PAUSE PAUSE LIVE TV STOP SLOW SEARCH SKIP PROG CHECK CH PAGE SELECT INPUT CH AV TV DRIVE SELECT DEL EXIT OK OPTION VOL 0 2abc 5jkl 8tuv 1 4ghi 7qrs p 3def 6mno 9xyz w EXTLINK MANUALSKIP REW LIVE ...

Страница 12: ... confirm the Channel List 76 Channel List To check the signal condition 77 Signal Condition To change PIN 86 PIN Entry To sort the Channel List by region 76 Channel Sorting by Region On Power consumption will be reduced to a minimum level in standby mode On Timer Set period of power save and then press OK Power Save in Standby mode is activated at the set time period Off It is possible to start qu...

Страница 13: ...t unauthorized access Refer to the operating instructions of the hub or router Home Network DLNA function setting can not be set when Power Save in Standby mode is activated If you set Home Network DLNA function to Off it is possible to set to On later 67 Network Easy Settings Display Check the following 1 LAN cable connection Fail Connection of the LAN cables 10 2 IP address setting Fail 3 Connec...

Страница 14: ...ect a Panasonic product with a USB connection cable setup screen may be displayed on the connected equipment For details refer to the instructions for the connected equipment To select a drive Press DRIVE SELECT to select the media drive that you operate Release disc protection RAM If the disc is protected when writing to the disc release the protection 72 Setting the protection Preparations Turni...

Страница 15: ...e and status of the media Basic operation To return to the previous screen Press To exit the screen Press Display Navigation Menu screen OK OK Select Enter BACK RETURN EXIT Page 001 002 Copy Select OPTION LIVE CAT 2 SPORTS NEWS World news DV 21 02 02 29 10 29 10 2 29 10 1 1 1 1 1 01 01 DV PLAY RETURN PICTURE MUSIC KD2A DOG LIVE CAT 04 10 04 10 29 10 Delete Page Up Page Down DEL USB OK RETURN USB d...

Страница 16: ...ELECT DEL EXIT OK OPTION VOL 0 2abc 5jkl 8tuv 1 4ghi 7qrs p 3def 6mno 9xyz w EXTLINK MANUALSKIP REW LIVE TV SELECT INPUT OK AV3 DV TV AV2 AV1 Input Selection RETURN Change Select GUIDE Select the current programme then press Select View then press Every time you change the channel channel information appears automatically Unit s display OK Landscape TV Guide WED 13 10 2010 19 36 WED 13th All Chann...

Страница 17: ...change Favourites Press the Blue button Selection of channel is made easy by creating Favourites of the channels 75 Favourites Edit To switch between the current programme and the next programme Press 2 1 To switch to another channel Press 3 4 Press OK to watch the channel To set the timer programme from channel information 27 Using Channel List All DVB Channels 1 2 3 4 5 6 7 RETURN View Select HD...

Страница 18: ...s in channel information 17 1Press AD 2Select Audio Description and set to Automatic 3Select Volume then adjust the volume with 2 1 Audio Description may not be available depending on the type of audio format You can also set Audio Description active in the Setup menu 77 When TXT appears in channel information 17 Press TEXT To select the page or access to certain topic areas and navigation Use 3 4...

Страница 19: ...stem To see programme information Programmes with the symbol To see advertisement Landscape TV Guide WED 13 10 2010 19 36 WED 13th All Channels AllTypes Time RETURN OK Select Programme Select Channel 24 hours Prog Type Category Page Up Page Down Portrait Landscape Info CH GUIDE 19 00 20 00 OPTION Advert 1 2 3 4 5 6 7 Portrait TV Guide WED 13 10 2010 19 36 WED 13th All Channels All Types RETURN OK ...

Страница 20: ... time of the current playback position Temporary save stops in the following cases When switching to other channels or other screen When recording of the watching programme is started When 2 programmes simultaneous recording is started When performing PAUSE LIVE TV or REWIND LIVE TV for more than 8 hours This may vary depending on the HDD free space These functions do not work in the following cas...

Страница 21: ...TEXT STTL CHAPTER F U N C T I O N M E N U D I R E C T N A V I G A T O R GUIDE BACK RETURN PLAY x1 3 PAUSE PAUSE LIVE TV STOP SLOW SEARCH SKIP PROG CHECK CH PAGE SELECT INPUT CH AV TV DRIVE SELECT DEL EXIT OK OPTION VOL 0 2abc 5jkl 8tuv 1 4ghi 7qrs p 3def 6mno 9xyz w EXTLINK MANUALSKIP REW LIVE TV SELECT INPUT OK AV3 DV TV AV2 AV1 Input Selection RETURN Change Select CH Press Recording starts Selec...

Страница 22: ...unit s tuner 2 programmes simultaneous recording is not possible in the following conditions While recording from DV input or executing Flexible Recording via AV input While high speed copying Channel or input cannot be switched except the 2 recorded programmes during 2 recording Operation during recording To check the recording programme To switch the Channel To display the recording programme on...

Страница 23: ...ink 68 You can use the function by using the TV s tuner when you connect the unit to a Q Link compatible TV Recording mode XP SP LP EP 68 Press DIRECT TV REC and hold for about 1 second To stop recording partway Press If you switch TV channels while recording broadcasting using the TV s tuner Direct TV Recording stops During EXT Link Standby mode or recording Direct TV Recording is unavailable Dir...

Страница 24: ...een may not appear depending on the programme If Programme Selection screen appears Depending on the signal sent from the broadcaster both High Definition picture programme and Standard Definition picture programme exist Select the programme then press OK OK Landscape TV Guide WED 13 10 2010 19 36 WED 13th All Channels AllTypes Time RETURN OK Select Programme Select Channel 24 hours Prog Type Cate...

Страница 25: ...e bundled and displayed as a group in the DIRECT NAVIGATOR screen 33 If the unit cannot record the selected programme the unit will record the repeat programme if it is available However this unit will not record the repeat programme if any part of the selected programme is recorded The series recording will be cancelled if there has been no episode of the series for 13 weeks Press Only Start and ...

Страница 26: ...mes e g news When setting timer from the 1st split programme other parts of the programme will be automatically set and indicated by the timer icon on the TV Guide This is indicated by Split in the Timer Recording screen in step 25 Recommendation Booking right You can record a programme that the broadcaster recommends If the signal is not sent correctly the recording may lack the beginning or the ...

Страница 27: ...ormation of a programme to record Switch the programme with 2 1 Switch the channel with 3 4 3 Press the Yellow button 4 Go to step on page 25 Timer recording from channel information All DVB Channels Set timer 19 00 19 30 Now Multi Audio D A Subtitles Dolby D TXT 19 07 Select favourites 12 ...

Страница 28: ...nput Name Press OK 74 Entering text 4 Press OK The timer programme is stored and the timer icon red is displayed You can enter up to 32 programmes up to a month in advance Each daily or weekly programme is counted as one programme Manual timer recording DEL Channel Name Schedule Drive Mode Space OK RETURN CH Page Up Page Down Turn Timer Off Resolve overlap Total 0 32 Timer Recording Remain 30 30 D...

Страница 29: ...ording standby is activated Grey Timer recording standby is deactivated Currently recording programme Part or all of the programme will not be recorded since the programme is overlapping Press the Green button to resolve overlapping right The disc was full Copy protected programme It was not recorded The programme did not complete recording because of some reason Auto Renewal Recording is set 28 G...

Страница 30: ...ding begins Timer recordings do not begin while copying in normal speed mode If you turn the unit off during the timer recording the recording is continued When you programme successive timer recordings to start last 1 minute of those programmes will not be recorded To start the timer recording while executing other operation 105 To cancel recording when timer recording has already begun Notes on ...

Страница 31: ... Select the item then press Some items can also be selected using the number buttons Playback starts TIMESLIP DISPLAY STATUS DIRECTTVREC AD 10s 60s RECMODE REC TEXT STTL CHAPTER F U N C T I O N M E N U D I R E C T N A V I G A T O R GUIDE BACK RETURN PLAY x1 3 PAUSE PAUSE LIVE TV STOP SLOW SEARCH SKIP PROG CHECK CH PAGE SELECT INPUT CH AV TV DRIVE SELECT DEL EXIT OK OPTION VOL 0 2abc 5jkl 8tuv 1 4g...

Страница 32: ...then press DivX It will go to step automatically if only DivX content is recorded on the disc STATUS F U N C T I O N M E N U D I R E C T N A V I G A T O R GUIDE BACK RETURN PLAY x1 3 PAUSE PAUSE LIVE TV STOP SLOW SEARCH SKIP PROG CHECK CH PAGE SELECT INPUT CH AV TV DRIVE SELECT DEL EXIT OK OPTION VOL 0 2abc 5jkl 8tuv 1 4ghi 7qrs p 3def 6mno 9xyz w REW LIVE TV DRIVE SELECT D I R E C T N A V I G A T...

Страница 33: ...t Genre Label HDD only Thumbnail HDD only Screen icons Title of the current recording Protected title Title was not recorded due to recording protection t Title cannot be played When copying a title to the HDD or when data is damaged etc Grouped titles HDD only Title has not yet been played HDD only Title is recorded using a different encoding system from that of the TV system on the unit Alter th...

Страница 34: ...w button again to cancel 2Press OPTION 3Select the item then press OK HDD 1Select the group then press OPTION 2Select Edit then press OK 3Select Enter Title Name then press OK 4Enter the name 74 Entering text Even if the group name is changed the title names in the group will not be changed 1Select the title then press Yellow button A check mark is displayed Repeat this step Press the Yellow butto...

Страница 35: ...is not heard during all levels search Skip forward 1 minute Press MANUAL SKIP 60s Skip backward 10 seconds Press MANUAL SKIP 10s Each time you press play skips forward or backward DivX This function is not effective Press and hold 1 PLAY a1 3 Play speed is quicker than normal Press again to return to normal speed RW VR DivX This function is not effective RW V This function is not effective even if...

Страница 36: ... to change the time by 10 minute DVD V DivX and AVCHD This function is not effective Press STATUS twice Title number and elapsed time during play and recording mode 1Press OPTION 2Select Multi Audio then press OK 3Select the desired audio HDD Press STTL DVD V DivX and AVCHD Display with Subtitles in the Disc menu 70 HDD 1Press AD 2Select Audio Description and set to Automatic 3Select Volume then a...

Страница 37: ...ation code to cancel the registration in www divx com Regarding DivX VOD content that can only be played a set number of times Some DivX VOD contents can only be played a set number of times When you play this content the number of times already played and initially playable number of times is displayed The remaining number of plays decreases each time a programme is played However when playing fr...

Страница 38: ...LAY x1 3 PAUSE PAUSE LIVE TV STOP SLOW SEARCH SKIP PROG CHECK CH PAGE SELECT INPUT CH AV TV DRIVE SELECT DEL EXIT OK OPTION VOL 0 2abc 5jkl 8tuv 1 4ghi 7qrs p 3def 6mno 9xyz w EXTLINK MANUALSKIP REW LIVE TV DRIVE SELECT D I R E C T N A V I G A T O R Time Remaining 45h54m DR HDD Page 003 003 Copy Select Grouped Titles VIDEO OPTION Birds World news Football Dogs and Cats 1 1 1 1 04 10 04 10 29 10 29...

Страница 39: ...lect Next then press OK to delete other sections Up to 20 sections can be set go to step 2 4Select Delete then press OK Chapter Mark is generated in the scene that was partially deleted 5Press BACK RETURN You can find the desired point by using search or Time slip function etc You cannot set points if they are too close to each other You cannot set an end point before a start point Editing titles ...

Страница 40: ...LAY a1 3 to start play 3Press OK at the point to use as a thumbnail To change the thumbnail Restart play and select Change then press OK at the point to change 4Select Finish then press OK R R DL RW V R R DL RW It is possible to change the image displayed on the Top Menu after finalising or Creating Top Menu You can find the desired point by using search or Time slip function etc HDD Genre informa...

Страница 41: ...l Recording 28 should be performed DR File Conversion Now Conversion begins immediately after step 7 Recording and playback are impossible during conversion Timer recording will not be performed during conversion During standby Conversion will be performed after the unit is turned off in a time slot for which no timer recording is set Convert Delete The original title will be deleted to save HDD c...

Страница 42: ...ter Title Chapter Chapter Chapter Chapter Mark Chapter has been created To edit and playback chapters Edit Chapter Mark Select the point where you want to start a new chapter while viewing the title 1 Press the Green button 2 Press OK at the point you want to divide Repeat this step 3 Press BACK RETURN to go to Chapter View screen 4 To start play Select the chapter then press OK To delete the chap...

Страница 43: ...bc 5jkl 8tuv 1 4ghi 7qrs p 3def 6mno 9xyz w REW LIVE TV DVD RAM DVD RAM is inserted View Pictures JPEG OK RETURN Play Video Copy e g OK Copy HDD DVD 1 2 3 Source Destination Cancel All Copy Direction Copy Mode Create List Start Copying HDD DVD VIDEO High Speed Select the copy direction RETURN 0 Information of the copy destination DVD RAM Copy restricted titles can be copied on to disc Set the reco...

Страница 44: ...een Grouped Titles Sort Information Copying list icons and functions Titles that cannot be copied in high speed mode to the inserted disc Title contains still picture s Still picture s cannot be copied NTSC PAL Title recorded using a different encoding system from that of the TV system currently selected on the unit Titles displaying these marks cannot be selected Title with Guidance information o...

Страница 45: ...estination then press OK Add Delete Move Delete All Setting the copying options Select the item in step 1 43 1 Select Other Settings then press 1 2 Select the copying option then press OK Subtitles 1 Select Subtitles then press OK 2 Select Automatic or Off then press OK Finalise HDD R R DL RW V R R DL only Create Top Menu HDD RW only 1 Select Finalise or Create Top Menu then press OK 2 Select On o...

Страница 46: ... 16 9 aspect using EP mode or FR recordings 5 hours or longer mode Copyable media and copy speed Original title s recording mode Destination Copy speed Media Picture quality DR RAM R R DL RW V R R DL RW Original Picture Quality High Definition Standard Definition Normal speed 1 HG HX HE HL or HM RAM R R DL RW V R R DL RW Original Picture Quality High Definition Standard Definition Normal speed XP ...

Страница 47: ...d copy during copy R R DL RW V R R DL RW Copying will be up to the point cancelled If copy is cancelled during the step while temporarily copying to the HDD then nothing will be copied Even if the title was not copied to the disc the amount of remaining writable disc space becomes less About maintaining the chapter mark The position of the chapter might shift slightly It will not maintain the exce...

Страница 48: ...ed in FR mode You can copy HD Video AVCHD format recorded on HDD by a Panasonic video camera etc to a disc HDD R R DL High Definition 1 Insert a new disc 2 Select Copy Video AVCHD to Disc then press OK If the menu screen is not displayed 15 3 Go to step on page 43 Copying titles HDD RAM RW R R DL RW V R R DL Standard Definition Go to step on page 43 Copying titles Select XP SP LP EP or FR mode in ...

Страница 49: ...ou want to start copying then press OK After the last title on the disc has finished playing the Top Menu is recorded until the set time is reached To stop copying Press You can also press and hold BACK RETURN for 3 seconds If stopped partway copying will be up to that point Operations and on screen displays during copy are also recorded Almost all DVD Video on sale have been treated to prevent il...

Страница 50: ...e date of Pictures by Date or album of Album View then press e g HDD Pictures by Date screen F U N C T I O N M E N U SD Card OK RETURN SD card is inserted Play Video AVCHD View Pictures JPEG Copy Video AVCHD Copy Pictures JPEG Copy Video MPEG2 e g SD OK OK OK 004 005 001 002 003 006 DIRECT NAVIGATOR PICTURE Page 01 01 Press OK to display pictures RETURN OK OPTION Slideshow VIDEO MUSIC Select Pictu...

Страница 51: ...OK While displaying DIRECT NAVIGATOR PICTURE You can set the following items for slideshow After completing the following settings select Set then press OK Display Interval Transition Effect You can set to Fade Motion or Random Repeat Play Background Music Music Selection You can select Background Music from HDD sample music My favourites or Playlists or USB memory Information is shown While displ...

Страница 52: ...IGATOR PICTURE appearance Editing a still picture 1Select the item then press OK 2Select the still pictures to edit then press OPTION Multiple editing Select the item then press the Yellow button Repeat this step A check mark appears Press the Yellow button again to cancel e g HDD 004 005 001 002 003 006 DIRECT NAVIGATOR PICTURE Page 01 01 Press OK to display pictures RETURN OK OPTION Slideshow VI...

Страница 53: ... Copy or Copy Album then press OK 2Select Start then press OK HDD RAM Pictures by Date only 1Select Change Date then press OK 2Select the item and change the date 3Press OK A new folder will be created The original folder is not deleted Delete it if unrequired If there is a same date folder pictures move into the folder Album View only Select Enter Album Name in Edit Album then press OK 74 Enterin...

Страница 54: ...topped Press FUNCTION MENU 2 Select Copy VIDEO PICTURE in Copy then press OK 3 Set the copy direction 1 Select Copy Direction then press 1 2 Set Source 3 Set Destination 4 Press 2 to confirm 4 Set the copy mode 1 Select Copy Mode then press 1 2 Set Format to PICTURE 3 Press 2 to confirm 5 Register still pictures to copy Pictures from different dates or albums will not be registered to the same lis...

Страница 55: ...If the number of files folders to be copied exceeds the maximum 110 copying will stop partway through Editing the copying list Select the item after step 5 7 54 1 Press OPTION 2 Select the operation then press OK Delete All Select Yes then press OK Add 1 Select the item then press the Yellow button A check mark is displayed Repeat this step Press the Yellow button again to cancel 2 Press OK Delete...

Страница 56: ...t Unknown Album In these cases enter the music CD title information manually after recording to the HDD has completed R R DL CD USB Music CD All tracks in the CD will be recorded R R DL CD USB MP3 All tracks in the folder will be recorded Cannot record track by track It will be recorded as 1 album to the HDD in 1 recording While stopped Music CD Insert a disc The unit starts accessing the Gracenot...

Страница 57: ...ylists is selected Select the playlist then press OK 4 Select the track then press OK You cannot play music tracks on HDD while copying Switching the VIDEO or PICTURE screens While the DIRECT NAVIGATOR Music Menu screen is displayed 1 Press the Red button 2 Select VIDEO or PICTURE then press OK To find a folder MP3 only Playing music recorded on HDD DIRECT NAVIGATOR CD MP3 Select Folder 0 09 RETUR...

Страница 58: ...PTION 2 Select Select Picture Album then press OK 3 Select the album then press OK e g To end the slideshow Press BACK RETURN To play music continuously even if the Power off link works 68 Operations during music play Stop Press Pause Press Press again or 1 PLAY a1 3 to restart play Search Press 6 or 5 Press 1 PLAY a1 3 to restart play Skip During play or while paused press or 9 Skip to the track ...

Страница 59: ...g text Tracks themselves are not deleted from the HDD While displaying the Playlists screen 1Select Remove All Tracks then press OK 2Select Remove then press OK While displaying the Music Menu screen 1Select Clear My Favourites or Clear Frequently Played then press OK 2Select Clear then press OK While displaying the My Favourites Track List of Playlists or Frequently Played screen 1Select Remove t...

Страница 60: ...tart then press OK It may take time for the copying to start To stop copying Press and hold BACK RETURN for 3 seconds Copy cannot be executed while recording or playback An AVCHD title with more than 100 scenes will be divided into titles every 99th scene and copied USB connection cable specified cable such as accessories of the USB equipment Copying HD Video AVCHD format 1 From video equipment Co...

Страница 61: ...eo on an SD card or in the HDD of the Panasonic s video camera etc with this unit You must copy the files to the HDD or a DVD RAM You cannot playback or record while copying SD Video Copying SD Video MPEG2 format 1 From video equipment Connect the video camera Select the appropriate mode that makes the video camera ready for data transfer on the video camera From an SD card Insert an SD card Displ...

Страница 62: ...ut 63 Copy will stop when timer recording starts Chasing playback simultaneous rec and play switching of input cannot be performed R RW V R RW Chapter will be created automatically Recording disc HDD Recording mode XP SP LP EP 1While stopped Press INPUT SELECT to select the input channel e g If you have connected to AV3 input terminals select AV3 2Press REC MODE to select the recording mode 3Start...

Страница 63: ...ou have connected to AV2 input terminals select AV2 2While stopped Press FUNCTION MENU 3Select Others then press OK 4Select Flexible Recording via AV input then press OK 5Select Hour and Min and set the recording time 6Start play on the other equipment 7Select Start then press OK To stop recording partway Press To show the remaining time Press STATUS DV Automatic Recording If the DV automatic reco...

Страница 64: ...s on the unit s display To cancel the External link 1 Turn on this unit 2 Press EXT LINK to stop recording or to cancel linked timer recording standby EXT L disappears It will be recorded in standard definition quality even if the programme is in high definition During Ext Link Standby mode or recording you cannot select external input other than AV2 This function does not work when TV System is s...

Страница 65: ...ectly A high speed Internet service with a speed of at least 6 Mbps is recommended Be sure to update the software firmware when a software firmware update notice is displayed on the screen If the software firmware is not updated you will not be able to use the VIERA CAST function The VIERA CAST Home screen is subject to change without notice The services through VIERA CAST are operated by their re...

Страница 66: ... if you use the Panasonic DLNA compatible equipment The DLNA compatible device that is to be connected to the unit should be connected to the same hub or broadband router as the unit You cannot playback the titles on other DLNA compatible equipment from this unit Files not on the HDD cannot be played back Editing is not possible Only delete can be performed from Panasonic equipment Programme durin...

Страница 67: ...me of this unit for displaying on the connected equipment After performing step 8 left 1 Select Setting device name then press OK 2 Select Select from a preset list or Create name then press OK 3 Select from a preset list Select the preset name then press OK 4 Create name Enter the name 74 Entering text Automatic All connected devices on the same network can access this unit 4 Panasonic DLNA compa...

Страница 68: ...u etc is performed When you set the TV to standby mode the unit is also automatically set to standby mode Power off link function does not work when recording copying finalising etc The following operations make it possible to keep the power of the unit ON and to play music continuously When the unit is connected to an amplifier receiver supporting VIERA Link 1While playing music Press OPTION 2Sel...

Страница 69: ...ional HDAVI equipment Please refer to individual manuals for other manufacturers equipment supporting VIERA Link function VIERA Link HDAVI Control based on the control functions provided by HDMI which is an industry standard known as HDMI CEC Consumer Electronics Control is a unique function that we have developed and added As such its operation with other manufacturers equipment that supports HDM...

Страница 70: ...case of multiple audio Subtitle Language Select the subtitle language in the case of multiple languages Angle Change the number to select an angle Audio Channel Change audio LR L R during playback Disc Play Picture Sound Other Soundtrack Subtitles 1 Angle Off 1 Digital 2 0 ch Menu Item Setting Signal type k kHz Sampling frequency b bit Number of bits ch channel Number of channels ENG FRA DEU ITA E...

Страница 71: ...utomatically detects the film and video content and appropriately converts it Video Select when using Auto and the content is distorted Film Select this if the edges of the film content appear jagged or rough when Auto is selected However if the video content is distorted as shown in the illustration to the right then select Auto Sound menu Change the sound effect Sound Effects Re master 1 Re mast...

Страница 72: ...w disc only SD Formatting deletes all contents including computer data and they cannot be restored Check carefully before proceeding The contents are deleted when you format a disc or card even if you have set protection After performing steps 1 3 left 1Select Format Disc or Format Card then press OK 2Select Yes then press OK 3Select Start then press OK 4Press OK To stop formatting RAM Press BACK ...

Страница 73: ...er the disc unusable When finalising a high speed recording compatible disc it may take longer than displayed on the confirmation screen approximately four times longer You cannot finalise discs recorded on other manufacturer s equipment R R DL RW V R R DL If you finalise discs recorded on Panasonic equipment other than this unit the background selected as Top Menu may not be displayed Discs final...

Страница 74: ...ing is previewed The maximum number of characters is different depending on the media If a name is long parts of it may not be shown in some screens 1 Press 7 to move to the 7th row 2 Press 7 twice to highlight R 3 Press OK _ Enter Title Name 1 2 3 4 5 A B C a D E F d G H I N O g J K L j M m 6 7 8 9 0 b c e f h i k l n _ o SPACE Set Delete P Q R S p T U V t W X Y Z w q r s u v x y z Top Menu Previ...

Страница 75: ...You can create Favourites of channels for making viewing and recording easier To add channels to the Favourites list 1 Select the channel in the All DVB Channels column then press OK Repeat this step Green Select Favourites Yellow Add all channels 2 Press BACK RETURN 3 Press OK to save the Favourites To change the order of the channels list 1 Select the channel in the Favourites column to move the...

Страница 76: ...n set each channel manually when the Auto Setup could not complete successfully 1 Select the frequency with 3 4 Select the frequency by checking the signal strength and signal quality displays 2 Press OK to start scan The set channel is displayed in the table Update Channel List You can update the channels to the latest one This takes about 3 minutes Finished is displayed when the search is finish...

Страница 77: ...Press OK is displayed Press OK again to cancel Red Change the input Green Lock all channel and AV input Yellow Unlock all channel and AV input Preferred Multi Audio Multi Audio Choose the audio language for broadcast If the selected language is not available then the original language will be selected Audio Description Select whether the Audio Description is set to be active or not Preferred Subti...

Страница 78: ...le on that disc Enter a code with the number buttons when you select Other 86 Language code list Menu Choose the language for disc menus Enter a code with the number buttons when you select Other 86 Language code list DVD Video Parental Control Set a ratings level to limit DVD Video play Follow the on screen instructions PIN is required to change 75 Child Lock You can restrict playback of the foll...

Страница 79: ...Format for DVD You can copy titles to DVD in high speed mode if you set to Video format when recording a programme This setting is valid for the following cases Recording from external equipment including DV equipment Copying from a finalised DVD Video disc If high speed copy is not necessary we recommend setting to VR format as the following restrictions are applied to recorded titles in case of ...

Страница 80: ...pports the virtual surround function There is no effect on Bitstream via HDMI AV OUT and DIGITAL AUDIO OUT The audio will be output in Stereo in the following cases AVCHD playback Bilingual Audio Selection Only when recording from DV input Select whether to record the main or secondary audio type when Copying to a DVD R DVD RW DVD Video format R and RW Recording Format for DVD is set to Video form...

Страница 81: ...th XP mode The picture quality of LPCM recordings may be lower than that of normal XP mode recordings The audio becomes Dolby Digital even if you selected LPCM when using a recording mode other than XP Audio Type for DV Input You can select the kind of audio when recording from the unit s DV input terminal 62 If Mix is selected both Stereo 1 and Stereo 2 are recorded When recording bilingual broad...

Страница 82: ...t Connection Setting the masked off area on the screen becomes grey Depending on the connected equipment some items may be shaded in grey on the display and cannot be selected or you may not be able to change the settings TV Aspect Set to match the type of TV connected Aspect for 4 3 Video To play a 4 3 title set how to show pictures on a 16 9 widescreen TV TV System Set in accordance with the TV ...

Страница 83: ...r not compatible with HDMI with a DIGITAL AUDIO OUT terminal HDCP on HDMI Output If you connect a DVI device that is not compatible with HDCP set to Off In this case some programmes or DVD Video cannot be seen Contents Type Flag Depending on the playback content the TV will output adjusting to the optimal method when a TV that supports Contents Type Flag is connected VIERA Link Set to use HDAVI Co...

Страница 84: ...led when the DLNA function is enabled in Home Network DLNA Settings left Automatic Standby Set the time to turn the unit to standby mode automatically After the unit has finished operating the unit will be turned to standby mode once the set time has passed When REWIND LIVE TV is set to On 79 Off cannot be selected Automatic Standby after OTR If On is selected this unit is turned to standby mode w...

Страница 85: ...tom when the remote control code of this unit is set to DVD 4 DVD 5 or DVD 6 Clock If the time is not set correctly use the settings listed in the method below Automatic This unit usually obtains time and date information from digital broadcasts But if the time is not set correctly set it to Off and perform Manual Setting Manual Setting 1 Select Off of Automatic then press OK 2 Select the item you...

Страница 86: ...azian 6566 Afar 6565 Afrikaans 6570 Albanian 8381 Amharic 6577 Arabic 6582 Armenian 7289 Assamese 6583 Aymara 6589 Azerbaijani 6590 Bashkir 6665 Basque 6985 Bengali Bangla 6678 Bhutani 6890 Bihari 6672 Breton 6682 Bulgarian 6671 Burmese 7789 Byelorussian 6669 Cambodian 7577 Catalan 6765 Chinese 9072 Corsican 6779 Croatian 7282 Czech 6783 Danish 6865 Dutch 7876 English 6978 Esperanto 6979 Estonian ...

Страница 87: ...s depending on the network or broadcast environment If the timer recording is scheduled within the following time at the start of the download the download will not be executed From broadcast Within 5 hours From Internet Within 1 hour You can also download the latest software firmware from the following website and burn it to a CD R to update the software firmware http panasonic jp support global ...

Страница 88: ...D function Press and hold OK and BACK RETURN simultaneously until X HOLD disappears Switching the aspect ratio of the screen Normal Normal output Side cut The black bars on the right and left sides of the 16 9 image disappear and the image is enlarged Zoom The black bars on the top and bottom sides of the 4 3 image disappear and the image is enlarged TV operation CH PAGE CH AV TV DRIVE SELECT VOL ...

Страница 89: ...ons AUDIO OUT VIDEO L R AUDIO IN VIDEO L R This unit s rear panel Audio Video cable TV s rear panel Amplifier connections HDMI AV OUT terminal DIGITAL AUDIO OUT terminal HDMI AV OUT HDMI IN HDMI AV OUT HDMI IN This unit s rear panel Amplifier s rear panel TV s rear panel HDMI cable HDMI cable OPTICAL IN DIGITAL AUDIO OUT PCM BITSTREAM OPTICAL This unit s rear panel Amplifier s rear panel Optical d...

Страница 90: ...as disconnected while the unit was on The unit is carrying out its recovery process This process restores the unit to normal operation The unit is not broken Wait until the message disappears PROG FULL There are already 32 timer programmes Delete unnecessary timer programmes 29 REMOVE The USB device is drawing too much power Remove the USB device START Update of the software firmware is started Yo...

Страница 91: ... is displayed when the unit is in the recovery process to return to normal operation Once the display clears you can use the unit again 92 If it remains displayed consult the dealer where the unit was purchased U99 The unit fails to operate properly Press Í I on the main unit to switch the unit to standby mode Now press Í I on the main unit again to turn the unit on H or F stands for a number Ther...

Страница 92: ... Linked timer recordings with external equipment is in recording standby EXT L on the unit s display blinks when Í is pressed Press EXT LINK to cancel the recording standby The display is dim Change Unit s Display 82 0 00 is flashing on the unit s display Set the clock 85 The time recorded on the disc and the available time shown do not add up If you record or edit about 200 times or more the rema...

Страница 93: ...ear on the TV The picture is distorted during play or video will not play correctly Check the connection and the TV s input settings The unit s TV System setting differs from the TV system used by the disc now playing While stopped keep pressing and OPEN CLOSE on the main unit for 5 or more seconds The system switches from PAL to NTSC or vice versa 82 Picture may not be seen when more than 4 devic...

Страница 94: ...ity on the HDD Delete unnecessary titles on the HDD 29 38 72 You cannot record and copy on finalised discs R R DL RW V R R DL RW Recording or editing may not be possible on these discs after ejecting and loading the disc or turning the unit on off for approximately 30 times after being recorded to Discs recorded on equipment other than this unit may not be able to be recorded to This unit cannot r...

Страница 95: ...lays the title in the same way as a normal programme However video and audio may momentarily cut out when the unit is switching layers DVD Video is not played You have set a ratings level 78 Ensure the disc is for the correct DVD Video region number and is not defective 100 You have forgotten your ratings PIN You want to cancel the ratings level The ratings level returns to the factory preset Whil...

Страница 96: ...CDs that do not conform to CD DA specifications copy control CDs etc cannot be guaranteed The contents of the USB memory cannot be read Remove the USB memory from the USB port and then insert again If this does not solve the problem turn off and turn on the unit again If it cannot be operated after that set VIERA Link to Off and turn the unit off again and turn it back on 83 USB memories connected...

Страница 97: ...ctions If the connection for the equipment connected with HDMI was changed or if there was a power failure or the plug was removed from the household mains socket HDAVI Control may not work In this case change TV VIERA setting for HDAVI Control again You cannot access this unit from DLNA compatible equipment on the network Check the network connection and the network settings 10 13 66 84 It may no...

Страница 98: ...CD DVD RAM RAM Video Not including AVCHD JPEG DVD R R Video Including AVCHD DVD R DL R DL DVD RW RW V Video Not including AVCHD R R R DL R DL RW RW 8X Speed RW disc is not supported Indemnity concerning recorded content Panasonic does not accept any responsibility for damages directly or indirectly due to any type of problems that result in loss of recording or edited content data and does not gua...

Страница 99: ...control CDs etc cannot be guaranteed Play only discs Disc type Standard symbol Uses DVD Video DVD V Movie and music DVD RW DVD Video Recording format RW VR DVD RW video recorded on another DVD recorder By formatting 72 the disc you can record onto it in DVD Video format It may be necessary to finalise the disc on the equipment used for recording 73 DVD R 1 DVD R DL 1 R R DL DivX MP3 JPEG DVD RAM D...

Страница 100: ...r edit the 8 cm disc Only playback or copy to the HDD is possible Discs that cannot be played Blu ray Disc BD Video BD RE BD R 2 6 and 5 2 GB DVD RAM 12 cm DVD Audio HD DVD Super Video CD Super Audio CD Video CD R 8 cm CD ROM Photo CD PD etc Region management information DVD Video This unit plays DVD Video marked with labels containing the region number 2 or ALL Example Discs recorded on equipment...

Страница 101: ...t in formatting etc and the loss of recorded content Setting the protection Switch the write protect switch to the LOCK position Using miniSD card or microSD card miniSD Cards microSD Cards miniSDHC Cards microSDHC Cards and microSDXC Cards can be used but must be used with an adaptor card These are usually supplied with such cards or otherwise customer provided e g Video images of the copyright p...

Страница 102: ...ability and high speed operation it is a very special device that is easily susceptible to damage As a basic rule save important content to a disc as backup The HDD is a device that is not built to withstand vibration shock or dust Depending on the setup environment and handling of the HDD some content may become damaged and play and recording may no longer be possible Especially during operation ...

Страница 103: ...n writing on the label side of the disc Do not expose the terminals of the SD card to water garbage or other strange things Do not drop stack or impact discs Do not place objects on them Do not use the following discs Discs with exposed adhesive from removed stickers or labels rental discs etc Discs that are badly warped or cracked Do not place in the following areas In direct sunlight In very dus...

Страница 104: ...erent from the actual remaining time Other recording modes This unit records using a VBR Variable bit rate data compression system to vary recorded data segments to match video data segments which may cause differences in the displayed amount of time and space remaining for recording If the remaining amount of time is insufficient delete any unwanted titles to create enough space before you start ...

Страница 105: ...ding from DV input While copying in normal speed mode While copying in high speed mode With finalising or creating Top Menu RW While copying in high speed mode Without finalising or creating Top Menu RW Starting of the timer recording while executing other operation Executing operation Starting of the timer recording Executing operation Starting of the timer recording Recording the title 1 Executi...

Страница 106: ...it the data SD Numbers XXX Letters 001 001track mp3 002track mp3 003track mp3 001track mp3 002track mp3 003track mp3 001track mp3 002track mp3 003track mp3 004track mp3 Root Order of play file track 001 Folder 002 Folder 003 Folder MP3 P0000010 jpg P0000011 jpg P0000012 jpg P0000003 jpg P0000004 jpg P0000005 jpg P0000001 jpg P0000002 jpg P0000006 jpg P0000007 jpg P0000008 jpg P0000009 jpg Root Ord...

Страница 107: ...0i Not provided Audio Recording system Dolby Digital XP SP LP EP mode 2ch Linear PCM XP mode Dolby Digital DR HG HX HE HL HM mode Max 5 1ch Dolby Digital Plus DR mode Max 5 1ch MPEG DR mode 2ch HE AAC DR mode Max 5 1ch Audio in AV1 AV2 21 pin AV3 pin jack Input level Standard 0 5 Vrms Full scale 2 0 Vrms at 1 kHz Input impedance More than 10 k Audio out AV1 AV2 21 pin Audio Out pin jack Output lev...

Страница 108: ...x Speed Maximum supporting speed of drive for each disc Refer to Recordable discs right Recordable discs DVD RAM 2X SPEED Ver 2 0 2 3X SPEED Ver 2 1 2 5X SPEED Ver 2 2 DVD R SL 1X SPEED Ver 2 0 1 4X SPEED Ver 2 0 1 8X SPEED Ver 2 0 1 16X SPEED Ver 2 1 DVD R DL 2 4X SPEED Ver 3 0 2 8X SPEED Ver 3 0 DVD RW 1X SPEED Ver 1 1 1 2X SPEED Ver 1 1 2 4X SPEED Ver 1 2 2 6X SPEED Ver 1 2 R SL 2 4X SPEED Ver ...

Страница 109: ... LASER specification Class 1 LASER Product Wave length 780 nm CDs 662 nm DVDs Laser power 1 Long file name is unsupported 2 Video Recording conversion and transfer is possible from SD card to HDD or DVD RAM disc After Video Recording conversion and transfer to HDD or DVD RAM disc is completed the playback becomes possible 1 Video Recording conversion and transfer is possible from USB device to HDD...

Страница 110: ... of files recognizable except for HDD 3000 files About JPEG MP3 DivX MPEG2 AVCHD files Extension Files must have the extension DIVX divx AVI or avi Picture resolution Up to 1920k1080 pixels Reference DivX certified to play DivX video up to HD 1080p including premium content Video Number of stream Up to 1 Codec DIV3 DIV4 DIVX DV50 DIV6 FPS Frame Per Second Up to 60 fps Audio Number of stream Up to ...

Страница 111: ...e is 8 Mbps 63 hours DR 1 Standard Definition SD quality estimated bit rate is 4 Mbps 126 hours HG 39 hours HX 58 hours HE 87 hours HL 117 hours HM 169 hours XP 53 hours 1 hour 2 hours 1 hour 1 hour 45 min SP 106 hours 2 hours 4 hours 2 hours 3 hours 35 min LP 212 hours 4 hours 8 hours 4 hours 7 hours 10 min EP 424 hours 318 hours 2 8 hours 6 hours 2 16 hours 12 hours 2 8 hours 6 hours 2 14 hours ...

Страница 112: ...loped independently by or for Panasonic Corporation 2 the software owned by third party and licensed to Panasonic Corporation 3 the software licensed under the GNU General Public License Version 2 GPL v2 4 the software licensed under the GNU LESSER General Public License Version 2 1 LGPL v2 1 and or 5 open sourced software other than the software licensed under the GPL v2 and or LGPL v2 1 For the ...

Страница 113: ... software from Gracenote the Gracenote Software enables this application to perform disc and or file identification and obtain music related information including name artist track and title information Gracenote Data from online servers or embedded databases collectively Gracenote Servers and to perform other functions You may use Gracenote Data only by means of the intended End User functions of...

Страница 114: ... unit from the power supply and contact your dealer Do not spray insecticides onto or into the unit They contain flammable gases which can ignite if sprayed into the unit Service Do not attempt to repair this unit by yourself If sound is interrupted indicators fail to light smoke appears or any other problem that is not covered in these instructions occurs disconnect the AC mains lead and contact ...

Страница 115: ...te handling For more information about collection and recycling of old products and batteries please contact your local municipality your waste disposal service or the point of sale where you purchased the items Penalties may be applicable for incorrect disposal of this waste in accordance with national legislation For business users in the European Union If you wish to discard electrical and elec...

Страница 116: ...reproduced if connected to a TV which does not support Deep Colour The unit will automatically set appropriate output to suit the connected TV Dolby Digital This is a method of coding digital signals developed by Dolby Laboratories Apart from stereo 2 channel audio these signals can also be multi channel audio Dolby Digital Plus Multi channel audio and higher audio quality is made possible using D...

Страница 117: ...s it transmits uncompressed digital video and audio signals on a single cable This unit supports high definition video output 720p 750p 1080i 1125i 1080p 1125p from HDMI AV OUT terminals To enjoy high definition video a High Definition compatible TV is required JPEG Joint Photographic Experts Group This is a system used for compressing decoding colour still pictures If you select JPEG as the stora...

Страница 118: ...th of the cable that is connected to the aerial etc Thumbnail This refers to a miniature representation of a picture used to display multiple pictures in the form of a list x v ColourTM x v ColourTM is a name for devices that are compatible with the xvYCC format an international standard for expanded colour in motion pictures and that follow the rules for signal transmission You can enjoy vivid co...

Страница 119: ...s 54 D DIRECT NAVIGATOR Operations 33 34 Screen icon 33 Disc management Auto Play Select 73 Create top menu 73 Delete all titles 72 Finalise 73 Format 72 Protection 72 Providing a name 72 Top menu 73 DivX 110 Play 37 DLNA 66 84 DVD Video Playback 31 Region code 100 E Editing Music 59 Editing Still picture 52 Editing Video 39 Change genre 40 Change thumbnail 40 Chapter 42 Delete 39 Divide Title 40 ...

Страница 120: ... 14 Music 58 Reset 86 97 Still picture 53 Television operation 88 Turning on 14 P PAUSE LIVE TV 20 PIN 75 Playback Music 56 Recorded on HDD 57 Playback Still picture 50 Slideshow 51 58 Playback Video DVD Video 31 Changing audio 36 DivX 37 DVD Video Ratings 78 Menu 78 Playlist created on other equipment 32 Recorded video contents 32 Soundtrack 70 78 Status message 36 Subtitles 34 70 78 Playback men...

Страница 121: ...rs 84 Picture 80 Sound 80 Tuning 75 Software Firmware Update 87 Specifications 107 Standby Power Save 12 84 Still pictures Copying 54 Deleting 53 Editing 52 Playback 50 Slideshow 51 58 Supplied accessories 2 Batteries 2 Remote control 6 85 88 T Timer recording 24 Auto Renewal Recording 28 Confirm and edit 29 Manually programming timer recording 28 Recommended programme recording 26 Tuning Channel ...

Страница 122: ...Reference VQT2J58 122 ...

Страница 123: ... CAUTION Danger of explosion if battery is incorrectly replaced Replace only with the same or equivalent type recommended by the manufacturer Dispose of used batteries according to the manufacturer s instructions THIS UNIT IS INTENDED FOR USE IN MODERATE CLIMATES This product may receive radio interference caused by mobile telephones during use If such interference is apparent please increase sepa...

Страница 124: ...onic UK Ltd It couldn t be simpler Also available through our Internet is direct shopping for a wide range of finished products take a browse on our website for further details Digital Switchover for Terrestrial broadcasts Starting in late 2007 and ending in 2012 TV services in the UK will go completely digital TV region by TV region If you have any questions please call Digital UK on 08456 50 50 ...

Отзывы: