background image

VQT4W60

49

Chapters—Creating and Editing

[HDD]


[RAM]

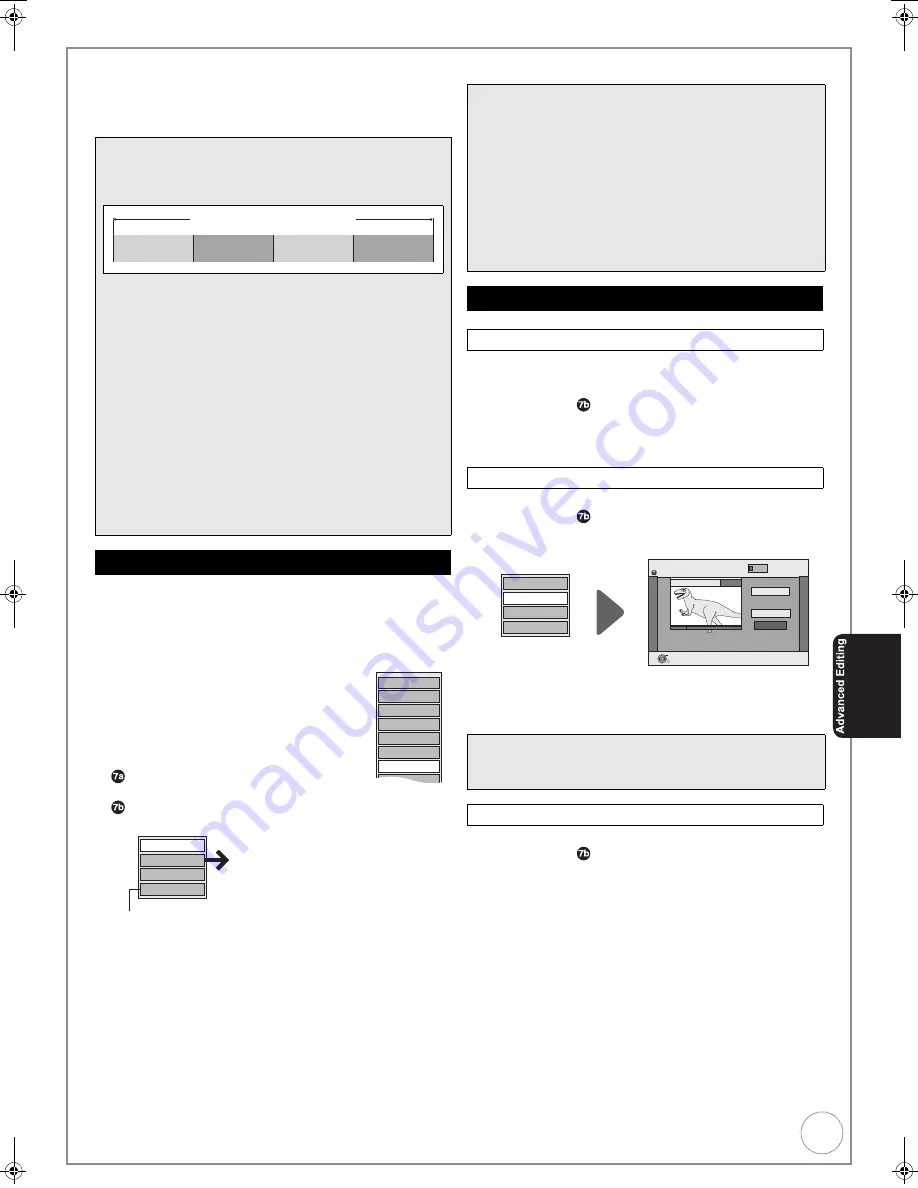
When creating chapters in your favourite scenes, you can easily 

reach the head of scene using [

:

9

] (SKIP) or play on 

Chapter View.

Allows viewing and editing chapters individually.

1

Press [DRIVE SELECT] to select the drive.

2

Press [DIRECT NAVIGATOR].

[HDD]


[RAM]

 When “VIDEO” is not selected, press the 

“Red” button to select “VIDEO”.

3

Press [

3

,

4

,

2

,

1

] to select a title.

4

Press [OPTION] to display the OPTION 

menu.

5

Press [

3

,

4

] to select “Chapter View” 

then press [OK].

6

Press [

3

,

4

,

2

,

1

] to select a 

chapter.

– Multiple editing (

>

right, Tips)

To play
Press [OK].
To edit

Press [OPTION] to display the menu list.

You can go back to the Title View.

You can delete the chapters for each title.

Important: 

Once deleted, recorded contents cannot be

recovered.
Perform steps 

1

 – 

 of “Accessing the Chapter View” (

>

left).

8

Press [

3

,

4

] to select “Delete Chapter”, then press 

[OK].

9

Press [

2

] to select “Delete”, then press [OK].

You can divide a title into multiple chapters.
Perform steps 

1

 – 

 of “Accessing the Chapter View” (

>

left).

8

Press [

3

,

4

] to select “Create Chapter”, then press 

[OK].

9

Press [OK] at the point you want to divide.

– For quicker editing (

>

48, Tips)

– Repeat this step to create additional chapters.

:

Press [

3

,

4

] to select “Finish”, then press [OK].

You can combine the divided chapters.
Perform steps 

1

 – 

 of “Accessing the Chapter View” (

>

left).

8

Press [

3

,

4

] to select “Combine Chapters”, then 

press [OK].

9

Press [

2

] to select “Combine”, then press [OK].

– The selected chapter gets combined with the next 

chapter.

Tips

Chapter

Each section between the division points becomes a 

chapter.

[HDD]


[RAM]

: You can change the order of chapters and 

create a Playlist (Video) (

>

50).

“Chapter Creation” in the Setup menu (

>

72)

“Automatic”:

Detects changes (special mute points like the start and the 

end of the programme) in the scene during recording and sets 

chapter start points on them automatically.

Depending on the programme to be recorded or the 

Recording Mode, the chapter start points may not be 

created correctly.

“5 minutes”:

Sets chapter start points automatically during recording at 

approximately 5-minute interval.

Maximum numbers of chapters on a disc

[HDD]

: Approx. 1000 per title

[RAM]


[-R]


[-R]DL]


[-RW‹V›]

: Approx. 1000

[+R]


[+R]DL]


[+RW]

: Approx. 254

Accessing the Chapter View

Title

Chapter

Chapter

Chapter

Chapter

Properties

Edit

TV Guide Explorer

Create Group

Release Grouping

Chapter View

Table Display

Delete

Combine Chapters 

Delete Chapter 

Create Chapter 

Title View

Refer to “Chapter 

Operations” (

>

right).

Tips

To exit the menu screens

Press [DIRECT NAVIGATOR].

To view other pages

Press [

3

,

4

,

2

,

1

] to select “Previous” or “Next”, then press 

[OK].

– You can also press [

:

9

] to view other pages.

Multiple editing

(Only Delete Chapter)

Select with [

3

,

4

,

2

,

1

], then press [

;

]. (Repeat.)

– A check mark appears. Press [

;

] again to cancel.

Chapter Operations

Delete Chapter

Create Chapter

Notes

A short portion of the title just after the creation point may be 

lost.

Combine Chapters

Combine Chapters

Delete Chapter

Create Chapter

Title View

DIRECT NAVIGATOR  Create Chapter 

Create 

Finish 

0:43.21 

PLAY 

008 

HDD 

OK 

RETURN 

VIDEO 

DMR-EX86EB_VQTXXXX-B.book  49 ページ  2013年3月6日 水曜日 午後4時26分

Содержание Diga DMR-EX86EB

Страница 1: ...iew channels only not Pay TV or encrypted channels unless connected to an external source capable of receiving Pay TV or encrypted channels This unit does not have an analogue broadcast tuner Region number supported by this unit Region numbers are allocated to DVD Recorders and DVD Video according to where they are sold The region number of this unit is 2 The unit will play DVDs marked with labels...

Страница 2: ...les Previous Page 02 02 Next 10 10 HDD MUSIC PICTURE VIDEO Select OK RETURN OPTION Previous Next 11 10 Dolphins Chantal Show 2 Select a function and an item You can access selected function easily Info TV Guide DIRECT NAVIGATOR Grouped Titles Previous Page 02 02 Next 10 10 HDD MUSIC PICTURE VIDEO Select OK RETURN OPTION Previous Next 11 10 Dolphins Chantal Show 2 Grouped title Info To get the most...

Страница 3: ...cated in parentheses when asking for replacement parts Product numbers correct as of February 2013 These may be subject to change 1 Remote control N2QAYB000462 1 AC mains lead K2CT2YY00098 For use with this unit only Do not use it with other equipment Also do not use cords for other equipment with this unit 2 Batteries for remote control R6 Size 1 RF coaxial cable K1TWACC00003 Sales and Support In...

Страница 4: ...ot recharge alkaline or manganese batteries Do not use batteries if the covering has been peeled off Remove batteries if you do not intend to use the remote control for a long period of time Store in a cool dark place When disposing the batteries please contact your local authorities or dealer and ask for the correct method of disposal WARNING CAUTION Table of Contents Getting started Features 2 A...

Страница 5: ...diting still pictures 56 Copying titles or Playlists Video 57 Copy Video HDD to DVD 59 Copying using the copying list Advanced Copy 60 Copying a finalised DVD R DVD R DL DVD RW DVD Video format R and R DL 61 Copy Video MPEG2 from a video equipment 62 Copying Still Pictures Playlist Picture 62 Copying using the copying list 62 Copying new still pictures on USB memory Copy New Pictures 63 Copying st...

Страница 6: ... unit on a surface that is flat and not subject to vibration or impact Do not place on anything that generates heat like a video cassette recorder etc Do not place in an area often subject to temperature changes Place in an area where condensation does not occur Condensation is a phenomenon where moisture forms on a cold surface when there is an extreme change in temperature Condensation may cause...

Страница 7: ... areas Near a heat source Places that undergo extreme shifts in temperature condensation can occur Where static electricity or electromagnetic waves occur Discs to avoid Discs that are not perfectly circular in shape Warped discs which may not balance properly in your unit causing improper operation or damage to the unit Cracked discs Discs with exposed adhesive from removed stickers or labels suc...

Страница 8: ...function REC Start recording 21 REC MODE Change recording mode 21 EXT LINK Linked timer recordings with external equipment 28 DIRECT TV REC Direct TV Recording 26 DVB function TEXT Show Digital Teletext service 45 STTL Show subtitles 45 Transmission window TV operations 77 Channel select Change pages in the GUIDE Plus list 19 21 33 Show timer recording list 30 A Input select Tuner AV1 AV2 AV3 19 2...

Страница 9: ... counter various messages 9 Remote control visual feedback This flashes when it is operated by the remote control Recording Playback indicator Rear Panel DMR EX86EB K VQ7AA01002 R SER NO RF IN RF OUT AV1 TV AV2 EXT AC IN AUDIO VIDEO L R OUT OPTICAL 1 Aerial input terminal 10 11 78 2 Aerial output terminal 10 11 78 3 AUDIO VIDEO output terminals 78 79 4 AV1 TV 21 pin Scart terminal 10 11 78 TV set ...

Страница 10: ...ng a fully wired 21 pin Scart cable You can use a variety of Q Link functions by connecting the unit to a Q Link compatible television 43 You can enjoy high quality viewing by connecting the unit to an RGB compatible television AV1 Output in the Setup menu is set to RGB 1 or RGB 2 75 Make AV2 Input settings in the Setup menu 75 Connecting to a Television only TV RF IN AV RF IN HDMI AV OUT HDMI IN ...

Страница 11: ...ctions proceed to the TV Tuning 13 Adding a Digital Satellite Receiver Connecting to a Television and a Digital Satellite Receiver To view digital satellite programmes Refer to Watching Digital Satellite Programmes 19 To record digital satellite programmes Refer to Recording from a Digital Satellite Receiver 28 Digital satellite receiver AV1 TV This unit TV RF IN AERIAL RF IN AV2 EXT RF OUT RF IN ...

Страница 12: ...nly compatible with 2 channel audio output audio with 3 channels or more will be down mixed 92 and output as 2 channels even if connecting with an HDMI cable some discs cannot be down mixed You cannot connect this unit to DVI devices that are incompatible with HDCP For display units compatible with HDCP High Bandwidth Digital Content Protection that are equipped with a digital DVI input terminal P...

Страница 13: ... TIME SLIP SKIP TV STOP PAUSE PLAY x1 3 DELETE INPUT SELECT AV VOL CH PAUSE LIVE TV 10s 60s MANUAL SKIP OK RETURN OK Tips To cancel Auto Setup Press RETURN If the unit displays No stations found Press 1 to select No and press OK Go to step 2 After you have performed steps 2 turn off the unit and confirm the cable or aerial input is connected to the RF IN terminal Restart the Auto Setup again 71 DV...

Страница 14: ...of the PIN number don t forget Owner ID cannot be reset by Shipping Condition in the setup menu 76 5 to store the PIN number 6 2 to select Yes then The cursor moves to Name 7 1 to enter the name 8 3 4 to select a letter then 1 to move to next character Repeat this to enter the name 9 to store the name 4 and 1 and then repeat steps 8 9 to enter and store House No and Postcode The Owner ID settings ...

Страница 15: ...iscs for Recording and Playback Disc type Logo Data that can be recorded and played Rewritable Play on other players 1 Recording 16 9 aspect picture 2 Copy once recording CPRM 24 Standard symbol Hard disk drive HDD Video Still picture Music HDD DVD RAM Video Still picture CPRM 92 compatible discs only RAM DVD R Video 3 or Still picture 3 R before finalisation DVD V after finalisation Video only DV...

Страница 16: ...pped to handle PAL 525 60 signals the picture will not be shown correctly 2 Select NTSC in TV System 74 When playing back a disc or title recorded on the HDD ensure that you match the TV System setting to the disc or title PAL or NTSC 74 Play only Discs Disc type Logo Standard symbol Uses DVD Video DVD V High quality movie and music discs DVD RW DVD Video Recording format RW VR DVD RW video record...

Страница 17: ...are supported UDF NTFS exFAT file system is not supported Depending on the sector size some files may not work Only the first partition on USB memories with multi partition is supported Standard symbol USB Data that can be played or copied below Possible Impossible File format MP3 Still pictures JPEG Playing Copying to HDD Instructions You can play MP3 files recorded with a computer onto the USB m...

Страница 18: ... taken Order of play RAM Folders can be created on other equipment These folders cannot be selected as a copying destination If a folder name or file name has been input using other equipment the name may not be displayed properly or you may not be able to play or edit the data Inserting Disc USB memory 1 Press OPEN CLOSE to open the tray Insert a disc 2 Press OPEN CLOSE to close tray Automatic dr...

Страница 19: ...OPTION RETURN SLOW SEARCH DRIVE SELECT PAGE PROG CHECK EXIT STATUS DIRECT TV REC EXT LINK REC MODE REC TEXT STTL DISPLAY TIME SLIP SKIP TV STOP PAUSE PLAY x1 3 DELETE INPUT SELECT AV VOL CH CHAPTER PAUSE LIVE TV 10s 60s MANUAL SKIP OK Landscape TV Guide Sun 10 10 10 19 45 Sun 10th All Channels SELECT RETURN Guide Change Display Mode Page Page 24 hours Prog Type AllTypes Category Time In today s sh...

Страница 20: ...buttons to select an item VCD Press the numbered buttons to select an item e g 5 15 OPTION RETURN SLOW SEARCH DRIVE SELECT PAGE CHAPTER PROG CHECK EXIT STATUS DIRECT TV REC EXT LINK REC MODE REC SKIP TV STOP PAUSE PLAY x1 3 DELETE INPUT SELECT AV VOL CH PAUSE LIVE TV 10s 60s MANUAL SKIP OK OK PLAY x1 3 DRIVE SELECT Tips To return to the menu screen DVD V 1 Press OPTION 2 Press 3 4 to select Top Me...

Страница 21: ...multiple subtitle select the desired language 71 To record with Audio Description Before starting the recording turn on the Audio Description and set the volume 45 To record with the selected audio Before starting the recording select the desired audio channel or language if the programme has multiple audio channel or language 67 71 To record sound using LPCM XP mode only Set the Audio Mode for XP...

Страница 22: ... not function under the following conditions Timer programmes set manually 30 Timer programmes set from the TV Guide are modified or start stop time changed by more than 10 minutes from original time Series Series recording 34 is set Split The programme is split in two or more parts by other programmes This unit pauses recording during the gap between the parts of the programme OPTION RETURN SLOW ...

Страница 23: ...PAUSE LIVE TV DELETE DRIVE SELECT Notes You cannot delete while recording or copying R R DL RW Even if you have set protection on other equipment such titles are deleted R R DL R RW V R DL It is not possible to delete contents from finalised discs Tips HDD RAM Deleting an item increases the available disc space by the amount of space taken by the item deleted R R DL R R DL Available disc space doe...

Страница 24: ...EP mode or FR recordings 5 hours or longer mode Copy once recording It is not possible to record the broadcasts that allow One time only recording onto DVD R DVD RW R RW or 8 cm DVD RAM discs Use the HDD or CPRM 92 compatible DVD RAM One time only recording titles can only be transferred from the HDD to CPRM compatible DVD RAM They are deleted from the HDD They cannot be copied Even when copying t...

Страница 25: ... of situations RAM R RW V R RW When the amount of free space on the disc makes selecting an appropriate recording mode difficult When you want to record a long programme with the best picture quality possible HDD When you want to record a title to HDD so that it can then be copied to fit one 4 7 GB disc perfectly You do not need to edit the recorded title or change the recording mode when copying ...

Страница 26: ... Setup menu Default setting On 76 HDD This function allows you to immediately start recording the programme that you are viewing on the TV without having to change the channels on this unit You can use the function when you connect the unit to a Q Link compatible TV using a 21 pin Scart cable You can also use this function using VIERA Link 43 Tips To stop recording Press Notes When the Digital Tel...

Страница 27: ... Press DIRECT NAVIGATOR To stop recording After play stops 1 Press DIRECT NAVIGATOR to exit the screen 2 Press 3 If the recording stop confirmation screen is displayed press 2 1 to select Yes or Stop Recording and press OK to stop recording Notes During playing while you are recording you cannot edit or delete titles Flexible Recording Preparation Select the channel or the external input to record...

Страница 28: ...minal irrespective of AV1 Output setting 75 During EXT LINK standby mode or recording playback is only available from the drive performing the recording When EXT L lights on the unit s display Direct TV Recording is unavailable Manual Recording Preparation RAM If the disc is protected release protection 68 Connect a digital satellite receiver to this unit s AV2 input terminals 11 Set the AV2 Input...

Страница 29: ...deo cassette approx 1 8 hours to a 4 7 GB disc with the best possible quality of recording without wasting disc space Notes Almost all videos and DVD Video on sale have been treated to prevent illegal copying Any software that has been so treated cannot be recorded using this unit Preparation Press DRIVE SELECT to select the HDD or DVD drive Press REC MODE to select the recording mode 25 When the ...

Страница 30: ...release protection 68 When recording to a disc insert a disc with enough remaining blank space Confirm that the clock on the unit s display is set to the correct time If connected via a digital satellite receiver please ensure before a timer recording starts the required channel is set on the digital satellite receiver 1 2 3 4 to select New Timer Programme then If New Timer Programme is already se...

Страница 31: ...HDD Remain SUN 10 10 10 12 54 00 RETURN OK Press OK to store new programme Mode STTL Stop Start No Date HDD DVD Channel Drive space NewTimer Programme AD F Timer programme is active μ Currently recording Programmes are overlapped Recording of the programme with the later start time starts when the earlier programme finishes recording You stopped a daily weekly or series timer recording The icon di...

Страница 32: ... pin Scart cable 10 11 Tips To stop recording Press Notes When this unit is in EXT LINK standby EXT L on the unit s display lights recording from TV does not start Programmes are recorded as one title on this unit when the end time of the earlier timer recording and the start time of the later timer recording are close to each other To divide the titles go to Divide Title 48 When a timer recording...

Страница 33: ...d set Timer recording Landscape view The GUIDE Plus system offers detailed information as if you see a TV programme magazine This is convenient to check the status of Timer recording Portrait view This is convenient to narrow down channels to search for the programme you want to watch To switch between Landscape view and Portrait view Press GUIDE Landscape TV Guide Sun 10 10 10 19 45 Sun 10th All ...

Страница 34: ...With Start and Stop automatically set by the Guide Link function Start can be changed back by up to 10 minutes and Stop can be changed forward by up to 10 minutes This unit automatically records the programmes that are identified to be of the same series by the GUIDE Plus data Titles recorded using series recording are bundled and displayed as a group in the DIRECT NAVIGATOR screen 36 except when ...

Страница 35: ...the programmes It might take more time to search the desired programme Search results appear 6 3 4 2 1 to select the programme After searching right Tips in Searching using programme information of titles recorded to the HDD Searching using programme information of titles recorded to the HDD OPTION Select Advert Free Word Search OK STOP OK Free Word Search Simplified Search Detailed Search Detaile...

Страница 36: ...s OK 3 Press 3 4 to select Enter Name and press OK 4 Enter the name 46 Entering Text Even if the group name is changed the title names in the group will not be changed Notes This function is only available for Videos and not available for music or still pictures Selecting Titles to Play 1 HDD RAM When VIDEO is not selected press the Red button to select VIDEO 2 3 4 2 1 to select the title you want...

Страница 37: ... View 49 Tips Chapters cannot be created during EXT LINK standby 28 Search During playback or There are 5 search speeds Each press increases the search speed R R DL RW up to 3 speeds Press 1 PLAY to restart normal playback Skip During playback or while paused or Each press increases the number of skips Quick View Play k 1 3 During playback Press and hold Press again to return to normal speed Direc...

Страница 38: ... music will stop as you set the TV to set to standby mode Tips To return to the track list Press RETURN Showing the menu screen Disc View Pictures JPEG Play Music MP3 Copy Music MP3 USB device Picture JPEG Video MPEG2 Music MP3 USB device View Pictures JPEG Start Slideshow Copy New Pictures JPEG Copy All Pictures JPEG Copy Selected Pictures JPEG Picture Music FUNCTION MENU OK RETURN Playback Recor...

Страница 39: ...tarting Slideshow 1 Press 3 4 2 1 to select the album 2 Press A check mark appears Press again to cancel the selection 3 Repeat steps 1 2 until you select all necessary albums 4 Perform step 2 To select all albums for starting Slideshow 1 Press in step 1 2 Press 2 1 to select Yes then press OK 3 Perform step 2 USB To start Slideshow on the menu screen 1 Insert the USB memory The menu is automatica...

Страница 40: ...hen 4 3 4 to select the item then 2 1 to select the setting below 5 After finishing settings 3 4 2 1 to select Set then Display Interval Select the desired interval Normal Long or Short The display interval may vary depending on the picture data size Repeat Play Select On to play pictures in the selected album repeatedly Random Select On to play pictures in the selected album at random Background ...

Страница 41: ...also select the track with the numbered buttons e g 5 0 0 0 5 15 0 0 1 5 115 0 1 1 5 1115 1 1 1 5 CD OK RETURN SELECT Play Music Copy Music OK OK OK Useful functions during music play Stop Press The stopped position is memorized Press 1 PLAY to restart from this position If is pressed several times the position is cleared Pause Press Press again or 1 PLAY to restart play Search Press 6 or 5 The sp...

Страница 42: ...after started DVB Multi Audio of on screen menu cannot be switched during Pause Live TV FUNCTION MENU Display 1 With the unit stopped 2 3 4 to select a function then 3 3 4 to select an item then Playback Select when you wish to playback the contents The DIRECT NAVIGATOR screen or menu screen etc will be displayed Video 20 36 Picture 39 Music 38 41 Top Menu 20 Menu 20 Recording Select when you wish...

Страница 43: ... operations on the connected equipment e g TV Set the input channel on VIERA to suit the terminal to be used as HDAVI Control 4 Turn on all HDAVI Control compatible equipment and select this unit s input channel on the connected TV so that the HDAVI Control function works properly Also when the connection or settings are changed repeat this procedure What is Q Link Q Link Q Link is a convenient fu...

Страница 44: ...splayed or while DVD Video is being copied 3 Select an item then press OK Using the Control Panel you can operate search backward search forward stop etc with the TV remote control Select Control Panel then press OK in step3 above The Control Panel is displayed right While playing a title or DVD Video etc 3 Pause 4 Stop 2 Search backward 1 Search forward OK Play EXIT Exit the Control Panel While p...

Страница 45: ...mation With the unit stopped to show the screen information When the digital channel information is being displayed Press STATUS again and detailed information will be displayed only when info is displayed During scrambled broadcasting You cannot watch the broadcast Audio Description service may be available Programme is broadcast in multi channel sound 67 DVB Multi Audio To select audio language ...

Страница 46: ...ames 20 Maximum number of characters per name 44 After entering the name step 1 1 Press 3 4 2 1 to select Add to List then press OK You can also press 9 to select Add to List 2 Press 2 1 to select Add then press OK Press RETURN to cancel To recall an added name 1 Press 3 4 2 1 to select Name List then press OK You can also press to select Name List 2 Press 3 4 2 1 to select the name to be recalled...

Страница 47: ...dit discs The available space on these discs decreases each time you edit their contents We recommend that you edit on the HDD and then copy to discs Tips To exit the menu screens Press DIRECT NAVIGATOR To view other pages Press 3 4 2 1 to select Previous or Next then press OK You can also press 9 to view other pages Multiple editing Only Delete Set up Protection Cancel Protection Select with 3 4 ...

Страница 48: ...ing below Tips Selecting Preview then pressing OK plays the title from 10 seconds prior to 10 seconds after the division point To change the point to divide at Press 3 4 to select Divide then press 1 PLAY to bring to the point where you want to divide then press OK 8 Press 3 4 to select Finish then press OK 9 Press 2 to select Divide then press OK The title is divided at that point Set up Protecti...

Страница 49: ...ss OK The selected chapter gets combined with the next chapter Tips Chapter Each section between the division points becomes a chapter HDD RAM You can change the order of chapters and create a Playlist Video 50 Chapter Creation in the Setup menu 72 Automatic Detects changes special mute points like the start and the end of the programme in the scene during recording and sets chapter start points o...

Страница 50: ...re not affected Perform steps 1 of Accessing the Playlist Video View left 5 Press 3 4 to select Delete then press OK 6 Press 2 to select Delete then press OK to confirm HDD RAM RW VR Playlist Video information e g length and date is shown Perform steps 1 of Accessing the Playlist Video View left 5 Press 3 4 to select Properties then press OK Tips HDD RAM A Playlist Video is a compilation of your f...

Страница 51: ...s Press 3 4 2 1 to select Previous or Next then press OK You can also press 9 to view other pages Multiple editing Only Delete Copy Select with 3 4 2 1 then press Repeat A check mark appears Press again to cancel Chapter View 4c 4c Move Chapter Create Chapter Combine Chapters Delete Chapter Playlist View Add Chapter Refer to Chapter Operations right Add Chapter 1 Press 3 4 to select Add Chapter th...

Страница 52: ...res are deleted Perform steps 1 3 of Accessing the Album still picture Picture View left When editing an album press 3 4 to select Edit Album then press OK after step 3 4 Press 3 4 to select Delete Album or Delete Pictures then press OK 5 Press 2 to select Delete then press OK Accessing the Album still picture Picture View Preparation Press DRIVE SELECT to select the HDD DVD drive RAM Release prot...

Страница 53: ...s OK 5 Press 2 to select Yes then press OK The lock symbol appears when the still picture or album is protected HDD RAM Perform steps 1 3 of Accessing the Album still picture Picture View 52 4 Press 3 4 to select Copy to DVD or Copy to HDD then press OK 5 For copy to DVD RAM or HDD Press 2 1 to select Start then press OK For copy to DVD R Press 2 1 to select Copy Finalise or Copy Only then press O...

Страница 54: ...ake certain before proceeding Enter Album Name Enter Track Name You can give names to albums and tracks 46 Entering Text Enter Artist Name You can edit the artist name of the track 46 Entering Text Notes When the timer recording starts Delete Album and Delete Track stops on the way Sample Music is not displayed on the MUSIC screen 2 2 Enter Album Name Repeat Play Setting Sort Track View Delete Alb...

Страница 55: ...c cannot be copied Editing still pictures in a Playlist Picture doesn t modify source albums or source still pictures Playlists Picture are not recorded separately so this doesn t use much capacity Accessing the Playlist Picture View Preparation Press DRIVE SELECT to select the HDD drive Still picture Still picture Still picture Still picture Still picture Album 1 Album 2 Playlist Picture Still pi...

Страница 56: ...kground Music when inserting Music CD Delete Tips To delete during play 1 Press DELETE A confirmation message displays 2 Press 2 to select Delete then press OK to confirm Edit Create 1 Press 3 4 to select Create then press OK 55 Creating Playlists Picture Copy 1 Press 3 4 to select Copy then press OK 2 Press 2 to select Copy then press OK Enter Playlist Name 1 Press 3 4 to select Enter Playlist Na...

Страница 57: ...Playlists Video it will become a title in the destination drive 5 RAM R DL R DL RW One title becomes one chapter R RW V R Chapters are created automatically R RW V about 5 minute chapters R about 8 minute chapters when finalising after copying the disc 6 Thumbnails return to the default position 7 When copying Playlists Video the thumbnails may not reflect changes made to them 8 It is possible to ...

Страница 58: ...ylists Video created from One time only recording titles Titles with recording limitations and Playlists Video cannot be registered on the same copying list The following icons give more information about copy restrictions of the title Notes When recording or playing while copying the unit may not use the maximum recording speed Depending on the condition of the disc the unit may not copy using th...

Страница 59: ... that you can use for copying 15 18 Confirm that there is enough remaining disc space Copy Video HDD to DVD COPY Navigator All Titles Page 01 01 HDD 001 BBC 10 10 FRI 13 30 BBC2 10 10 FRI 9 25 AV2 4 10 SAT 16 10 BBC 3 10 FRI 22 05 AV2 3 10 FRI 20 00 BBC1 27 9 SAT 12 15 BBC 26 9 FRI 13 30 002 003 004 005 006 007 Title Name Time No Channel Date Day 008 BBC 11 10 SAT 21 00 RETURN OK OPTION Rec time 0...

Страница 60: ...er pages 57 5 Press OK to confirm To edit the copying list below You cannot start copying when the value of the Size exceeds 100 Destination Capacity is not sufficient 61 About the data size for copying 6 Press 2 to confirm 7 Press 3 4 to select Start Copying then press OK 8 Press 2 to select Yes then press OK to start copying HDD R R DL RW V R R DL Press 2 1 to select Copy Finalise or Copy Only t...

Страница 61: ...ta size for copying Data size of each registered item Data size recorded to the copy destination When copying at normal speed the total data size will change according to the recording mode The total data size shown may be larger than the sum of the data sizes for each registered item because of data management information being written to the copy destination etc Tips To view other pages Press 3 ...

Страница 62: ... RAM HDD R JPEG 1 While stopped Press FUNCTION MENU 2 Press 3 4 to select Copy then press OK 3 Press 3 4 to select Advanced Copy then press OK If you are not going to change the registered list press 4 several times step 7 4 Set the copy direction If you are not going to change the copying direction press 4 step 5 1 Press 3 4 to select Copy Direction then press 1 2 Press 3 4 to select Source then ...

Страница 63: ... the copying list 1 Press 3 4 to select Add then press OK 2 Press 3 4 2 1 to select the still picture or folder to be added then press A check mark is displayed Repeat this step until you select all necessary items Press again to cancel 3 Press OK Delete Delete the selected items 1 Press 3 4 to select Delete then press OK 2 Press 2 to select Yes then press OK Cancel all registered copying setting ...

Страница 64: ... or the number of files folders to be copied exceeds the maximum 17 copying will stop partway through You cannot copy the information about the picture rotation Still pictures copied from USB memories are grouped by the shooting date in the HDD or DVD RAM Copy All Pictures Copy from USB Copy to HDD Copy all pictures JPEG by date Copy Cancel RETURN SELECT OK Copy Select the copy direction USB HDD 1...

Страница 65: ...pying then press OK For individual files only When specifying an existing folder as the copying destination 1 Press 3 4 to select Folder then press OK 2 Press 3 4 to select the folder then press OK When creating a new folder as the copying destination 1 Press 2 1 to select Yes then press OK 2 Enter the folder name 46 Entering Text 5 Press 2 1 to select Yes then press OK Select the item in step 3 5...

Страница 66: ...ation cannot be recorded using this unit DVD V Turn the subtitle on off and select the language below Soundtrack Subtitle language VCD SVCD Turn the subtitle on off and select Text or the subtitle number Text or subtitle numbers are displayed even if there are not multiple subtitles Audio channel HDD RAM RW VR VCD Change audio during playback LR L R Angle DVD V Change the number to select an angle...

Страница 67: ...io only If more than one audio channel is output you can set the desired channel before recording DVB Multi Audio cannot be selected during playback or recording Depending on the broadcast the items that can be selected will differ English 1 English 2 Dialogue Enhancer HDD RAM R R DL RW V R R DL RW DVD V RW VR Dolby Digital 3 channel or over only including a centre channel When On the volume of th...

Страница 68: ...mportant Once formatted contents cannot be recovered Perform preparation steps 1 4 of Accessing the Management Menus left 5 Press 3 4 to select Format HDD Format Disc then press OK 6 Press 2 to select Yes then press OK 7 Press 2 to select Start then press OK Formatting starts RAM may take up to a maximum of 70 minutes A message appears when formatting is finished 8 Press OK to complete Accessing t...

Страница 69: ...ore playing a RW disc on other equipment Perform preparation steps 1 4 of Accessing the Management Menus 68 5 Press 3 4 to select Create Top Menu then press OK 6 Press 2 to select Yes then press OK 7 Press 2 to select Start then press OK Create Top Menu cannot be cancelled once started Create Top Menu takes a few minutes 8 Press OK to complete Selecting the background style Top Menu Selecting Whet...

Страница 70: ...t this step to add other channels Press the Blue button to add all the available channels to the Favourite Only when no channels have been added to the Favourite 2 Press OK to save the Favourite To change the order of channels of a Favourite 1 Press 1 2 Press 3 4 to select the channel in the Favourite column to move then press the Green button 3 Press 3 4 to select the new position of the channel ...

Страница 71: ...Channel Name Type 0 10 0 10 CH54 738 0 Signal Quality Signal Strength TV 15 Radio 4 Data 0 8 DVB channels found BBC ONE Wales BBC 2W BBC NEWS 24 BBC Radio Wales ITV 1 2 3 4 5 TV TV TV Radio TV Setup Disc Picture Sound Display Connection Tuning English English Others OK RETURN TAB SELECT Favourites Edit DVB Auto Setup by Signal Quality DVB Auto Setup by Region DVB Manual Tuning AddNewDVBChannels Si...

Страница 72: ...ture Sound Display Connection Tuning Settings for Playback Settings for Recording Others Disc RETURN TAB SELECT Settings for Recording Press OK to show the following settings Recording time in EP mode Select the maximum number of hours for recording in EP mode EP 6hours You can record for 6 hours on an unused 4 7GB disc EP 8hours You can record for 8 hours on an unused 4 7GB disc Chapter Creation ...

Страница 73: ... Range Compression Off Audio Mode for XP Recording Dolby Digital Digital Audio Output RETURN TAB SELECT Digital Audio Output Change the settings when you have connected equipment through the unit s Digital Audio Output terminal 79 Press OK to show the following settings PCM Down Conversion Select how to output audio with a sampling frequency of 96kHz Signals are converted to 48 kHz despite the abo...

Страница 74: ...pect television 16 9 widescreen television 16 9 When connected to a 16 9 widescreen television 4 3 When connected to a 4 3 aspect television side picture is trimmed for 16 9 picture 93 Pan Scan Letterbox When connected to a 4 3 aspect television widescreen picture is shown in the letterbox style 93 TV System Change this setting if you connect an NTSC television or to record NTSC video from another...

Страница 75: ... want to use HDAVI Control AV1 Output Set according to the terminal of the connected TV Video Select when a TV that can receive a composite signal is connected S Video Select when a TV is connected that can receive an S Video signal RGB 1 Select when a TV that can receive an RGB signal is connected If you always would like to view the picture from the unit in RGB signal select this mode The TV scr...

Страница 76: ... minutes While the update is in progress SW DL appears on the unit s display You cannot operate the unit until the update is complete Removing the AC mains lead while the update is in progress may damage the unit TV Guide download will take approximately 30 minutes While the TV Guide download is in progress GUIDE appears on the unit s display The TV Guide download can be interrupted by switching o...

Страница 77: ...and RETURN at the same time until X HOLD disappears Using the Unit s Remote Control to Operate the TV Manufacturer Code No Panasonic 01 02 03 04 AIWA 35 AKAI 27 30 BEJING 33 BEKO 05 71 72 73 74 BENQ 58 59 BP 09 BRANDT 10 15 BUSH 05 CENTREX 66 CHANGHONG 69 CURTIS 05 DAEWOO 64 65 DESMET 05 DUAL 05 ELEMIS 05 FERGUSON 10 34 FINLUX 61 FISHER 21 DRIVE SELECT PAGE TV AV VOL CH DRIVE SELECT Channel Select...

Страница 78: ...evision AV1 Output in the Setup menu is set to RGB 1 or RGB 2 75 Make AV2 Input settings in the Setup menu 75 Use of the RF coaxial cable Keep the RF coaxial cables as far away as possible from other cables Do not roll up the RF coaxial cables Adding a VCR Connecting to a Television and a Video Cassette Recorder To record from a VCR Refer to Recording from a Digital Satellite Receiver 28 Connectin...

Страница 79: ...o is only output from the amplifier not the television You cannot use DTS Digital Surround decoders not meant for DVD Before purchasing an optical digital audio cable check the terminal shape of the equipment to be connected AUDIO IN R L AUDIO OUT VIDEO This unit Amplifier or System Component L R This unit Amplifier or System Component OPTICAL OPTICALIN DIGITALAUDIOOUT PCM BITSTREAM Insert fully w...

Страница 80: ... DVD RW DVD Video format R and RW and plays DVD RW DVD Video Recording format However you cannot directly record to a DVD R DL or R DL disc on this unit playback and copy are possible 15 16 This unit also records and plays high speed recording compatible discs 94 After recording but before finalising DVD R DVD R DL DVD RW R R DL You may not be able to play and record discs on this unit after recor...

Страница 81: ...t RW It is not necessary to finalise RW To enable play on other DVD players please use Create Top Menu in the DVD Management menu 69 In any case ability to play a disc depends on the condition of the recording the quality of the disc and the capability and format constraints of the DVD player If you play a DVD R DL R DL or RW use compatible equipment Not all equipment will play these discs Can a d...

Страница 82: ... SP LP and the numbers are examples Available space on the HDD or disc The example SP 35 50 is displayed when less than 100 hours are available and the example LP 151h is displayed when over 100 hours are available SP and LP are recording modes 35 50 means 35 hours 50 minutes and 151h means 151 hours UNSUPPORT You have inserted a disc the unit cannot play or record onto 15 16 You tried to operate ...

Страница 83: ...d Maximum number of titles exceeded Cannot playback TV system is different from the setting To playback please change the TV System in Setup You tried to play a title recorded using a different encoding system from that of the TV system currently selected on the unit Alter the TV System setting on this unit to suit 74 Cannot play on this unit You tried to play a non compatible image 17 No Disc The...

Страница 84: ... 5 seconds on the remote control Disc Picture Sound Display Tuning Connection Others OK RETURN To Reset This Unit To reset the unit s settings To reset the ratings level settings To restore the unit if it freezes Abkhazian 6566 Afar 6565 Afrikaans 6570 Albanian 8381 Amharic 6577 Arabic 6582 Armenian 7289 Assamese 6583 Aymara 6589 Azerbaijani 6590 Bashkir 6665 Basque 6985 Bengali Bangla 6678 Bhutan...

Страница 85: ...at or RW disc increases when you delete the last title space may increase slightly when you delete other titles If you record or edit about 200 times or more the remaining capacity of DVD R DVD R DL R and R DL is reduced and then recording or editing may be disabled for the second layer on DVD R DL and R DL this happens after about 60 times The time during searching may not be displayed accurately...

Страница 86: ...quipment is in recording standby EXT L on the unit s display blinks when Í is pressed Press EXT LINK to cancel the recording standby If the Child Lock function is activated above operation does not work Cancel the Child Lock function 28 77 Startup is slow Startup takes time in the following situations A disc other than a DVD RAM is inserted The clock is not set Immediately after a power failure or...

Страница 87: ...ditional information in the digital channel information is displayed Digital Teletext does not work Perform DVB Auto Setup by Signal Quality in the Setup menu 71 After the Auto Setup there aren t any stations in the station list although found stations were displayed during Auto Setup Shipping Condition was performed or the unit was in the delivery status The Auto Setup was then started and interr...

Страница 88: ...nnect an HDMI cable set Aspect for 4 3 Video in the Setup menu to 16 9 75 Check the settings for TV Aspect in the Setup menu 74 It may be possible to adjust the display mode on the TV Refer to your television s operating instructions Titles recorded with 16 9 aspect are stretched vertically 16 9 aspect programmes are recorded in 4 3 aspect in the following cases R R DL RW V If you recorded or copi...

Страница 89: ...same way as a normal programme However video and audio may momentarily cut out when the unit is switching layers 15 DVD Video is not played Ensure the DVD Video region number for the disc is correct and the disc is not defective Cover You have set a ratings level to limit DVD Video play Change this setting 72 Alternative soundtrack and subtitles cannot be selected The languages are not recorded on...

Страница 90: ...DVD RW DVD Video format R R DL discs However you can record and copy again if you format DVD RW If you repeatedly insert discs or turn the unit on and off about 50 times or more the recording or editing of DVD R DVD R DL DVD RW DVD Video format R R DL and RW discs may be disabled DVD R DVD R DL DVD RW DVD Video format R R DL and RW discs recorded on this unit may not be recordable on other Panason...

Страница 91: ... FR recordings 5 hours or longer mode R R DL RW Titles recorded on other Panasonic DVD Recorders with Recording Format Rec for High Speed Copy set to Video format On and then copied to the HDD on this unit may not copy to R R DL or RW discs with high speed copy When copying it takes a long time even in high speed mode Use a disc that is compatible with high speed recording Even if the disc is high...

Страница 92: ...urs with smooth detailed gradation and minimal colour banding A lower colour gradation 256 steps without Deep Colour will be reproduced if connected to a TV which does not support Deep Colour The unit will automatically set appropriate output to suit the connected TV Dolby Digital This is a method of coding digital signals developed by Dolby Laboratories Apart from stereo 2 channel audio these sig...

Страница 93: ... Letterbox In general DVD Video are produced with the intention that they will be viewed on a widescreen TV 16 9 aspect ratio so images often don t fit regular TVs 4 3 aspect ratio 2 styles of picture Pan Scan and Letterbox deal with this problem Playback control PBC If a Video CD has playback control you can select scenes and information with menus on the screen This unit is compatible with versi...

Страница 94: ...deo format MP3 1 JPEG 1 DVD RW DVD Video Recording format DVD Video format R R DL Double Layer RW DVD Video CD Audio CD DA Video CD SVCD 2 CD R CD RW CD DA 1 Video CD 1 SVCD 1 2 MP3 1 JPEG 1 Internal HDD capacity 320 GB Optical pick up System with 1 lens 2 integration units 662 nm wavelength for DVDs 780 nm wavelength for CDs LASER Specification Class 1 LASER Product Wave Length 780 nm CDs 662 nm ...

Страница 95: ...ion from the owner of the copyright or other such rights in that content Panasonic has no authority to and does not grant you that permission and explicitly disclaims any right ability or intention to obtain such permission on your behalf It is your responsibility to ensure that your use of this or any other device complies with applicable copyright legislation in your country Please refer to that...

Страница 96: ...r 49 Music on HDD 54 Playlist 50 56 Still picture 52 Title 47 Enabling discs to be played on other equipment Finalise 69 Encrypted 45 Enter Album Name 53 External Link 28 75 F Finalise 69 92 Flexible Recording 27 Format 68 93 FR Flexible recording mode 25 27 FREEVIEW 22 FUNCTION MENU Display 42 74 G GUIDE Plus 22 33 35 H HDAVI Control 12 43 44 79 HDMI 12 75 High Speed Copy 59 72 I Initialize 76 J ...

Отзывы: