background image

3

English

Safety Information

CQ-C800U

Caution

Observe the following cautions when using this
unit.

Keep the sound volume at an appropriate level.

Keep the volume level low enough to be aware of road and
traffic conditions while driving.

Do not insert or allow your hand or fingers to be
caught in the unit.

To prevent injury, do not get your hand or fingers caught in
moving parts or in the disc slot. Especially watch out for
infants.

This unit is designed for use exclusively in automo-
biles.

Do not operate the unit for a prolonged period with
the engine turned off.

Operating the audio system for a long period of time with the
engine turned off will drain the battery.

Do not expose the unit to direct sunlight or exces-
sive heat.

Otherwise these will raise the interior temperature of the
unit, and it may lead to smoke, fire, or other damage to the
unit.

Do not use the product where it is exposed to water,
moisture, or dust.

Exposure of the unit to water, moisture, or dust may lead to
smoke, fire, or other damage to the unit. Make especially
sure that the unit does not get wet in car washes or on rainy
days.

Observe the following cautions when
installing.

Refer wiring and installation to qualified service
personnel.

Installation of this unit requires special skills and experience.
For maximum safety, have it installed by your dealer.
Panasonic is not liable for any problems resulting from your
own installation of the unit.

Follow the instructions to install and wire the prod-
uct.

Not following the instructions to properly install and wire the
product could cause an accident or fire.

Take care not to damage the leads.

When wiring, take care not to damage the leads. Prevent
them from getting caught in the vehicle chassis, screws, and
moving parts such as seat rails. Do not scratch, pull, bend or
twist the leads. Do not run them near heat sources or place
heavy objects on them. If leads must be run over sharp
metal edges, protect the leads by winding them with vinyl
tape or similar protection.

Use the designated parts and tools for installation.

Use the supplied or designated parts and appropriate tools
to install the product. The use of parts other than those sup-
plied or designated may result in internal damage to the unit.
Faulty installation may lead to an accident, a malfunction or
fire.

Do not block the air vent or the cooling plate of the
unit.

Blocking these parts will cause the interior of the unit to
overheat and will result in fire or other damage.

Do not install the product where it is exposed to
strong vibrations or is unstable.

Avoid slanted or strongly curved surfaces for installation. If
the installation is not stable, the unit may fall down while
driving and this can lead to an accident or injury.

Installation Angle

The product should be installed in a horizontal position with
the front end up at a convenient angle, but not more than
30˚.
The user should bear in mind that in some areas there may
be restrictions on how and where this unit must be installed.
Consult your dealer for further details.

Wear gloves for safety. Make sure that wiring is
completed before installation. 

To prevent damage to the unit, do not connect the
power connector until the whole wiring is complet-
ed.

Do not connect more than one speaker to one set of
speaker leads. (except for connecting to a tweeter)

Observe the following cautions when handling
the battery for the remote control unit.

Use only specified battery (CR2025).

Match the polarity of the battery with the (+) and (–) marks
in the battery case.

Replace dead battery as soon as possible.

Remove the battery from the remote control unit when not
using it for an extended period of time.

Insulate the battery (by placing them in a plastic bag or cov-
ering them with vinyl tape) before disposal or storage. 

Dispose of the battery according to the local regulations.

Do not disassemble, recharge, heat or short the battery. Do
not throw a battery into a fire or water.

In case of battery leakage

Thoroughly wipe the battery liquid off the battery case and
insert new battery.

If any part of your body or clothing comes into contact with
battery liquid, wash it with plenty of water.

If battery liquid comes into contact with your eyes, wash
them with plenty of water and get immediate medical atten-
tion.

C800U_OI_01_eng  10/18/2007  04:03 PM  頁面 3

Содержание CQC800U - AUTO RADIO/CD DECK

Страница 1: ...EL SRSWO W CQ C800U Please read these instructions including Limited Warranty and Customer Services Directory carefully before using this product and keep this manual for future reference Prière de lire attentivement ces instructions y compris la Garantie limitée et le Répertoire des services à la clientèle avant d utiliser ce produit et conserver ce manuel d utilisation pour s y référer ultérieur...

Страница 2: ...TRICAL SAFETY SYSTEM RESULTING IN DAMAGE TO THE VEHICLE AND PERSONAL INJURY OR DEATH Never use safety related components for installa tion grounding and other such functions Do not use safety related vehicle components fuel tank brake suspension steering wheel pedals airbag etc for wiring or fixing the product or its accessories Installing the product on the air bag cover or in a location where it...

Страница 3: ...on Use the supplied or designated parts and appropriate tools to install the product The use of parts other than those sup plied or designated may result in internal damage to the unit Faulty installation may lead to an accident a malfunction or fire Do not block the air vent or the cooling plate of the unit Blocking these parts will cause the interior of the unit to overheat and will result in fi...

Страница 4: ...u to our constantly growing family of electronic products owners We endeavor to give you the advantages of precise electronic and mechanical engineering manufactured with carefully selected components and assembled by people who are proud of the reputation their work has built for our company We know this product will bring you many hours of enjoyment and after you discover the quality value and r...

Страница 5: ...derneath each accessory part name is the part number for maintenance and service Accessories and their parts numbers are subject to modification without prior notice due to improve ments Mounting Collar and Trim Plate are mounted on the main unit at shipment Hex Nut 5 mmø YEP0FZ5739 Q ty 1 set Rear Support Strap YFG044C002ZA Q ty 1 XXXXXXXXXXXXXXX XXXXXXXXXXXXXXXXX XXXXXXXXXXXXXX XXXXXXXXXXXXXXXX ...

Страница 6: ...nly Monday Friday 9 am to 8 pm EST Panasonic Services Company 20421 84th Avenue South Kent WA 98032 We accept Visa MasterCard Discover Card American Express and Personal Checks For hearing or speech impaired TTY users TTY 1 866 605 1277 Service in Puerto Rico Matsushita Electric of Puerto Rico Inc Panasonic Sales Company Factory Servicenter Ave 65 de Infantería Km 9 5 San Gabriel Industrial Park C...

Страница 7: ...if applicable travel to and from the servicer and loss of media data or other memory contents The items listed are not exclusive but are for illustration only ALL EXPRESS AND IMPLIED WARRANTIES INCLUDING THE WARRANTY OF MER CHANTABILITY ARE LIMITED TO THE PERIOD OF THE LIMITED WARRANTY Some states do not allow the exclusion or limitation of incidental or consequential damages or limitations on how...

Страница 8: ...on Cable for DVD CD Changer CA CC30U allows you to connect the option al Panasonic DVD changer unit CX DH801U CD Changer The optional adapter Conversion Cable for DVD CD Changer CA CC30U allows you to connect the option al Panasonic CD changer unit CX DP880U iPod The optional adapter Direct Cable for iPod CA DC300U allows you to connect the optional iPod series iPod is a trademark of Apple Compute...

Страница 9: ...dio 20 CD Player 22 MP3 WMA AAC Player 24 Audio Setting 28 Function Setting Security Function Setting etc 29 Display Setting 30 Customize the Display Customize Function 31 Troubleshooting 33 Error Display Messages 37 Notes on Discs 38 Maintenance Fuse 38 Specifications 39 English 2 Français 40 Español 78 Common Each Source As Needed C800U_OI_01_eng 10 18 2007 04 03 PM 頁面 9 ...

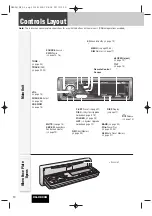
Страница 10: ...O W CQ C800U SOURCE Source PWR Power a page 14 16 SQ Sound Quality a page 19 MENU a page 29 30 DIM Dimmer a page 17 P SET Preset a page 21 DISC a System Upgrade Guidebook page 8 10 FOLDER a page 24 LIST a System Upgrade Guidebook page 12 DISP Display a page 17 Release a page 14 u OPEN eject a page 15 TILT a page 15 MUTE a page 15 SBC SW Super Bass Control Subwoofer a page 19 D M Direct Memory a pa...

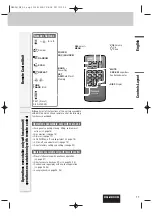
Страница 11: ...o tracks on CDs a page 23 25 Random and repeat play with one touch operation a page 23 25 Scan playback a page 23 25 Controls Layout Remote Control Unit Operations executable only with main unit operations executable only with remote control SEL SEL SRC SRC BAND BAND MUTE MUTE 2 3 1 5 8 0 6 4 9 7 VOL VOL DISP CAR AUDIO MENU SEL POWER SOURCE SRC SET BAND MUTE 2 3 1 5 8 0 6 4 9 7 VOL RANDOM NUMBER T...

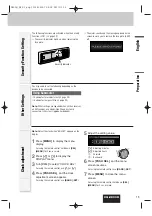
Страница 12: ... an explosion or ignition resulting in injury or a fire Note Battery Information Battery Type Panasonic lithium battery CR2025 Included in the remote control Battery Life Approximately 6 months under normal use at room temperature For the first use the following screen may appear repeatedly 1 Set your car s ignition switch to the ACC or On position The demonstration screen appears 2 Press SOURCE P...

Страница 13: ... to close the menu screen For using the remote control hold down SEL MENU for 2 sec or more You may need to set the following depending on the devices to be connected Using Subwoofer Subwoofer level adjustment a page 28 Subwoofer low pass filter a page 28 Note Other settings are required when a Sirius receiver an XM receiver or a Hands Free Phone System is connected a System Upgrade Guidebook The ...

Страница 14: ...ce plate when the plate is at the closed position Do not remove or mount the face plate when the plate is in motion This face plate is not waterproof Do not expose it to water or excessive moisture Do not remove the face plate while driving your car Do not place the face plate on the dashboard or nearby areas where the temperature rises to high levels Do not touch the contacts on the face plate or...

Страница 15: ... off down Press MUTE Cancel Press MUTE again Note Volume down range can be specified a page 29 OPEN DISP BAND TILT SET APM SQ MENU TUNE TRACK MUTE D M SBC SW FOLDER P SET DISC LIST SOURCE PWR DIM VOLPUSH SEL SRSWO W CQ C800U OPEN DISP BAND TILT SET APM SQ MENU TUNE TRACK MUTE D M SBC SW FOLDER P SET DISC LIST SOURCE PWR DIM VOLPUSH SEL SRSWO W CQ C800U General Face Plate Motion Open Close Tilt OPE...

Страница 16: ...r Device connected to the System up Connector of this unit When optional devices are connected Shift to connected devices When an expansion module is connected The devices connected to the ports 1 to 4 are activated in sequence after shifting to AUX2 devices connected to the AUX terminal of the expansion module Note For information about connectable devices refer to the System Upgrade Guidebook or...

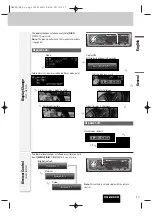
Страница 17: ...DISP BAND TILT SET APM SQ MENU TUNE TRACK MUTE D M SBC SW FOLDER P SET DISC LIST SOURCE PWR DIM VOLPUSH SEL SRSWO W CQ C800U At power on Off Only still image Display Change DISP DISPLAY The dimmer level changes as follows every time you hold down MENU DIM DIMMER for 2 sec or more Dimmer Control DIM DIMMER Note This setting is not adjustable with the remote control OPEN DISP BAND TILT SET APM SQ ME...

Страница 18: ... SW FOLDER P SET DISC LIST SOURCE PWR DIM VOLPUSH SEL SRSWO W CQ C800U You can make a fine adjustment to SRS WOW 1 Set the SRS WOW mode to on 2 Hold down SQ for 2 sec or more to display SRS WOW MENU 3 Turn VOL to select a function to be adjusted For using the remote control use or 4 Press PUSH SEL to adjust For using the remote control use BAND SET 5 Press DISP DISPLAY to close the menu screen SRS...

Страница 19: ... display the preset data that is called up can be turned into the default 4 Press PUSH SEL The screen of Step 1 appears again For using the remote control use BAND SET 5 Press DISP DISPLAY The regular screen appears again OPEN DISP BAND TILT SET APM SQ MENU TUNE TRACK MUTE D M SBC SW FOLDER P SET DISC LIST SOURCE PWR DIM VOLPUSH SEL SRSWO W CQ C800U OPEN DISP BAND TILT SET APM SQ MENU TUNE TRACK M...

Страница 20: ...M VOLPUSH SEL SRSWO W CQ C800U Operation Flow You can assign your favorite broadcasting station to the D M button As the result of doing that your favorite broadcasting station can be received even if the unit is in the CD mode or other modes Default FM 87 9 MHz Note For the use of an FM transmitter it is useful for users to register applicable frequencies on D M Direct Memory D M station Calling ...

Страница 21: ...is stored at the selected preset number Notes In step 2 a station can be registered by holding down the numeric button 1 to 6 for 2 sec or more To stop presetting stations press DISP DISPLAY The operation above allows users to replace the cur rent station with the station preset in the selected number while selecting a preset station Preset Swap Station Preset APM AUTO PRESET MEMORY P SET PRESET O...

Страница 22: ...c is already loaded lights the disc will automatically be ejected 2 Load a disc with the printed side facing up The face plate closes automatically and the unit rec ognizes the disc and starts playing automatically too 3 Select a desired portion Track selection 7 TRACK Next track 6 TRACK Preceding track press twice Note Hold down for fast forward reverse Pause Press BAND h 5 Press again to cancel ...

Страница 23: ...RACK MUTE D M SBC SW FOLDER P SET DISC LIST SOURCE PWR DIM VOLPUSH SEL SRSWO W Play Mode Selection One touch operation is available for selecting a track playing style by use of RANDOM or REPEAT RANDOM Press RANDOM Press again to cancel REPEAT Press REPEAT Press again to cancel SCAN play You can find your favorite track by playing first 10 sec of each track Press SCAN Press again to cancel Direct ...

Страница 24: ...der File selection 7 TRACK Next file 6 TRACK Preceding file press twice Note Hold down for fast forward reverse Pause Press BAND h 5 Press again to cancel 4 Press uOPEN to eject the disc Note The panel automatically closes after 20 sec onds OPEN DISP BAND TILT SET APM SQ MENU TUNE TRACK MUTE D M SBC SW FOLDER P SET DISC LIST SOURCE PWR DIM VOLPUSH SEL SRSWO W CQ C800U Compressed Audio Player Mode ...

Страница 25: ...tes At high bit rates the Re master function may have little effect The Re master function is only effective for playback of MP3 WMA AAC data Digital sound enhancer activated default Digital sound enhancer inactivated SQ MENU TUNE TRACK MUTE D M SBC SW FOLDER P SET DISC LIST SOURCE PWR DIM VOLPUSH SEL SRSWO W Play Mode Selection One touch operation is available for selecting a file playing style b...

Страница 26: ...is recommended to set the bit rate to 128 kbps or more and fixed WMA It is recommended to set the bit rate to 64 kbps or more and fixed Do not set the copy protect attribute on the WMA file to enable this unit to play back AAC It is recommended to set the bit rate to 128 kbps or more and Stereo Files with the extension of m4a encoded using iTunes version 6 are playable on this unit Some of the fil...

Страница 27: ...der is included Notes This unit counts the number of folders irrespective of the presence or absence of a compressed audio file If the selected folder does not contain any com pressed audio file the nearest compressed audio file in the order of playback will play Playback order of this unit may be different from that of other compressed audio players even if the same disc is used ROOT appears when...

Страница 28: ...etting range mute 6 dB to 6 dB 2 dB Step Default 0 dB q Up w Down LPF Subwoofer Low Pass Filter Setting range 80 Hz 120 Hz 160 Hz Default 80 Hz q Up w Down HPF High Pass Filter Setting range Filter OFF 90 Hz 135 Hz 180 Hz 225 Hz Default Filter OFF q Up w Down REAR SRS WOW Rear Level Adjustment Setting range 0 to 15 Default 10 q Up w Down Note The rear level is adjustable only when SRS WOW is enabl...

Страница 29: ...to close the menu screen For using the remote control hold down SEL MENU for 2 sec or more MUTE KEY Setting MUTE buttons functions Volume off default Volume down by 10 steps Volume down by 5 steps SECURITY Setting the security function a page 13 ON default OFF BUILT IN AMP You can toggle the integrated amplifier on and off Amplifier on default Amplifier off when the external amplifier is used SQ M...

Страница 30: ...fault All Turn VOL to make a selection All Sequential display from pattern A to D Pattern A D DEMONSTRATION Switching by PUSH SEL ON Demonstration screen at no operation default OFF Regular screen STILL IMAGE PATTERN Default All Turn VOL to make a selection All Sequential display from pattern 1 to 10 No 1 10 CLOCK ADJ Note Adjust the clock when ADJUST appears on the display Adjusting minutes Adjus...

Страница 31: ...t PUSH SEL Confirm Note To exit the customize menu hold down PUSH SEL for 4 sec or more GRAPHIC PATTERN Moving image graphic pattern data a page 30 STILL IMAGE Still image data a page 30 OPENING MESSAGE Moving image at power on CLOSING MESSAGE Moving image at power off 6 Select a file q w Select PUSH SEL Confirm Notes Files are automatically identified by their exten sions and target files are dis...

Страница 32: ... be recognized Follow the table below with regard to the number of files that are saved to a disc Files beyond the speci fied capacity are not readable Discs recorded by the packet writing software are not supported At Customizing If customizing is interrupted on account of turning off the power stopping the engine removing the face plate or other reasons you may lose the data In such a case try c...

Страница 33: ...cause it is dangerous to do so Problem Possible cause a Possible solution Common No power to the unit The power cord battery power and ground is connected in the wrong way a Check the wiring Fuse blows out a Eliminate the cause of fuse blowout and replace the fuse with new one Consult your dealer Sound is not generated MUTE is set to ON a Set MUTE to OFF The wiring of speaker lines are not correct...

Страница 34: ...and left channels of speakers are connected reversely a Perform the speaker wiring in accordance with the wiring diagram Radio Poor reception or noise Antenna installation or wiring of antenna cable is faulty a Check whether the antenna mounting position and its wiring are correct In addition check to see whether the antenna ground is securely connected to the chassis No power is supplied to the a...

Страница 35: ...her factors a Unplug the power cord and plug it again In case the unit is still out of order consult your dealer CD The CD R RWs that are playable on other devices are not playable on this unit The playability of some CD R RWs may depend on the combination of media recording software and recorder to be used even if these CD R RWs are playable on other devices such as a PC a Make CD R RWs in differ...

Страница 36: ...ect direction The battery is weak a Replace the battery with new one The aiming direction of the remote control unit is wrong a Aim the remote control unit at the sensor of the unit and press buttons The sensor is exposed to direct sunlight The remote control unit may not be opera ble when the sensor is exposed to direct sunlight In such a case the system is not faulty a Block off sunlight to the ...

Страница 37: ...sary After 5 seconds To next file automatically The disc is dirty or is upside down a Check the disc The disc has scratches a Check the disc No operation by some cause a Unplug the power cord and plug it again In case the unit is still out of order consult your dealer a Installation Instructions A WMA file can be copyrighted a The file protected by copyright is not playable No disc Display Possibl...

Страница 38: ...ck successfully thanks to incompatibility among writing software a CD recorder CD R RW drive and the discs This player cannot play the CD R RW discs if the session is not closed This player cannot play the CD R RW discs which contains other than CD DA or compressed audio data Be sure to observe the instructions of CD R RW disc for handling it Notes on CD CD Media CD ROM CD R CD RW Your product is ...

Страница 39: ...z Image response ratio 55 dB IF response ratio 100 dB Signal to noise ratio 62 dB AM Frequency Range 530 kHz 1 710 kHz Usable Sensitivity 27 dB µV S N 20 dB English Power Supply DC 12 V 11 V 16 V Test Voltage 14 4 V Negative Ground Tone Controls Bass Treble Bass 12 dB at 60 Hz Treble 12 dB at 16 kHz Equalizer Center Frequency 60 160 400 1 k 3 k 6 k 16 k Hz Variable Range of Equalizer 12 dB to 12 d...

Страница 40: ...ey 07094 http www panasonic com Panasonic Sales Company Division of Panasonic Puerto Rico Inc PSC Ave 65 de Infanteria Km 9 5 San Gabriel Industrial Park Carolina Puerto Rico 00985 http www panasonic com Panasonic Canada Inc 5770 Ambler Drive Mississauga Ontario L4W 2T3 http www panasonic ca CQ C800U 2007 Matsushita Electric Industrial Co Ltd All Rights Reserved C800U_OI_cover 11 27 2007 09 58 AM ...

Отзывы: