background image

30

Troubleshooting

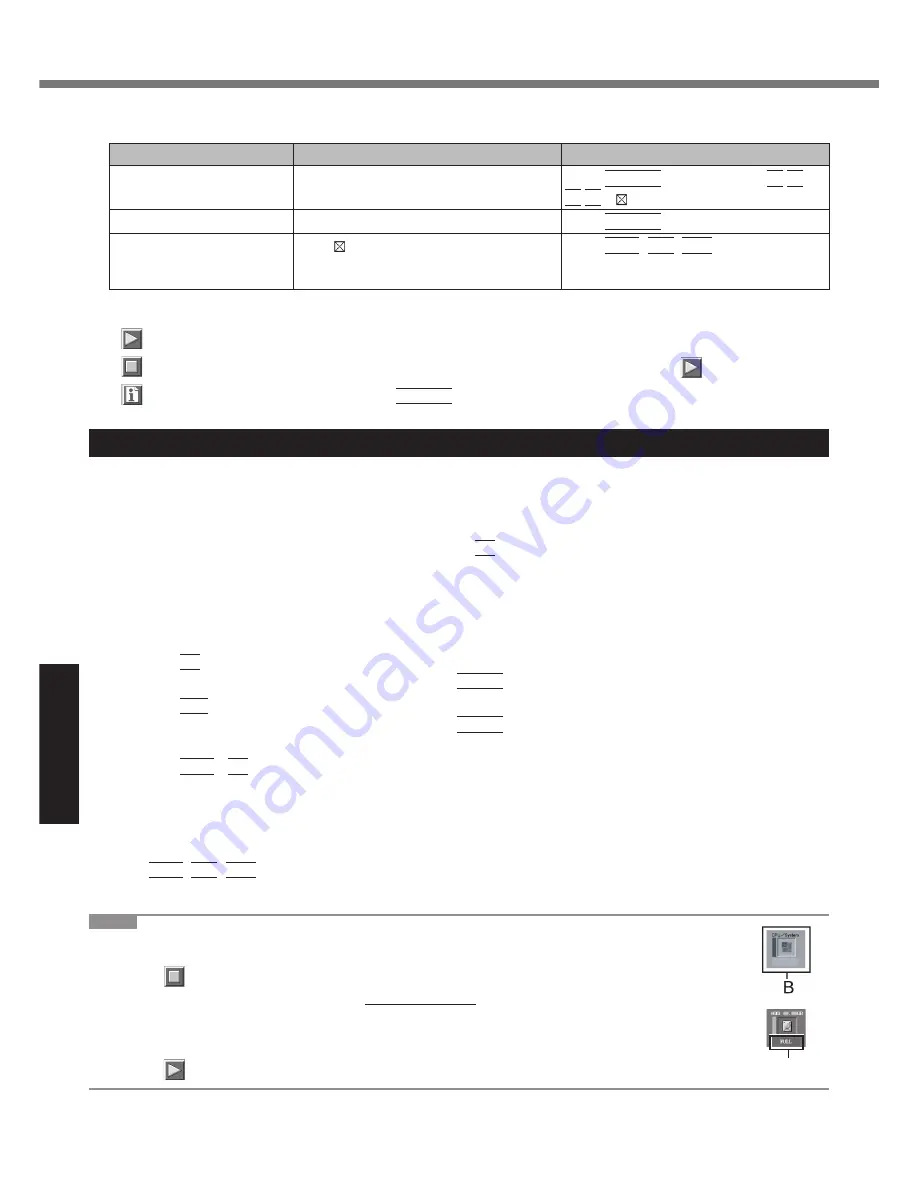
  We recommend that you use the touch pad for operations. When not using the touch pad, you can operate using 

the internal keyboard instead.

Operations

Touch pad operations

Internal keyboard operations

Select icon

Place the cursor above the icon

Press 

Space

,

 and then press 


  (  (close) cannot be selected)

Click the icon

Tap or click (right click cannot be used)

Press 

Space

 above the icon

Complete the PC- Diagnos-
tics Utility and then restart 
the computer

Click   (close)

Press 

Ctrl

+

Alt

+

Del

.

  By clicking the icon, you can execute the following operations:


 : Start the diagnostic check from the beginning


 : Stop the diagnostic check (You cannot restart the check partway through by clicking 

)


 : Display help (click the screen or press 

Space

 to return to the original diagnostic check screen)

Running the Diagnostic Check

Disconnect any peripheral devices (e.g., storage device) before running the diagnostic check. 

Connect the AC adaptor and turn on the wireless switch. (  page 10)

During the diagnostic check, do not remove the AC adaptor, or attach any peripheral devices.

Turn on or restart the computer, and press 

F2

 for several times while [Panasonic] boot 

screen is displayed.

The Setup Utility starts up.

  If the password is requested, enter the Supervisor Password. 
  If you are using the computer after changing the settings from the status at the time of purchase, we recom-

mend that you make a note of the settings that are changed.

3 Press 

F9

.

At the con

fi

 rmation message, select [Yes] and press 

Enter

.

4 Press 

F10

.

At the con

fi

 rmation message, select [Yes] and press 

Enter

.

The computer will restart.

5 Press 

Ctrl

F7

 while [Panasonic] boot screen is displayed.

When the PC-Diagnostic Utility starts up, it will automatically begin the diagnostic check for all hardware compo-
nents.

  If the password is requested, enter the password.
  The touch pad and the internal keyboard cannot be used until alternating blue and yellow colors are dis-

played on the left side of the hardware icon (  page 29). If the touch pad does not operate properly, press 

Ctrl

+

Alt

+

Del

 to restart the computer, or slide the power switch to turn the power off, and then restart the 

PC-Diagnostic Utility. 

 NOTE 

  Using the following procedure, you can run a diagnostic check on a speci

fi

 ed hardware component, 

or run an extended diagnostic check on the hard disk.

A

 Click 

 to stop the diagnostic check.

B

 Click the icon for the hardware that is not to be checked, so that the icon is displayed in gray (B).

When running a check on the hard disk, clicking the icon once will turn on the extended diagnostic 
check (“FULL” (C) will be displayed below the icon); click again, and the icon will be displayed in 
gray.  

C

 Click 

 to start the diagnostic check.

C

Hardware Diagnostics

Содержание CF-30 Series

Страница 1: ...ity 21 Reinstalling Software 22 Troubleshooting Error Code Message 24 Troubleshooting Basic 25 Hardware Diagnostics 29 Appendix LIMITED USE LICENSE AGREEMENT 32 Specifications 34 LIMITED WARRANTY 37 P...

Страница 2: ...splay Clone The same screen is displayed on the internal LCD and the ex ternal display Extended desktop The extended working area across the internal LCD and the external display Copyright This manual...

Страница 3: ...ent instructions for wireless transmitters Also user must maintain mini mum 20 cm spacing between external antenna s and all person s body excluding extremities of hands wrist and feet during wireless...

Страница 4: ...radation of service in some situations Repairs to certified equipment should be coordinated by a representative designated by the supplier Any repairs or alterations made by the user to this equipment...

Страница 5: ...roved for mobile operation and unless otherwise advised in separate supplemental instructions for individual wireless transmitter s requires minimum 20 cm spacing be proved between antenna s and all p...

Страница 6: ...y emitted by wireless devices like for example mobile phones Because this product operates within the guidelines found in radio frequency safety standards and recommenda tions we believe this product...

Страница 7: ...the AC Plug or the AC Adaptor Do not damage or modify the cord place it near hot tools bend twist or pull it forcefully place heavy objects on it or bundle it tightly Continuing to use a damaged cord...

Страница 8: ...l the remaining battery level becomes 30 to 40 and store it in a cool dry place This computer prevents overcharging of the battery by recharging only when the remaining power is less than approx 95 of...

Страница 9: ...pean Union This symbol is only valid in the European Union If you wish to discard this product please contact your local authorities or dealer and ask for the correct method of disposal 36 M 1 Avertis...

Страница 10: ...less LAN Blue tooth and or Wireless WAN are connected and ready It does not necessarily indicate the On Off condition of the wireless connection Reference Manual Wireless LAN Blue tooth Wireless Switc...

Страница 11: ...y N Headphone Jack You can connect headphones or amplified speakers When they are connected audio from the internal speakers is not heard O Microphone Jack A condenser microphone can be used If other...

Страница 12: ...Use the tether to attach the stylus to the computer so you will not lose it There are holes A to attach it 1 2 3 4 To ensure waterproof integrity close the connector covers completely When closing the...

Страница 13: ...ENSE AGREEMENT before breaking the seal on the computer s packaging page 32 1 Insert the battery pack ASlide the latch A to the right to unlock the cover BSlide the latch A down and open the cover CIn...

Страница 14: ...e power switch Touching the keyboard touch pad or touchscreen only for model with touchscreen Closing the display When the CPU temperature is high the computer may not start up to prevent overheating...

Страница 15: ...so that you can make the optimum settings This is not an error message and you can use the computer However making appropriate measures is recommended to reduce the risk of virus and other attacks No...

Страница 16: ...riting Standby and Hibernation Functions Security Measures Battery Power Multimedia Pocket PC Card ExpressCard SD Memory Card SD Security Smart Card RAM Module Port Replicator External Display USB Dev...

Страница 17: ...t in a plastic bag to protect its terminals The touch pad is designed to be used with a finger tip Do not place any object on its surface and do not press down strongly with sharp pointed or hard obje...

Страница 18: ...R Sub Menu and press Enter 3 Select Computrace R BIOS Module and set to Enable 4 At the confirmation message select Execute and press Enter 5 At the reconfirmation message select Execute and press Ent...

Страница 19: ...y switches including hot keys When restarting the computer the message Check file system on C may appear Follow the on screen instruc tions Do not skip the check process Make sure you allow enough spa...

Страница 20: ...Recover Pro Complete Restore This function uses the data created during complete backup It restores the hard disk data to the condition when you performed the complete backup Files created and changes...

Страница 21: ...c CD DVD drive for the multimedia pocket optional refer to recent catalogs and other sources for information about the products available Remove all peripherals except for the CD DVD drive Connect the...

Страница 22: ...ket 2 Turn on the computer and press F2 several times while Panasonic boot screen is dis played The Setup Utility starts up If the password is requested enter the Supervisor Password 3 Write down all...

Страница 23: ...necessary to per form additional operations during the following procedure 16 Perform the first time operation page 13 17 Start the Setup Utility and change the settings as necessary To change the dri...

Страница 24: ...ility Change the settings if necessary 0613 Serial Port 1 con figuration changed 0614 Serial Port 1 config error device disabled 1 A or B appears here to indicate the name of the conflict ing port The...

Страница 25: ...sk and enter any wrong password then follow the on screen instructions and set a new password If you do not have a password reset disk reinstall page 22 and set up Windows and then set a new password...

Страница 26: ...r Password appears after the Panasonic boot screen disappears As soon as you enter the password and press Enter press and hold F8 Entering Password On the Enter Password screen a beep sounds and the p...

Страница 27: ...Command Prompt is set to Full Screen by pressing Alt Enter the picture is displayed on one of the screens only When the window display is restored by pressing Alt Enter the picture is displayed on bo...

Страница 28: ...Pro 6 htm Where and download install Cleanup Utility for Recover Pro 6 B Delete the backup area using Cleanup Utility for Recover Pro 6 C Reinstall Recover Pro In this case all data in the backup are...

Страница 29: ...rding the PC Diagnostic Utility NOTE Run this utility using the default settings in the Setup Utility If the Setup Utility or other settings will not allow a hard ware to be executed the hardware icon...

Страница 30: ...Password If you are using the computer after changing the settings from the status at the time of purchase we recom mend that you make a note of the settings that are changed 3 Press F9 At the confirm...

Страница 31: ...layed the computer s hardware is operating normally Continue using the computer as is If the computer still does not operate properly reinstall the software page 22 NOTE If you run a memory diagnostic...

Страница 32: ...roduct which was accompanied by the Programs to such other party At the time of such a transfer you must also transfer all copies whether in printed or machine readable form of every Program and the r...

Страница 33: ...er de modifier les Logiciels E Vous ne pouvez c der les Logiciels et en octroyer la licence une autre partie qu en rapport avec votre cession du Produit unique qui est accompagn par les Logiciels cett...

Страница 34: ...Memory Card 11 x 1 Data transfer rate 8 MB per second 12 Smart Card 13 x 1 RAM Module Slot 200 pin 1 8 V SO DIMM DDR2 SDRAM PC2 4200 Compliant Interface USB port 4 pin USB 2 0 x 3 Serial port Dsub 9 p...

Страница 35: ...2 11a 5 18 5 32 GHz 5 745 5 825 GHz IEEE802 11b IEEE802 11g 2 412 2 462 GHz BluetoothTM Only for model with Bluetooth Bluetooth Version 2 0 EDR Transmission method FHSS system Wireless Channels Used C...

Страница 36: ...4 0 1 17 Measured using MobileMark 2005 LCD brightness 60 cd m2 18 Approx 0 9 W when the battery pack is fully charged or not being charged and the computer is OFF Approx 1 5 W when the Wake up from L...

Страница 37: ...period you may contact our representatives at 1 800 LAPTOP5 If the prob lem is not handled to your satisfaction then write to the Consumer Affairs Division at the address indicated below SOFTWARE LIM...

Страница 38: ...te of original pur chase No liability is assumed for loss or damage to the product while in transit if you chose your own transportation carrier SOFTWARE MEDIA LIMITED WARRANTY Coverage Panasonic Cana...

Страница 39: ...39 MEMO...

Страница 40: ...evelopment and dis semination of products with functions that effectively reduce energy consumption It is an open system in which business proprietors can participate voluntarily The targeted products...

Отзывы: