background image

Pg. 17

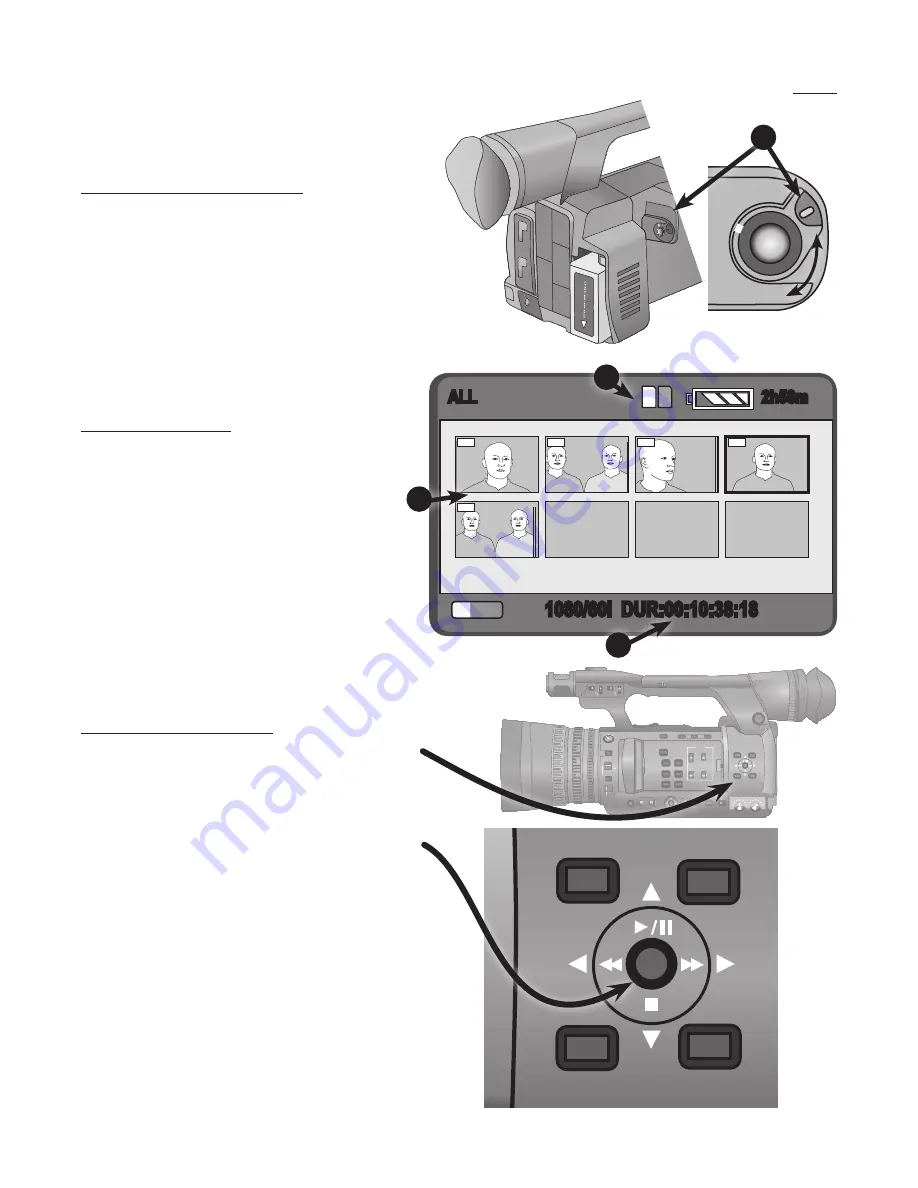
Reviewing What You’ve Recorded:

You can watch what you’ve recorded on 

either viewfinder (eyepiece or LCD), or 

connect an external monitor.

Switch to Playback mode:

This control switches from the “Camera”  

or “Record” function to “Playback” mode.
1)  Rotate the Main Power Switch PAST 

the ON position to the MODE setting. 

The switch will spring back to the ON 

position when you let go.

The tiny indicator light just above the 

switch will change from Camera to PB.

In the Viewfinder:

Each “Clip” you recorded -- every time 

you started and stopped recording -- will 

be displayed in the Viewfinder as a tiny 

“Thumbnail” image.

The display provides other information:

1)  Starting “Timecode” of each clip

2)  Duration of selected clip

3)  Which Memory Card the clip is from

Each clip will show a yellow border 

around the thumbnail frame to indicate 

which clip is “selected”.

Select and Play a Clip:

On the face of the camera, just below the 

handle, are the controls for selecting and 

playing the clips.

1)  Push the center stick left/right/up/

down to select a clip you want to play.

2)  Push in on the stick to select the 

desired clip and start playing.

3)  Push the stick up to PAUSE
4)  Push UP again to resume PLAY
5)  Push Right or Left while playing to 

FAST SCAN forward or back.

6) 

Push down to stop play, and return to 

the clip screen.

0 2 : 2 4 : 4 0 : 1 0

0 2 : 2 6 : 4 8 : 0 3

0 2 : 3 2 : 2 2 : 1 4

0 2 : 4 1 : 1 1 : 2 8

0 2 : 4 8 : 3 2 : 1 6

1

2

3

OF

F O

N


MOD

E

OFF  ON M

OD

E

1

0001

0002

0003

0004

0005

1 2

2h58m

ALL

1080/60i  DUR:00:10:38:18

PH 

1080

SCENE FILE

AUDIO

CH1 SELECT CH2 SELECT

INT(L)

INPUT1

INPUT2

INPUT2

INT(R)

CH 1

CH 2

MANU

AUTO

MANU

AUTO

BARS

EVF DTL

ZEBRA

LCD

WFM

COUNTER-RESET/TC SET

OIS

USER 1

USER 2

USER 3

INPUT1

OFF

ON

LINE   MIC

+48V

INPUT2

OFF

ON

LINE   MIC

+48V

OFF  1/4 1/16

ND FILTER

1/64

FOCUS ASSIST

FOCUS

A

M

PUSH AUTO

ZOOM

MANU

SERVO

IRIS

GAIN

WHITE BAL

FUNCTION SHTR/F.RATE

DIAL SEL

DISP/

MODE CHK

L

M

H

B

A

PRST

AUTO   MANU

CH 1           AUDIO LEVEL           CH 2 

HANDLE ZOOM

123

MENU

EXEC

AUDIO MON/ADV

PUSH-

ENTER

-                    +

SCENE FILE

AUDIO

CH1 SELECT CH2 SELECT

INT(L)

INPUT1

INPUT2

INPUT2

INT(R)

CH 1

CH 2

MANU

AUTO

MANU

AUTO

BARS

EVF DTL

ZEBRA

LCD

WFM

COUNTER-RESET/TC SET

OIS

USER 1

USER 2

USER 3

INPUT1

OFF

ON

LINE   MIC

+48V INPUT2

OFF

ON

LINE   MIC

+48V

OFF  1/4 1/16

ND FILTER

1/64

FOCUS ASSIST

FOCUS

A

M

PUSH AUTO

ZOOM

MANU

SERVO

IRIS

GAIN

WHITE BAL

FUNCTION SHTR/F.RATE

DIAL SEL

DISP/

MODE CHK

L

M

H

B

A

PRST

AUTO   MANU

CH 1           AUDIO LEVEL           CH 2 

HANDLE ZOOM

123

MENU

EXEC

AUDIO MON/ADV

PUSH-

ENTER

-                    +

Содержание AVCCAM AG-AC160

Страница 1: ...dio A or B or the Mini Mobile Micro Mobile The Camera The Panasonic AG AC160 camcorder records high quality digital video and audio on flash memory cards The camera comes equipped with 2 64 Gigabyte SDHC cards which com bined can hold more than 10 hours of High Definition video in the standard setting Once recorded the video and audio on the memory cards can be transferred to an editing computer q...

Страница 2: ...e s All reservations are on a first come first served basis s You can reserve the field cameras up to 3 months in advance of your production s You can check out a AC160 Camera for up to 72 hours per reservation s You can have up to 72 hours of camera usage reserved at any one time For example you could have 1 reservation of 72 hours or 3 reservations of 24 hours each You must use one of these befo...

Страница 3: ...OFF ON LINE MIC 48V INPUT2 OFF ON LINE MIC 48V OFF 1 4 1 16 ND FILTER 1 64 FOCUS ASSIST FOCUS A M PUSH AUTO ZOOM MANU SERVO IRIS GAIN WHITE BAL FUNCTION SHTR F RATE DIAL SEL DISP MODE CHK L M H B A PRST AUTO MANU CH 1 AUDIO LEVEL CH 2 HANDLE ZOOM 123 MENU EXEC AUDIO MON ADV PUSH ENTER A Quick Tour of the Camera Here are a few of the basic features of the AC160 camcorder Camera Microphone Lens Manu...

Страница 4: ...ht Leg Extension Locks Lift levers to extend length of legs to raise camera height Leg Locks Push button down to spread legs for better stability Ball Level Adjust Loosen knob to tilt Tripod Head so that camera is level Pedestal Lock Loosen to raise or lower pedestal Pan Drag Adjust smoothness of left right moves Fluid Tripod Heads Better quality video tripods are often called fluid heads The TILT...

Страница 5: ...the lever clockwise until tight to prevent up down movement 6 Pan Lock Rotate the end of the lever out from the head until to prevent left right movement The Drag Controls The drag controls add resistance to Pan and Tilt movements to make them smooth and fluid 7 Pan Drag Turn the knob above the pan lock under the mounting surface to add or remove friction on pans 8 Tilt Drag Turn the knob clockwis...

Страница 6: ...remove the battery push the release button located just above the battery forward and slide the battery up and out of the slot Using the Power Supply For long shoots or when your batteries are all exhausted use the AC Power Supply The adaptor attaches to the back of the camera in the same place as the battery 1 Attach the plug end of the AC adaptor cable to the outlet on the front of the Battery C...

Страница 7: ...amera image until you turn on the power The power switch is located just above the battery slot The Power Switch 1 Push in on the small white button This lets you rotate the power switch 2 Rotate the switch so that the pointer is in the ON position 2 REMEMBER Please turn off the power when changing batteries or attaching the AC power adaptor The Parts of the Camera Recording There are two round re...

Страница 8: ...t you see what the camera sees while you are recording and also let you play back what you shot previously The camera is equipped with 2 viewfinders Eyepiece and LCD Only one of the viewfinders can be used at a time when you fold out the LCD viewfinder it shuts off the picture in the eyepiece Both viewfinders can also provide information about the status of camera functions such as remaining batte...

Страница 9: ...K L M H B A PRST AUTO MANU CH 1 AUDIO HANDLE ZOOM 123 MENU AUDIO MO PUSH ENTER T W Lens Functions Zoom and Focus ZOOM The Zoom controls simulate the effect of mov ing the camera closer or further from the subject by magnifying the image At maximum zoom the camera magnifies the image by 22X For convenience the camera has 2 zoom con trols the larger main zoom and the smaller handle zoom The ends of ...

Страница 10: ...trast or poor lighting the auto focus may be unsatisfactory In some cases the auto focus may hunt chang ing the focus over and over when the camera can t decide what to focus on If you practice your Manual Focus technique you may find you prefer using it Pre Focus Technique The most accurate method for manually focussing a camera 1 Zoom in as close as possible to the desired subject Focus is not c...

Страница 11: ...it reads MANUAL IRIS push the button again The MANUAL IRIS provides more control over picture brightness Push the round button until the viewfinder displays MANUAL IRIS Turn the IRIS ADJUST wheel until the picture is the correct brightness Your viewfinder may also display f stop numbers which relate to the size of the iris opening See page 18 for information on the viewfinder display GAIN The Gain...

Страница 12: ... room to room or from outdoors to indoors you should reset the White Balance to ensure accurate color Auto vs Manual White Balance AUTO white balance will continuously adjust color as you shoot This can cause a subtle shift in color when there are mixed sources of light sunlight and man made light on a scene MANUAL white balance takes a little more work but can result in more accurate color The Wh...

Страница 13: ...ris settings by superimposing a pattern of diagonal lines over areas of the viewfinder picture that are above 80 of the maximum brightness of the scene When using the manual iris controls you close the iris until only very bright areas of the picture sky show the pattern The lines are not recorded 4 COUNTER and RESET TC SET These buttons let you adjust the time counter There are several options in...

Страница 14: ...e screen 3 DISP MODE CHK This button switches on or off the display of information in the viewfinders about the status of controls for iris gain etc The display of the time counter and REC or PAUSE status of the camera is always visible 4 AUTO MANUAL If all of the buttons and switches are getting in the way of your creativity this switch is for you Slide the switch to the AUTO position and most of...

Страница 15: ...ight 8 ND OFF Displays the setting of the Neutral Density knob see Page 11 9 MF 40 Displays the position of Manual Focus with the number ranging from very close 00 to very far away 99 For more information see page 10 10 Z26 Displays the degree of zoom with the number changing from wide 00 to maximum magnification 99 For more information see page 10 11 F8 6 Displays the Iris setting Ranges from F1 ...

Страница 16: ... purchasing your own cards look for a card of at least Class 6 or above quality 3 Recording time is based on the size in Gigabytes of the card In the standard HD recording format a 32 gigabyte card will provide about 3 hours of record time 4 The MetroEast provided cards are a pair of 64 gigabyte Class 10 cards The 2 cards will provide more than 12 hours of recording 5 The cameras are configured to...

Страница 17: ...r stick left right up down to select a clip you want to play 2 Push in on the stick to select the desired clip and start playing 3 Push the stick up to PAUSE 4 Push UP again to resume PLAY 5 Push Right or Left while playing to FAST SCAN forward or back 6 Push down to stop play and return to the clip screen 0 2 2 4 4 0 1 0 0 2 2 6 4 8 0 3 0 2 3 2 2 2 1 4 0 2 4 1 11 2 8 0 2 4 8 3 2 1 6 1 2 3 O F F O...

Страница 18: ...ophone MetroEast has several different microphones for different applications Connecting External Microphones The 2 mic connections are on the upper handle just above the main zoom control The right one connects to Channel 1 and the left one attaches to Channel 2 LINE vs MIC On the opposite side of the handle are 2 important switches A microphone creates a very weak electrical signal Other audio d...

Страница 19: ...ptions are a INT R The Camera Microphone b INPUT 2 A mic or Line source connected to the Channel 2 connection NOTE Plugging in an external mic does not automatically override the camera mic You MUST select which you prefer to use Monitoring Sound You should ALWAYS wear headphones to monitor sound as you record Headphones The connection is under a rubber flap on the rear of the camera 3 Monitor Vol...

Страница 20: ...nd bounce up to the 12 line Each person speaks at a different volume so you should reset the volume each time you change performers C H C H 2 NEVER allow the meter to reach up to the 0dB mark The audio will be unusable TC 02 25 00 06 ND OFF 0dB 2h58m MF40 Z26 C H C H F8 6 Bch BACK 1 2 PH1080 SCENE FILE AUDIO CH1 SELECT CH2 SELECT INT L INPUT1 INPUT2 INPUT2 INT R CH 1 CH 2 MANU AUTO MANU AUTO BARS ...

Отзывы: