background image

10

Setup.Mode.Operations.

(continued)

11

5-1.Save.ROP.configuration.file.to.memory.card
1..

Press.<SAVE/LOAD>.to.select.[ND].

• Each press of <SAVE/LOAD> toggles between [ND] (Save) and 

[CC] (load).

ND

M.GAIN

IRIS

M.PED

CC

SHT

SYNC

2..

Press.<UP>.or.<DOWN>.to.select.[y].and.press.

<EXECUTE>.to.confirm.the.selection.

• Do not remove a memory card that is being accessed.

ND

M.GAIN

IRIS

M.PED

CC

SHT

SYNC

• To cancel saving, select [n] and press <EXECUTE>.

• The file is saved to the memory card and [Fin] appears when saving 

ends.

• [E02] is displayed if the save operation to the memory card fails.

(→page 13)

If this happens, check the memory card and try again or insert 

another memory card to perform the operation again.

• [E01] is displayed when an ROP configuration file with the same 

name as the one you are attempting to save already exists on the 

memory card.

To overwrite the file, press <UP> or <DOWN> to select [y] and 

press <EXECUTE>.(→page 13)

• For details on Save/Load data, refer to page 6.

• To exit setup mode, hold down <EXIT> for about 2 seconds.

• To make other settings, press <SELECT> to select a menu number.

5-2.Load.ROP.configuration.file.from.memory.card
1..

Press.<SAVE/LOAD>.to.select.[CC].

• Each press of <SAVE/LOAD> toggles between [ND] (Save) and 

[CC] (load).

ND

M.GAIN

IRIS

M.PED

CC

SHT

SYNC

2..

Press.<UP>.or.<DOWN>.to.select.[y].and.press.

<EXECUTE>.to.confirm.the.selection.

• The file is loaded from the memory card and [Fin] appears when 

loading ends. A few seconds later, the unit is restarted.

• Do not remove a memory card that is being accessed.

ND

M.GAIN

IRIS

M.PED

CC

SHT

SYNC

• To cancel loading, select [n] and press <EXECUTE>.

• [E02] is displayed if the load operation from the memory card fails.

(→page 13)

If this happens, check the memory card and see whether the file 

exists on the memory card. If it does, start over from step 1.

• To exit setup mode, hold down <EXIT> for about 2 seconds.

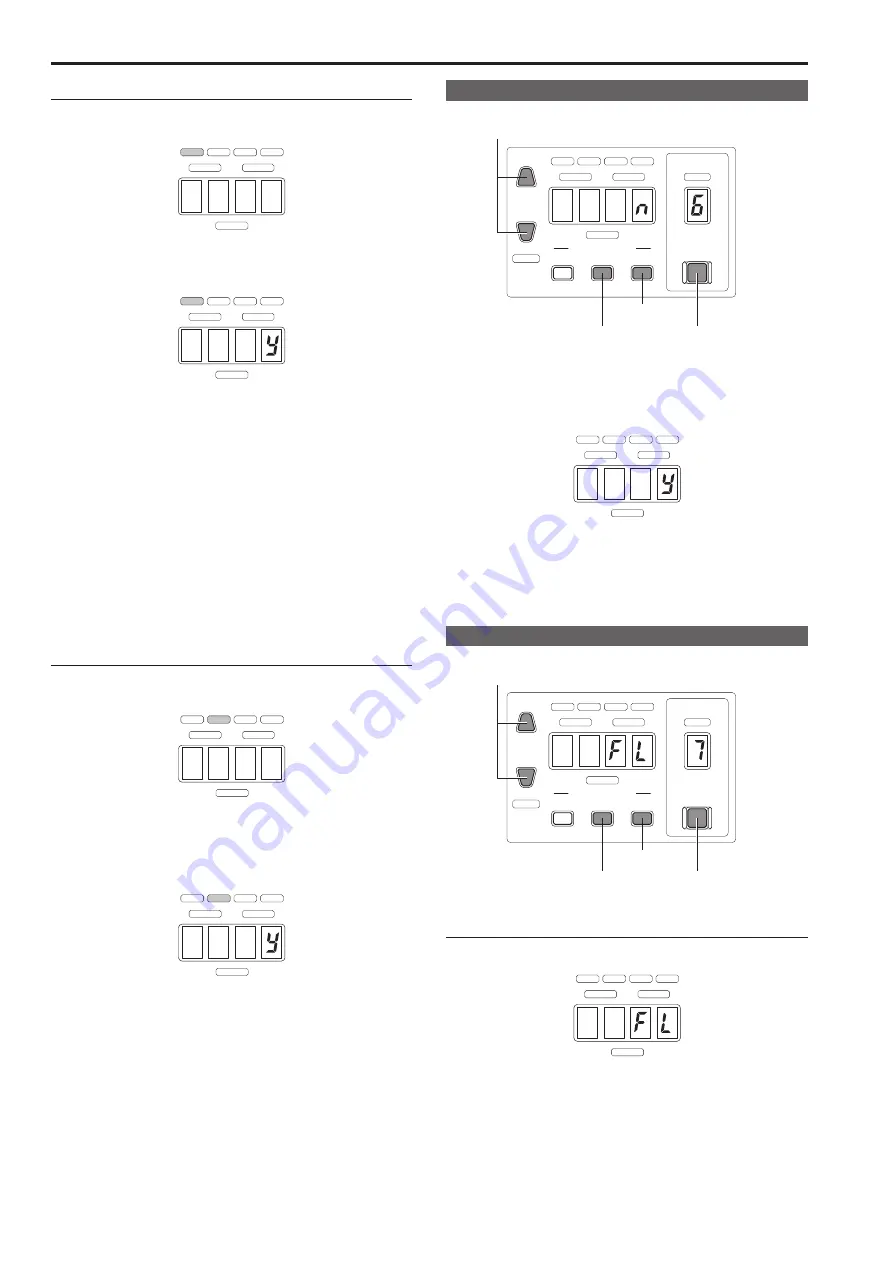
6.Format.memory.card

1..

Press.<SELECT>to.select.menu.number.[6].

CAMERA

No.

DATA

SET

DISPLAY SELECT

UP

DOWN
SET UP

ND/CC M.GAIN/M.PED SHUTTER

ND

M.GAIN

IRIS

M.PED

10-19

CC

SHT

SYNC

SELECT

EXECUTE

EXIT

SAVE/LOAD

SHIFT

+

UP+DOWN

Select y (Format)/n (Cancel)

Press to select the 

menu number

Press to exit setup mode 

(hold down)

Press to confirm

2..

Press.<UP>.or.<DOWN>.to.select.[y].and.press.

<EXECUTE>.to.confirm.the.selection.

• Card formatting starts.

• Do not remove a memory card that is being accessed.

ND

M.GAIN

IRIS

M.PED

CC

SHT

SYNC

• To cancel formatting, select [n] and press <EXECUTE>.

• When the formatting ends, [Fin] appears.

• To exit setup mode, hold down <EXIT> for about 2 seconds.

• To make other settings, press <SELECT> to select a menu number.

7.Select/set.flare.and.pedestal

Press.<SELECT>to.select.menu.number.[7].

CAMERA

No.

DATA

SET

DISPLAY SELECT

UP

DOWN
SET UP

ND/CC M.GAIN/M.PED SHUTTER

ND

M.GAIN

IRIS

M.PED

10-19

CC

SHT

SYNC

SELECT

EXECUTE

EXIT

SAVE/LOAD

SHIFT

+

UP+DOWN

Select FL (Flare)/PE (Pedestal)

Press to select the 

menu number

Press to exit setup mode 

(hold down)

Press to confirm

7-1.Set.flare

Press.<UP>.or.<DOWN>.to.select.[FL].and.press.

<EXECUTE>.to.confirm.the.selection.

ND

M.GAIN

IRIS

M.PED

CC

SHT

SYNC

• To exit setup mode, hold down <EXIT> for about 2 seconds.

• To make other settings, press <SELECT> to select a menu number.

Содержание AKHRP200

Страница 1: ...ct the unit to the required equipment and set it up Before installing the unit be sure to read the Basics manual to ensure that you know how to install it correctly Operations and Settings this manual Operations and Settings describe how to operate and set up the unit M1012KT0 PS ENGLISH Before operating this product please read the instructions carefully and save this manual for future use ...

Страница 2: ...1 2 19 HD DTL SKIN DTL 2 2 20 SD DETAIL 20 SYSTEM 1 2 21 SYSTEM 2 2 22 FUNCTION 22 LENS FILE EDIT 1 2 23 LENS FILE EDIT 2 2 23 Index 24 About trademarks and registered trademarks SDHC logo is a trademark of SD 3C LLC Other company names and product names appearing in this manual are the registered trademarks or trademarks of their respective companies Copyrights It is prohibited to transfer copy d...

Страница 3: ...s or CCUs For details consult your supplier Disclaimer of warranty IN NO EVENT SHALL Panasonic Corporation BE LIABLE TO ANY PARTY OR ANY PERSON EXCEPT FOR REPLACEMENT OR REASONABLE MAINTENANCE OF THE PRODUCT FOR THE CASES INCLUDING BUT NOT LIMITED TO BELOW 1 ANY DAMAGE AND LOSS INCLUDING WITHOUT LIMITATION DIRECT OR INDIRECT SPECIAL CONSEQUENTIAL OR EXEMPLARY ARISING OUT OF OR RELATING TO THE PROD...

Страница 4: ...e to load lens file from memory card Saves the currently used lens file to a memory card It also allows you to load a lens file stored on a memory card 5 Save ROP configuration file to load ROP configuration file from memory card Save a configuration file for the unit to a memory card It also allows you to load a configuration file for the unit stored on a memory card 6 Format memory card Formats ...

Страница 5: ... 1 SHIFT Exiting setup mode To exit setup mode hold down EXIT for two seconds The unit returns to normal operating mode CAMERA No DATA SET DISPLAY SELECT UP DOWN SET UP ND CC M GAIN M PED SHUTTER ND M GAIN IRIS M PED 10 19 CC SHT SYNC SELECT EXECUTE EXIT SAVE LOAD SHIFT UP DOWN Basic operations The buttons indicated in the figure below are available in setup mode No other buttons are available All...

Страница 6: ...from memory card ND Save to memory card Lens files 1 to 32 1 CC Load from memory card Lens files 1 to 32 1 5 Save ROP configuration file to load ROP configuration file from memory card ND Save to memory card CC Load from memory card 6 Format memory card 1 7 Select set flare and pedestal 1 FLARE PED FL PE FL 8 Set buzzer beep Call 1 Enable disable buzzer on off on 9 Set display brightness LED 7 seg...

Страница 7: ...UP or DOWN to select a file number on the memory card and press EXECUTE to confirm the selection ND M GAIN IRIS M PED CC SHT SYNC To save a file to file no 2 on the memory card 3 Press UP or DOWN to select y and press EXECUTE to confirm the selection Do not remove a memory card that is being accessed ND M GAIN IRIS M PED CC SHT SYNC To cancel saving select n and press EXECUTE The file is saved to ...

Страница 8: ...he memory card and Fin appears when saving ends E02 is displayed if the save operation to the memory card fails page 13 If this happens check the memory card and try again or insert another memory card to perform the operation again E01 is displayed when a user file with the same name as the one you are attempting to save already exists on the memory card To overwrite the file press UP or DOWN to ...

Страница 9: ...ss UP or DOWN to select y and press EXECUTE page 13 E04 is displayed when the lens file is off To exit setup mode hold down EXIT for about 2 seconds To make other settings press SELECT to select a menu number 4 2 Load lens file from memory card 1 Press SAVE LOAD to select CC Each press of SAVE LOAD toggles it between ND Save and CC Load ND M GAIN IRIS M PED CC SHT SYNC 2 Press UP or DOWN to select...

Страница 10: ...hat is being accessed ND M GAIN IRIS M PED CC SHT SYNC To cancel loading select n and press EXECUTE E02 is displayed if the load operation from the memory card fails page 13 If this happens check the memory card and see whether the file exists on the memory card If it does start over from step 1 To exit setup mode hold down EXIT for about 2 seconds 6 Format memory card 1 Press SELECT to select men...

Страница 11: ...rightness 1 Press SAVE LOAD to select ND and press EXECUTE to confirm the selection Each press of SAVE LOAD toggles between ND LED display brightness and CC 7 segment display brightness ND M GAIN IRIS M PED CC SHT SYNC 2 Press UP or DOWN to select LED display brightness and press EXECUTE to confirm the selection ND M GAIN IRIS M PED CC SHT SYNC To exit setup mode hold down EXIT for about 2 seconds...

Страница 12: ...he menu number Press to confirm Select y Save n Cancel Press to exit setup mode hold down 2 Press UP or DOWN to select y and press EXECUTE to confirm the selection ND M GAIN IRIS M PED CC SHT SYNC The file is saved to the memory card and Fin appears when saving ends E02 is displayed if the save operation to the memory card fails page 13 If this happens check the memory card and try again or insert...

Страница 13: ...2 card E03 A memory card has not been inserted E04 A communication error occurred Check the connected equipment The lens file is off E05 An error occurred Start over from the beginning When a file with the same name exists on the memory card E01 is displayed when a file with the same name as the one you are attempting to save already exists on the memory card To overwrite the file press UP or DOWN...

Страница 14: ... seconds The REMOTE OPERATION MENU appears The cursor appears at the beginning of the first line CHARA MENU SELECT REMOTE OPERATION MENU SHADING WHITE PEDESTAL FLARE GAIN GAMMA BLACK GAMMA CINEMA GAMMA KNEE WHITE CLIP MATRIX HD DTL SKIN DTL SD DETAIL SYSTEM FUNCTION LENS FILE EDIT Cursor 2 Turn SELECT one click clockwise to move the cursor CHARA MENU SELECT REMOTE OPERATION MENU SHADING WHITE PEDE...

Страница 15: ... ON 0 0 0 0 0 0 0 0 0 0 0 0 Cursor movement In a character entry menu the cursor will also appear LENS FILE EDIT 1 2 FILE NO FILE NAME EXECUTE MODE LOAD NO Cursor movement When the cursor is at the beginning of a menu press SELECT to confirm to turn the cursor into to continue selecting menu items SHADING WHITE WHITE SHADING SWITCH G B R HSAW HPRA VSAW VPARA ON 0 0 0 0 0 0 0 0 0 0 0 0 SHADING WHIT...

Страница 16: ...the increase in pedestal level in proportion to light intensity MASTER PEDESTAL 99 0 99 Indicates set master pedestal value Settings cannot be made PEDESTAL R 800 0 800 Amount by which the level is increased or decreased relative to the G pedestal to adjust the black balance When the auto black balance is achieved 0 is set as the adjustment value PEDESTAL G 800 0 800 Adjusts the amount of G pedest...

Страница 17: ... gamma correction to the optimal setting EFFECT DEPTH 1 5 Turn on for contrast adjustment Higher numbers mean greater effect PRE CORRECTION 4 0 4 5 5 0 Turn on to adjust the rising slope in low light areas CINEMA GAMMA Note The settings in this menu are not available when the CINEMA GAMMA SWITCH is set to OFF CINEMA GAMMA CINEMA GAMMA SWITCH CINEMA GAMMA SEL BLACK STRETCH LEVEL DYNAMIC LEVEL KNEE ...

Страница 18: ... B 15 0 15 Sets the B white clip function HI COLOR OFF ON Turn on to improve the color reproducibility in the high brightness areas MATRIX 1 2 MATRIX 1 2 PRESET MATRIX SWITCH MEMORY R G R B G R G B B R B G NORMAL OFF A 0 0 0 0 0 0 indicates factory default settings Item Display Function PRESET NORMAL EBU NTSC Switches matrix presets MATRIX SWITCH OFF ON Enables or disables saturation and color pha...

Страница 19: ...ETAIL GAIN ON 20 20 10 0 R G 2 0 0 0 0 0 8 17 3 indicates factory default settings Item Display Function DETAIL SWITCH OFF ON Enables or disables the HD DETAIL effect V DETAIL 0 20 63 Adjusts the level of vertical detail H DETAIL 0 20 63 Adjusts the level of horizontal detail CRISP 0 10 63 Sets the maximum amplitude of the very faint noise components that are removed from detail components PEAK FR...

Страница 20: ...s the width of skin tone areas in memory bank A in a range from 0 to 255 MEM A SATU 0 255 Changes the saturation of skin tone areas in memory bank A in a range of 0 to 255 MEM B CRISP 63 0 63 Removes very faint noise components from detail components in skin tone areas in memory bank B MEM B PHASE 0 359 Changes the color phase of skin tone areas in memory bank B in a range of 0 to 359 on a vector ...

Страница 21: ...s the up conversion system for videos used as SD SDI and VBS return videos Item Display Function HD COLOR BAR FULL BARS 1 ARIB BARS 2 BARS 3 BARS 4 BARS 5 BARS 6 Select the color bar signals to be output from the HD SD SDI OUT connectors and VBS connector when BAR has been selected on the operation panel of the ROP When they are output in VBS or SD format color bars in HD format are output in the ...

Страница 22: ... Performs coarse adjustment of MIC1 gain Item Display Function MIC1 AMP 20dB 0 20dB Makes fine adjustments of the MIC1 gain in 1 dB increments MIC2 GAIN 20dB 40dB 60dB Makes coarse adjustments of MIC2 gain MIC2 AMP 20dB 0 20dB Makes fine adjustments of MIC2 gain in 1 dB increments FUNCTION FUNCTION ALC LEBEL ALC SPEED ALC WINDOW ALC PEAK ALC RANGE ASU SETUP ASU REF FILE ASU MASTER PED SET ASU FILT...

Страница 23: ...rs Use to enter the file name It is disabled when LOAD is selected in MODE Allowable characters 0 9 A Z a z _ under bar space EXECUTE YES NO Executes processes selected in MODE LENS FILE EDIT 2 2 LENS FILE EDIT 2 2 EXTENDER FILE FLARE GAIN R G B STORE CANCEL X1 0 R G B HSAW HPARA VSAW VPARA indicates factory default settings Item Display Function EXTENDER x 1 0 x 2 0 Sets the current magnification...

Страница 24: ... 9 Save 9 LENS FILE EDIT 23 M MATRIX 18 19 P PEDESTAL FLARE GAIN 16 R ROP configuration file 9 Load 10 Save 10 ROP menu Operation 14 Setting 16 S Save unit data 12 Scene file 7 Load 7 Save 7 SD DETAIL 20 Set 7 segment display brightness 11 Set buzzer 11 Set display brightness 11 Set flare 10 Set LED display brightness 11 Set pedestal 11 Setup mode 4 SHADING WHITE 16 SYSTEM 21 22 U Upgrade 12 User ...

Страница 25: ...25 Memo ...

Страница 26: ...Web Site http panasonic net プロフェッショナルAVビジネスユニット 571 8503 大阪府門真市松葉町 2 番 15 号 06 6901 1161 Panasonic Corporation 2012 ...

Отзывы: