background image

7 (E)

BEFORE USE

ENGLISH

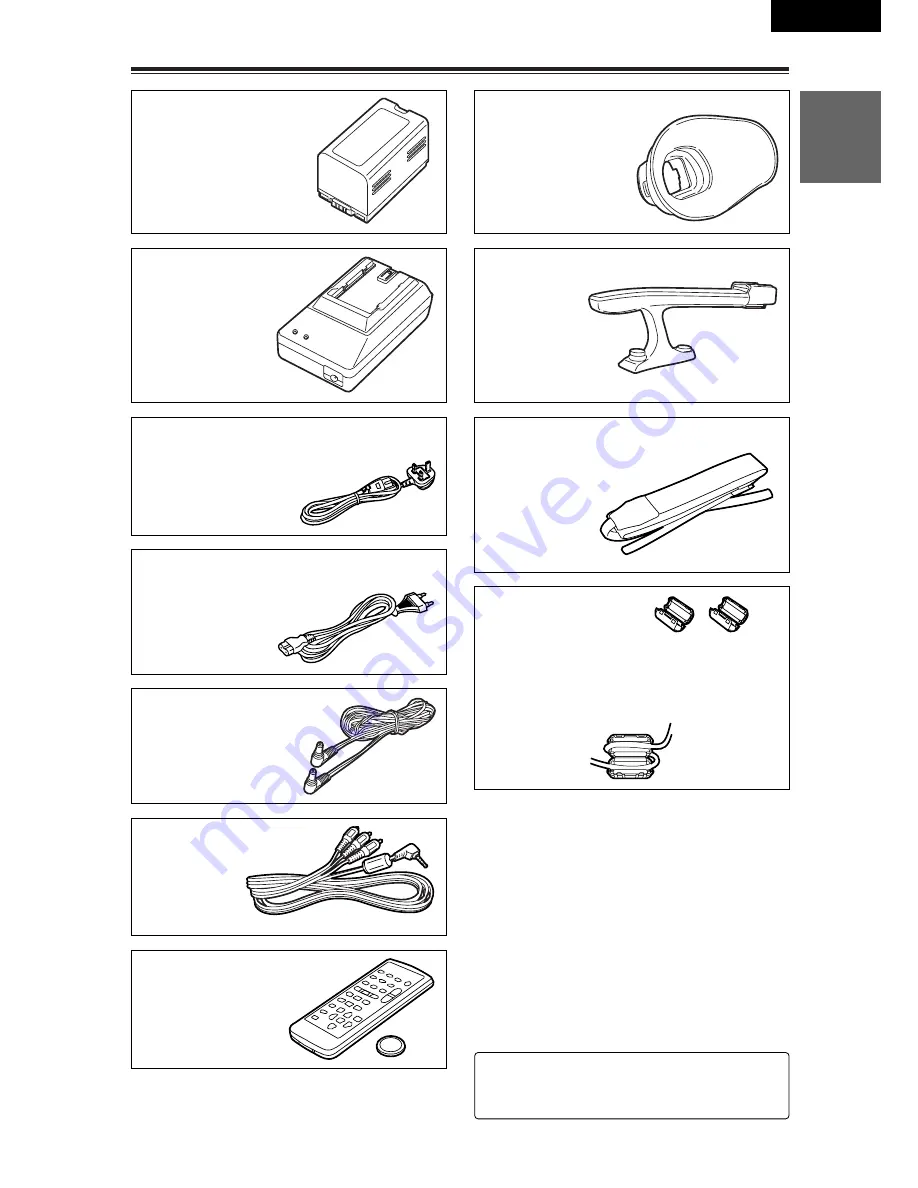
Accessories

Wireless remote control

(VFA0402)

Button battery

(CR2025)

DC cord

(K2GJ2DC00002)

AC cord

(U.K. only: K2CT3DA00001)

AC cord

(All areas except U.K.: K2CR2DA00005)

AV cable

(VYC0922)

Handle

(VYH0312)

Shoulder strap

(VFC3891)

Ferrite cores

(J0KG00000013)

Ferrite cores for DV cable:
When the DV cable is to be connected, attach
one ferrite core to one end of the cable and
the other one to the other end.

Eye-cup (large)

(VMG1370)

2

:

For the battery and AC adapter model
numbers, refer to the “Optional peripheral
units” section. 

(P86)

Battery (

2

)

AC adapter (

2

)

Содержание AG-DVC30E

Страница 1: ...ON SHOOTING PLAYBACK EDITING DISPLAYS MENUS TROUBLE SHOOTING SPECIFI CATIONS OTHER Before operating this product please read the instructions carefully and save this manual for future use Model AG E Digital Video Camera Recorder ÒPAL VQT0J26 1 ...

Страница 2: ... coloured in accordance with the following code Blue Neutral Brown Live Caution for AC Mains Lead As the colours of the wires in the mains lead of this appliance may not correspond with the coloured markings identifying the terminals in your plug proceed as follows The wire which is coloured BLUE must be connected to the terminal in the plug which is marked with the letter N or coloured BLACK The ...

Страница 3: ...ID CONTAINERS ON TOP OF THE EQUIPMENT Operating precaution Operation near any appliance which generates strong magnetic fields may give rise to noise in the video and audio signals If this should be the case deal with the situation by for instance moving the source of the magnetic fields away from the unit before operation DO NOT REMOVE PANEL COVER BY UNSCREWING To reduce the risk of electric shoc...

Страница 4: ...te Respect copyrights Copyright laws forbid the use of video and audio material you have recorded for any purpose other than your own personal enjoyment Remember that restrictions apply to the shooting of certain material even it is intended for private use Caution concerning illustrations in these instructions O Note that all illustrations camera recorder menu screens etc in these operating instr...

Страница 5: ...ing the user s bit 30 Setting the time code 32 Specifying the time code 32 PREPARATION Regular shooting 34 Preparation and inspections 34 Shooting 34 Shooting techniques for different targets 35 Low angle shooting 35 Searching specific scenes image search 35 Zoom functions 35 Self portrait shooting 36 Recording the time stamp 36 High sensitivity shooting SNS 36 Vibration reduction function 37 Wind...

Страница 6: ...59 Analogue output 60 Digital input output 61 EDITING Screen displays 62 Displays in CAMERA and VCR modes 62 In VCR mode only 65 Warnings 65 Using the MODE CHK button 66 Setting the DISPLAY items 66 DISPLAYS Menu operations 67 Setting the menu mode 67 Selecting the main items 68 Selecting the sub items 68 Entering the settings 69 Setting other sub items 70 Returning to the main item screen 70 Sett...

Страница 7: ...00005 AV cable VYC0922 Handle VYH0312 Shoulder strap VFC3891 Ferrite cores J0KG00000013 Ferrite cores for DV cable When the DV cable is to be connected attach one ferrite core to one end of the cable and the other one to the other end Eye cup large VMG1370 2 For the battery and AC adapter model numbers refer to the Optional peripheral units section P86 Battery 2 AC adapter 2 ...

Страница 8: ...ially careful when inserting or removing the cassettes AC adapter and battery O If the battery has become extremely hot or cold or if it has not been used for a long time and has no charge the CHARGE lamp will blink several times and charging will start automatically O If the CHARGE lamp continues to blink even when the battery temperature is normal it may mean that something is wrong with the bat...

Страница 9: ...ter Liquid crystal displays O If the same image or characters are left displayed on the LCD monitor or viewfinder for an extended period they may become burned onto the screen However if the power is kept off for several hours the screen will return to normal O The liquid crystal parts are manufactured using high precision technology More than 99 99 of the pixels are effective which means that les...

Страница 10: ... it again Cassette tapes O Always rewind your tapes to the start before storing them If a cassette that has been stopped part the way through is left standing for six months or more this timeframe differs depending on the storage conditions the tape will become slack O Always put tapes back into their original cases before storing them as factors such as dust direct sunlight ultraviolet rays and h...

Страница 11: ... the unit is working properly before you attempt to shoot anything 2 Connect the other end of the DC cord and one end of the AC cord to the AC adapter 3 Plug the other end of the AC cord into the power outlet 2 2 3 1 Connect the cords properly as shown in the figure above The battery cannot be charged when power is being supplied to the camera recorder from the AC adapter AC adapter AC cord U K on...

Страница 12: ...th both hands to keep it stable O Do not forcibly push the cassette holder into place as this may cause malfunctioning O Wait until the cassette holder is completely retracted before closing the cassette cover 3 4 OFF ON MODE POWER CAMERA VCR Hold down the white button and turn the POWER lever to the ON position The CAMERA red lamp lights and the camera recorder switches to shooting pause mode POW...

Страница 13: ...COUNTER RESET MODE CHK ZEBRA OIS PHOTO SHOT BARS MANUAL AUTO 1 Open the LCD monitor while holding down the panel locking button The LCD monitor can be opened to a maximum angle of 90 Forcing it past this point will damage the camera recorder Checking what you have shot rec check 90 You can conduct an image search P35 by holding down the 6 button in the shooting pause mode Do not hold down the 6 bu...

Страница 14: ...tion of the arrow and open the cassette cover When the cover is fully opened the cassette holder pops out automatically 2 Take out the cassette tape 3 Press the part marked PUSH and close the cassette holder 4 Close the cassette cover after the cassette holder has been completely retracted 2 OPEN EJECT 1 3 4 O Check that the camera recorder s power is on before sliding the OPEN EJECT lever O Close...

Страница 15: ...e handle into place 3 Tighten the coin screw to secure the handle firmly O If the coin screw is loose the camera recorder may drop off 1 Pull the viewfinder towards you Coin screw Attaching the large eye cup When you look through the viewfinder while wearing spectacles or when the area around the camera recorder is too bright you will be able to see the images in the viewfinder more clearly if you...

Страница 16: ...ulder strap 20 mm or more 20 mm or more 20 mm or more 20 mm or more We recommended that you attach the shoulder strap to help you avoid dropping the camera recorder When the handle is not attached When the handle is attached ...

Страница 17: ...ing this camera recorder is played back in another digital video unit O a tape shot in the LP mode using another digital video unit is played back in this camera recorder O a tape shot in the LP mode using this camera recorder is played back in another digital video unit that does not have an LP mode capability O slow or frame feed playback is performed or O an image search is conducted Audio dubb...

Страница 18: ...4 Shoulder strap eyelet P16 PHONES jack P47 P49 P54 P65 P79 DV connector P41 P54 P60 P62 P75 P78 CAM REMOTE jack 2 5 mm diameter Tripod mounting hole P9 Shoe P15 P56 Zoom buttons P35 P75 POWER lever P12 P14 P23 P34 P48 P57 P79 Hand strap P15 Shoulder strap eyelet P16 Cassette holder P12 P14 P83 Cassette cover P12 P14 P34 USER button P40 P51 P57 P62 P63 P74 POWER lamp P12 P14 P23 P48 Built in stere...

Страница 19: ...VIDEO IN OUT MIC AV IN OUT XLR ADAPTER White balance sensor P44 S VIDEO IN OUT connector P55 XLR ADAPTER connector P56 P58 Tally lamp P78 P83 Focusing ring P35 P41 P43 P75 Infrared light P36 P79 MIC jack P56 P58 P63 P77 AV IN OUT jack P55 P57 P59 P73 P77 P79 Lens hood P17 Lens P9 ...

Страница 20: ...ton P40 P51 P57 P62 P63 P74 USER3 button P40 P51 P57 P62 P63 P74 FOCUS button P41 WHITE BAL button P44 P45 Remote control sensor P24 MENU button P26 P28 P31 P33 P46 P47 P67 P70 MODE CHK button P66 Multi dial P26 P28 P30 P33 P42 P43 P46 P47 P49 P52 P65 P68 P69 P75 RESET button P83 Digital zoom 1 button P35 P48 P50 P51 P60 P61 SEARCH 5 button P35 P48 P50 BARS button P38 P48 P59 P61 P63 PHOTO SHOT bu...

Страница 21: ...48 P59 P61 13 FF B button 5 21 P35 P48 P53 21 During playback these buttons function in exactly the same way as the corresponding buttons on the camera recorder Shooting volume controls 14 PHOTO SHOT button 22 P38 15 START STOP button 22 P34 16 ZOOM VOL buttons 22 P49 22 During shooting these buttons function in exactly the same way as the corresponding buttons on the camera recorder 17 VAR SEARCH...

Страница 22: ...cross the terminals causing the battery to heat up and you may seriously burn yourself if you touch the battery in this state OThe battery becomes hot while it is being used or charged Similarly the camera recorder body becomes hot during use OIf recording and stopping are done unnecessarily and repeatedly the recording time will be less than the figure given in the table above OThe battery should...

Страница 23: ...to place 3 Return the viewfinder to its original position OTurn the POWER lever to the OFF position check that the POWER lamp CAMERA VCR has gone off and then remove the battery OSupport the battery with your hand so that it does not drop off Battery cont Mounting To remove the battery hold down the battery release button and slide it up Removing ...

Страница 24: ...ote control unit is set for use with VCR1 O Camera recorder Use the menus P67 P70 to set the REMOTE item on the OTHER FUNCTIONS screen P78 If different settings are used for the camera recorder and remote control unit REMOTE will light up in red on the viewfinder and LCD monitor 1 Pull out the battery holder while pressing the knob in the direction of arrow 1 2 Insert the battery with the marked s...

Страница 25: ...monitor and those displayed on a TV monitor To see how the final images will appear check them on a TV monitor Using the viewfinder Diopter adjustment lever Viewfinder Using the LCD monitor 1 Set the POWER lever to the ON position 2 Open the LCD monitor while holding down the panel locking button The LCD monitor can be opened to a maximum angle of 90 Forcing it past this point will damage the came...

Страница 26: ... B R I G H T N E S S L C D C O L O U R L E V E L L C D C O L O U R L E V E L E V F B R I G H T N E S S P U S H M E N U T O R E T U R N P U S H M E N U T O R E T U R N PB ZOOM MENU SET ITEM SHUTTER IRIS VOL JOG PUSH 6 Turn the multi dial to adjust the brightness of the viewfinder screen L C D E V F S E T L C D E V F S E T L C D B R I G H T N E S S L C D C O L O U R L E V E L E V F B R I G H T N E S...

Страница 27: ...lour or black and white can be selected for displaying the viewfinder images P78 No matter whether colour or black and white is selected the images will have the same resolution OWhen you press the USER button to which the EVF DTL function has been allocated the contours of the images in the viewfinder and LCD monitor are emphasized making it easier to bring the subject into focus P74 Note that th...

Страница 28: ...T U R N P U S H M E N U T O R E T U R N C L O C K S E T C L O C K S E T Y E A R Y E A R 2 0 0 4 2 0 0 4 M O N T H A P R D A Y 2 4 H O U R 1 3 M I N 7 P U S H M E N U T O R E T U R N P U S H M E N U T O R E T U R N PB ZOOM MENU SET ITEM SHUTTER IRIS VOL JOG PUSH C L O C K S E T C L O C K S E T Y E A R 2 0 0 4 M O N T H M O N T H A P R A P R D A Y 2 4 H O U R 1 3 M I N 7 P U S H M E N U T O R E T U ...

Страница 29: ... battery has run out Follow the steps below to charge the battery Set the date and time after the battery is fully recharged 1 Connect the AC adapter to the camera recorder P11 O Keep the LCD monitor closed 2 Leave the POWER lever at the OFF position 3 Leave the camera recorder like this for about 4 hours O The internal battery is charged during this time Time data cont Charging the internal batte...

Страница 30: ...T O R E T U R N PB ZOOM MENU SET ITEM R E C O R D I N G S E T U P R E C O R D I N G S E T U P F I R S T R E C T C R E G E N T C P R E S E T U B M O D E U S E R U B P R E S E T U B P R E S E T Y E S Y E S O N E S H O T R E C O F F R E C T I M E 0 5 S P U S H M E N U T O R E T U R N P U S H M E N U T O R E T U R N SHUTTER IRIS VOL JOG PUSH 4 Press the multi dial to move 1 to YES PB ZOOM MENU SET ITE...

Страница 31: ...G Y E S Y E S P U S H J O G P U S H J O G SHUTTER IRIS VOL JOG PUSH 6 Press the MENU button when you finish setting the user s bit SELECT STORE OFF ON P B DIGITAL VAR SEARCH PB ZOOM MENU SET ITEM MENU 9 Press the MENU button twice to exit the menu mode SELECT STORE OFF ON P B DIGITAL VAR SEARCH PB ZOOM MENU SET ITEM MENU If the RESET button counter is pressed when the user s bit has been set the u...

Страница 32: ...ime code to be used at the start of recording 3 Turn the multi dial to move to the TC PRESET item PB ZOOM MENU SET ITEM R E C O R D I N G S E T U P R E C O R D I N G S E T U P F I R S T R E C T C P R E S E T T C P R E S E T T C P R E S E T Y E S Y E S U B M O D E U S E R U B P R E S E T O N E S H O T R E C O F F R E C T I M E 0 5 S P U S H M E N U T O R E T U R N P U S H M E N U T O R E T U R N SH...

Страница 33: ...T MODE CHK ZEBRA OIS PHOTO SHOT BARS MANUAL AUTO 7 The screen shown below appears Turn the multi dial to select YES 8 The time code is entered when the multi dial is pressed PB ZOOM MENU SET ITEM T C P R E S E T T C P R E S E T P R E S E T O K N O N O P U S H J O G Y E S P U S H J O G SHUTTER IRIS VOL JOG PUSH PB ZOOM MENU SET ITEM T C P R E S E T T C P R E S E T P R E S E T O K N O P U S H J O G ...

Страница 34: ... can be performed both automatically and manually P41 O Check that the lens iris operations can be performed automatically and manually P43 Time data P28 P33 O Check that the calendar and time have been set correctly O Check that the time code and user s bit have been set correctly Preparation and inspections 1 Set the AUTO MANUAL selector switch to the AUTO position 2 Squeeze both sides of the le...

Страница 35: ...ting at a low angle you can attach the accessory handle P15 and use the START STOP button on the lens The recording operation of this button can be set using the FRONT S S INHIBIT item on the SW MODE screen P75 To check what you have shot straight away conduct a rec check P13 To find specific scenes among the ones that you have shot so far conduct an image search while the shooting pause mode is e...

Страница 36: ...arning Recording the time stamp By selecting REC as the TIME STAMP setting on the RECORDING SETUP screen using the menus P67 P70 the shooting date and time can be superimposed on the images shot and recorded on the tape P75 When REC is selected as the TIME STAMP item setting appears on the screen R O The time stamp cannot be recorded when k160 has been selected as the D ZOOM item setting on the SW...

Страница 37: ...duction function works for both the internal microphone and external microphone O If there is any bass sound some of it may be reduced along with the wind noise Movie like shooting When 4 MOVIE LIKE has been selected as the SCENE FILE item setting on the SCENE FILE screen using the menus P67 P70 you can shoot movie like images P72 When SUPER_IR or COLOUR_NS has been selected as the high sensitivit...

Страница 38: ...our bars complying with the EBU standard which come in handy for adjusting the picture quality of TV and external monitor images can be displayed When the BARS button is pressed again the original image is restored When the ID information in the ID SET item on the RECORDING SETUP screen have been set using the menus P67 P70 the ID information will be displayed on the screen along with the colour b...

Страница 39: ... can be shot using frame recording 25 frames per second P72 When playing back still pictures high quality images can be obtained O If normal moving image playback is performed the images will appear jerky When you are going to shoot scenes using frame recording we recommend that you set the shutter speed to 1 50 P42 Field recording Frame recording Changing the image size This camera recorder allow...

Страница 40: ...corder zooms in on the subject from the current zoom position for a close up shot and focuses automatically When the button is released the camera recorder returns to the original zoom position This function is useful when you are shooting with manual focusing One touch zooming Index recording The scene index signals are recorded on the tape when you press the USER button P74 to which you have all...

Страница 41: ...R FUNCTIONS screen P78 Remember the following when you record backups of images OThe menu item settings are retained in the memory even when the power is turned off This means that if the camera recorder is used with the settings for backup recording still in effect images on tapes in any unit that has been connected may be overwritten If you have performed backup recording check the menu item set...

Страница 42: ...w shutter speed You cannot switch to the slow shutter speed while you are shooting at a normal shutter speed Neither can you switch to the normal shutter speed while you are shooting at a slow shutter speed To make the switch first set the camera recorder to the shooting pause mode and then select the normal shutter speed or slow shutter speed you desire 1 Turn the multi dial in the direction for ...

Страница 43: ...al noise that is generated when TV screens are shot O With artificial lighting and especially fluorescent lights and mercury vapor lamps the luminance changes in synchronization with the power line frequency In areas where this frequency is 60 Hz mutual interference will occur between the camera recorder s vertical sync frequency approx 50 Hz and the lighting frequency 60 Hz This means that the wh...

Страница 44: ...ting the white balance Auto white balance White balance sensor 1 Set the AUTO MANUAL selector switch to MANUAL O No adjustments can be performed with this switch at AUTO 1 MANUAL AUTO 2 Press the WHITE BAL button to select the desired white balance setting mode Setting mode W LOCK Lock mode The current white balance is retained Indoor incandescent bulb mode Incandescent bulbs halogen lamps Outdoor...

Страница 45: ...darkens for a moment before the black balance is adjusted automatically When the adjustments have been completed stops blinking and changes back to a lit display O Do not move the screen away from the subject until the adjustments are completed 2 Set the AUTO MANUAL selector switch to MANUAL O No adjustments can be performed with this switch at AUTO 1 MANUAL AUTO OIf these steps are taken during s...

Страница 46: ...L A U T O M A N U A L M I C A _ I N L E V E L I N P U T d B 4 8 K P U S H M E N U T O R E T U R N P U S H M E N U T O R E T U R N PB ZOOM MENU SET ITEM SHUTTER IRIS VOL JOG PUSH CH1 30 10 20 0 CH2 6 Press the multi dial to clear the 1 display and complete the adjustment A U D I O L E V E L S E T U P A U D I O L E V E L S E T U P P A U S E M O N I T O R L E V E L M I C A _ I N M O D E M A N U A L M...

Страница 47: ...n to release the AUDIO LEVEL SETUP screen SELECT STORE OFF ON P B DIGITAL VAR SEARCH PB ZOOM MENU SET ITEM MENU 3 Press the multi dial 1 appears to the left of the level meter under the MONITOR LEVEL item A U D I O L E V E L S E T U P A U D I O L E V E L S E T U P P A U S E M O N I T O R L E V E L M O N I T O R L E V E L M I C A _ I N M O D E A U T O I N P U T d B 4 8 K P U S H M E N U T O R E T U...

Страница 48: ...de is established and 1k is displayed P51 No sound is heard at this time Press the VAR SEARCH button to establish the variable speed search mode using the remote control unit Press this to fast forward the tape while the camera recorder is in the stop mode While the tape is playing back it plays back the tape at 10 times the normal tape speed When this button is pressed while the tape is playing b...

Страница 49: ...ayback images on the TV screen 1 Connect the camera recorder to the TV set P55 2 Start playback O Press the OSD button on the remote control unit to display the information counter mode displays appearing on the LCD monitor and viewfinder on the TV screen The displays are cleared when the OSD button is pressed again OSD COUNTER RESET TITLE VOL MULTI P IN P REC A DUB ZOOM DATE TIME PHOTO SHOT START...

Страница 50: ...ames can be viewed Still picture playback STILL ADV PAUSE STILL ADV INDEX SELECT VAR SEARCH VOL PB ZOOM STOP INDEX MULTI P IN P REC A DUB PLAY C REW FF B SEARCH RESET SEARCH DIGITAL ZOOM REC COUNTER RESET MODE CHK ZEBRA OIS PHOTO SHOT BARS MANUAL AUTO Frame feed playback can be initiated by turning the multi dial during still picture playback Turn the multi dial upward to play back the tape in the...

Страница 51: ...s in the sequence of 1 5k or 1 3k in the LP mode 1k 2k 5k 10k and 20k the normal tape speed The tape is played back in the forward direction when the dial is turned upward and in the reverse direction when it is turned downward INDEX SELECT STORE OFF ON P B DIGITAL VAR SEARCH PB ZOOM MENU SET ITEM STOP INDEX SHUTTER IRIS VOL JOG PUSH Blank search If in the VCR mode you press the USER button P74 to...

Страница 52: ... R N PB ZOOM MENU SET ITEM SHUTTER IRIS VOL JOG PUSH 2 Press one of the INDEX buttons 9 or on the remote control unit STILL ADV PAUSE STILL ADV INDEX SELECT VAR VOL PB STOP INDEX P IN P REC A DUB PLAY C REW FF B PHOTO When the INDEX button is pressed the tape is cued back or forward to the image containing the photo index signal When the tape is cued it is played back for about 4 seconds and then ...

Страница 53: ...zero by pressing the RESET button counter while the counter value or counter memory is displayed O The time code and user s bit cannot be reset using the RESET button counter Counter display After shooting or playback the tape can first be returned to near the position reset to zero using the counter memory and then stopped automatically Counter memory function OSD COUNTER RESET TITLE VOL MULTI P ...

Страница 54: ...amera recorder and cause malfunctioning Always connect the DV cable to the unit with the 6 pin type DV connector first OWhen recording signals from an external unit first check that video signals are supplied OWhile signals from an external unit are being recorded do not operate the external unit or disconnect any of its cables This will stop the output which may result in the signals not being re...

Страница 55: ...n external unit to the camera recorder and inputting the video and audio signals of that unit to the camera recorder connect the camera recorder to the output connectors on the external unit OWhen connecting an external unit to the camera recorder and outputting the video and audio signals of the camera recorder to that unit connect the camera recorder to the input connectors on the external unit ...

Страница 56: ... AV IN OUT XLR ADAPTER XLR microphone AG MC100G option Stereo microphone AG MC15 option XLR microphone adapter AG MYA30G option Connecting external units cont P57 P58 External microphone connected to phono jack P57 P58 External microphone connected to XLR connector ...

Страница 57: ...ne is recorded A_IN The sound of the audio component connected to the AV IN OUT jack is recorded 32K 12bit The sound is recorded using the 12 bit 32kHz 4 channel system Use this mode when you want to keep the sound that was heard while you were shooting even after audio dubbing has been performed 48K 16bit The sound is recorded using the 16 bit 48kHz system 2 channels with a good sound quality Whe...

Страница 58: ...pe then stops automatically at the position on the tape where the counter memory display was reset Adjusting the audio input level Use the procedure described for Adjusting the mic input audio level P46 to adjust the audio level of mic input and line input from the audio component connected to the AV IN OUT jack Adjusting the audio output level Use the procedure described for Adjusting the headpho...

Страница 59: ...utton O If you do this during still picture playback P50 the camera recorder will be set to the rec pause status To resume recording from the rec pause status press the button COUNTER RESET TITLE STILL ADV PAUSE STILL ADV INDEX VOL STOP INDEX MULTI P IN P REC A DUB PLAY C REW FF B ZOOM SEARCH RESET SEARCH DIGITAL ZOOM REC COUNTER RESET MODE CHK ZEBRA OIS PHOTO SHOT BARS MANUAL AUTO STILL ADV PAUSE...

Страница 60: ...MANUAL AUTO STILL ADV PAUSE STILL ADV INDEX SELECT VAR SEARCH VOL PB ZOOM STOP INDEX MULTI P IN P REC A DUB PLAY C REW FF B SEARCH RESET SEARCH DIGITAL ZOOM REC COUNTER RESET MODE CHK ZEBRA OIS PHOTO SHOT BARS MANUAL AUTO PHONES DV CAM REMOTE S VIDEO IN OUT MIC AV IN OUT XLR ADAPTER Analogue digital AD conversion You can use the camera recorder as an analogue digital AD converter by using the menu...

Страница 61: ... PLAY C REW FF B SEARCH RESET SEARCH DIGITAL ZOOM REC COUNTER RESET MODE CHK ZEBRA OIS PHOTO SHOT BARS MANUAL AUTO 3 To start recording in the recorder press the REC button while holding down the REC sub button If you are using the remote control unit press the PLAY button while holding down the REC button O If you do this during still picture playback P50 the camera recorder will be set to the re...

Страница 62: ...kup unit cannot be controlled DV The backup unit has not been connected DV The backup unit is connected but it is not in the recording or recording standby mode 3 Recording time mode SP SP standard play mode LP LP long play mode 4 Squeeze information This display appears when recording with SQUEEZE selected as the ASPECT CONV item setting on the CAMERA SETUP screen or when images recorded in the s...

Страница 63: ...culated or during slow playback 15 Remaining battery charge As the remaining battery charge drops the display changes as follows 5 5 5 5 When the battery has completely discharged blinks When the AC adapter is being used a display other than may appear this is not a sign of malfunctioning R 16 Calendar The current date and time are displayed here When the BARS button is pressed to display colour b...

Страница 64: ...andby Recording standby for self portraits Playback pause STNDBY Standby cylinder heads stopped A DUB Audio dubbing standby A DUB 1 1 Audio dubbing 1 1 Playback 5 5 6 6 Fast forward cue rewind review 1 1 2 2 Slow playback slow playback in reverse direction AELOCK CHK Rec check 9 9 Cue up cue up in reverse direction 1 1 2 2 Frame feed playback frame feed playback in reverse direction BLANK Blank se...

Страница 65: ...IBLE TAPE This tape cannot be used because it conforms to a different standard data saving tape etc EXTERNAL DV DISCONNECT This message appears when shooting with EXT selected as the DV CONTROL item setting on the OTHER FUNCTIONS screen and with no external unit connected to the DV connector P41 P54 P78 FOCUS LOCK This message appears when a problem has occurred during focusing ZOOM LOCK This mess...

Страница 66: ...ing the DISPLAY items D 1 6 X Z 0 0 1 2 5 X M F 1 1 0 0 F 5 6 1 8 dB R N O V 3 0 2 0 0 3 2 3 5 9 5 9 M 2 2 2 min The amount of information to be displayed can be set by using the menus P67 P70 to select the DISPLAY item setting on the DISPLAY SETUP screen P77 When PARTIAL is selected as the DISPLAY item setting D 1 6 X Z 0 0 1 2 5 X S P MN L S Q U M F 1 1 0 0 F 5 6 1 8 dB S N S WINDCUT R N O V 3 0...

Страница 67: ...ARCH VOL PB ZOOM MENU SET ITEM STOP INDEX MULTI P IN P REC A DUB PLAY C REW FF B ZOOM DATE TIME PHOTO SHOT START STOP CAMERA mode VCR mode O When the remote control unit is used C A M E R A M E N U C A M E R A M E N U 1 S C E N E F I L E 1 S C E N E F I L E 2 C A M E R S E T U P 3 S W M O D E 4 R E C O R D I N G S E T U P 5 D I S P L A Y S E T U P 6 O T H E R F U N C T I O N S P U S H M E N U T O ...

Страница 68: ...TORE OFF ON P B DIGITAL VAR SEARCH PB ZOOM MENU SET ITEM SHUTTER IRIS VOL JOG PUSH 3 Press the multi dial at the position of the item to be displayed The sub items are now displayed SELECT STORE OFF ON P B DIGITAL VAR SEARCH PB ZOOM MENU SET ITEM SHUTTER IRIS VOL JOG PUSH Example C A M E R A M E N U C A M E R A M E N U 1 S C E N E F I L E 2 C A M E R S E T U P 3 S W M O D E 4 R E C O R D I N G S E...

Страница 69: ...n and move 1 to the position of the numerical value which is to be changed O Turn the multi dial and change the setting SELECT STORE OFF ON P B DIGITAL VAR SEARCH PB ZOOM MENU SET ITEM SHUTTER IRIS VOL JOG PUSH O Press the multi dial to enter the setting SELECT STORE OFF ON P B DIGITAL VAR SEARCH PB ZOOM MENU SET ITEM SHUTTER IRIS VOL JOG PUSH SELECT STORE OFF ON P B DIGITAL VAR SEARCH PB ZOOM MEN...

Страница 70: ...C E N E F I L E 2 C A M E R S E T U P 3 S W M O D E 4 R E C O R D I N G S E T U P 5 D I S P L A Y S E T U P 6 O T H E R F U N C T I O N S 6 O T H E R F U N C T I O N S P U S H M E N U T O E X I T P U S H M E N U T O E X I T Initializing the menu settings O When INITIAL is selected as the USER FILE item setting on the OTHER FUNCTIONS screen you can return the menu settings in the currently used use...

Страница 71: ... CAMERA SETUP SCENE FILE SETTING NAME EDIT SAVE INIT RECORDING SETUP REC SPEED AUDIO REC WIND CUT ID SET TIME STAMP TCG FIRST REC TC TC PRESET UB MODE UB PRESET ONE SHOT REC REC TIME OTHER FUNCTIONS REMOTE DV CONTROL DV CMD SEL REC LAMP BEEP SOUND CLOCK SET TIME SHIFT TAPE PROTECT IR LED USER FILE HOUR METER SYNCRO SCAN ASPECT CONV SW MODE USER1 USER2 USER3 FOCUS RING IRIS DIAL ZOOM MODE FRONT S S...

Страница 72: ... the dark parts of the images may become blackened out When it is set in the direction the dark parts of the images such as the shadows become brighter AE SHIFT 4 0 4 Use this to adjust the auto iris setting Set it in the direction for a darker setting Set it the direction for a brighter setting SKIN TONE DTL OFF ON When ON is selected soft skin tones are reproduced when people are shot making the...

Страница 73: ... CH3 tracks CH2 signals CH2 CH4 tracks Note When sound is recorded in the 48K 16 bit audio mode CH3 and CH4 do not exist so the following always stands CH1 signals CH1 track CH2 signals CH2 track AUDIO OUT VCR Use this to set the audio signals to be output from the AV IN OUT jack when the tape is played back CH1 CH2 CH1 output CH1 signals CH2 output CH2 signals CH1 CH1 output CH1 signals CH2 outpu...

Страница 74: ...de P36 SW MODE screen EVF DTL Select this to emphasize the outlines of the images on the screen when the button is pressed so that the subject becomes easier to bring into focus EVF DTL ON appears for about 2 seconds in the centre of the screen after the button has been pressed However the regular images are what is recorded not the ones with their outlines emphasized The original images are resto...

Страница 75: ... is displayed when the colour bar mode is established O Characters which can be set space A to Z 0 to 9 TIME STAMP CAMERA Set this to REC to record the date and time that were selected using the DATE TIME setting item P77 on the DISPLAY SETUP screen as an image on the tape NO REC REC Menu configuration cont FOCUS RING CAMERA Use this to select the function to be allocated to the focus ring ZOOM Zo...

Страница 76: ...be recorded when recording the signals of the unit connected to the DV connector OFF The user s bit selected by the UB MODE item is recorded ON The user s bit of the signals input to the DV connector is recorded O When ON has been selected as this item s setting it takes precedence over the UB MODE item setting O If the signals do not contain the user s bit information the user s bit is not record...

Страница 77: ...backlight of the LCD monitor When HI is selected the backlight is made brighter than usual HI NORMAL DISPLAY SETUP screen CAMERA DATA VCR With the ON setting the camera settings vibration reduction F number gain value and white balance information at the time of shooting are displayed when the tape is played back OFF ON Note When a tape on which the unit s camera settings has been recorded is play...

Страница 78: ...se with VCR2 are accepted OFF No operations performed using a remote control unit are accepted DV CONTROL CAMERA Use this to set the control method to be used when a backup unit is connected to the DV connector and backup recording is to be performed OFF The backup unit is not controlled EXT The backup unit is controlled using the camera recorder s START STOP button The images shot using the camer...

Страница 79: ...0 beeps sound in succession O when a cassette tape has not been inserted O when the cassette tape is set to the recording inhibited status O when condensation has formed inside the camera recorder O when a problem has occurred in the camera recorder CLOCK SET CAMERA VCR Use this to set the camera recorder s internal calendar TIME SHIFT CAMERA VCR The time set using this item is added to the clock ...

Страница 80: ...ARGE lamp goes off P22 O Are you using the battery in a cold place The battery is affected by the ambient temperature Its operating time is reduced in low temperature locations O Has the battery reached the end of its service life The battery has a fixed service life which differs depending on how the battery is used If the battery operates only for a short period even when it is charged adequatel...

Страница 81: ...he tracks on the tape in this mode are narrower than the head width Editing There s something wrong with the time code display O If a tape is played in the reverse slow mode the time code display may not register a regular count but this is not a sign of malfunctioning The remaining tape display differs from the actual amount of tape remaining O The remaining tape is not displayed accurately if yo...

Страница 82: ...can remove the cassette even if the POWER lever is at the OFF position I can remove the cassette but I can t perform any other operations O Has condensation formed If it forms the only operation you can perform is to remove the cassette Wait until the condensation has dried out P83 O If the cassette cover is closed immediately after sliding the EJECT switch to open the cassette cover you may no lo...

Страница 83: ...oving the cassette 2 Wait two to three hours with the cassette holder open The time you need to wait will differ depending on the amount of condensation and the ambient temperature 3 Turn on the power two to three hours later and check whether or not the condensation display has gone off To make doubly sure wait another hour or so after the condensation display has gone off before using the camera...

Страница 84: ...the VCR lamp has lit 3 Press the 1 button then ten seconds later press the button Do not rewind the tape at this time 4 Remove the cleaning tape proceed with recording and playback as a trial on another tape and check the resulting images 5 If the images are not clear repeat steps 1 to 4 Do not use the cleaning tape more than 4 times in one go O Do not rewind the cleaning tape at any interim point...

Страница 85: ...sec Recording time when AY DVM60 is used SP mode 60 minutes LP mode 90 minutes Tapes used 6 35 mm wide metal tapes FF REW time Approx 140 sec when AY DVM60 is used Pickup devices Interline transfer 1 4 inch CCD image senser k3 Number of pixels Total number of pixels 470 000 Number of effective pixels 440 000 pixel offset system Lens Leica DICOMAR optical image stabilizer lens motorized 16k zoom F1...

Страница 86: ... impedance XLR ADAPTER Dedicated mini XLR connector DC input INPUT 7 9 V DC 7 9 V PHONES Stereo 3 5 mm diameter DV 4 pins digital input output compliant with IEEE 1394 standard CAM REMOTE Mini jack 2 5 mm diameter OPTIONAL UNITS Wide conversion lens AG LW4307P Stereo microphone AG MC15P XLR microphone AG MC100G XLR microphone adapter AG MYA30G Infrared light AG YRL30G Hard carrying case AG HT30G S...

Страница 87: ...ENGLISH Memo ...

Страница 88: ...Matsushita Electric Industrial Co Ltd Web Site http www panasonic co jp global F0204W1034 Printed in Japan E ...

Отзывы: