background image

Settings

PICTURE menu

34 - 

E

NGLISH

Q

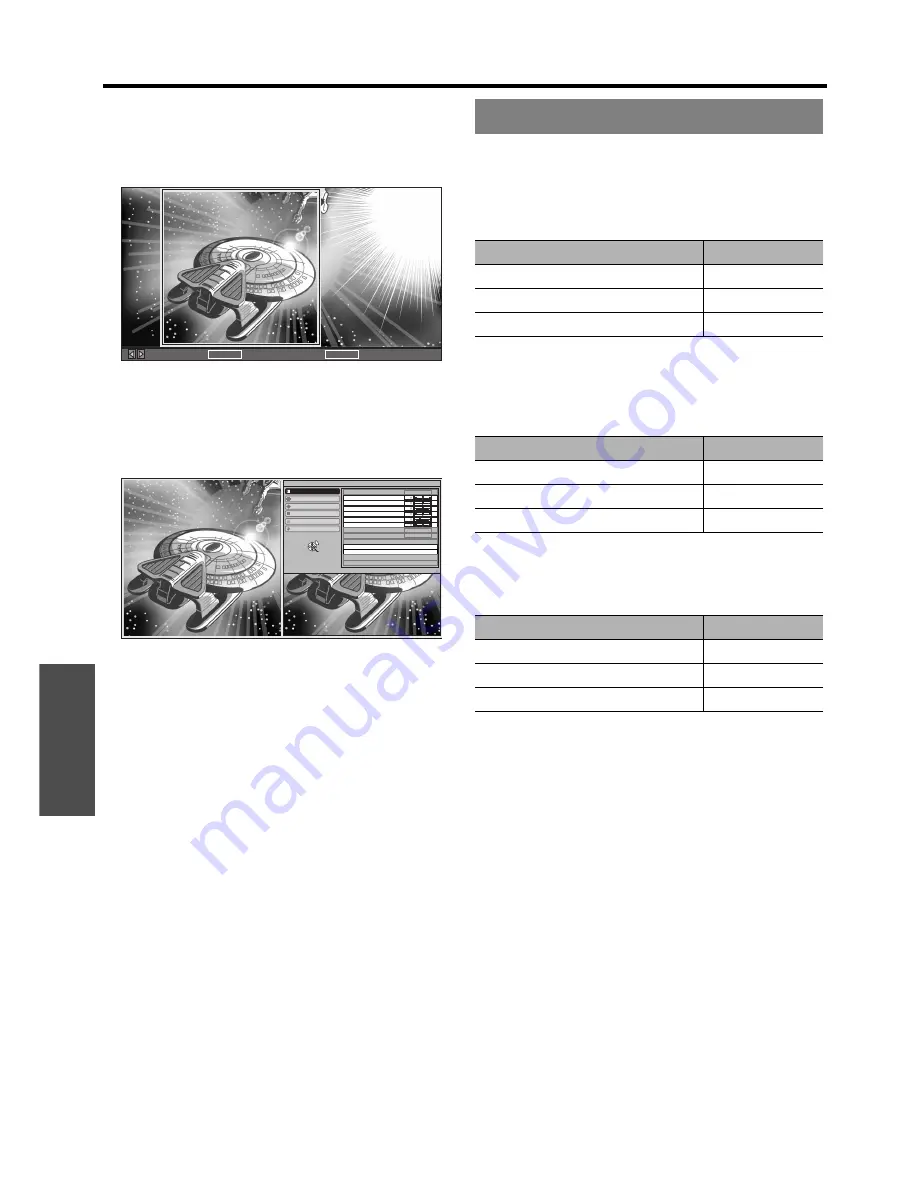
Adjusting the image in a split window

1. Select 

AREA SELECT

 and press the 

ENTER


button.


The image will be frozen and the area cursor will be 
displayed.

2. Press 

I


H

 to move the area cursor to select the 

area of interest and press the 

ENTER

 button.


The selected frozen image will be displayed in a split 
window.

3. Press the 

MENU

 to display the 

PICTURE

 menu on 

the right.

4. Adjust the required 

PICTURE

 menu items.


Only the highlighted menu items are adjustable.


Sub-menu items vary according to the selected input 
signal. See “Main menu and sub-menu” on page 30.

5. Press the 

MENU

/

RETURN

 button several times to 

escape from the menu.

6. Press the 

ENTER

 button.


The confirmation screen will be displayed. Select 

OK


to finish the adjustment.

7. Press the 

ENTER

 button.


Press the 

ENTER

 button again to return to the 

AREA 

SELECT

.


Press the 

RETURN

 button to escape from the 

SPLIT 

ADJUST

 mode.

You can perform more detailed image adjustment 
manually.

J

GAMMA

You can adjust linear intensity at 3 levels. Press 

I


H

 to increase/decrease 1 point.


Setting range: -8 to +8

J

CONTRAST

You can adjust the amount of contrast of individual 
RGB colors. Press 

I


H

 to increase/decrease 

1 point.


Setting range: -32 to +32

J

BRIGHTNESS

You can adjust the brightness of individual RGB 
colors. Press 

I


H

 to increase/decrease 1 point.


Setting range: -16 to +16

J

NR (Noise Reduction)

You can adjust the automatic noise reduction 
system level. Press 

I


H

 to change the level.


Setting range: 0 to +3

MOVE AREA

GO TO SPLIT ADJUST

ENTER

GO TO FREEZE SCREEN

RETURN

ENTER

PICTURE MODE

CONTRAST
BRIGHTNESS
COLOR
TINT
SHARPNESS
COLOR TEMPERATURE

DYNAMIC IRIS
WAVEFORM MONITOR

ADVANCED MENU

SPLIT ADJUST

MEMORY SAVE

MEMORY LOAD
MEMORY EDIT

PICTURE

POSITION

LANGUAGE

FUNCTION BUTTON

LENS CONTROL

OPTION

SELECT

NORMAL

ON

OFF

RETURN

ADVANCED MENU

Levels

Default setting

GAMMA HIGH

0

GAMMA MID

0

GAMMA LOW

0

RGB

Default setting

CONTRAST R

0

CONTRAST G

0

CONTRAST B

0

RGB

Default setting

BRIGHTNESS R

0

BRIGHTNESS G

0

BRIGHTNESS B

0

Содержание AE3000U - LCD Projector - HD 1080p

Страница 1: ...ENGLISH Operating Instructions LCD Projector Model No PT AE3000U Before operating this product please read the instructions carefully and save this manual for future use TQBJ0277 1 ...

Страница 2: ...or power supplies up to 125 V 7 A If you need to use higher voltages or currents than this you will need to obtain a separate 250 V power cord If you use the accessory cord in such situations fire may result The lightning flash with arrowhead symbol within an equilateral triangle is intended to alert the user to the presence of uninsulated dangerous voltage within the product s enclosure that may ...

Страница 3: ...locate the receiving antenna Increase the separation between the equipment and receiver Connect the equipment into an outlet on a circuit different from that to which the receiver is connected Consult the dealer or an experienced radio TV technician for help FCC CAUTION To assure continued compliance use only shielded interface cables when connecting to computers or peripheral devices Any unauthor...

Страница 4: ...cord 19 Power indicator 20 Switching on the projector 21 Switching off the projector 21 Projecting an image 22 Selecting the input signal 22 Positioning the image 22 Remote control operation 23 Operating range 23 Managing the lens control settings 23 Switching the picture mode 23 Adjusting the image 23 Loading a saved setting 24 Switching the aspect ratio 24 Adjusting the signal condition with a w...

Страница 5: ... AUTO SETUP 39 LENS CONTROL 40 ZOOM FOCUS 40 LENS MEMORY LOAD 40 LENS MEMORY SAVE 40 LENS MEMORY EDIT 41 H AREA POSITION 41 V AREA POSITION 41 FUNCTION BUTTON 42 BUTTON 42 OPTION menu 43 INPUT GUIDE 43 OSD DESIGN 43 OSD POSITION 43 BACK COLOR 43 STARTUP LOGO 43 AUTO SEARCH 43 HDMI SIGNAL LEVEL 43 FRAME RESPONSE 43 INSTALLATION 44 SLEEP 44 HIGH ALTITUDE MODE 44 LAMP POWER 44 LAMP RUNTIME 44 Mainten...

Страница 6: ...e Pull the power plug out from the wall outlet and wipe it with a dry cloth If not using the projector for an extended period of time pull the power plug out from the wall outlet Do not handle the power plug with wet hands Failure to observe this may result in electric shocks Insert the power plug securely into the wall outlet If the plug is not inserted correctly electric shocks or overheating co...

Страница 7: ... it to cool for at least one hour before handling it The lamp cover gets very hot and touching it can cause burns Before replacing the lamp be sure to disconnect the power plug from the wall outlet Electric shocks or explosions can result if this is not done Do not allow infants or pets to touch the remote control unit Keep the remote control unit out of the reach of infants and pets after using i...

Страница 8: ...jector could break and injury may result Be especially careful not to let young children stand or sit on the projector Disconnect the power plug from the wall outlet as a safety precaution before carrying out any cleaning Electric shocks can result if this is not done If the lamp has broken ventilate the room immediately Do not touch or bring your face close to the broken pieces Failure to observe...

Страница 9: ... with your bare hands If the surface of the lens becomes dirty from fingerprints or anything else this will be magnified and projected onto the screen Moreover when not using the projector attach the lens cover Liquid crystal panel Do not project the same image for long periods of time as this may remain as an afterimage on the liquid crystal panel Display the white screen test pattern for more th...

Страница 10: ...over or foam cartons must be treated properly Contact to an Authorized Service Center for lost accessories Accessories Remote control for PT AE3000U x1 N2QAYB000316 Safety cable TTRA0141 Attachment screw x1 Safety cable x1 Lens cover x1 TXFKK01VKF5 Attached to the projector by default Power cord x1 K2CG3FH00017 3 m 9 10 AA batteries for remote control x2 Power cord secure lock x1 TTRA0184 ...

Страница 11: ...te control signal page 23 Button backlight When any button is pressed the button backlight is lit Without any operation it gets darker after 5 seconds and goes off after next 5 seconds Display the PICTURE menu or ADVANCED MENU page 23 Switch to cycle through the PICTURE MODE page 23 Switch to cycle through the aspect ratio page 24 Display the main menu or return to the previous menu page 29 Naviga...

Страница 12: ...ctivate the menu item with the ENTER button page 29 Power While the MAIN POWER is on switch between standby mode and projection mode page 21 MENU Display the main menu Return to the previous menu page 29 Air exhaust port Heated air comes out of this opening Projection lens Lens shift dial Vertical page 16 Lens shift dial Horizontal page 16 Lens cover Protects the projection lens from dust or dirt ...

Страница 13: ...em Top cover Hold the top cover at the back corner and slightly push up to open page 47 Air intake port AC IN Connect the power cord to supply electronic power to the projector page 19 Safety cable attachment point Attach the safety cable when mounted on the ceiling page 56 COMPUTER IN Connect an RGB signal cable from your PC S VIDEO IN Connect a S VIDEO signal cable VIDEO IN Connect an RCA compos...

Страница 14: ...ance LT 1 02 m 40 1 2 m 3 11 2 3 m 7 6 1 3 m 4 3 1 27 m 50 1 5 m 4 11 2 9 m 9 6 1 6 m 5 2 2 3 m 7 6 1 52 m 60 1 8 m 5 10 3 5 m 11 5 1 9 m 6 2 2 8 m 9 2 1 78 m 70 2 1 m 6 10 4 1 m 13 5 2 2 m 7 2 3 3 m 10 9 2 03 m 80 2 4 m 7 10 4 7 m 15 5 2 6 m 8 6 3 8 m 12 5 2 29 m 90 2 7 m 8 10 5 3 m 17 4 2 9 m 9 6 4 2 m 13 9 2 54 m 100 3 0 m 9 10 5 9 m 19 4 3 2 m 10 5 4 7 m 15 5 3 05 m 120 3 6 m 11 9 7 2 m 23 7 3...

Страница 15: ...ONT DESK INSTALLATION REAR DESK J Mounting on the ceiling and projecting from front J Mounting on the ceiling and projecting from rear INSTALLATION FRONT CEILING INSTALLATION REAR CEILING NOTE A translucent screen is required for rear projection When mounting the projector on the ceiling the optional ceiling mount bracket ET PKE2000 ET PKE1000S is required See Ceiling mount bracket safeguards on p...

Страница 16: ...sition with the Lens shift dial Horizontal Q Vertical shift You can place the projector where the projector lens is up to 100 vertically off center from the screen and then adjust the image position with the Lens shift dial Vertical Lens shift and positioning Turning the dial clockwise Image moves to the right Up to about 40 of the projection Turning the dial counterclockwise Image moves to the le...

Страница 17: ... shift dial Vertical is at the vertical limit of the shift range you cannot turn the dial to the horizontal limit likewise when the Lens shift dial Horizontal is at the horizontal limit of the shift range you cannot turn the dial to the vertical limit When the projector is tilted and adjusting KEYSTONE the center of the screen and the lens need to be realigned Do not force the lens shift dials to ...

Страница 18: ...jector Connecting example COMPONENT IN S VIDEO IN VIDEO IN Connecting example HDMI IN COMPUTER IN NOTE Make sure the HDMI cable is adapted to your HDMI device for proper performance A compatible cable is required for an HDMI 1 080p signal It is possible to connect with DVI devices via a HDMI DVI conversion adapter but some equipment may not project the image properly or other problems could be enc...

Страница 19: ... 1 Unplug the power cord from the wall outlet 2 Depress the latch and slide the cover off 3 Slide the power cord secure lock up along the side guide rail and remove 4 Hold the plug and unplug the power cord from the AC IN terminal on the back of the projector Power cord Rail guide Latch Latch Rail guide NOTE Do not use other than the provided power cord Ensure all the input devices are connected a...

Страница 20: ...n and the projector is in standby mode Green Flashing The power button is switched on and the projector is getting ready to project Lit Projecting Orange Lit The power button is switched off and the projector is cooling the lamp Flashing The power button is switched on again when cooling the lamp and recovering to projection mode Recovery may take a while NOTE See TEMP indicator on page 45 While t...

Страница 21: ...IN POWER button on the left side of the projector 4 Attach the lens cover Switching on the projector 1 1 3 3 2 2 Power indicator NOTE When the internal cooling fan is operating some operational sound may be heard The loudness of the operational sound depends on the external temperature You can reduce the operational sound by setting the LAMP POWER in OPTION menu to the ECO MODE See LAMP POWER on p...

Страница 22: ... Screw down the front leg adjusters and adjust the angle vertically See Front leg adjusters and throwing angle on page 15 4 Adjust the focus and the projected image size Press of the FOCUS and ZOOM buttons to adjust Press the LENS button to adjust the focus and zoom by the remote control See LENS CONTROL on page 40 Selecting the input signal NOTE AUTO SEARCH is ON as default and the signal from th...

Страница 23: ...ed setting is selected See PICTURE MODE on page 32 You can display the PICTURE and ADVANCED MENU menu items in called up style by pressing the PICTURE ADJUSTMENT button Press the button to switch between PICTURE and ADVANCED MENU menu Press F G to select the required menu item and I H to adjust Q PICTURE menu items PICTURE MODE CONTRAST BRIGHTNESS COLOR TINT SHARPNESS COLOR TEMPERATURE and DYNAMIC...

Страница 24: ...be cropped Select an aspect ratio which preserves the intention of the image creator The order of aspect type is defined not only by the input method but also by the input signals See List of compatible signals on page 50 If you project a copyrighted image enlarged or distorted by using ASPECT function in commercial use in a public place such as a restaurant or hotel you might infringe on the copy...

Страница 25: ...S B by pressing F G When PICTURE menu is displayed press the button again to switch to the ADVANCED MENU 3 Adjust by pressing I H Adjust the bottom line of the waveform to 0 0 or 7 5 IRE Setting range 16 to 16 4 Press F G to display the CONTRAST R CONTRAST G CONTRAST B 5 Adjust by pressing I H Adjust the up line of the waveform to 100 100 IRE Setting range 32 to 32 100 50 0 100 50 0 100 50 0 ENTER...

Страница 26: ...nds and the result is stored in LOG You can store up to 8 logs under LOG for each PICTURE MODE setting 5 Press MENU or RETURN to return to the previous menu Repeat the steps above to store more adjustment Q Managing stored logs You can edit or delete the stored logs of the selected PICTURE MODE 1 Select LOG and press ENTER The LOG menu is displayed 2 Select the required log from 1 8 or ALL DELETE ...

Страница 27: ...enu 1 Select PROFILE NAME CHANGE and press the ENTER button 2 Select the required profile and press the ENTER button 3 Rename the profile Use F G I H to specify the location of the required character to enter and press the ENTER button 4 Select OK and press the ENTER button to set the entered text as a name Q Loading saved profiles When profiles are loaded under the PICTURE MODE setting you can ke...

Страница 28: ... Resetting to the factory default settings NOTE Some menu items are not available to reset by pressing the DEFAULT button Adjust each menu item manually Capturing an image Switching the input signal COMPONENT 1 IN COMPONENT 2 IN COMPUTER IN S VIDEO IN HDMI 3 IN VIDEO IN HDMI 2 IN HDMI 1 IN COMPONENT 1 IN COMPONENT YPBPR signals from the equipment connected to COMPONENT IN 1 COMPONENT IN 2 COMPONEN...

Страница 29: ...eturn to the menu mode If there is a lower level the next level will be displayed 3 Press I H to adjust or set the selected item For items using a bar scale the current settings are displayed on the left of the bar scale You can cycle through the options of an item by pressing I H 4 Press the MENU or RETURN button to return to the previous menu Navigating through the MENU ENTER PICTURE MODE CONTRA...

Страница 30: ...SCAN Y SINGLE LINE SCAN R SINGLE LINE SCAN G SINGLE LINE SCAN B MONITOR POSITION AUTO ADJUST SPLIT ADJUST page 33 AREA SELECT SPLIT ADJUST MODE NORMAL REVERSE ADVANCED MENU page 34 GAMMA GAMMA HIGH Default 0 GAMMA MID Default 0 GAMMA LOW Default 0 CONTRAST CONTRAST R Default 0 CONTRAST G Default 0 CONTRAST B Default 0 BRIGHTNESS BRIGHTNESS R Default 0 BRIGHTNESS G Default 0 BRIGHTNESS B Default 0 ...

Страница 31: ...RAST B NORMAL DYNAMIC COLOR1 COLOR2 CINEMA1 CINEMA2 CINEMA3 SPLIT ADJUST WAVEFORM AUTO ADJUST LENS MEMORY LOAD BRIGHTNESS BRIGHTNESS R BRIGHTNESS G BRIGHTNESS B INPUT GUIDE page 43 DETAILED SIMPLE OFF OSD DESIGN page 43 TYPE1 TYPE2 TYPE3 OSD POSITION page 43 UPPER LEFT UPPER CENTER UPPER RIGHT CENTER LOWER LEFT LOWER CENTER LOWER RIGHT BACK COLOR page 43 BLUE BLACK STARTUP LOGO page 43 ON OFF AUTO...

Страница 32: ... 60p 1 125 1 080 50p You can adjust the sharpness of the projected image Setting range will vary according to the selected input signal PICTURE MODE NORMAL CINEMA3 DYNAMIC CINEMA2 COLOR1 COLOR2 CINEMA1 NORMAL Setting for a general image such as sports programme or TV games DYNAMIC Bright and sharp setting COLOR1 Setting for HDTV standard in ITU R BT 709 and color temperature 6 500 K at the default...

Страница 33: ...tion screen will be displayed 4 Press I H and select OK 5 Press the ENTER button You can perform image adjustment for some PICTURE menu items while displaying a certain area of the frozen image in a split window Q SPLIT ADJUST MODE Select the required split style from NORMAL and REVERSE in the SPLIT ADJUST MODE menu NORMAL REVERSE COLOR TEMPERATURE DYNAMIC IRIS WAVEFORM MONITOR NOTE When the WAVEF...

Страница 34: ...ST mode You can perform more detailed image adjustment manually J GAMMA You can adjust linear intensity at 3 levels Press I H to increase decrease 1 point Setting range 8 to 8 J CONTRAST You can adjust the amount of contrast of individual RGB colors Press I H to increase decrease 1 point Setting range 32 to 32 J BRIGHTNESS You can adjust the brightness of individual RGB colors Press I H to increas...

Страница 35: ...witch the automatic detail clarity system on off ON Active OFF Deactive J CINEMA REALITY You can switch the automatic image synchroniser on off for 24 frames a second images such as movies Press I H to select the required setting ON Active OFF Deactive J TV SYSTEM When the video signal is changed the setting switches automatically You can switch the setting manually to match the video data Press I...

Страница 36: ...n 2 Select the required memory setting and press the ENTER button If you select ALL DELETE you can delete all of the saved memory settings 3 Select OK in the confirmation screen and press the ENTER button Q Changing the name of the memory setting 1 Select MEMORY NAME CHANGE and press the ENTER button 2 Select the required memory setting and press the ENTER button 3 Rename the memory setting Use F ...

Страница 37: ...mote control Control panel See Navigating through the MENU on page 29 See Main menu and sub menu on page 30 Move right Move left Move up Move down CLOCK PHASE NOTE If the projecting signal s dot clock frequency is higher than 150 MHz the adjustment may not make a difference Available signals from COMPONENT IN 1 125 1 080 60i 1 125 1 080 50i 1 125 1 080 60p 1 125 1 080 50p 1 125 1 080 24p 750 720 6...

Страница 38: ...Original size 4 3 Squeeze signal 16 9 Letter box 14 9 Letter Box 2 35 1 Cinescope 4 3 Projects at 4 3 16 9 Adjusts horizontally to 16 9 JUST Adjusts horizontally to fit 16 9 Closer to edge more enlarged Not available with COMPUTER signals ZOOM ZOOM1 Adjusts to 16 9 size while preserving original ratio Escape the menu mode and press FG to adjust vertically ZOOM2 Adjusts to cinescope size not includ...

Страница 39: ...if the projection screen has an angled surface you can correct the keystone vertically Setting range 32 to 32 You can adjust V POSITION H POSITION DOT CLOCK and CLOCK PHASE automatically when connecting via COMPUTER IN Press ENTER to adjust these at the same time WSS OVER SCAN Enlarge Shrink KEYSTONE Image Operation NOTE You can correct the distortion 30 degrees from the vertical plane For a bette...

Страница 40: ...ters Move the cursor to ALL DELETE and press the ENTER button to delete all the entered text line Press the DEFAULT button to delete the last entered character or indicted with the cursor in the text box To insert a character in the entered text line move the cursor to the text box to select the required place and press G then perform step 5 7 Select OK and press the ENTER button to set the entere...

Страница 41: ...ne You can enter up to 16 characters Move the cursor to ALL DELETE and press the ENTER button to delete all the entered text line Press the DEFAULT button to delete the last entered character or indicted with the cursor in the text box To insert a character in the entered text line move the cursor to the text box to select the required place and press G then perform step 2 5 Select OK and press th...

Страница 42: ...tions BUTTON Remote control Control panel See Navigating through the MENU on page 29 See Main menu and sub menu on page 30 Functions Refer HDMI 1 IN 1 1 The underlined item is factory default setting page 28 HDMI 2 IN HDMI 3 IN COMPUTER IN COMPONENT 1 IN COMPONENT 2 IN S VIDEO IN VIDEO IN BLANK AUTO SETUP page 39 CONTRAST page 32 CONTRAST R page 34 CONTRAST G CONTRAST B NORMAL page 32 DYNAMIC COLO...

Страница 43: ...ess I H to cycle through the options ON Active OFF Deactive When an HDMI IN is selected you can switch the HDMI signal NORMAL or EXPAND to display the image Press I H to select an option NORMAL For general HDMI equipment EXPAND For HDMI equipment with expanded signals You can minimise the time delay of image displayed for the progressive signals NORMAL Prioritise the image quality FAST Prioritise ...

Страница 44: ...lamp to save on electricity prolong the lamp life and reduce the noise You can check how long the lamp has been used INSTALLATION FRONT DESK Setting on a desk floor and projecting from front FRONT CEILING Mounting on the ceiling and projecting from front REAR DESK Setting on a desk floor and projecting from rear REAR CEILING Mounting on the ceiling and projecting from rear SLEEP OFF 240MIN 60MIN 2...

Страница 45: ...ugh Lamp circuit failure abnormal function The lamp unit is damaged Remedy See Replacing the lamp unit on page 47 Let the lamp unit cool down and turn on the MAIN POWER after 90 seconds Contact an Authorized Service Center See Replacing the lamp unit on page 47 Indicator Illuminating red while projecting and the alert will be displayed Flashing red and the power button is turned off Problem The te...

Страница 46: ...remains on the surface of the lens It will be enlarged and projected onto a screen J Cleaning the air filter If the air filter is excessively dirty the internal temperature of the projector increases and may cause malfunction Clean the air filter regularly every 100 hours of usage 1 Place a finger at the bottom of the air filter 2 Slightly push up and pull out the air filter to remove 3 Vacuum dir...

Страница 47: ...op cover up and press the sides of each hinge parts to remove When the projector is mounted on the ceiling removing the hinge parts is not required 4 Remove the top cover aside Replacing the lamp unit NOTE Prior to replacing the lamp unit allow it to cool down to prevent the risk of burns damage and other hazards Do not attempt replacement with an unauthorized lamp unit Indication On screen LAMP i...

Страница 48: ...ssed 2 000 hours when LAMP POWER has been set to NORMAL the projector will switch to standby mode after approximately 10 minutes of operation The resetting procedure should thus be completed within 10 minutes 1 Connect the power cord to the projector and a wall outlet and switch the MAIN POWER on 2 Switch the power button 3 Press the MENU button to display the menu 4 Press F G to select OPTION and...

Страница 49: ...The projector may be tilted too much 22 14 46 16 The color is pale or grayish COLOR or TINT adjustment may be incorrect The equipment which is connected to the projector may not be adjusted correctly 32 The Remote control does not operate The batteries may be weak The batteries may not have been inserted correctly The remote control signal receptor on the projector may be obstructed The remote con...

Страница 50: ... AA COMPONENT HDMI COMPUTER 1 125 1 080 50p 1 125 50p 1 920 x 1 080 56 3 50 0 148 5 AA 750 720 60p 750 60p 1 280 x 720 45 0 60 0 74 3 AA COMPONENT HDMI 750 720 50p 750 50p 1 280 x 720 37 5 50 0 74 3 AA VGA480 VGA60 640 x 480 31 5 59 9 25 2 A COMPUTER VGA75 640 x 480 37 5 75 0 31 5 A VGA85 640 x 480 43 3 85 0 36 0 A VGA138 640 x 480 72 1 138 0 62 3 A SVGA SVGA55 800 x 600 35 2 56 3 36 0 A SVGA60 80...

Страница 51: ...ommand before sending the next command When a command which does not require parameters to be sent the colon is not required If an incorrect command is sent from the personal computer the ER401 command will be sent from the projector to the personal computer Serial terminal NOTE You must use only an RS 232C Serial Interface Cable with a ferrite core type ET ADSER Pin No Signal name Contents A NC B...

Страница 52: ...Navigation buttons OCU F button OCD G button OCL I button OCR H button OLE LENS Activating the LENS CONTROL menu OST DEFAULT Resetting to the factory default setting page 28 OFZ FREEZE Freezing the projected screen Parameter 0 OFF 1 ON FC1 FUNCTION BUTTON Activates the function that is assigned to the FUNCTION button of the remote control OOT SLEEP Setting the duration of time to turn off the powe...

Страница 53: ...PONENT2 IN VID VIDEO IN HD2 HDMI2 IN RG1 COMPUTER IN QOT OFF TIMER status 0 OFF 1 60min 2 90min 3 120min 4 150min 5 180min 6 210min 7 240min QPM PICTURE MODE status NOR NORMAL DYN DYNAMIC CL1 COLOR1 CL2 COLOR2 CN1 CINEMA1 CN2 CINEMA2 CN3 CINEMA3 QSH BLANK status 0 OFF 1 ON QWM WAVEFORM status Parameter 0 OFF 1 FULL SCAN Y 2 FULL SCAN R 3 FULL SCAN G 4 FULL SCAN B 5 SINGLE LINE SCAN Y 6 SINGLE LINE...

Страница 54: ... 600 lm Operating environment Temperature 0 C 40 C 32 F 104 F When the HIGH ALTITUDE MODE page 44 is set to ON 0 C 35 C 32 F 95 F Humidity 20 80 no condensation Scanning frequency 2 for RGB signal 2 See List of compatible signals on page 50 for available signals Horizontal scanning frequency 30 kHz 70 kHz Vertical scanning frequency 50 Hz 87 Hz Dot clock frequency Less than 150 MHz COMPONENT YPBPR...

Страница 55: ... PB CB PR CR 0 7 V p p 75 Ω HDMI IN Triple line 19 pin HDMI connector HDCP compliant SERIAL D sub 9 pin RS 232C compatible Cabinet Moulded plastic PC ABS Dimensions Width 460 mm 18 3 32 Height 130 mm 5 3 32 Length 300 mm 11 25 32 Weight Approx 7 3 kg 16 09 lbs 1 1 Average value Each product has an individual variability in weight Certifications UL60950 1 FCC Class B C UL ICES 003 Remote control Po...

Страница 56: ...ough the loop on the other end of the cable 3 Attach the latch on to the bottom of the projector with a provided screw Torque 1 25 0 2 N m Ceiling mount bracket safeguards NOTE Even if it is during guarantee period the manufacturer is not responsible for any hazard or damage caused by using a ceiling mount bracket which is not purchased from an authorized distributors or environmental conditions M...

Страница 57: ...High Definition Multimedia Interface are trademarks or registered trademarks of HDMI Licensing LLC The font used in the on screen displays is a Ricoh bitmap font which is manufactured and sold by Ricoh Company Ltd All other trademarks are the property of the various trademark owners Dimensions Trademark acknowledgements 300 11 23 32 460 18 3 32 230 9 1 32 15 19 6 147 5 25 32 60 2 5 16 116 4 9 16 1...

Страница 58: ...LENS CONTROL menu 40 FRAME CREATION 35 FRAME RESPONSE 43 FREEZE Remote control button 11 Remote control function 28 Front leg adjusters 13 15 FUNCTION Remote control button 11 Remote control function 28 FUNCTION BUTTON Main menu 42 Remote control buttons 11 Remote control function 28 G GAMMA 34 H H AREA POSITION 41 HDMI IN Connection 18 Terminal 13 HDMI SIGNAL LEVEL 43 HIGH ALTITUDE MODE 44 H FIT ...

Страница 59: ...Operation 23 Signal emitter 11 Signal receptor 12 RETURN Control panel button 12 Remote control button 11 Remote control function 29 S Safety cable 56 Accessory 10 Attachment point 13 Screen size 14 Calculation methods 14 Security lock 13 SERIAL Basic format 51 Cable specifications 51 Communication settings 52 Connection 51 Control commands 52 Inquiry commands 53 Pin assignments 51 Terminal 13 SHA...

Страница 60: ...Printed in Japan S0908 2108C ...

Отзывы: