HygroPro
II
User's Manual
3
Chapter 1. Installation
1.3
Mounting the Transmitter
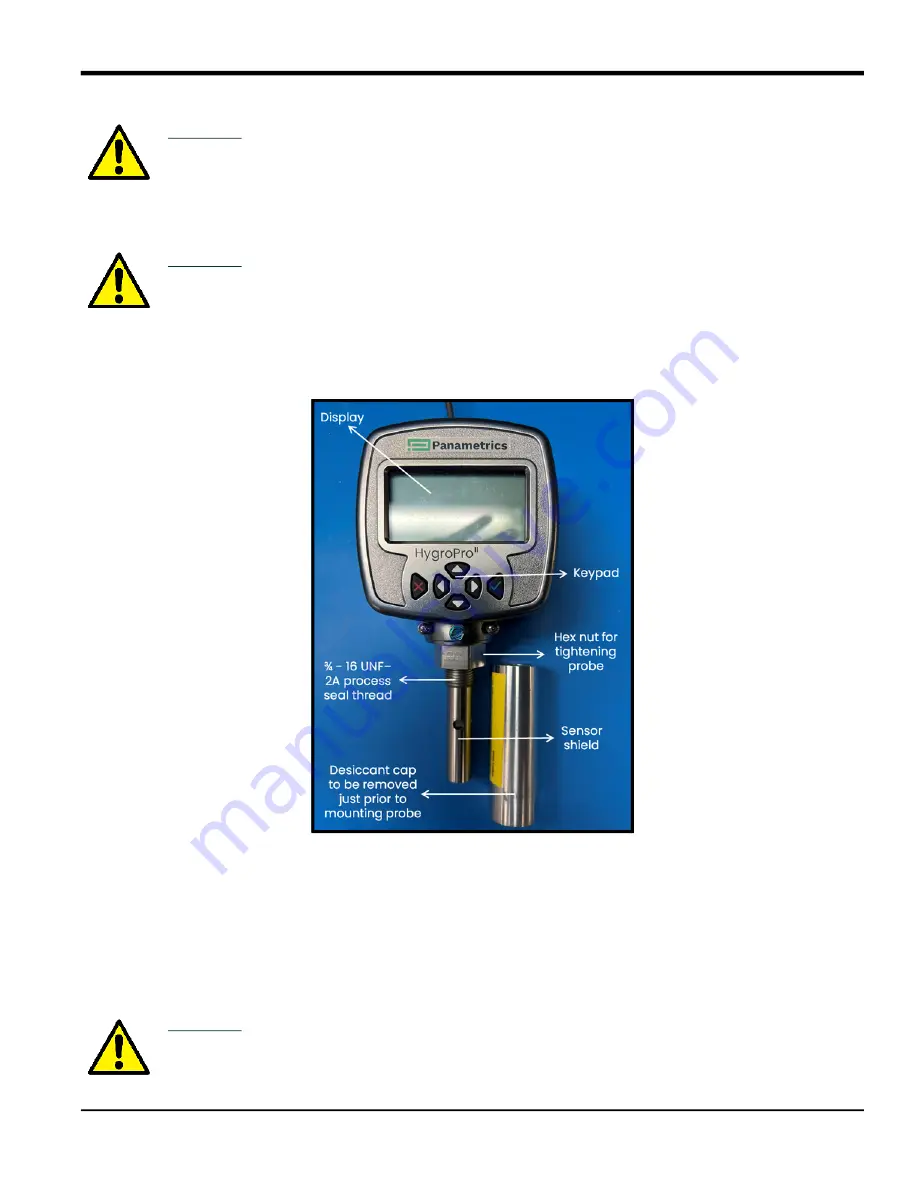
Refer to Figure 3 below and complete the steps on the next page to install the HygroPro
II
transmitter.
Figure 3: Key HygroPro
II
parts relevant to installation
1.
Make sure the stainless-steel shield is in place over the sensor. This shield protects the aluminum oxide sensor
from damage during operation.
2.
Using the integral 3/4-16 straight male thread, screw the probe end of the transmitter into the process or sample
system fitting. Make sure not to damage the threads.
Note:
A 3/4-16 to G 1/2 thread adapter is available from Panametrics.
3.
Using a 1-1/8” wrench on the probe hex nut, tighten the probe securely into the process or sample system fitting.
CAUTION!
The O-ring on the Hygro
II
RTE mount at the base of the ¾-16 straight thread should be
checked prior to mounting the HygroPro
II
and replaced if necessary. Failure to replace
the O-ring when the probe is dismounted and replaced can result in hazardous gas
leaks.
CAUTION!
If the HygroPro
II
will be installed directly into the process line, consult Panametrics for
proper installation instructions and precautions before proceeding.
CAUTION!
Do not apply torque to the transmitter display module to tighten the unit into its sample
system fitting.
Содержание HydroProII
Страница 1: ...panametrics com 910 331 A November 2022 HygroProII Moisture Transmitter User s Manual...
Страница 2: ......
Страница 4: ...ii no content intended for this page...
Страница 12: ...Preface x HygroProII User s Manual no content intended for this page...
Страница 42: ...Chapter 2 Operation 30 HygroProII User s Manual no content intended for this page...
Страница 52: ...Chapter 4 Specifications 40 HygroProII User s Manual no content intended for this page...
Страница 100: ...Appendix B HygroProII Field Service Update User Manual 88 HygroProII User s Manual no content intended for this page...
Страница 102: ...Warranty 90 HygroProII User s Manual no content intended for this page...
Страница 103: ......


