background image

System Setting 

(continued)

23

Cancel    15 Min.   30 Min.    45 Min.    60 Min.     90 Min.    120 Min.

Setting Menu Background

Press 

MENU

 to display the menu main page.

Press 

VOL+/-

 repeatedly to display 

Option

 menu page.

Press 

CH

    repeatedly to select 

Menu Background

 item.

Press 

VOL+

 or 

ENTER

 to access the sub-menu.

Press 

CH

         to select 

Transparent

 or 

Opaque

.

Press 

ENTER

 to confirm and press 

MENU

 repeatedly to exit.

Setting Blue Screen

Press 

MENU

 to display the menu main page.

Press 

VOL+/-

 repeatedly to display 

Option

 menu page.

Press 

CH

    repeatedly to select 

Blue Screen

 item.

Press 

VOL+

 or 

ENTER

 to access the sub-menu.

Press 

CH

         to select 

On

 or 

Off

.

Press 

ENTER

 to confirm and press 

MENU

 repeatedly to exit.

If the [Blue Screen] is set to [On], the unit displays a blue background when there is no input signal.
In TV mode, when there is no input signal for approx. 5 minutes, the TV set auto goes to STANDBY
mode.

Setting Sleep Timer

You can quickly set the sleep timer by using the SLP button on the
remote control. With every press of this button the sleep time
changes as follows:

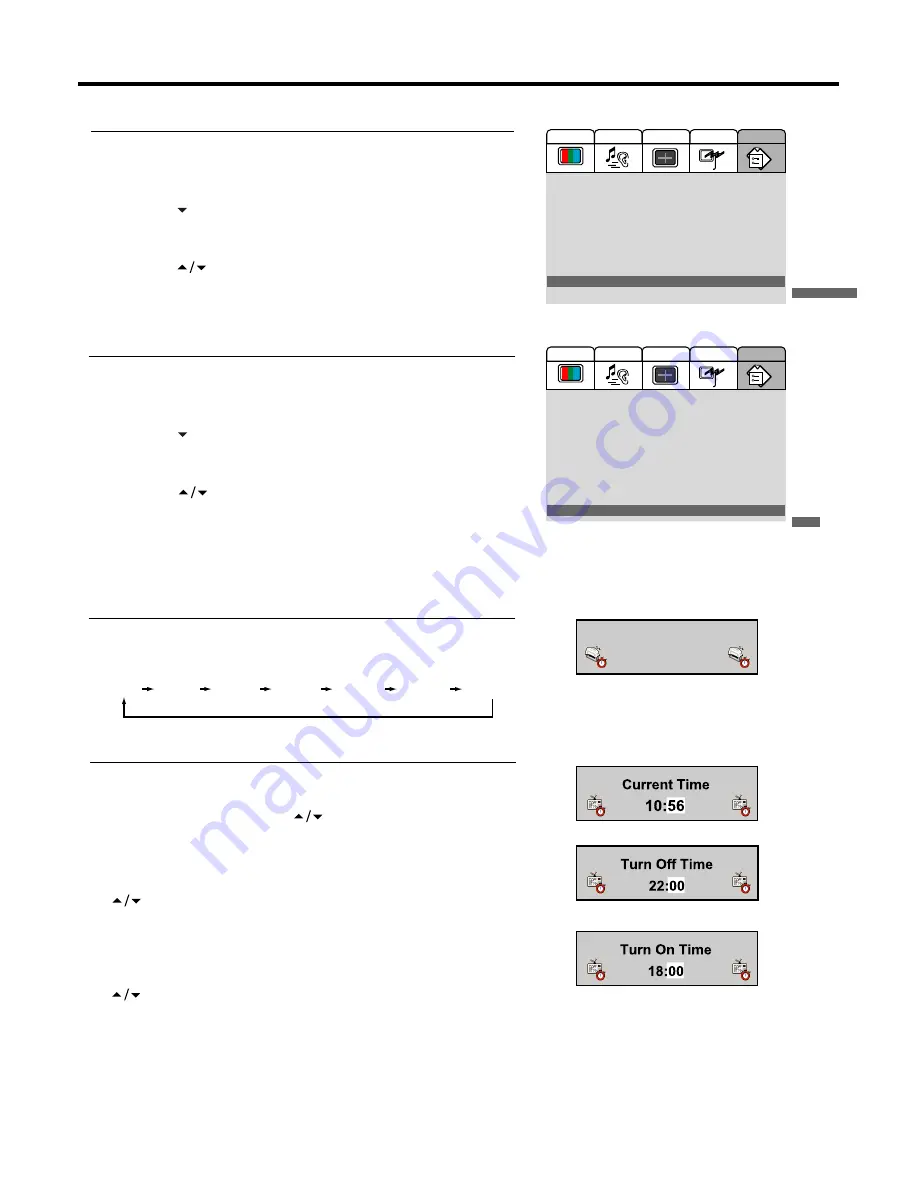
Setting Current Time/Turn Off Timer/Turn On Timer

With the 

Turn Off Time

 menu on the screen, press 

TIMER

 again to

display 

Turn On Time

 setting menu, which allows you to set 

Turn

On Time

. You may use 

VOL+/-

 to toggle hour or minute and

CH

         to adjust.

Note:

If you want to cancel the Off-Timer or On-Timer function, please set the [Turn
Off Timer or [Turn On Time] to [00:00]. 

4

3

2

1

5
6

4

3

2

1

5
6

With the unit working, press 

TIMER

 to display C

urrent Time

 setting

menu, which allows you to set Current Time. You may use 

VOL+/-

to toggle hour or minute and 

CH

         to adjust.

With the 

Current Time

 menu on the screen, press 

TIMER

 again to

display 

Turn Off Time

 setting menu, which allows you To set 

Turn

Off Time

. You may use 

VOL+/-

 to toggle hour or minute and

CH

         to adjust.

1. Main Display Source:
2. Display Mode:
3. PIP Mode:
4. MultiWin Mode:
5. Child Lock:
6. Change Password
7. Menu Language:
8. Country:
9. Menu Background:

0. Blue Screen:

TV

16:9 Mode

Off
Off
Off

English

Others...

Transparent

On

Audio

Video

Screen

Option

Program

Off

On

Sleep Time:

30 Minutes

1. Main Display Source:
2. Display Mode:
3. PIP Mode:
4. MultiWin Mode:
5. Child Lock:
6. Change Password
7. Menu Language:
8. Country:

9. Menu Background:

0. Blue Screen:

TV

16:9 Mode

Off
Off
Off

English

Others...

Transparent

On

Audio

Video

Screen

Option

Program

Opaque

Transparent

Содержание TFTV680

Страница 1: ...OYNTON AVENUE WATERLOO NSW 2017 AUSTRALIA TEL 02 9313 7111 FAX 02 9313 7555 www palsonic com au PALSONIC CUSTOMER SERVICE TELEPHONE AUSTRALIA 1300 657 888 68CM CORDLESS REMOTE LCD TELEVISION MONITOR M...

Страница 2: ...splays Viewing TV Programs Select a Region Storing Channels in Memory Automatically Manual Fine Tuning Manual Search Skipping Channel Editing Channels Setting Favourite Channel Editing Program Name Lo...

Страница 3: ...ing Screen Layout Selecting Screen Layout PIP Operations Viewing the Picture in Picture Using PIP POS button Using Active WIN Button Swap the Contents of the PIP Image and Main Image Adjustment in D S...

Страница 4: ...ert an object into the product through vents or openings High voltage flows in the product and inserting an object can cause electric shock and or short internal parts For the same reason do not spill...

Страница 5: ...nvironment as this causes condensation which may result in fire electric shock or other hazards 20 Ventilation Do not block any ventilation openings Install in accordance with the manufacturer instruc...

Страница 6: ...ries in the remote control Open the battery cover Insert two size AAA batteries Replace the cover and slide in reverse until the lock snaps Slide the cover while pressing down Place the batteries with...

Страница 7: ...e 75 ohm coaxial cable be used to eliminate interference and noise which may occur due to radio wave conditions The aerial cable should not be bundled with the power cord and the like 1 Connecting the...

Страница 8: ...ENU Press this button to access the Menu main page 4 VOL Press the VOL or VOL button to directly increase or decrease the sound volume level In OSD Menu press these buttons to adjust the value or sett...

Страница 9: ...S VIDEO interface 6 D Sub input Audio in Connect to the D Sub audio output jacks on your PC 7 DVI input Audio in Receives the digital video audio signals from a set top box or PC 8 HDTV inputs Y Pb C...

Страница 10: ...S To select SRS sound effect To freeze current picture 7 Freeze 8 0 9 digit buttons button 0 9 Direct channel select To in put character when editing channel label button one digit 2 digit 3 digit cha...

Страница 11: ...w update Teletext page Teletext To select to view multi window mode 19 PIP POS 20 TEXT 21 HOLD 23 M WIN 24 Active WIN Remote Control To set current time turn off timer or turn on timer 26 SWAP In full...

Страница 12: ...ton Carefully check the terminals for position and type before making any connections The illustration of the external equipment may be different depending on your model Loose connectors can result in...

Страница 13: ...control 2 Press CH to select Video or S Video and press ENTER to confirm 3 Turn on the external device and play it Note For better video you can use the S Video terminal if your source supports it If...

Страница 14: ...RCE button on the remote control 2 Press CH to select YPbPr 3 Press ENTER to confirm 4 Turn on your DVD player insert a DVD disc and press the Play button Note The Y Cb Cr outputs on your DVD player a...

Страница 15: ...Video 4 SCART 1 5 SCART 2 AV 6 SCART 2 Y C 7 YPbPr 8 D Sub 9 DVI Select Main Source DTV Receiver Rear of the DTV receiver Connect a DTV receiver DVI cable Audio cable How to connect Connect a D Sub c...

Страница 16: ...peration manual provides a description based on operation with the remote control Displaying Status Information The unit displays current status information e g channel number channel name channel loc...

Страница 17: ...stopped if you press the MENU button During the process of auto Search the unit automatically identifies and stores the program name if the program s name is available If the program s name is with mo...

Страница 18: ...Press VOL repeatedly to display Program menu page Press CH repeatedly to select Skip item Press VOL or ENTER to access the sub menu Press CH to select On or Off Press ENTER to confirm and press MENU...

Страница 19: ...H repeatedly to select Program Name item Press ENTER to edit program name Use VOL to move cursor right or left Use 0 9 number buttons to input characters Use DSP CAPS to switch between lowercase and U...

Страница 20: ...a icon appears and the screen is blank In this situation if you still want to view the locked channel you may follow these steps to unlock 1 Press FREEZE to display password input page 2 Enter the pas...

Страница 21: ...nnel number by using the 0 9 number buttons To select a three digit channel Press to display and input the channel number by using the 0 9 number buttons Note When you use the number buttons You may d...

Страница 22: ...m Press VOL or ENTER to access the sub menu Press CH to select Press ENTER to confirm and press MENU repeatedly to exit Sometimes a noisy picture may appear on the screen because of poor signal This f...

Страница 23: ...preference Press MENU to exit Note You may quickly select the preset sound effects by using the S M button Press MENU to display the menu main page Press VOL repeatedly to display Audio menu page Pres...

Страница 24: ...njoy NICAM broadcasting this TV set receives NICAM system stereo bilingual and monaural broadcasts Stereo When the TV set is receiving a stereo broadcast press the STEREO button to select NICAM Stereo...

Страница 25: ...9 signal format This mode displays a 16 9 aspect ratio picture Selecting Menu Language Press MENU to display the menu main page Press VOL repeatedly to display Option menu page Press CH repeatedly to...

Страница 26: ...Turn Off Timer Turn On Timer With the Turn Off Time menu on the screen press TIMER again to display Turn On Time setting menu which allows you to set Turn On Time You may use VOL to toggle hour or mi...

Страница 27: ...he screen into a double window that allows you to watch two programs at the same time The main window program can come from a TV broadcast Video or S Video input while the POP window always displays T...

Страница 28: ...atedly to exit Note You may use the PIP button to quickly turn on or off the PIP feature Using the PIP POS button Press the PIP POS button to quickly select the position for PIP window Using the Activ...

Страница 29: ...can obtain a clearer image by adjusting the Fine Tune item Note The Fine Tune item can not be accessed in DVI mode Adjusting the Screen Automatically Press MENU to display the menu main page Press VO...

Страница 30: ...ced adjustment in normal case In most cases the Auto Sync function is able to adjust and rectify the picture automatically But sometimes if you find that the image position can not be correctly displa...

Страница 31: ...tom of the screen by pressing the corresponding colour RED GREEN YELLOW BLUE on the remote control unit 0 9 Directly select any page by using 0 9 REVEAL Press the button to reveal hidden information s...

Страница 32: ...d but poor colour Poor picture Horizontal dotted line Adjust the contrast colour and brightness settings Sometimes poor picture quality occurs when having activated an S VHS camera or camcorder connec...

Страница 33: ...L SECAM BG DK PAL I SECAM L SECAM L TFT LCD 1280 x 720 0 0 51mm x 0 51mm VHF 1 12 2 12 2 12 2 12 1 12 2 4 5 12 Teletext Maximum Audio Output Power Supply Power Consumption Unit Weight kg Unit Dimensio...

Страница 34: ...ord 1 Remote Control 2 AAA Batteries 1 Audio Video Cable RCA 1 D Sub Cable 1 RF Coaxial Cable 1 S Video Cable 1 Component Video Cable YPbPr YCbCr 1 Audio Cable RCA 1 Audio Cable RCA to Stereo mini pho...

Страница 35: ...ALSONIC CORPORATION PTY LTD 1 JOYNTON AVENUE WATERLOO NSW 2017 AUSTRALIA TEL 02 9313 7111 FAX 02 9313 7555 www palsonic com au PALSONIC CUSTOMER SERVICE TELEPHONE AUSTRALIA 1300 657 888 604 L27M6S3 02...

Отзывы: