background image

6

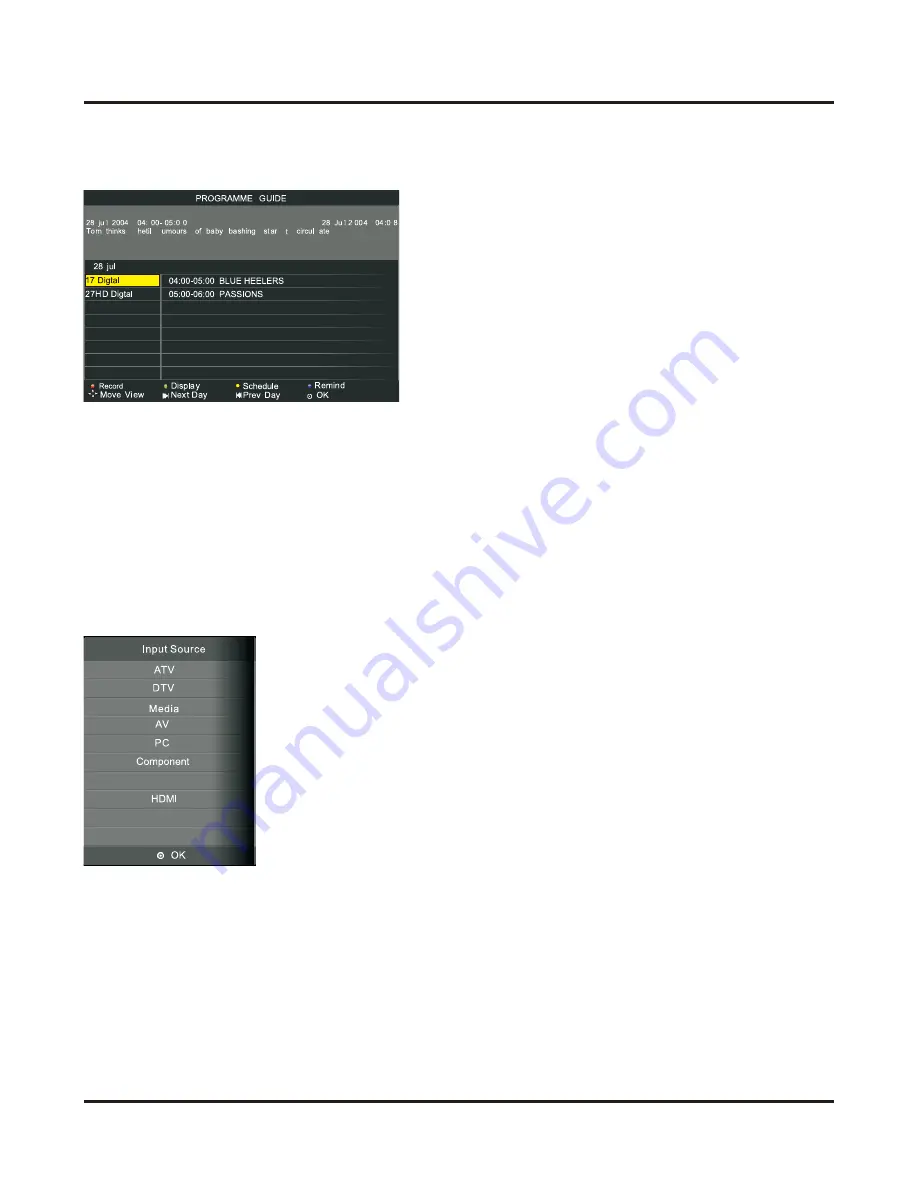
EPG (only available in DTV mode)

Press the 

EPG

 on the remote control to enter 

EPG

 menu.

Press the 

RED 

button to enter the submenu. You can choose the time of the appointment to 

record you want.

Press the 

GREEN

 button to display the detail information about the program.

Press the 

YELLOW

 button to display the schedule list that you can see the settings you have 

done before.

Press the 

BLUE

 button to set the time you want to remind the grogram you want to see.

Press 

EPG

 button or 

EXIT

 button to exit.

Select Input Source 

Press the 

INPUT

 button to select input source, press ▲/▼ to select the input source and then 

press OK button to enter.

B


0B 


0

P

OP


0

0

:

6

0

-

0

0

:

5

0

r

l

t


t

r

I2

I1

t2

t

t1

S-Video

AV2

1

V1V

A

HDMI

V

GA

DVD

Содержание TFTV6043FHD

Страница 1: ...User s Manual Offering Australians quality since 1958 www palsonic com au TFTV6043FHD 60cm 23 6 LCD TV DVD Combo with DVB T...

Страница 2: ...th tub washbowl kitchen sink or laundry tub in a wet basement or near a swimming pool Do not place this equipment on an unstable surface stand or cart The television equipment may fall causing serious...

Страница 3: ...h the electrical outlet with safety grounded wire Do not over load wall outlets and extension cords as this can result in fire or electric shock Never push objects of any kind into this television equ...

Страница 4: ...ccur or scattered broken glass may result Do not touch broken glass or crystalline liquid which is toxic with bare hands that have cuts or skin irritation as poisoning any result If any crystalline li...

Страница 5: ...ng the OSD Menu 7 Channel Adjustment 7 Picture Adjustment 9 Sound Adjustment 10 Time Adjustment 11 Lock Adjustment 12 Hotel Adjustment 13 Setup Adjustment 14 PC Mode 15 Recording Function 16 Media Ope...

Страница 6: ...variety of features Color active matrix TFT LCD TV with remote control Safe sturdy construction Maximum resolution 23 6 1920 x 1080 Audio Video support HDMI input RF input YPbPr input PC input PC Audi...

Страница 7: ...y available in TV with DVD player INPUT Switch the input sources MENU Press the button to enter On Screen Display OSD VOL Increase or decrease the volume CH Increase or decrease channel numbers POWER...

Страница 8: ...nnect to the audio output from your PC or portable computer 6 CVBS Connect to video receiver 7 YPbPr Connect to the component output of A V device 8 L R Audio Connect to audio receiver 9 RF IN Connect...

Страница 9: ...an extended period of time remove the batteries to prevent damage or injury from possible battery leakage Remote Control STANDBY AUTO MUTE ASPECT AUDIO DISPLAY DISPLAY LCD MENU SOURCE P MODE S MODE SL...

Страница 10: ...display favorite programme list 20 FAV Switch to lower channel number programme in the favorite list 21 FAV Switch to higher channel number programme in the favorite list 22 EPG Press to display elect...

Страница 11: ...program Press the YELLOW button to display the schedule list that you can see the settings you have done before Press the BLUE button to set the time you want to remind the grogram you want to see Pre...

Страница 12: ...finishing your adjustment press MENU button to save and return back to the previous menu Auto Tuning Press button to select Auto Tuning then press OK button to start auto search ATV Manual Tuning Pres...

Страница 13: ...nd the arrow button to move the current channel Use Blue button to skip the current channel Use FAV button to set the current channel for favour Under DTV Mode This option has three functions Use Red...

Страница 14: ...just NOTE Contrast This item can adjust the highlight intensity of the picture but the shadow of the picture is invariable Brightness This item can adjust the optical fiber output of the entire pictur...

Страница 15: ...button to select Auto Volume then press OK button to select On or Off SPDIF MODE Press button to select SPDIF MODE then press OK button to select Off PCM or Auto AD Switch For DTV Mode Press button t...

Страница 16: ...0min 30min 60min 90min 120min 180min 240min Auto Standby Press button to select Auto Standby then press OK button to set the time to turn off the TV Off 3H 4H 5H H stands for Hour OSD Timer Press butt...

Страница 17: ...ss button to select Block Program then press OK button to enter submenu Press button to select the program you want to lock then press green button on your remote control Press green button to unlock...

Страница 18: ...ATV as the Default Source you can then select the Boot Channel If you select Off the default program will be the last channel you watch before you turn off the TV Max Volume Press button to select Max...

Страница 19: ...OSD Language then press OK button to enter submenu Press button to select OSD Language delfault setting is English TT Language Press button to select TT Language then press OK button to enter Press bu...

Страница 20: ...to select First Time Installation then press OK button to set relevant options including OSD language country and tuning Reset Press button to select Reset then press OK button to enter a dialogue Pr...

Страница 21: ...stem Check whether the USB storage device connected is compatible and has created file system for recording If not the system will creat the file system automatically USB Disk A Pass will be displayed...

Страница 22: ...the remote control or select STOP on the on screen menu then press Yes to stop recording It will return to normal broadcast Schedule Recording Press EPG button on the remote control and press the Red...

Страница 23: ...Press button to select betweeen Photo Music Movie and Text in the Media menu then press OK button to enter Photo Press button to select PHOTO in the main menu then press OK button to enter Press butto...

Страница 24: ...ss OK to play background music Play list Press button to select Play list press OK to enter Info Press button to select Info press OK to enter You can see the detailed information of the picture Zoom...

Страница 25: ...s DISPLAY button and select function in the botton you want to run then press OK button to operate When highlighting the option you select the file information will appear on the right and music will...

Страница 26: ...play the selected movie Press DISPLAY button and select function in the botton you want to run then press OK button to operate Repe at Al l Stop MUTE Info Pl ay list Goto Time Stop Press button to se...

Страница 27: ...isplay the next movie Stop Press button to select Stop press OK to stop Info Press button to select Info press OK to enter You can see the detailed information of the movie Slow Forward Press button t...

Страница 28: ...e is big enough to surpass the screen you may use this function to move the picture Aspect Ratio Aspect Ratio Press button to select Arpect Ratio press OK to enter Switch display modes Auto 4 3 16 9 z...

Страница 29: ...ss OK to display the previous text Next Press button to select Next press OK to display the next text Stop Press button to select Stop press OK to stop Music Press button to select Music press OK to p...

Страница 30: ...quired and use the button to select the sub menu In the sub menu use the buttons to select the item required and OK to confirm TV Shape Some DVD discs have heen authored in 4 3 aspect ratio format To...

Страница 31: ...ng the buttons Set the level using the buttons and press OK You will be asked for the password 0000 Default is ADULT PASSWORD Select Password using the buttons Select Change using the buttons and OK P...

Страница 32: ...tional OSD languages English French German Italian Spanish Portuguese Default OSD language is French Last Memory Select last memory in this case the LCD TV can memory the last data Choose ON or OFF to...

Страница 33: ...guage available it will display subtitles in that languague There are 7 optional Subtitle languages English French German Italian Spanish Portuguese Off Disc Menu Highlight the Disc Menu option and pr...

Страница 34: ...00 Coaxial output 1 Standards BG DK USB 1 Color system PAL SECAM AV Other Progressive scan User manual Noise reduction Dimensions HWD 438mm 585mm 210mm Packing size HWD 508mm 660mm 175mm Audio Gross w...

Страница 35: ...s and clean them to remove dust Remote control unit does not operate Check if the batteries are inserted with the polarity correctly aligned Check if the batteries are discharged Please replace with n...

Страница 36: ...Palsonic Customer Service Telephone Australia 1300 657 888 Palsonic C ABN 34 000 474 108 1 Joynton Avenue Waterloo NSW 2017 Australia Telephone 02 9313 7111 Facsimile 02 9697 0655 www palsonic com au...

Отзывы: