background image

Identifications of Controls 

(continued)

11

To access screen layout select menu

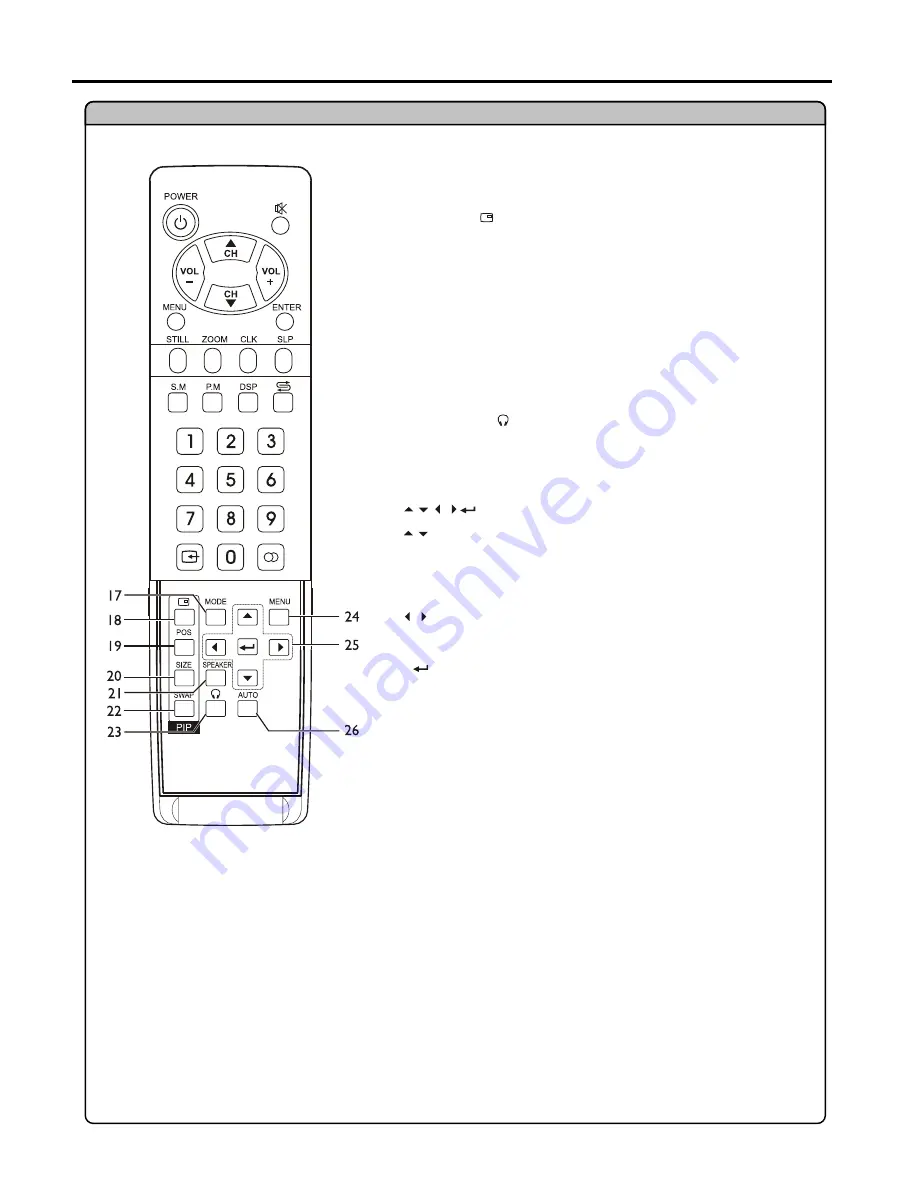
18. PIP display

To activate picture in picture

To access PIP frame position select menu

To access PIP frame size adjusting menu

In multi-picture mode, press this button to output the sound of the
selected picture frame from speaker

To exchange PIP and MAIN PICTURE source

23. HEADPHONE

In multi-picture mode, press this button to output the sound of the
selected picture frame from headphone

To access the MENU main page

: To move upward or downward in menu operation;

To adjust zoom rate in ZOOM mode and pan picture in PAN
mode;
to select picture frame in multi-picture mode, the selected
picture frame displays with a green border;
To move left or right in menu operation;
To adjust selected menu item in menu operation;
To pan picture in PAN mode;
To confirm your operation or setting or access a submenu

:

:

To rectify the picture automatically in VGA mode

17. MODE

19. POS

20. SIZE

21. SPEAKER 

22. SWAP

24. MENU

26. AUTO

25.

Remote Control

Содержание PDP4250

Страница 1: ...NTON AVENUE WATERLOO NSW 2017 AUSTRALIA TEL 02 9313 7111 FAX 02 9313 7555 www palsonic com au PALSONIC CUSTOMER SERVICE TELEPHONE AUSTRALIA 1300 657 888 107CM CORDLESS REMOTE PLASMA TELEVISION MONITOR...

Страница 2: ...24 24 25 Setting the Menu Background Setting Colour and Sound System Setting Current Time Setting Sleep Timer Changing Screen Options Changing the Scaling mode of Image Freezing the Picture Changing...

Страница 3: ...eaners or aerosol cleaners Use a damp cloth for cleaning 7 Ventilation Do not block any ventilation openings Install in accordance with the manufacturer instructions The vents and other openings in th...

Страница 4: ...often requires extensive adjustment work by a qualified technician e If the product has been dropped or the cabinet has been damaged in any way f When the product displays an abnormal condition or exh...

Страница 5: ...anel is a very high technology product giving you finely detailed pictures Occasionally a few non active pixels may appear on the screen as a fixed point of blue green or red Please note that this doe...

Страница 6: ...ries in the remote control Open the battery cover Insert two size AAA batteries Replace the cover and slide in reverse until the lock snaps Slide the cover while pressing down Place the batteries with...

Страница 7: ...om power outlet when not using for a long period of time The illustration of the AC plug is for your reference only depending on your area AC INPUT Power connection Connect the speaker audio cable to...

Страница 8: ...viewing Optimum reception of colour requires a good signal and will generally mean that an outdoor aerial must be used The exact type and position of the aerial will depend upon your particular area N...

Страница 9: ...l Press these two buttons to directly change the TV channel In OSD Menu press these buttons to choose the OSD items Note Functions of SOURCE MENU VOL and CH are also provided to the remote control thi...

Страница 10: ...udio and component output jacks of a DVD player or Set Top Box 6 Headphone jack 7 AV outputs Video Audio L R Connect to the VCR input jacks to record programs 8 AV inputs Video Audio L R Receive a vid...

Страница 11: ...menu To access picture mode select menu 8 0 9 digit buttons Direct channel select 9 SOURCE To access source select menu 10 MUTE Sound mute 11 ENTER To confirm your operation or setting or access the...

Страница 12: ...to output the sound of the selected picture frame from headphone To access the MENU main page To move upward or downward in menu operation To adjust zoom rate in ZOOM mode and pan picture in PAN mode...

Страница 13: ...VOL to select AV VIDEO and press ENTER to confirm 3 Turn on your VCR insert a videotape and press the Play button Yellow VIDEO White AUDIO L Red AUDIO R Rear of the VCR S video cable Audio cable Vide...

Страница 14: ...s SOURCE button on the remote control 2 Press VOL to select AV VIDEO and press ENTER to confirm 3 Turn on your camcorder and set it to output mode For details refer to your camcorder owner s manual 4...

Страница 15: ...omponent video terminals automatically If you connect Y Cb Cr terminals the screen displays YCbCr detected on the bottom right corner Similar if the component video terminals are Y Pb Pr the screen di...

Страница 16: ...tput jacks on the DTV receiver Connect the Audio cable between the AUDIO input jack on the unit and AUDIO output jacks on the DTV receiver To Watch DTV 1 Turn on your PDP TV press SOURCE button on the...

Страница 17: ...he VGA or DVI input jack on the unit Connect an Audio cable between the AUDIO output on the PC and AUDIO input jack on the unit To Watch the PC screen 1 Turn on your PDP TV press SOURCE button on the...

Страница 18: ...Turn on your VCR insert a videotape for recording 3 Press the Record button to begin recording To enjoy high quality sound through an external amplifier 1 Turn on your PDP TV select a program 2 Turn t...

Страница 19: ...ain menu appears on the screen Use the CH to select menu item Use VOL to adjust value or setting of each item Use ENTER to confirm or access items of menu On screen menu will disappear from the screen...

Страница 20: ...to Setting colour and Sound System on page 25 to select a proper sound system according to your area Manual Search Use Manual Search if desired channels cannot be memorised or if you would like to st...

Страница 21: ...tomatically to display search menu page If you fine tune a program manually the auto fine tune item will be turned to off automatically Press CH repeatedly to select channel skip item Press VOL to sel...

Страница 22: ...using the 0 9 number buttons directly and then press ENTER or wait for 3 seconds To select a three digit channel Input the channel using the 0 9 number buttons directly Note Be sure to enter the chann...

Страница 23: ...elect TV signal 3 2 1 settings right left to change language audio format video format language menu background BG AUTO English opaque Note This unit identifies the type of component video terminals a...

Страница 24: ...Use MENU to return enter to activate tuner menu options tv tuner Editing Channel Label Use CH to select a channel you want add label to Use to select character Use to move cursor left or right Use SOU...

Страница 25: ...isplay picture mode select menu Press VOL to select a desired picture mode Press MENU to exit There are three preset picture modes Normal Bright and Soft and one user set picture mode User Each preset...

Страница 26: ...m Note The Audio format function is available in TV mode only Setting Current Time Press the CLK button to display current time menu Press CH to select hour or minute Press VOL to adjust Press MENU to...

Страница 27: ...stortion on the extreme left and right edges of the picture The top and bottom five percent of the picture are cropped Zoom If the display aspect ratio is greater than 4 3 this mode fills the panel ho...

Страница 28: ...to adjust zoom ratio Note You can quickly access Zoom menu by using the ZOOM button Digital pan and zoom are not always available The unit allows you to pan the picture after you zoom in the picture...

Страница 29: ...ne user set Audio mode User Each preset mode has its own Audio settings Cinema Select for a movie program picture Music Select for a music program News Select for a speech or conversation program Adju...

Страница 30: ...NlCAM system stereo bilingual and monaural broadcasts Stereo When the TV set is receiving a stereo broadcast please select NlCAM STEREO or NlCAM MONO mode by pressing the MTS button When NlCAM MONO m...

Страница 31: ...to confirm Press MENU to exit Full Screen When this item is selected only main frame displays on the screen 4 3 2 1 Press MENU to display the menu main page Press VOL to display layout menu page Press...

Страница 32: ...reen When this item is selected the screen will be split into two frames When this item is selected one main frame and three scanning frames display on the screen Grid POP3 When this item is selected...

Страница 33: ...reen border Note You can quickly open or close PIP frame by directly using the PIP displaying button Many but not all adjustments and settings can be applied to the PIP picture when the PIP frame is s...

Страница 34: ...e PIP frame displaying press MENU to display the menu main page Press VOL to display window menu page Press CH repeatedly to select pip size item Press VOL to adjust the size of PIP frame Press MENU t...

Страница 35: ...exit You may find that images blur depending on the clock phase of your PC s Processor If you experience blurring you can obtain a clearer image by adjusting the phase item Adjust the clock frequency...

Страница 36: ...e Press VOL to display window menu page Press CH to select h position or v position item Press VOL to adjust the value of the item until the screen is well aligned Press MENU to exit Displaying the In...

Страница 37: ...until the screen is well aligned Press MENU to exit Adjusting Image width and height Press Menu to display the menu main page Press VOL to display window menu page Press CH to select h wide or v high...

Страница 38: ...he contrast colour and brightness settings Sometimes poor picture quality occurs when having activated an S VHS camera or camcorder connected and having connected another peripheral at the same time I...

Страница 39: ...1280x1024 60Hz 800x600 60Hz 72Hz 75Hz 85Hz 1280x1024 60Hz 800x600 60Hz 72Hz 75Hz 85Hz 1080i 50Hz 59Hz 60Hz 1024x768 60Hz 1024x768 60Hz RS232 x 1 Video In Video Out Audio In Audio Out Other Other Feat...

Страница 40: ...Dimensional Drawings 39 1247 778 Design and specifications are subject to change without notice Unit mm 645 1050 718...

Страница 41: ...NIC CORPORATION PTY LTD 1 JOYNTON AVENUE WATERLOO NSW 2017 AUSTRALIA TEL 02 9313 7111 FAX 02 9313 7555 www palsonic com au PALSONIC CUSTOMER SERVICE TELEPHONE AUSTRALIA 1300 657 888 604 PS42D83 19 Ver...

Отзывы: