background image

Important Safety Precautions 

(Continued)

2

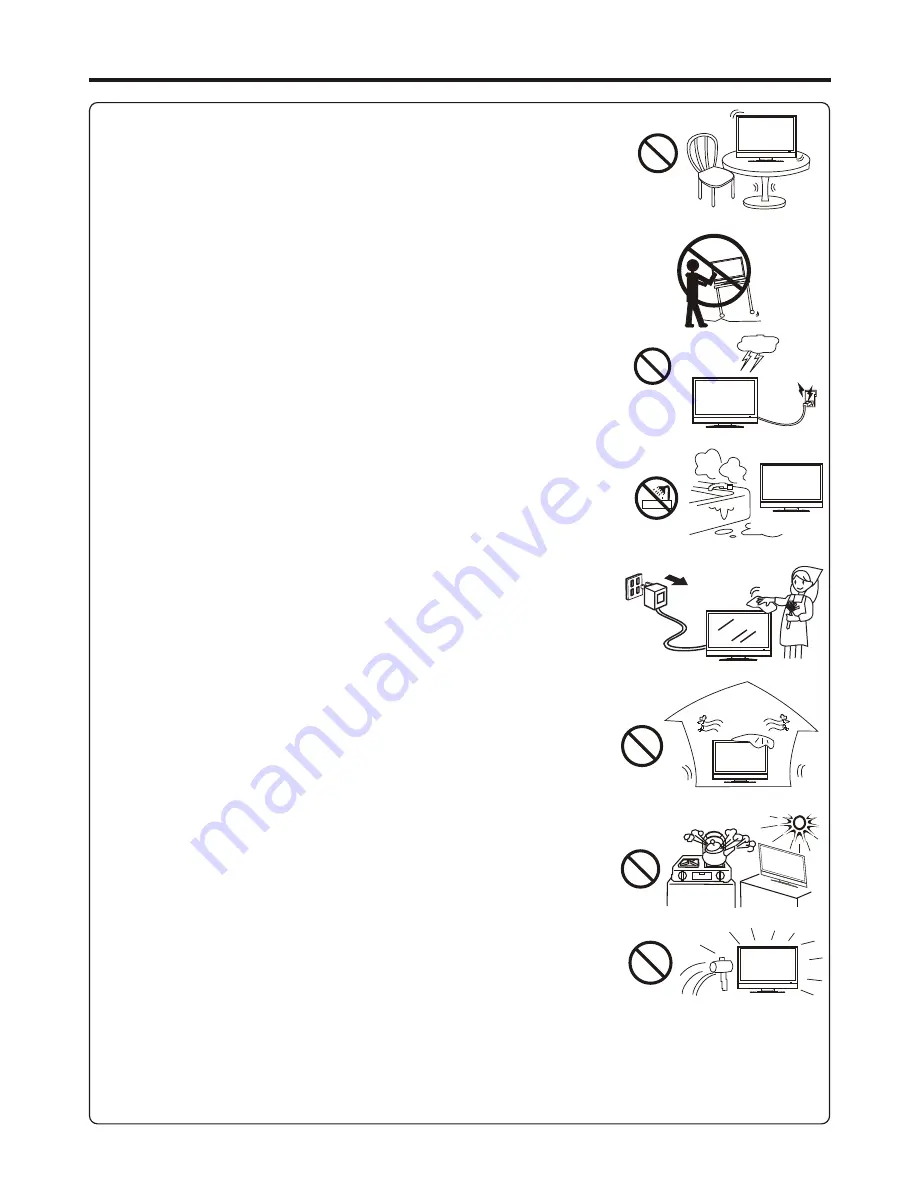
15. Stand---Use only with the cart, stand, tripod, bracket, or table specified by the 
manufacturer,  or  sold  with  the  apparatus.  Do  not  place  the  product  on  an  unstable 
trolley, stand, tripod or table. Placing the product on an unstable base can cause the 
product to fall, resulting in serious personal injuries as well as damage to the product. 
When mounting the product on a wall, be sure to follow the manufacturer’s instructions. 
Use only the mounting hardware recommended by the manufacturer.

16.Careful move---When a cart is used, use caution when moving the cart/apparatus 
combination to avoid injury from tip-over. Sudden stops, excessive force and uneven 
floor surfaces can cause the product to fall from the trolley.
Never attempt to move the TV unless the AC  power cord has been disconnected.

17. Lightning---Unplug this apparatus during lightning storms or when unused for long 
periods of time.
For added protection for this television equipment during a lightning storm, or when it is 
left unattended and unused for long periods of time, unplug it from the wall outlet and 
disconnect the antenna. This will prevent damage to the equipment due to lightning and 
power-line surges.

18. Do not use this apparatus near water---for example, near a bathtub, washbowl, 
kitchen sink, or laundry tub, in a wet basement, or near a swimming pool, and the like.
Do  not  use  immediately  after  moving  from  a  low  temperature  to  high  temperature 
environment, as this causes condensation, which may result in fire, electric shock, or 
other hazards.

19.  Clean  only  with  dry  cloth---Unplug  this  product  from  the  wall  outlet  before 
cleaning. Do not use liquid cleaners or aerosol cleaners. Use a damp cloth for cleaning.

20. Ventilation---Do not block any ventilation openings. Install in accordance with the 
manufacturer instructions. The vents and other openings in the cabinet are designed for 
ventilation. Do not cover or block these vents and openings since insufficient ventilation 
can cause overheating and/or shorten the life of the product. Do not place the product on 
a bed, sofa, rug or other similar surface, since they can block ventilation openings. This 
product is not designed for built-in installation; do not place the product in an enclosed 
place  such  as  a  bookcase  or  rack,  unless  proper  ventilation  is  provided  or  the 
manufacturer’s instructions are followed.

21.Heat sources---Do not install near any heat sources such as radiators, heat registers, 
stoves, or other apparatus (including amplifiers) that produce heat.

22.Panel  protection---The  display  panel  used  in  this  product  is  made  of  glass. 
Therefore, it can break when the product is dropped or impacted upon by other objects. 
Be careful not to be injured by broken glass pieces in case the display panel breaks.

23.Pixel defect---The display panel is a very high technology product, giving you finely detailed pictures. Occasionally, a few 
non-active pixels may appear on the screen as a fixed point of blue, green or red. Please note that this does not affect the 
performance of your product.

Warning: For continued safety, apparatus with class I construction shall be connected to a mains socket outlet with a 
protective earthing connection.

Содержание PDP3280HD

Страница 1: ...CM WIDE SCREEN PDP TV MONITOR MODEL PDP3280HD PALSONIC CORPORATION PTY LTD 1 JOYNTON AVENUE WATERLOO NSW 2017 AUSTRALIA TEL 02 9313 7111 FAX 02 9313 7555 PALSONIC CUSTOMER SERVICE TELEPHONE AUSTRALIA...

Страница 2: ...ols 6 Connections 9 Basic Operations 13 Memorizing the Channels 15 Channel and Program Selection 19 Timer Setup 26 EPG Operation 28 Teletext Subtitle Troubleshooting 31 Specifications 33 Picture Adjus...

Страница 3: ...h vents or openings High voltages are present in the product and inserting an object can cause electric shock and or short internal parts For the same reason do not spill water or liquid on the produc...

Страница 4: ...ch may result in fire electric shock or other hazards 19 Clean only with dry cloth Unplug this product from the wall outlet before cleaning Do not use liquid cleaners or aerosol cleaners Use a damp cl...

Страница 5: ...lay the fixed image for extended periods of time C Turn the power off when not in actual use Important Information Regarding Use of Video Games Computers Captions or Other Fixed Image Displays after i...

Страница 6: ...chemicals and or explosion Be sure to follow the instructions below Place batteries with their terminals corresponding to the and indications Different types of batteries have different characteristi...

Страница 7: ...t the 75 ohm coaxial cable be used to eliminate interference and noise which may occur due to radio wave conditions The antenna cable should not be bundled with the power cord Note 75 ohm coaxial cabl...

Страница 8: ...ch item 5 MENU Press this button to access Menu main page 6 SOURCE To access input source select menu 7 POWER Press this button to turn the unit ON from STANDBY mode Press it again to turn the set bac...

Страница 9: ...nt output jacks of a DVD player or Set Top Box 4 Headphone jack Connect to your headphones 5 AV inputs Video Audio L R Receive video audio signal from external sources such as VCR or DVD player 6 AV o...

Страница 10: ...en SOURCE Displays input source menu LIST Displays the channel list CH Changes channel up and down 1 2 3 4 5 6 7 8 9 10 11 12 13 14 15 16 17 18 19 20 21 22 23 24 25 26 27 28 31 Below is teletext contr...

Страница 11: ...s Refer to the operating manual of the external device as well When connecting an external device turn the power off to avoid any issues Cautions before connecting Connections Connecting digital coaxi...

Страница 12: ...refer to your camcorder user manual 4 Insert the tape into the camcorder and press Play button Note Connecting an HDMI device HDMI cable Device with HDMI output Connect the HDMI cable between the HDMI...

Страница 13: ...nput jacks on the unit and AUDIO output jacks on the device Audio cable Connecting a Computer How to connect 1 Turn on your TV then press SOURCE button The Input Source menu opens 2 Press5or6to select...

Страница 14: ...ideotape for recording 3 Press the Record button to begin recording To record program Insert the plug of the headphone into the TV s Headphone jack When using headphones adjust the headphone volume so...

Страница 15: ...annel Picture Mode Standard Contrast 75 Brightness 45 Sharpness 50 Color 50 Select Move Menu Exit Picture Sound Time Option Lock Channel Select Move Menu Exit Picture Sound Time Option Lock Channel Se...

Страница 16: ...V Watch the signal from the AV input terminals Component1 Watch the signal from the COMPONENT 1 input terminals Component2 Watch the signal from the COMPONENT 2 input terminals D SUB Watch the signal...

Страница 17: ...memory 1 Press MENU and the main menu screen displays And before you start Auto Tuning it is necessary to select a country firstly Then the TV begins memorizing all ATV DTV channels available in your...

Страница 18: ...a better picture and sound effect use Fine Tune Navigate to ATV Manual Tuning submenu highlight Current CH item press 3or4 to select a channel you want to perform fine tune 1 Press 6 to select Fine T...

Страница 19: ...NAME 17 Setting Favorite Channels You can set up favorite channels list so that you can quickly browse through your favorite channels by using Favorite button 1 Navigate to the Channel menu press 5or6...

Страница 20: ...ramme Edit menu has more than one page you may press5or6 to scroll the page upward or downward To restore a skipped channel navigate to the Programme Edit menu select the channel and press BLUEbutton...

Страница 21: ...e seconds or press OK to go directly to that channel When selecting the TV will indicate the channel through the information banner Method 4 Using channel list Press LIST button to display the channel...

Страница 22: ...Contrast Brightness Sharpness Adjusts image contrast Color Temperature Adjusts screen brightness for easier viewing of dark picture such as night scenes and black hair Adjusts image sharpness and dis...

Страница 23: ...0 Auto Volume Balance 0 Spatial Off Off Option Description Sound Mode Selectsadesiredsoundmode YoucanselectfromStandard Music Movie SportsandUser Standard Select for normal programs Note To quickly ch...

Страница 24: ...tereo broadcast press the STEREO button to select Stereo or Mono When Mono is selected the TV sound is output monaurally When the TV set is receiving bilingual program press the STEREO button to selec...

Страница 25: ...uage Hearing Impaired Only for digital programs Press 3 4 to select On to display the subtitles if available for the hearing impaired SPDIF Only for digital programs Auto Output audio signal as its or...

Страница 26: ...word is 0000 2 The Password setup sub menu is used to set a new system password or to change an existing system password By default the system password is 0000 and you may change it To access Parental...

Страница 27: ...h that parents may not want their children to view the program M Mature Audience Suitable for mature audience MA Mature Adult Audience May contain mature themes profane language graphic violence and s...

Страница 28: ...e Press 5or6 to select Hour or Minute item and press 3or4to adjust the value 4 Option Description Volume Mode Program Number Sets desired volume for the On program Selects one source to be viewed thro...

Страница 29: ...re is no signal input for a certain time the unit will turn off automatically You may directly press SLEEP button on the remote control to set sleep timer After you have set sleep timer when the last...

Страница 30: ...ress YELLOW button again to exit Use 5 6 3or4to navigate among the channels and program events and press INFO button to get more detailed information if available about the programme you choose If you...

Страница 31: ...responding pages Hold button Certain pages contain sub pages which are automatically displayed successively This button is used to stop or resume sub page acquisition Reveal button Press the button to...

Страница 32: ...djust an option To confirm press OK Press MENU and the main menu screen displays 2 5 Vertical Position Moves the image on the screen up or down Press MENU to return to previous menu Press EXIT to exit...

Страница 33: ...es Make sure the power cord is plugged in Press POWER on the TV or on the remote control Try another channel it could be station trouble Select a proper picture mode Adjust the brightness in the video...

Страница 34: ...ct and may be accompanied by a slight creaking noise This is not a malfunction Control buttons do not operate Disconnect the power cord and wait for a few seconds Then re plug the power cord and turn...

Страница 35: ...y AC100 240V 50 60Hz Power Consumption 220W Dimensions mm 841 W x 632 H x 270 D Unit Weight kg 21 Specifications Design and specifications are subject to change without notice Note 33 TV System Analog...

Страница 36: ...5944032750 PALSONIC CORPORATION PTY LTD 1 JOYNTON AVENUE WATERLOO NSW 2017 AUSTRALIA TEL 02 9313 7111 FAX 02 9313 7555 PALSONIC CUSTOMER SERVICE TELEPHONE AUSTRALIA 1300 657 888 Ver 1 0...

Отзывы: