background image

Using the unit

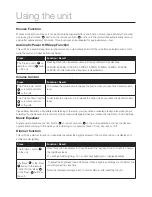
Operating the iPod, iPhone or iPad

This unit is designed to allow you to connect an iPod, iPhone or iPad without the need for dock connectors. The 
design of the unit has been structured to provide support to the connector under normal usage without excessive 
pressure on the ipod/ iphone/ ipad when controlling playback using the ipod/ iphone/ ipad screen.

You can operate the iPod, iPhone or iPad using either the unit, remote control or directly with the iPod, iPhone or iPad.  
When the iPod, iPhone or iPad is connected to the unit, it will start charging the battery of the iPod, iPhone or iPad.

Connect the iPod, iPhone or iPad with the dock connector, see page 12 –13, turn everything on and follow the 
instructions below.

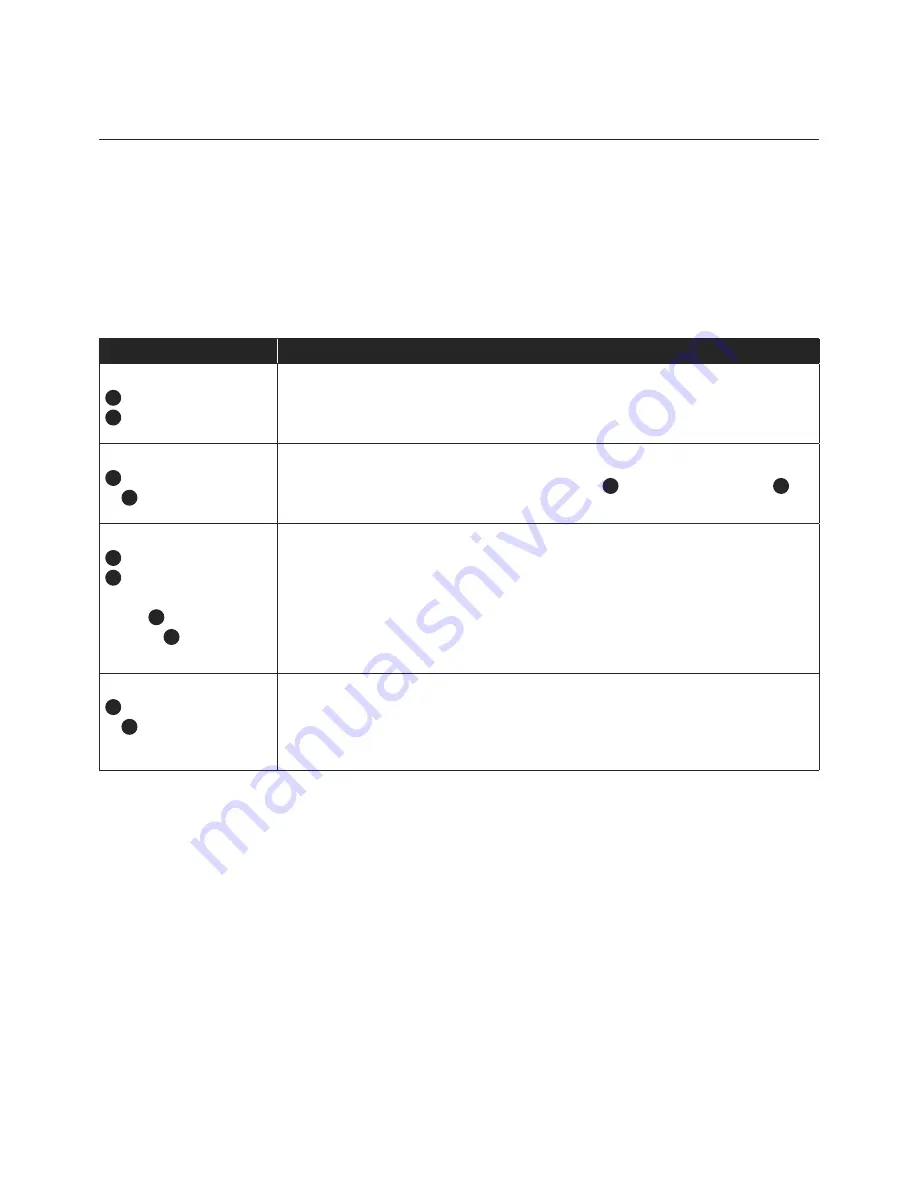
Press

Function / Result

The ‘Function’ button  

3

 o

n remote control or  

8

 o

n the unit

Press this repeatedly until the display shows ‘iPod’.

The unit will automatically playback the songs from your iPod, iPhone or iPad. The 
screen or the iPod, iPhone or iPad will display information of the current song.

The ‘Play / Pause’ button  

5

 on the remote control 

or 

12

 on the unit.

To pause the operation of the unit. 

To resume operation press the ‘Play / Pause’ button 

5

 on the remote control or 

12

 on 

the unit again and the unit will resume operation at the same song as it was paused on. 

The ‘Back / Tune Down’ 

4

 or the ‘Next / Tune Up’ 

6

 button on the remote 

control or the ‘‘Back / Tune 
Down’ 

11

 or the ‘Next / 

Tune Up’ 

13

 button on the 

the unit.

If you press and RELEASE the buttons it will skip forward or backwards by one track.

If you press and HOLD the buttons it will fast forward or fast reverse.

The ‘Play / Pause’ button  

5

 on the remote control 

or 

12

 on the unit.

HOLD BUTTON

To stop playback.

Note: Never remove (or unplug) the iPod, iPhone or iPad from the unit during playback, 
always stop playback first or change the funtion to ‘Radio’.

‘Made for iPod’, ‘Made for iPhone’ and ‘Made for iPad’ mean that an electronic accessory has been designed 
to connect specifically to iPod, iPhone, iPad, respectively, and has been certified by the developer to meet Apple 
performance standards. Apple is not responsible for the operation of this device or its compliance with safety 
and regulatory standards. Please note that the use of this accessory with iPod, iPhone, iPad may affect wireless 
performance.

NOTE: Due to restriction by Apple for any iPad accessories (such as this product), please note that the following iPods 
will not charge when docked in this product: iPod Classic,  iPod 4G or iPod 5G.

Содержание iP12iPA

Страница 1: ...BLUE LCD DISPLAY PLL DIGITAL TUNE R 2WAY SPEAKER SYSTEM CLOCK QUARTZ DIGITAL IR REMOTE CONTROL User s Manual iP12iPA Docking System with FM PLL Radio and Radio Alarm Clock PRODUCT SHOT HERE...

Страница 2: ...the power socket grasp the plug and pull it from the power socket Never drag the appliance by the power cord Keep the power cord away from heated surfaces It is NOT recommended to use the appliance w...

Страница 3: ...de Setting 5 Snooze Function 5 Automatic Power Off Sleep Finction 6 Volume Control 6 Music Equaliser 6 Dimmer Function 6 Operating the Radio 7 Radio Memory 7 Operating the iPod iPhone or iPad 8 Repeat...

Страница 4: ...hone or iPad Rear Support Stand 4 Dimmer 5 Eq Sleep 6 Display Clock Set 7 Alarm On Off 8 Function 9 Volume Up 10 Snooze 11 Back Tune Down memory 12 Play Pause FM Mode 13 Next Tune Up memory 14 Memory...

Страница 5: ...aptor to operate the unit Use of other adaptors may damage the unit Make sure the voltage of the AC adaptor operates at the same voltage as your local household voltage Insert the plug of the power co...

Страница 6: ...11 button on the remote control or the Clock Set 6 button on the unit Hold for 3 seconds The display flashes 12 Hour or 24 Hour The Back 4 or the Next 6 button on the remote control Or the Back 11 or...

Страница 7: ...the Alarm button 7 on the remote control or 7 on the unit to confirm The Wake Up Source will start to flash in the display The Back 4 or the Next 6 button on the remote control Or the Back 11 or the...

Страница 8: ...trol or 15 on the unit To decrease the volume of unit release the button when you reach the desired volume level Please Note Sometimes especially while listening to the radio you may notice a repeated...

Страница 9: ...1 or the Next 13 button on the unit HOLD FOR 2 SECONDS To Seek automatically adjust the radio s frequency Up or Down to the next available radio station The radio s LCD will indicate the exact frequen...

Страница 10: ...peration press the Play Pause button 5 on the remote control or 12 on the unit again and the unit will resume operation at the same song as it was paused on The Back Tune Down 4 or the Next Tune Up 6...

Страница 11: ...utton 3 on remote control or 8 on the unit Press this repeatedly until the display shows AUX Switch on the external device eg MP3 player or TV Start playback of the external device and adjust the volu...

Страница 12: ...nergy Rating Speaker Main speaker 2 x 2 Dimensions Weight approx APN Design and specifications are current as of July 2011 V 1 but are subject to change without notice Specifications for Australia New...

Отзывы: