background image

Press 

SETUP

.

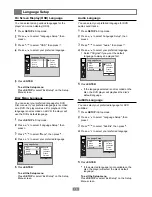
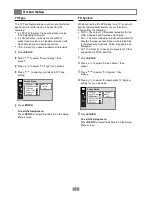
Press          to select "Screen Setup", then
press    .

Press          to select "Video Output", then
press    .

Press          to select the appropriate Video
Output setting for your television. 

Press 

SETUP

.

Press          to select "Screen Setup", then
press    .

Press          to select "Brightness", then
press    .

Press          to select the desired Brightness
setting.  

Screen Setup

17

Brightness

Video Output

You can change the light intensity of DVD playback to
"Normal", "Bright", or "Soft".

Normal
Bright
Soft

TV Type
Screen Saver
TV System
Video Output
Brightness
Contrast

Screen Setup

Press 

ENTER

.

To exit the Setup menu

Press 

SETUP

 or select "Exit Setup" on the Setup

Menu screen.

-3
-2
-1
0
+1
+2
+3

TV Type
Screen Saver
TV System
Video Output
Brightness
Contrast

Screen Setup

Contrast

You can increase or decrease the difference between
light and dark tones during DVD playback.

Press 

SETUP

.

Press          to select "Screen Setup", then
press    .

Press          to select "Contrast", then press    .

Press           to select the desired Contrast setting
from -4 (least contrast, may lose detail in dark
scenes) to +4  (most contrast, may lose detail in
well-lit scenes). 

Press 

ENTER

.

To exit the Setup menu

Press 

SETUP

 or select "Exit Setup" on the Setup

Menu screen.

S -Video - Choose when using a
standard Composite Video or S-Video
connection to your TV.
YUV - Choose when using a standard
Composite Video or Component Video
connection to your TV. 
P-SCAN - Choose when using a
Progressive Scan connection to your TV.

Press 

ENTER

.

If you selected YUV P-SCAN, you will be
prompted to confirm that your TV supports
Progressive Scan. Press 

ENTER

 to continue

or 

STOP

      to cancel.

To exit the Setup menu

Press 

SETUP

 or select 'Exit Setup" on the Setup

Menu screen.

If you connected the DVD player to your TV using
the S-Video or Component Video output, you must
specify in the menu system which of these connection
types you are using.
Before you select YUV P-SCAN, make sure your
TV supports Progressive Scan and that the Y, Pb,
and Pr cables are properly connected.
If your screen turns black after adjusting this
setting, press the PROG.SCAN button on the
remote control to switch back to Interlace mode.

S-Video
YUV
P-SCAN

TV Type
Screen Saver
TV System
Video Output
Brightness
Contrast

Screen Setup

Содержание DVD2021

Страница 1: ...1 JOYNTON AVENUE WATERLOO NSW 2017 AUSTRALIA TEL 02 9313 7111 FAX 02 9313 7555 www palsonic com au PALSONIC CUSTOMER SERVICE TELEPHONE AUSTRALIA 1300 657 888 DVD2021 USER S MANUAL Please read this man...

Страница 2: ...teries 2 Audio Video Cable User s Guide Limited warranty FCC and Safety Information Important Safety Instructions Player Overview Front View Rear View Remote Control Inserting Remote Control Batteries...

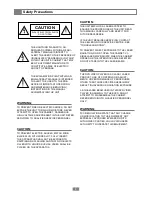
Страница 3: ...H AS VASES SHALL BE PLACED ON THE APPARATUS THE UNIT EMPLOYS A LASER SYSTEM TO ENSURE THE PROPER USE OF THE UNIT READ THIS MANUAL CAREFULLY AND KEEP IT FOR FUTURE REFERENCE IF THE UNIT REQUIRES SERVIC...

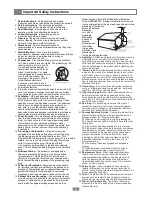
Страница 4: ...rounding If an outside antenna or cable system is connected to the product be sure the antenna or cable system is grounded so as to provide some protection against voltage surges and built up PORTABLE...

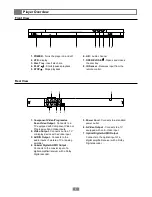
Страница 5: ...ith Component Video or Progressive Scan Video inputs 2 Video Output Connects out to a TV or display device with a Video input 3 AUDIO Output Connects to the audio inputs of a stereo TV or analog ampli...

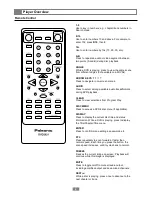
Страница 6: ...DVD playback CLEAR Press to clear selections from Program Play DISC MENU Press to access a DVD s disc menu if applicable DISPLAY Press to display the current disc time and status information While a D...

Страница 7: ...k to normal SEARCH Press to jump to a specific time title chapter or track during disc playback SETUP While the disc is stopped press to display the Setup menu for the DVD player SLOW Press repeatedly...

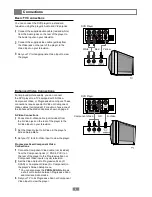
Страница 8: ...ive Scan inputs These connections require special S Video or Component Video cables not included For audio choose one of the Enhanced Audio Connections shown on page 9 S Video Connections Enhanced Vid...

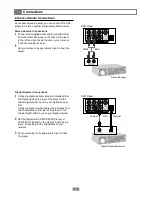
Страница 9: ...ceiver Set the Digital Out to SPDIF PCM Stereo or SPDIF RAW Digital in the player s Audio Setup menu depending on the capabilities of your receiver Set your receiver to its appropriate input to hear t...

Страница 10: ...or chapter 1 10 for chapter 10 etc Press PLAY The player starts playback of the selected item Stop Press STOP once to stop and hold playback at the current position Press STOP twice to stop and reset...

Страница 11: ...Mark the beginning point A and the ending point B of the segment you want to review While playing a DVD or CD at the place you want the repeat to start press the A B button Repeat A will appear on scr...

Страница 12: ...rn on your stereo or audio system and select the appropriate audio input Basic Audio CD Playback Press POWER on Press OPEN CLOSE to open the disc tray Hold the edge of the disc and place it in the tra...

Страница 13: ...PAUSE to pause the slide show Press STOP to stop the slide show and enter Thumbnail mode You can rotate images during a slide show by pressing the keys when the image appears on screen Rotate Mode You...

Страница 14: ...s PLAY Other Disc Playback 14 Playing CDs with MP3 and JPEG Files Playing MP3 CDs Press POWER on Press OPEN CLOSE to open disc tray Hold the edge of the MP3 disc and place it in the tray with the labe...

Страница 15: ...If the language is not recorded on a DVD the player will use the DVDs default language Press ENTER To exit the Setup menu Press SETUP or select Exit Setup on the Setup Menu screen Subtitle Language Y...

Страница 16: ...ss to select TV Type then press Press to select your preferred TV Type setting Screen Setup 16 TV System TV Type The TV Type feature allows you to set your preferred aspect ratio for DVD movies Choose...

Страница 17: ...l in dark scenes to 4 most contrast may lose detail in well lit scenes Press ENTER To exit the Setup menu Press SETUP or select Exit Setup on the Setup Menu screen S Video Choose when using a standard...

Страница 18: ...al Audio Output Audio Setup Digital Out SPDIF PCM SPDIF RAW Off The digital audio output jack labelled Coaxial is used to output the audio signal recorded on DVD discs to an external amplifier receive...

Страница 19: ...level to PG 13 the player will block playback of movies rated PG 13 R NC 17 and X unless the correct password is entered You can only use the Parental Control feature with rated DVD discs Press SETUP...

Страница 20: ...e player alert you when multiple angles are available by displaying an Angle Mark on screen Whether Angle Mark is set to On or Off pressing the ANGLE button will always allow selection of multiple ang...

Страница 21: ...o source Check volume adjustment on the player and external equipment Check the MUTE on the player and the TV No sound will be heard during Pause or when fast forward or reverse is used Ensure that th...

Страница 22: ...ndition of the TV interference may appear on the TV monitor while you watch a TV broadcast and the unit is left on This is not a malfunction of the unit or the TV To watch a TV broadcast turn off the...

Страница 23: ...PALSONIC CORPORATION PTY LTD 1 JOYNTON AVENUE WATERLOO NSW 2017 AUSTRALIA TEL 02 9313 7111 FAX 02 9313 7555 www palsonic com au PALSONIC CUSTOMER SERVICE TELEPHONE AUSTRALIA 1300 657 888...

Отзывы: