background image

1

2

3

4

5

6

7

8

9

M

EN

U

CH

CH

VOL

VOL

AV

D

S

P

EDIT

SLEEP

SOUND

PIC

GAME

SYSTEM

S

C

A

N

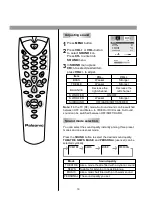
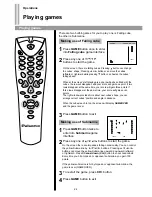
The setting of colour and sound system

Fine tuning

3

2

1

14

2

1

Tuning in

 (continued)

Operations

Fine tuning/The setting of colour and sound system

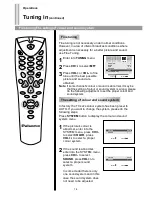
Fine tuning is not necessary under normal conditions.
However, in area of inferior broadcast conditions where
adjustment is necessary for a better picture and sound,
use Fine Tuning.

Enter into 

TUNING

 menu.

Press 

CH+/-

 to select 

MFT

.

Press 

VOL+

 or 

VOL-

 to fine

tune until the best possible
picture and sound are
obtained.

Note: 

if some channel's colour or sound is abnormal, it may be
that the setting of colour or sound system is wrong, please
do the following adjustment to set the proper colour and
sound system.

In factory the TV set's colour system has been preset to
AUTO. If you want to change the system, please do the
following steps:
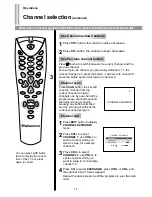
Press 

SYSTEM

 button to display the colour and sound

system menu.

If the picture's colour is
abnormal, enter into the
SYSTEM menu, press 

CH+/-

to select 

COLOR

, press

VOL+/-

 to select a proper

colour system.

If the sound is abnormal.
enter into the SYSTEM menu,
press 

CH+/-

 to select

SOUND

, press 

VOL+/-

 to

select a proper sound
system.

In some model there is only
one sound system and in this
case the sound system does
not need to be adjusted.

PICTURE

TIMER

SOUND

TUNING

SETUP

POSITION
BAND
SKIP
SEARCH

MFT

AUTO MEMORY

8

VHFL

ON

SELECT                      ADJUST

COLOR

SOUND

AUTO

I

SELECT                      ADJUST

COLOR

SOUND

AUTO

I

SELECT                      ADJUST

Содержание 6140GY

Страница 1: ...ALIA TEL 02 9313 7111 FAX 02 9313 7555 www palsonic com au PALSONIC CUSTOMER SERVICE TELEPHONE AUSTRALIA 1300 657 888 61CM CORDLESS REMOTE COLOUR TELEVISION MODEL 6140GY OWNER S MANUAL Type Tested Ele...

Страница 2: ...cation for future reference Screen displays and illustrations in this manual may differ from the actual ones for better visibility Contents Main Features Important Safety Cautions Identification of Co...

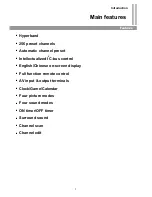
Страница 3: ...ualized I 2 C bus control English Chinese on screen display Full function remote control AV input output terminals Clock Game Calendar Four picture modes Four sound modes ON timer OFF timer Surround s...

Страница 4: ...cleaning dust off the picture tube disconnect the power first You can wipe lightly with a piece of dry clean and soft cloth Avoid exposing the set to direct sunlight and other sources of heat to prev...

Страница 5: ...er the ventilating hole in the cabinet Keep a space of more than 10cm from the walls to the TV set to ensure adequate ventilation If the power cord or the plug is damaged contact a qualified service d...

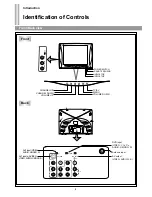
Страница 6: ...NO R L MONO VIDEO B R C Y C AUDIO R L 1 DVD input VIDEO Y CB CR AUDIO L MONO R Antenna input AV output VIDEO AUDIO L R AV1 inputs S VIDEO VIDEO AUDIO L MONO R AV2 input VIDEO AUDIO L MONO R TV AV MENU...

Страница 7: ...t Sleep timer Channel edit MENU control buttons Game control buttons Power on standby TV VIDEO input select Direct channel select Previous program MENU Volume up down Menu item adjust Sound mode selec...

Страница 8: ...good signal and will generally mean that an outdoor aerial must be used The exact type and position of the aerial will depend upon your particular area It is recommended that the 75 ohm coaxial cable...

Страница 9: ...ge batteries not intended to be recharged Use only the size and type of batteries specified Do not mix different types of batteries together or old batteries with fresh ones When the remote control wi...

Страница 10: ...ect any plug from the S VIDEO terminal 8 External Equipment Connection Introduction External Equipment Connection Please refer to the owner s manual of the equipment to be connected as well To connect...

Страница 11: ...C AUDIO R L 1 W B R G W B R G R DVD Player Laser Disc Player etc TV SET S REAR Signals White audio L MONO Red audio R CR Green Y Blue CB Y CB CR L MONO R NOTES 1 Both the CR terminal and the audio R t...

Страница 12: ...set is turned on In STANDBY mode you can also press the Channel up button on the set to turn on Press the Power Switch on the TV set if you want to cut off the power completely If you want to turn off...

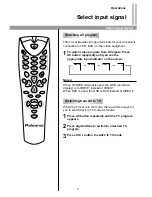
Страница 13: ...nal is used the OSD on screen display is S VIDEO1 instead of VIDEO1 When DVD is used the OSD is DVD instead of VIDEO 2 When the TV set is in AV mode there are three ways for you to switch back to TV m...

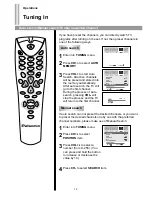
Страница 14: ...and the TV will return to the first channel If auto search can not preset the desired channels or you want to preset the desired channels one by one with the preferred channel numbers please make use...

Страница 15: ...searching process if you know which band your desired program locates in The band switched among UHF VHFL VHFH Repeat the above steps if you want to store another program in other position number Afte...

Страница 16: ...of colour or sound system is wrong please do the following adjustment to set the proper colour and sound system In factory the TV set s colour system has been preset to AUTO If you want to change the...

Страница 17: ...n input the number and wait for 2 seconds Be sure the period of two press should be within 2 seconds To select two digit channel Method 1 Input the channel number using the digit buttons and wait for...

Страница 18: ...nel 2 Press SCAN button the set will scan the channel from the current channel to higher channels one by one until all the programs are scanned over and then stop During scanning pressing any button w...

Страница 19: ...e quality instantly among three modes and one user set mode Press the PIC button to select the desired picture quality BRILLIANT STANDARD SOFTNESS and PERSONAL user set can be selected cyclically Pres...

Страница 20: ...adjustment Use VOL or VOL button Press VOL button the volume increases Press VOL button the volume decreases If you want to mute the sound press button on the remote control To restore the sound pres...

Страница 21: ...can be switched between OFF and Stereo In VIDEO or DVD mode Surround sound can be switched between OFF SOFT HARD You can select the sound quality instantly among three preset modes and one user set m...

Страница 22: ...t LANGUAGE Enter into SETUP menu Press CH to select DEMO Press VOL or VOL to select START and the TV starts the menu demonstration which shows you how to use the menu After the demonstration it will r...

Страница 23: ...P menu Press CH to select CALENDAR item Press VOL to enter into calendar sub menu Press CH to select SOLAR or LUNAR press VOL to enter After entering into SOLAR or LUNAR calendar press CH to select ye...

Страница 24: ...ou set On Timer to Every this occurs every day To cancel this function set On Timer to Off Press CH button use VOL to set the ON time Press CH button to select POS item use VOL to select a channel num...

Страница 25: ...ff Timer to Once or Every When you are setting the time by VOL button if you press and hold the time will increase or decrease by 10 minutes For example you would like the TV to turn off in 60 minutes...

Страница 26: ...ar at the same time your score will gain three points If three rows disappear at the same time your score will gain seven points The right window provides hints about next cubes shape you can arrange...

Страница 27: ...mps etc Stripes appear on the screen Double images or ghosts Snowy picture Possible interference of electronic interference from another TV set a computer an electronics game machine a broadcast stati...

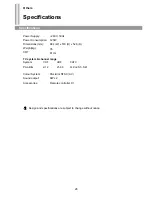
Страница 28: ...240V 50Hz 120W 684 W x 510 H x 526 D 35 61cm System PAL B G VHF 2 12 UHF 21 69 CATV X Z 2 S1 S41 Colour System Sound output Accessories PAL B G NTSC AV 6W x 2 Remote controller X 1 Design and specific...

Страница 29: ...PALSONIC CORPORATION PTY LTD 1 JOYNTON AVENUE WATERLOO NSW 2017 AUSTRALIA TEL 02 9313 7111 FAX 02 9313 7555 www palsonic com au PALSONIC CUSTOMER SERVICE TELEPHONE AUSTRALIA 1300 657 888 604 W3483 00...

Отзывы: