background image

Teletext

Operations

Switch on/off/Description of TELETEXT/Button Introduction

Teletext is an optional function, therefore only a set with the teletext system can receive the teletext
broadcast.

Switching Teletext on/off

Press the TEXT button to switch on teletext. The initial page or
last selected page appears on the screen.
To switch off teletext, press the TEXT button repeatedly until the
Teletext disappears.

Description of Teletext

Teletext is a free service broadcast by most TV stations which
gives up-to-the-minute information on news, weather, television
programs, share prices and many other topics.
The thing to remember about Teletext is that it is slow. It is the
nature of the system itself, where a large amount of information
is sent using a small fraction of the TV signal. If you get yourself
into trouble, read the following instruction carefully. It may have
your answer.
Teletext is controlled through the remote controller. 

Button introduction

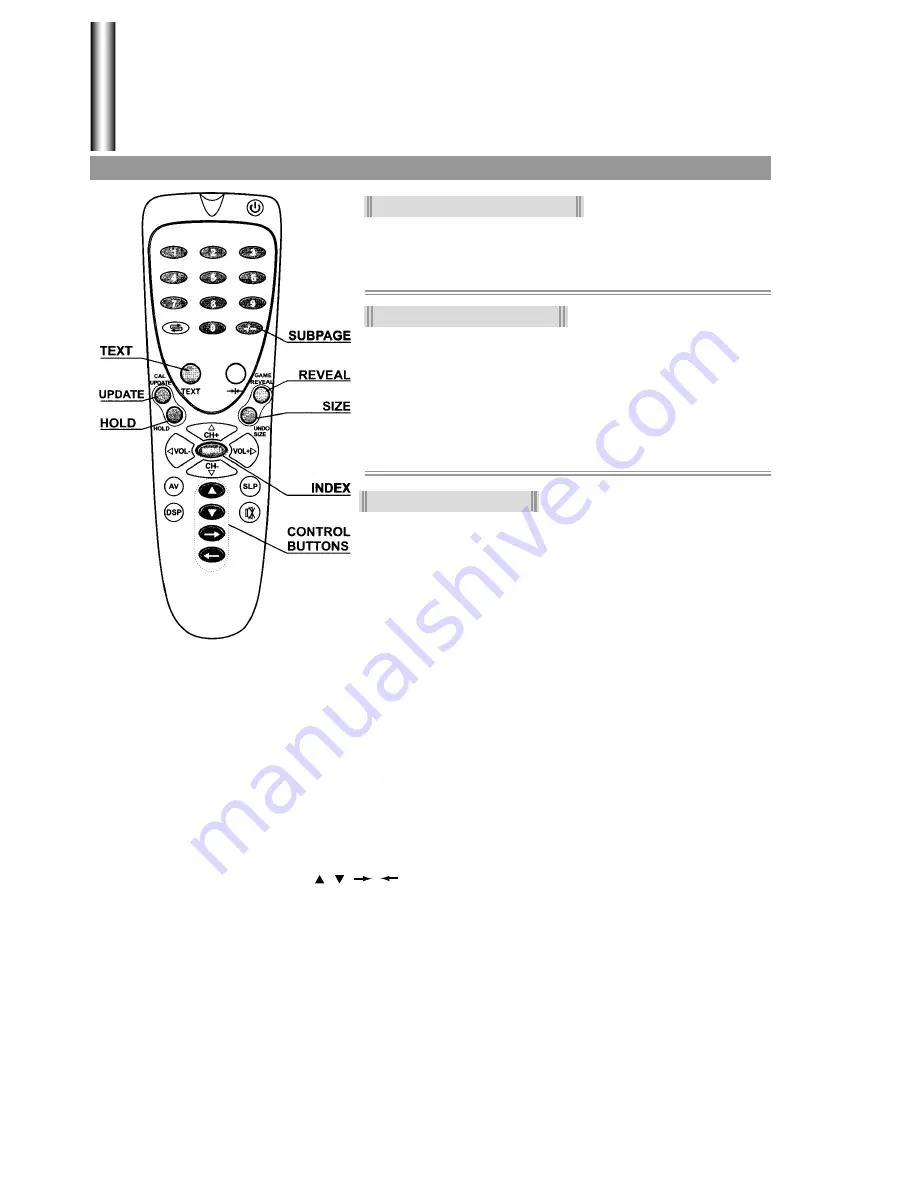
1. TEXT

Press the button to bring the set from TV mode to Teletext mode.
Press it again to get mixed mode which superimpose the text on
a TV picture. Press it once more to resume TV mode.

2. UPDATE

Press the button to view the updated teletext page.
Display the TV picture on the screen while waiting for the new
teletext page. The characters "???" will appear at the top of left

corner of the screen. Then you can input a desired page number. When the update page is available, then
the characters "???"will change to the page number.

3. REVEAL

Press this button to display concealed information, such as solutions of riddles or puzzles. Press again to
remove the information from the display.

4. HOLD

When a Teletext page has sub-pages the screen will change automatically to display the next sub-page
when it comes around. This button freezes the page on screen to prevent this.
To release the page press HOLD again.
Sub-page may be identified by a number such as "2/3" on the page itself. The "2/3" means that the page on
screen is sub-page 2 of a 3 page set.

5. SIZE

Press the button to expand the top half of the display. Press it again to expand the bottom half of the display.
Press it once more to resume normal size.

6. RED/GREEN/YELLOW/BLUE 

(   /    /      /      ) buttons

These four colour-coded buttons control a memory that allows instant access to selected page number.

7. INDEX 

Press this button to select index page.

8. SUBPAGE

Select the Teletext alarm page or Teletext subpage. Press the button, the "S****" will be displayed on the
screen. Now enter the subpage number at which this page should be displayed by using buttons 0-9 on
the remote controller. To cancel this feature press the button again.

22

Содержание 5180G

Страница 1: ...ALIA TEL 02 9313 7111 FAX 02 9313 7555 www palsonic com au PALSONIC CUSTOMER SERVICE TELEPHONE AUSTRALIA 1300 657 888 51CM CORDLESS REMOTE COLOUR TELEVISION MODEL 5180G OWNER S MANUAL Type Tested Elec...

Страница 2: ...displays and illustrations in this manual may differ from the actual ones for better visibility CONTENTS Features Important Safety Cautions Identification of Controls 1 2 4 4 5 6 7 7 8 8 9 10 11 12 12...

Страница 3: ...etting 15 16 17 18 18 18 18 19 19 20 20 20 20 21 21 22 23 24 Setting Sleep Timer Setting Timer Setting Time Off Setting Time On Setting Alarm Channel System Setting Selecting OSD language Calendar set...

Страница 4: ...D language Hyperband 255 preset channels Automatic channel preset Full function remote control AV input S VIDEO input terminals Digital AFT technology Four picture modes ON timer OFF timer TELETEXT Ho...

Страница 5: ...expose the TV set to rain or excessive moisture Avoid using the set in very warm or damp places and never use it in a bathroom When cleaning dust off the picture tube disconnect the power first You c...

Страница 6: ...ot cover the ventilating hole in the cabinet Keep a space of more than 5cm from the walls to the TV set to ensure adequate ventilation 6 If the power cord or the plug is damaged contact a qualified se...

Страница 7: ...VOL button volume down adjust menu item adjust 5 VOL button volume up adjust menu item adjust 6 CH button channel down select menu item select 7 CH button channel up select menu item select AV input...

Страница 8: ...Back 1 Antenna input 2 AV input VIDEO AUDIO L MONO R 3 S VIDEO input 5...

Страница 9: ...f buttons are equal to the CH buttons and the function of buttons are equal to the VOL buttons but in TELETEXT operation the buttons only serve as teletext control keys Identification of Controls cont...

Страница 10: ...he remote control will not be used for a long period of time or when the batteries are worn out remove the batteries Do not throw the batteries into a fire Dispose of used batteries in the specified m...

Страница 11: ...colour requires a good signal and will generally mean that an outdoor aerial must be used The exact type and position of the aerial will depend upon your particular area Notes It is recommended that t...

Страница 12: ...manual of the equipment to be connected as well Important notes on the AV input terminals Please do not connect and use the front and rear input terminals at the same time You can also use the AV ter...

Страница 13: ...ed on In STANDBY mode you can also press the AV TV button on the set to turn on Notes If there is no input signal then a blueback appears After 15 minutes the set auto goes to STANDBY Press the Power...

Страница 14: ...ogram from AV input terminals If you want to switch to TV press AV button again or follow step 2 3 or 4 Press digit buttons to switch back to TV mode Press CH or CH button to switch back to TV mode Pr...

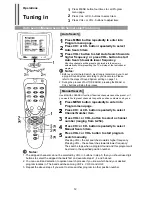
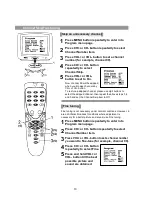
Страница 15: ...if you would like to preset channels to specific position numbers one by one Press MENU button repeatedly to enter into Program menu page Press CH or CH button repeatedly to select Channel Number item...

Страница 16: ...he above steps 1 4 and 5 and set the Channel Skip item to Off Fine tuning Fine tuning is not necessary under normal conditions However in area of inferior broadcast conditions where adjustment is nece...

Страница 17: ...sound system setting is wrong Then you can select a proper sound system as follows Press MENU button repeatedly to enter into Program menu page Press CH button to select Sound System item Press VOL or...

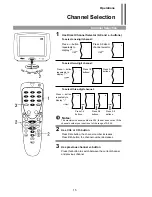
Страница 18: ...tton repeatedly to display Press 1 2 buttons Press 0 9 buttons Press 0 9 buttons Notes The maximum channel number is 254 the set does not act if the channel number you input is out of the range of 0 2...

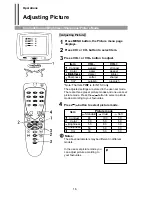
Страница 19: ...s for NTSC only The adjusted settings are stored in the user set mode There are three preset picture modes and one user set picture mode Press the button to select a picture mode according to your fav...

Страница 20: ...ume decreases The minimum volume is 0 and the maximum volume is 100 If you want to mute the sound press button on the remote To resume the sound press this button again Notes You can also resume the s...

Страница 21: ...ly to enter into Clock menu page Press CH button to select Timer item Press VOL or VOL button to set current time Notes The Time Off and Time On items are available only after you finish setting the T...

Страница 22: ...rm Channel item Notes Clock Sleep Timer Time Off Time On Alarm Channel 99 30 00 10 00 30 07 00 1 When you adjust time by VOL or VOL button the increasing decreasing step of time is 1 minute in every p...

Страница 23: ...o enter into Preset menu page Press VOL or VOL button to select OSD language Calendar setting Hotel mode The TV set provides Hotel mode lock or unlock function When the Hotel is in lock mode the Progr...

Страница 24: ...ow to play the name Description of icons the man you control the box to push the destination to push the box to the wall The player should control the man to push the box just push not pull to the des...

Страница 25: ...play the TV picture on the screen while waiting for the new teletext page The characters will appear at the top of left corner of the screen Then you can input a desired page number When the update pa...

Страница 26: ...for 10 minutes before switching on again Check whether the Child Lock is set to On Power is not turned on Poor colour poor tint Be sure the power cord is plugged in Contrast colour tint are not corre...

Страница 27: ...05 W x 481 H x 482 D 23 51cm System PAL B G VHF 2 12 UHF 21 69 CATV X Z 2 S1 S41 TELETEXT Color System Sound output Accessories WST FLOF TELETEXT PAL B G NTSC playback 1 5W x 2 Remote controller X 1 D...

Страница 28: ...603 J21173 01 PALSONIC CORPORATION PTY LTD 1 JOYNTON AVENUE WATERLOO NSW 2017 AUSTRALIA TEL 02 9313 7111 FAX 02 9313 7555 www palsonic com au PALSONIC CUSTOMER SERVICE TELEPHONE AUSTRALIA 1300 657 888...

Отзывы: