background image

Installation

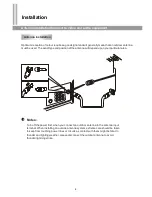
Antenna installation/Connect to video and audio equipment

8

Optimum reception of colour requires a good signal and will generally mean that an outdoor antenna
must be used. The exact type and position of the antenna will depend upon your particular area. 

Turn off the power first, when you connect an outdoor antenna to the antenna input
terminal. When installing an outside antenna system, extreme care should be taken
to keep from touching power lines or circuits as contact with them might be fatal. In
thunder and lighting weather, please disconnect the outdoor antenna to avoid
thunder/lightning strike. 

Antenna installation

Notes:

Содержание 3430GM

Страница 1: ...ALIA TEL 02 9313 7111 FAX 02 9313 7555 www palsonic com au PALSONIC CUSTOMER SERVICE TELEPHONE AUSTRALIA 1300 657 888 34CM CORDLESS REMOTE COLOUR TELEVISION MODEL 3430GM OWNER S MANUAL Type Tested Ele...

Страница 2: ...t you thoroughly read this manual before use to fully enjoy the many functions and excellent effects of this receiver Retain this manual in an easily accessible location for future reference Screen di...

Страница 3: ...kipping Fine tuning Channel exchange Setting colour system Setting sound system Selecting channel Use digit buttons Use CH buttons Use previous button Picture controls Sound controls Use VOL Use butto...

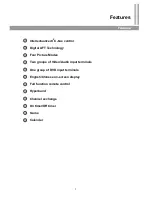
Страница 4: ...ontrol Digital AFT Technology Four Picture Modes Two groups of Video Audio input terminals One group of DVD input terminals English Chinese on screen display Full function remote control Hyperband Cha...

Страница 5: ...ing dust off the picture tube disconnect the power first You can wipe lightly with a piece of dry clean and soft cloth Avoid exposing the set to direct sunlight and other sources of heat to prevent da...

Страница 6: ...er the ventilating hole in the cabinet Keep a space of more than 10cm from the walls to the TV set to ensure adequate ventilation If the power cord or the plug is damaged contact a qualified service d...

Страница 7: ...3 MENU button to enter into menu operation 4 VOL button volume down adjust menu item adjust 5 VOL button volume up adjust menu item adjust 6 CH button channel down select menu item select 7 CH button...

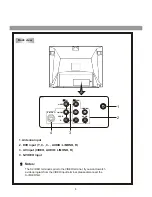
Страница 8: ...DIO L MONO R 4 S VIDEO input 1 2 4 3 S VIDEO Back view VIDEO AUDIO R R L MONO L MONO Y CB B R R C Notes The S VIDEO terminal is prior to the VIDEO terminal if you want to watch a video program from th...

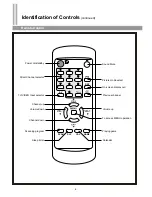
Страница 9: ...ued Remote Control 6 Power on standby Direct Channel selector TV VIDEO Input selector Channel up Volume down Channel down Scanning program Sleep timer Calendar Playing game To access MENU operation Vo...

Страница 10: ...exhausted or the polarity is wrong 4 When direct sunlight and incandescent lamp fluorescent lamp or any other strong light shines on the remote sensor of the TV the remote operation may be unstable 7...

Страница 11: ...antenna will depend upon your particular area Turn off the power first when you connect an outdoor antenna to the antenna input terminal When installing an outside antenna system extreme care should b...

Страница 12: ...VIDEO EQUIPMENT W W Y Y R R R L MONO VIDEO Signal AUDIO To audio outputs To video output Connect the rear AV and DVD input terminals To video output To audio outputs To audio outputs W W W W W W W W Y...

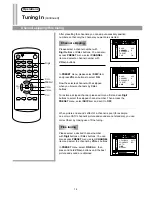
Страница 13: ...sound system To search program automatically To fine tune manually To search program manually it stops if a certain program is found To select the band for current channel Current program number To ex...

Страница 14: ...o turn on the TV Note If there is no input signal to the TV when the TV is on blue background will appear on the screen when the BLUEBACK is set to ON After 15 minutes if there are still no TV signals...

Страница 15: ...l Operations Press AV button repeatedly The screen displays input signal source AV1 AV2 YUV TV Select the input signal source you need In AV mode you can press the digit buttons to switch back to TV m...

Страница 16: ...also access PRESET menu select CHANNEL item and adjust with VOL button manually to select the desired channel number from 0 255 In PRESET menu select MANUAL item Press VOL button the set searches tow...

Страница 17: ...channel please exit menu first and use Digit buttons to select the skipped channel number Then access the PRESET menu select SKIP item and set it to OFF When picture and sound s effect of a channel i...

Страница 18: ...ow the programs in the current channel and target channel will exchange You can select the current channel in the PRESET menu by adjusting CHANNEL item If the picture s colour is abnormal you can adju...

Страница 19: ...hannel To select two digit channel To select three digit channel Note The maximum channel number is 255 the set does not act if the channel number you input is out of the range of 0 255 Use CH buttons...

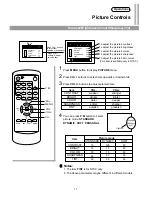
Страница 20: ...s To adjust the picture s colour To adjust the picture s sharpness To adjust the picture s skin colour This item is available only in NTSC Press MENU button to display PICTURE menu Press CH buttons to...

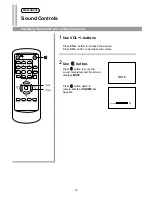
Страница 21: ...and the screen displays MUTE Sound Controls Adjusting the volume and muting the sound Operations Use VOL buttons Press VOL button to increase the volume Press VOL button to decrease the volume Use but...

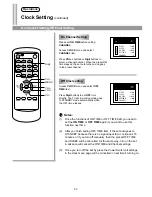
Страница 22: ...igit buttons directly to set current time for the TV Note The ON TIME and OFF TIME can be set only after you finish setting the CLOCK item Access CLOCK menu and select ON TIME item Press VOL buttons t...

Страница 23: ...et in working mode goes to STANDBY mode automatically when the OFF time elapses 1 2 3 Once the functions of ON TIME or OFF TIME fulfil you need to set the ON TIME or OFF TIME again if you want to use...

Страница 24: ...TUP menu Press CH buttons to select CALENDAR item Press VOL buttons to access calendar interface You can also press CAL button directly to access calendar interface Press VOL buttons to select year mo...

Страница 25: ...s VOL buttons to select game level 0 4 The higher the level the faster the bars roll Press CH buttons to select desired array Every time you select you will be deducted 1 point Press VOL buttons to st...

Страница 26: ...ess CH buttons to select DEMO item Press VOL buttons then TV set demonstrates menu operation Press any button to stop it CH CH VOL VOL MENU ON ENG BLUEBACK LANGUAGE CALENDAR GAME DEMO S E T U P 5 3 2...

Страница 27: ...n the screen Possible interferences of automobiles motorcycle trolley bus neon lamps etc Stripes appear on the screen Double images or ghosts Snowy picture Possible interference of electronic interfer...

Страница 28: ...umption Dimensions mm Weight kg CRT AC 240V 50Hz 60W 436 W x 340 H x 380 D 12 34cm System PAL B G VHF 2 12 UHF 21 69 CATV X Z 2 S1 S41 Colour System Sound output Accessories PAL NTSC AV 2 5W x 2 Remot...

Страница 29: ...PALSONIC CORPORATION PTY LTD 1 JOYNTON AVENUE WATERLOO NSW 2017 AUSTRALIA TEL 02 9313 7111 FAX 02 9313 7555 www palsonic com au PALSONIC CUSTOMER SERVICE TELEPHONE AUSTRALIA 1300 657 888 604 M14333 02...

Отзывы: