ION 2000 HARDWARE REFERENCE | Install ION 2000
31
©
2021 Palo Alto Networks, Inc.
Wall Mount the ION 2000
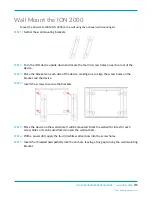
Mount the Prisma SD-WAN ION 2000 on the wall using the optional wall mounting kit.
STEP 1 |
Gather the wall mounting brackets.
STEP 2 |
Turn the ION device upside down and locate the four (4) screw holes on each corner of the
device.
STEP 3 |
Place the brackets on each side of the device, making sure to align the screw holes on the
bracket and the device.
STEP 4 |
Insert the screws to secure the brackets.
STEP 5 |
Place the device on the wall where it will be mounted. Mark the wall with circles for each
screw hole so it can be used later to insert the wall anchors.
STEP 6 |
With a power drill, apply the four (4) white wall anchors into the screw holes.
STEP 7 |
Insert the threaded nails partially into the anchors, leaving a tiny gap to hang the wall mounting
bracket.
Содержание Prisma SD-WAN ION 2000
Страница 1: ...ION 2000 Hardware Reference paloaltonetworks com documentation...
Страница 4: ...iv TABLE OF CONTENTS...
Страница 6: ...6 ION 2000 HARDWARE REFERENCE Before You Begin 2021 Palo Alto Networks Inc...
Страница 11: ...ION 2000 HARDWARE REFERENCE Before You Begin 11 2021 Palo Alto Networks Inc...
Страница 12: ...12 ION 2000 HARDWARE REFERENCE Before You Begin 2021 Palo Alto Networks Inc Applicable to ION 9000...
Страница 13: ...ION 2000 HARDWARE REFERENCE Before You Begin 13 2021 Palo Alto Networks Inc...
Страница 14: ...14 ION 2000 HARDWARE REFERENCE Before You Begin...
Страница 16: ...16 ION 2000 HARDWARE REFERENCE ION 2000 Overview 2021 Palo Alto Networks Inc...
Страница 26: ...26 ION 2000 HARDWARE REFERENCE ION 2000 Overview...
Страница 28: ...28 ION 2000 HARDWARE REFERENCE Install ION 2000 2021 Palo Alto Networks Inc...
Страница 38: ...38 ION 2000 HARDWARE REFERENCE Install ION 2000...


