USERS MANUAL |
9
MANUAL INSTALLATION AND ASSEMBLY
HOW TO ASSEMBLE
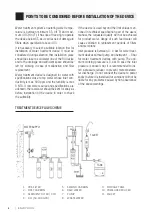
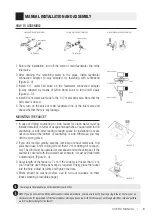
1. Before the installation, turn off the valve of main feedwater line orthe
inlet valve.
2. After draining the remaining water in the pipes, install feedwater
connection adapter (3-way adapter) by fastening with teflonband
(Figure A- 2)
3. Install 1/4’’ metal ball valve on the feedwater connection adapter
(3-way adapter) by means of teflon band so as to turn on/off easily
(Figure A –3).
4. Install 6 mm water inlet tube to the 1/4 “metal ball valve. Note that the
ball valve is closed.
5. Then, turn on the valve of main feedwater line or the inlet valve and
check whether there is any leakage.
NOTE: If you do not want to drill the under counter sink and washbasin, you can also install it by using a single faucet. Contact your au-
thorized service for replacement of the faucet adapter, which you have used, with the three-way one through which hot, cold and purified
water flow (Extra charge for the faucet) .
The images in the manual may not be identical to each other.
FIGURE A-3
FIGURE A-2
FIGURE A-4
FIGURE A-5
3-way adapter
3-way adapter
Closed
1/4 Ball Valve
Open
WATER INTAKE IN UNDER COUNTER
DOUBLE BATTERY WATER INTAKE
3-way adapter
1/4 Ball Valve
SINGLE BATTERY WATER INTAKE
3-way adapter
Extension
1/4 Ball Valve
1. In case of drilling countertop or sink, faucet for clean water must be
installed carefully in terms of usage and aesthetics. You can start to drill
countertop or sink after leaving enough space for installation of seal,
nut and union at the bottom of countertop or sink. Otherwise, you may
drill the wrong place.
2. If you drill marble, granite ceramic, laminate or sheet metal sink, first
you should use 5 mm drilling bit and then 12 mm drilling bit, respecti-
vely. The drill must be operated at low speed and without impact. If the
counter is covered with tile-coated cast concrete, it must be drilled with
a diamond bit. (Figure A- 4)
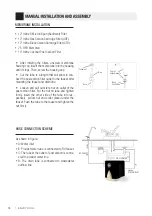
3. Outer length of the faucet is 7 cm. If the counter is thicker than 7 cm,
you’ll need to use fittings as many as required. Finally, place the faucet
into the hole, adjust its joints and tighten the nuts.
4. Filters should be washed before use to run out residues on them
(check washing procedures page).
MOUNTING THE FAUCET


