background image

ITALIANO

ENGLISH

DEUTSCH

FRANÇAIS

ESPAÑOL

004778610 - 16/12/2020


89

11.5  Cleaning the glass

Do not clean the glass while the appliance is operating and do not use abrasive sponges.

During the cleaning operations, support the door with one hand to avoid excessive stress-

es to the structure.

Be very careful not to strike the ceramic glass as the material is very brittle.

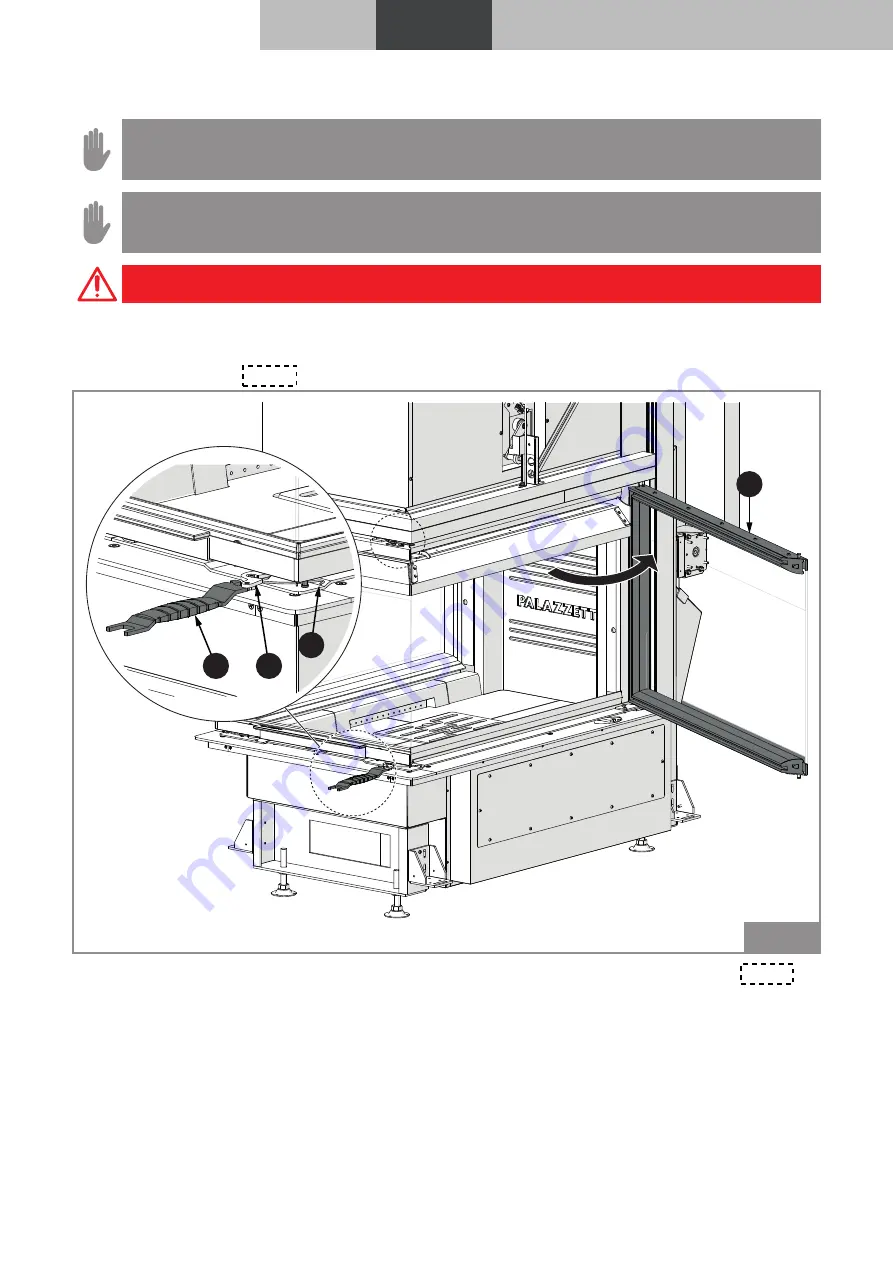
To clean the glass, proceed as follows:

1) 

Use the cold handle (

A

) to rotate the lever (

B

) and to release the hook (

C

2) 

Open the door (

D

) (

Fig. 44

).

A

B

C

D

Fig. 44 

3) 

Clean the glass with a damp cloth or with paper moistened and dabbed in the ashes (

Fig. 45

).

You can also use detergents suitable for cleaning kitchen ovens.

Содержание WT60 3D N16

Страница 1: ...TION USE AND MAINTENANCE MANUAL This manual is an integral part of the product Read the instructions carefully before installing servicing or operating the product Translation of the original instruct...

Страница 2: ...ke to thank you for having purchased one of our products and congratulate you on your choice To make sure you get the most out of your product please carefully follow the instructions provided in this...

Страница 3: ...nutenzione 8 1 10 Parti di ricambio 8 1 11 Targhetta matricola 8 1 12 Consegna dell apparecchio 8 2 AVVERTENZE PER LA SICUREZZA 9 2 1 Avvertenze per l installatore 9 2 2 Avvertenze per il personale te...

Страница 4: ...di montaggio 25 7 5 Messa a terra 26 7 6 Sistema di evacuazione dei fumi 26 7 7 Presa d aria 27 7 8 Collegamento mandata aria calda 28 7 9 Controcappa 30 7 10 Collegamento elettrico 30 8 MESSA IN SERV...

Страница 5: ...odifica della ventilazione 40 10 6 Apertura Chiusura porta ove previsto 40 10 7 Reset del telecomando 40 11 PULIZIA E MANUTENZIONE 41 11 1 Manutenzione del sistema fumario 41 11 2 Manutenzione dell ap...

Страница 6: ...re le regole fondamentali e di base per una corretta installa zione dell apparecchio La scrupolosa osservanza di quanto in esso de scritto garantisce un elevato grado di sicurezza e produttivit dell a...

Страница 7: ...a d aria e alla correttezza delle soluzioni di installazione proposte 1 7 Conformit Gli apparecchi oggetto del presente manuale sono conformi alle disposizioni legislative delle seguenti direttive com...

Страница 8: ...trebbero provocare gravi danni a persone e cose 1 11 Targhetta matricola La targhetta matricola A posta sotto il profilo coprimarmo dell ecomonoblocco accessibile svitando le tre viti e sollevando il...

Страница 9: ...tore deve ottemperare a tutti i regolamenti di sicurezza locali nazio nali ed europei L apparecchio dovr essere installato su pavimenti con adeguata capacit portante Verificare che le predisposizioni...

Страница 10: ...devono sempre osservare le indicazioni riportate nel presente manuale L apparecchio presenta delle superfici esterne particolarmente calde porta maniglia vetro tubi uscita fumi ecc Occorre quindi evi...

Страница 11: ...in funzionamento o per spegnere il fuoco nel braciere Non usare l apparecchio come suppor to ad ancoraggio di qualunque tipo vietato utilizzare il prodotto come scala o struttura di appoggio Non puli...

Страница 12: ...una fiamma in questo apparecchio Tenere questi liquidi a debita distanza dall ap parecchio durante il funzionamento Alcuni consigli per evitare fenomeni di corrosione effettuare accuratamente le opera...

Страница 13: ...l apparecchio L uso continuo e prolungato di legna particolarmente ricca di oli aromati ci es eucalipto mirto etc provoca il deterioramento repentino dei com ponenti interni che compongono il prodotto...

Страница 14: ...one aria 2 Maniglia di apertura porta 3 Vetro porta 4 Griglia focolare 5 Cassetto cenere 6 Maniglia fredda 7 Regolazione aria comburente 8 Ingresso aria comburente 9 Ventilatore ambiente 10 Automazion...

Страница 15: ...S ESPA OL 004778610 16 12 2020 15 4 2 Dimensioni WT60 3D N16 683 577 341 5 341 5 1627 826 166 5 350 166 5 904 139 5 377 5 558 356 356 606 246 76 5 61 118 1240 683 663 altezza variabile in funzione dei...

Страница 16: ...2020 WT60 3D V16 235 694 683 577 241 5 241 5 200 341 5 341 5 1627 826 166 5 350 166 5 904 139 5 377 5 558 356 356 606 246 138 76 5 61 118 1247 318 670 683 altezza variabile in funzione dei piedini Dim...

Страница 17: ...778610 16 12 2020 17 WT60 3D V16 EPLUS 235 694 372 683 577 724 241 5 241 5 200 341 5 341 5 1627 826 166 5 350 166 5 904 139 5 258 377 5 558 356 356 606 1301 683 246 138 76 5 61 118 altezza variabile i...

Страница 18: ...CO 13 di O2 mg Nm3 717 717 Temperatura fumi C 270 270 Combustibile Legna Tiraggio del camino Pa 12 2 Peso kg 460 Uscita fumi mm 250 Presa d aria esterna mm 110 Ingresso aria comburente mm 140 Adatto...

Страница 19: ...x W Potenza assorbita in stand by Wmin W Distanza minima da materiali infiammabili X1 X2 Y mm Leggere e seguire le istruzioni di uso e manutenzione Usare solo il combustibile raccomandato Non usare in...

Страница 20: ...by customer Do not change polarity USER INTERFACE RED 3 2 1 Air YELOW GREEN BROWN BLUE UI DATA CABLE K t O01 220 240 Vac 220 240 Vac O02 O03 O04 I01 T02 T01 T03 GND PE FUSE T4A C01 GND BATTERY CR 20...

Страница 21: ...EEN GREEN BLUE Air BROWN GREEN BROWN RED WHITE BLUE 1 2 3 USER INTERFACE 5 6 BROWN WHITE GREEN YELLOW 4 7 Fig 8 1 Sonda fumi 2 Sonda temperature camera di combustione 3 Motore della porta Air 4 Ventil...

Страница 22: ...del focolare Rimuovere le viti che fissano i piedi ni dell apparecchio al pallet Fig 9 e rimuoverlo Fig 9 5 MOVIMENTAZIONE E TRASPORTO L apparecchio viene consegnato completo di tutte le parti previst...

Страница 23: ...sono fornite in dotazione ma sono acquistabili separatamente Fig 10 Durante il sollevamento evitare strappi o bruschi movimenti Fare attenzione alla tendenza allo sbilanciamen to dell apparecchiatura...

Страница 24: ...in base al D M 37 08 6 3 Luogo d installazione Per le distanze minime che devono essere ri spettate nel posizionamento dell apparecchio rispetto a materiali e oggetti infiammabili fare riferimento al...

Страница 25: ...omonoblocco altezza piano fuoco del rivestimento sar suffi ciente agire sulle viti di regolazione predisposte sulle gambe Registrare le viti Fig 15 A vite re golazione B altezza piano fuoco fino a por...

Страница 26: ...ovvista di una propria messa a terra in conformit alle normative vigenti 7 6 Sistema di evacuazione dei fumi L apparecchio deve essere collegato ad un siste ma di evacuazione fumi idoneo ad assicurare...

Страница 27: ...sezione di passaggio dei fumi in uscita almeno doppia di quella interna del condotto fumario D H 2D max 45 A Fig 18 7 7 Presa d aria L Ecomonoblocco deve avere il giusto apporto di aria comburente per...

Страница 28: ...malfunzionamenti alla combustione causati dalla scarsit di aria comburente 7 8 Collegamento mandata aria calda Solo per modelli V16 V16 EPLUS 7 8 1 Raccordo in controcappa per riscaldamento in unico...

Страница 29: ...le porte ESEMPIO DI CANALIZZAZIONE ARIA Fig 24 BM Bocchetta di mandata a soffitto completa di serranda di taratura GT Griglia di transito sulla parte bassa della porta A B GRIGLIE di ripresa aria ambi...

Страница 30: ...tuare il montaggio definitivo sar opportuno effettuare un collaudo fumistico ossia provare il funzionamento dell apparecchio 7 10 Collegamento elettrico Solo per modelli V16 V16 EPLUS Collegare l appa...

Страница 31: ...va in dotazione 8 2 Descrizione e posizionamento deflettori N Descrizione Quantit Dimensione 1 Pannello inferiore ant 2 184x350 2 Pannello inferiore post 2 184x300 3 Pannello intermedio ant 4 184x210...

Страница 32: ...o opposto Fig 30 Fig 30 8 4 Montaggio refrattario 1 Appoggiare lo schienale in refrattario A alla parete dell Ecomonoblocco e farlo delicata mente scivolare in posizione centrandolo con le protuberanz...

Страница 33: ...6 12 2020 33 8 5 Collegamenti elettrici 8 5 1 Serie WT60 3D V16 1 2 3 4 5 6 N L P E S1 Le immagini del prodotto sono puramente indicative Sonda temperatura ambiente canalizzazione Sonda temperatura ca...

Страница 34: ...3D V16 EPLUS 1 2 3 4 5 6 L 3 0 0 0 L 3000 B B A A 5 6 Sonda temperatura camera di combustione Alimentatore Display Sonda temperatura ambiente Sonda temperatura ambiente canalizzazione Fig 34 Le immagi...

Страница 35: ...terni al focolare e gli adesivi esterni applicati sul vetro L operazione di prima accensione un opera zione fondamentale che permette di testare il prodotto in piena funzione e di far evaporare gradua...

Страница 36: ...icarica del combustibile Durante il funzionamento per eseguire la ricarica del combustibile necessario seguire la seguen te procedura Aprire lentamente la porta fuoco onde evitare di creare una depres...

Страница 37: ...rsi tra le varie funzioni 3 led di stato 4 tasti per modificare i parametri di funziona mento e accedere ai sotto men 2 1 3 4 Fig 37 Tutti i tasti sono di tipo capacitivo pertanto non necessitano di u...

Страница 38: ...di combustione T4 xx C temperatura aria in uscita dalle bocchette Schermata 3 per versione WT60 3D V16 EPLUS T1 xx C temperatura ambiente rilevata nelle vici nanze del display T3 xx C temperatura cam...

Страница 39: ...EPLUS Per aprire chiudere la porta C Portarsi con i tasti o sul menu Porta Door D Premere il tasto per aprire la porta E Premere il tasto per chiudere la porta Modalit di funzionamento del pannello d...

Страница 40: ...caso in cui il telecomando riman ga al di fuori del raggio di copertura del segnale per lungo tempo 10 3 Legenda pulsanti 1 Accensione Spegnimento tenere premu to per circa 3 sec per effettuare l oper...

Страница 41: ...sicurezza 11 1 Manutenzione del sistema fumario Da effettuarsi almeno una volta all anno oppure ogni 40 quintali di combustibile bruciati come specificato nella norma di prodotto rivolgendosi a perso...

Страница 42: ...re Griglia Fig 42 X Cassetto Vano cenere Fig 43 X Vetro Fig 44 Fig 45 X 11 3 2 Centro di assistenza tecnico abilitato 1 ANNO Guarnizioni porta X Cementi e deflettori fumi fare riferimento al paragrafo...

Страница 43: ...dal basamento ed aspirare l eventuale cenere depositata nei vani sottostanti Fig 43 Il cassetto cenere che si trova al di sotto del focolare deve essere svuotato quo tidianamente per evitare che la c...

Страница 44: ...truttura Fare molta attenzione a non urtare il vetro ceramico a causa dell elevata fragilit del materiale Per effettuare la pulizia del vetro necessario 1 Utilizzare la maniglia fredda A per ruotare l...

Страница 45: ...zioni e i depositi presenti sui deflettori e sul retro dei pannelli refrattari possono com promettere il corretto funzionamento e la durata dell apparecchio Per una buona pulizia delle parti e dell ap...

Страница 46: ...trarre i pannelli 2 Fig 51 6 Sfilare ed estrarre l O2RING 3 3 2 Fig 51 7 Sfilare ed estrarre i pannelli 4 Fig 52 4 Fig 52 8 Procedere allo stesso modo sul lato opposto Fig 53 Fig 53 9 Effettuata la pu...

Страница 47: ...re distrutti Il simbolo del cassonetto barrato riportato sull e tichetta dell apparecchiatura indica che il pro dotto alla fine della propria vita utile deve essere raccolto separatamente da altri rif...

Страница 48: ...tance and maintenance 53 1 10 Spare Parts 53 1 11 Serial identification plate 53 1 12 Delivery of the appliance 53 2 SAFETY WARNING 54 2 1 Warnings for the installer 54 2 2 Warnings for technical main...

Страница 49: ...70 7 3 Levelling of the appliance 70 7 4 Assembly diagram 70 7 5 Earthing 71 7 6 Fumes evacuation system 71 7 7 Air intake 72 7 8 Hot air delivery connection 73 7 9 Hood liner 75 7 10 Electrical conne...

Страница 50: ...pening closing where provided 85 10 7 Reset the remote control 85 11 CLEANING AND MAINTENANCE 86 11 1 Maintenance of the smoke system 86 11 2 Appliance maintenance 86 11 3 Cleaning and maintenance pro...

Страница 51: ...ontent of the manual The purpose of this manual is to provide the fundamental and basic regulations for correct installation of the appliance Strict observance of that which is described herein guaran...

Страница 52: ...1 7 Compliance The appliances covered by this manual comply with the legislative provisions of the following European directives 2014 30 EU Electromagnetic Compatibility Directive 2014 35 EU Low Volt...

Страница 53: ...se serious harm to persons and property 1 11 Serial identification plate The serial plate A is located under the cover pro file of the ecomonoblocco accessible by loosen ing the three screws and lifti...

Страница 54: ...national and European safety regulations The appliance must be installed on floors with adequate load bearing capacity Check that the chimney flue and air inlet set ups conform to the type of install...

Страница 55: ...the instruc tions provided in this manual The outer surface of the appliance presents several particularly hot parts door handle glass flue gas pipes etc Contact with these parts must there fore be av...

Страница 56: ...d It is prohibited to use the product as a ladder or support structure Do not clean the appliance until the structure and ashes have completely cooled In case of flue gas leaks in the room or deflagra...

Страница 57: ...om the appliance during operation Some tips to avoid corrosion phenomena carry out routine cleaning operations to avoid the build up of ash deposits feed the appliance only with fuel having the charac...

Страница 58: ...rolonged use of wood particularly rich in aromatic oils e g eucalyptus myrtle etc causes sudden deterioration of the internal components of the product The nominal yield declared in kW of the stove is...

Страница 59: ...Description 8 9 10 12 1 2 11 3 4 5 6 7 Fig 2 1 Air ducting 2 Door opening handle 3 Door glass 4 Fire box grate 5 Ash drawer 6 Cold handle 7 Combustion air regulation 8 Combustion air inlet 9 Room fan...

Страница 60: ...610 16 12 2020 4 2 Dimensions WT60 3D N16 683 577 341 5 341 5 1627 826 166 5 350 166 5 904 139 5 377 5 558 356 356 606 246 76 5 61 118 1240 683 663 variable height depending on the feet Dimensions in...

Страница 61: ...OL 004778610 16 12 2020 61 WT60 3D V16 235 694 683 577 241 5 241 5 200 341 5 341 5 1627 826 166 5 350 166 5 904 139 5 377 5 558 356 356 606 246 138 76 5 61 118 1247 318 670 683 variable height depend...

Страница 62: ...0 WT60 3D V16 EPLUS 235 694 372 683 577 724 241 5 241 5 200 341 5 341 5 1627 826 166 5 350 166 5 904 139 5 258 377 5 558 356 356 606 1301 683 246 138 76 5 61 118 variable height depending on the feet...

Страница 63: ...s 16 3 16 3 CO emissions 13 of O2 mg Nm3 717 717 Flue gas temperature C 270 270 Fuel Wood Chimney draught Pa 12 2 Weight kg 460 Flue gas outlet mm 250 Outside air intake mm 110 Combustion air inlet m...

Страница 64: ...nsione Wmax W Potenza assorbita in stand by Wmin W Distanza minima da materiali infiammabili X1 X2 Y mm Leggere e seguire le istruzioni di uso e manutenzione Usare solo il combustibile raccomandato No...

Страница 65: ...NOTE phase protection added by customer Do not change polarity USER INTERFACE RED 3 2 1 Air YELOW GREEN BROWN BLUE UI DATA CABLE K t O01 220 240 Vac 220 240 Vac O02 O03 O04 I01 T02 T01 T03 GND PE FUSE...

Страница 66: ...REEN BLUE Air BROWN GREEN BROWN RED WHITE BLUE 1 2 3 USER INTERFACE 5 6 BROWN WHITE GREEN YELLOW 4 7 Fig 8 1 Flue gas probe 2 Combustion chamber temperature probe 3 Door motor Air 4 Room fan 5 Limit s...

Страница 67: ...rts of the inner lin ing of the fire box Remove the screws that secure the feet of the appliance to the pallet Fig 9 and remove it Fig 9 5 HANDLING AND TRANSPORTATION The appliance is delivered comple...

Страница 68: ...d standard but can be purchased separately Fig 10 Duringlifting avoidjerkingorabruptmovements Pay attention to overbalancing 5 2 Checking the floor where the appliance will be placed Check the load ca...

Страница 69: ...ifica tion issued by the chamber of com merce based on the Ministerial Decree 37 08 6 3 Place of installation For the minimum distances that must be re spected when positioning the appliance with resp...

Страница 70: ...it is sufficient to act on the adjusting screws on the legs Adjust the screws Fig 15 A adjustment screw B fire bed height until the marble cover profile is brought on the Ecomonoblocco to the require...

Страница 71: ...ided with its own earth ing in compliance with the current regulations 7 6 Fumes evacuation system The appliance must be connected to a system for flue gas evacuation suitable to ensure an adequate di...

Страница 72: ...chimney and the passage section of the exhaust smoke at least twice the one inside the flue pipe D H 2D max 45 A Fig 18 7 7 Air intake The Ecomonoblocco must have the right flow of combustion air to...

Страница 73: ...operating suction hoods malfunctions to the combustion may occur caused by a shortage of combustion air 7 8 Hot air delivery connection Only for models V16 V16 EPLUS 7 8 1 Hood liner fitting for heati...

Страница 74: ...ajar EXAMPLE OF AIR DUCTING Fig 24 BM Ceiling delivery vent complete with calibra tion shutter GT Grille on lower part of door A B Ambient air intake GRILLES with 14 cm holes connected to the fan wit...

Страница 75: ...adding for component inspection Before carrying out the final assembly it will be advisable to carry out a smoke test i e to test the operation of the appliance 7 10 Electrical connection Only for mod...

Страница 76: ...and positioning of the deflectors No Description Quantity Dimension 1 Front lower panel 2 184x350 2 Rear lower panel 2 184x300 3 Front intermediate panel 4 184x210 4 Rear intermediate panel 2 184x184...

Страница 77: ...e same way on the opposite side Fig 30 Fig 30 8 4 Assembly of refractory brick 1 Place the refractory back plate A on the Eco monoblocco wall and gently slide it into po sition centring it with the pr...

Страница 78: ...2020 8 5 Electrical connections 8 5 1 Series WT60 3D V16 1 2 3 4 5 6 N L P E S1 Product images are purely indicative Ducting ambient temperature probe Combustion chamber temperature probe Room temper...

Страница 79: ...16 12 2020 79 8 5 2 Series WT60 3D V16 EPLUS 1 2 3 4 5 6 L 3 0 0 0 L 3000 B B A A 5 6 Combustion chamber temperature probe Power supply unit Display Room temperature probe Ducting ambient temperature...

Страница 80: ...ning remove the stickers and packaging inside the fire box and the external stickers applied to the glass The first lighting operation is a fundamental op eration used to test the product in full func...

Страница 81: ...ase of embers has formed A B Fig 35 9 2 Adding fuel During operation to add fuel it is necessary to follow this procedure Slowly open the fire door in order to avoid cre ating an air depression in the...

Страница 82: ...n the various functions 3 status LED 4 keys to modify the operating parameters and to access the submenus 2 1 3 4 Fig 37 All the keys are capacitive and therefore do not require a pressure to be activ...

Страница 83: ...ni ty of the display T3 xx C temperature combustion chamber T4 xx C temperature outlet air from the vents Screen 3 for version WT60 3D V16 EPLUS T1 xx C room temperature detected in the vicini ty of t...

Страница 84: ...WT60 3D V16 EPLUS To open close the door C Use the keys or to go to the Door menu D Press the key to open the door E Press the key to close the door Mode of operation of the control panel The control...

Страница 85: ...the remote control It may be necessary to perform this procedure again in case the remote control remains outside of the range of the signal for a long time 10 3 Keys 1 Switch On Off press and hold fo...

Страница 86: ...s 11 1 Maintenance of the smoke system To be carried out at least once a year or every 4 tonnes of fuel burned as specified in the product standard by contacting specialist personnel If there are hori...

Страница 87: ...NCE IS TURNED ON EVERY WEEK 1 MONTH Burn pot Grate Fig 42 X Ash drawer Compartment Fig 43 X Glass Fig 44 Fig 45 X 11 3 2 Authorised technical service centre 1 YEAR Door seals X Cements and smoke defle...

Страница 88: ...deposited in the com partments below Fig 43 The ash drawer below the fire box must be emptied out every day to stop it from filling up with ash thus caus ing the cast iron grate of the fire box to ov...

Страница 89: ...hand to avoid excessive stress es to the structure Be very careful not to strike the ceramic glass as the material is very brittle To clean the glass proceed as follows 1 Use the cold handle A to rota...

Страница 90: ...he deflectors and on the back of the refractory panels can compro mise the correct functioning and duration of the appliance To clean the parts and the appliance properly use a simple brush or ash vac...

Страница 91: ...ig 50 5 Slide out and extract the panels 2 Fig 51 6 Slide out and extract the O RING 3 3 2 Fig 51 7 Remove and extract the panels 4 Fig 52 4 Fig 52 8 Proceed in the same way on the opposite side Fig 5...

Страница 92: ...bin symbol that appears on the label of the appliance indicates that at the end of its useful life the product must be disposed of separately from other waste Pursuant to art 13 of Italian Legislative...

Страница 93: ...1 10 Pi ces d tach es 98 1 11 Plaque signal tique 98 1 12 Livraison de l appareil 98 2 AVERTISSEMENTS POUR LA S CURIT 99 2 1 Avertissements pour l installateur 99 2 2 Avertissements pour les technicie...

Страница 94: ...rre 116 7 6 Syst me d vacuation des fum es 116 7 7 Prise d air 117 7 8 Raccordement de l arriv e d air chaud 118 7 9 Habillage de la hotte 120 7 10 Branchement lectrique 120 8 MISE EN MARCHE 121 8 1 C...

Страница 95: ...n 130 10 6 Ouverture Fermeture de la porte si cela est pr vu 130 10 7 Reset de la t l commande 130 11 NETTOYAGE ET ENTRETIEN 131 11 1 Maintenance du syst me d vacuation de la fum e 131 11 2 Maintenanc...

Страница 96: ...t et contenu du manuel Le but de ce manuel est de fournir les r gles fondamentales et de base pour l installation cor recte de l appareil Le respect scrupuleux des indications qui y fi gurent garantit...

Страница 97: ...et de v rifier que les solutions d installation propos es sont appropri es 1 7 Conformit Les appareils couverts par ce manuel sont conformes aux dispositions l gislatives des direc tives communautair...

Страница 98: ...ait provo quer de graves dommages aux personnes et aux choses 1 11 Plaque signal tique La plaque signal tique A est situ e sous le profil de recouvrement du marbre de l ecomonobloc co accessible en d...

Страница 99: ...e s curit locaux nationaux et europ ens L appareil devra tre install sur des planchers ayant une capacit portante appropri e V rifier que les pr dispositions du conduit de fum e et de l ar riv e d air...

Страница 100: ...s qui y sont connect s et pour pr venir les accidents les instructions donn es dans ce manuel doivent toujours tre respect es L appareil pr sente des surfaces ex t rieures particuli rement chaudes por...

Страница 101: ...en cas de fonc tionnement anormal de suspicion de rupture ou des bruits insolites En cas de panne ou de dysfonction nement teindre l appareil et contac ter imm diatement le technicien sp cialis Ne pa...

Страница 102: ...pour lampe du k ros ne du liquide allume feu pour bois de l al cool thylique ou des liquides similaires pour allumer ou raviver une flamme dans cet appareil Garder ces liquides une distance s re de l...

Страница 103: ...pier et du carton sous peine de d ch ance de la garantie L utilisation continue et prolong e de bois particuli rement riche en huiles aromatiques ex eucalyptus myrte etc entra ne la d t rioration soud...

Страница 104: ...ign e d ouverture de la porte 3 Vitre porte 4 Grille foyer 5 Tiroir cendres 6 Poign e froide 7 R glage de l air de combustion 8 Arriv e de l air de combustion 9 Ventilateur ambiant 10 Automatisme port...

Страница 105: ...IS ESPA OL 004778610 16 12 2020 105 4 2 Dimensions WT60 3D N16 683 577 341 5 341 5 1627 826 166 5 350 166 5 904 139 5 377 5 558 356 356 606 246 76 5 61 118 1240 683 663 hauteur variable en fonction de...

Страница 106: ...2 2020 WT60 3D V16 235 694 683 577 241 5 241 5 200 341 5 341 5 1627 826 166 5 350 166 5 904 139 5 377 5 558 356 356 606 246 138 76 5 61 118 1247 318 670 683 hauteur variable en fonction des pieds Dime...

Страница 107: ...4778610 16 12 2020 107 WT60 3D V16 EPLUS 235 694 372 683 577 724 241 5 241 5 200 341 5 341 5 1627 826 166 5 350 166 5 904 139 5 258 377 5 558 356 356 606 1301 683 246 138 76 5 61 118 hauteur variable...

Страница 108: ...Nm3 717 717 Temp rature des fum es C 270 270 Combustible Bois Tirage de la chemin e Pa 12 2 Poids kg 460 Sortie fum e mm 250 Prise d air externe mm 110 Arriv e de l air de combustion mm 140 Indiqu pou...

Страница 109: ...sorbita in stand by Wmin W Distanza minima da materiali infiammabili X1 X2 Y mm Leggere e seguire le istruzioni di uso e manutenzione Usare solo il combustibile raccomandato Non usare in canna fumaria...

Страница 110: ...y customer Do not change polarity USER INTERFACE RED 3 2 1 Air YELOW GREEN BROWN BLUE UI DATA CABLE K t O01 220 240 Vac 220 240 Vac O02 O03 O04 I01 T02 T01 T03 GND PE FUSE T4A C01 GND BATTERY CR 20 32...

Страница 111: ...REEN GREEN BLUE Air BROWN GREEN BROWN RED WHITE BLUE 1 2 3 USER INTERFACE 5 6 BROWN WHITE GREEN YELLOW 4 7 Fig 8 1 Sonde fum es 2 Sonde de temp rature chambre de combustion 3 Moteur de la porte Air 4...

Страница 112: ...ement int rieur du foyer Extraire les vis qui fixent les pieds de l appareil la palette Fig 9 et enlever l appareil Fig 9 5 MANUTENTION ET TRANSPORT L appareil est livr complet avec toutes les par tie...

Страница 113: ...sont pas fournies mais sont vendues s par ment Fig 10 Pendant le soul vement viter les mouvements brusques et les coups Faire attention la tendance de l appareil tre en d s quilibre 5 2 Contr le du p...

Страница 114: ...ist riel 37 08 6 3 Lieu d installation Pour les distances minimum respecter lors du positionnement de l appareil par rapport aux mat riaux et aux objets inflammables se r f rer aux indications de Fig...

Страница 115: ...nt il suffit d agir sur les vis de r glage pr sentes sur les pieds R gler les vis Fig 15 A vis de r glage B hauteur plan feu jusqu ce que le profil de recouvrement du marbre sur l Ecomonoblocco soit p...

Страница 116: ...e la terre en conformit avec les r glementations en vigueur 7 6 Syst me d vacuation des fum es L appareil doit tre raccord un syst me d va cuation des fum es en mesure de garantir une dispersion appro...

Страница 117: ...es fum es et section de passage des fum es en sortie faisant au moins le double de celle interne du conduit d vacuation des fum es D H 2D max 45 A Fig 18 7 7 Prise d air L Ecomonoblocco doit avoir la...

Страница 118: ...ion dus un manque d air de combustion 7 8 Raccordement de l arriv e d air chaud Uniquement pour les mod les V16 V16 EPLUS 7 8 1 Raccordement dans l habillage pour le chauffage dans une seule pi ce App...

Страница 119: ...portes entrouvertes EXEMPLE DE CANALISATION DE L AIR Fig 24 BM Bouche d arriv e au plafond avec clapet de r glage GT Grille de passage sur la partie inf rieure de la porte A B GRILLES de prise d air a...

Страница 120: ...pour l inspection des composants Avant le montage final il est conseill d effectuer un essai des fum es c est dire de tester le fonctionnement de l appareil 7 10 Branchement lectrique Uniquement pour...

Страница 121: ...urnie 8 2 Description et position des d flecteurs N Description Quantit Dimension 1 Panneau inf rieur av 2 184x350 2 Panneau inf rieur arr 2 184x300 3 Panneau interm diaire av 4 184x210 4 Panneau inte...

Страница 122: ...du c t oppos Fig 30 Fig 30 8 4 Montage du r fractaire 1 Appuyer le dosseret en r fractaire A la paroi de l Ecomonoblocco et le faire d licate ment glisser en position en le centrant avec les protub r...

Страница 123: ...020 123 8 5 Branchements lectriques 8 5 1 S rie WT60 3D V16 1 2 3 4 5 6 N L P E S1 Les images du produit sont purement indicatives Sonde de temp rature environnement canalisation Sonde de temp rature...

Страница 124: ...6 EPLUS 1 2 3 4 5 6 L 3 0 0 0 L 3000 B B A A 5 6 Sonde de temp rature chambre de combustion Alimentateur Afficheur Sonde de temp rature ambiante Sonde de temp rature environnement canalisation Fig 34...

Страница 125: ...nternes du foyer ainsi que les tiquettes ext rieures appliqu es sur la vitre Le premier allumage du produit est une op ration fondamentale qui permet de tester le produit en plein fonctionnement et d...

Страница 126: ...for m e A B Fig 35 9 2 Rechargement du combustible Durant le fonctionnement pour approvisionner le combustible suivre la proc dure suivante Ouvrir lentement la porte du foyer afin d viter la cr ation...

Страница 127: ...iff rentes fonctions 3 led d tat 4 touches pour modifier les param tres de fonctionnement et acc der aux sous menus 2 1 3 4 Fig 37 Toutes les touches sont de type capacitif elles n ont donc pas besoin...

Страница 128: ...p rature de l air la sortie des bouches Page cran 3 pour version WT60 3D V16 EPLUS T1 xx C temp rature ambiante relev e proximi t de l cran T3 xx C temp rature dans la chambre de combustion T4 xx C te...

Страница 129: ...our ouvrir fermer la porte C l aide des touches ou aller au menu Porte Door D Appuyer sur la touche pour ouvrir la porte E Appuyer sur la touche pour fermer la porte Modalit s de fonctionnement du pan...

Страница 130: ...este hors du rayon de couverture du signal pendant un temps prolong 10 3 L gende boutons 1 Allumage Arr t maintenir enfonc pendant environ 3 s pour r aliser l op ration souhait e 2 Touche momentan men...

Страница 131: ...du syst me d vacuation de la fum e Elle doit tre effectu e une fois par an au moins ou bien tous les 40 quintaux de combustible br l comme sp cifi dans la norme du produit en faisant appel du personn...

Страница 132: ...Brasier Grille Fig 42 X Tiroir Compartiment cendres Fig 43 X Vitre Fig 44 Fig 45 X 11 3 2 Centre d assistance technicien autoris 1 AN Joints porte X Ciments et d flecteurs fum es se r f rer au paragra...

Страница 133: ...pirer les cendres d pos es dans les comparti ments situ s en dessous Fig 43 Le tiroir cendres situ sous le foyer doit tre vid tous les jours pour viter que les cendres n atteignent le sommet en causan...

Страница 134: ...tructure Faire tr s attention de ne pas heurter le verre c ramique en raison de la grande fragilit du mat riau Pour effectuer le nettoyage de la vitre 1 Utiliser la poign e froide A pour tourner le le...

Страница 135: ...s et les d p ts sur les d flecteurs et l arri re des panneaux r fractaires peuvent compromettre le bon fonctionnement et la dur e de vie de l appareil Pour un bon nettoyage des parties et de l appa re...

Страница 136: ...anneaux 2 Fig 51 6 Faire glisser et extraire le joint torique 3 3 2 Fig 51 7 Faire glisser et extraire les panneaux 4 Fig 52 4 Fig 52 8 Proc der de la m me fa on du c t oppos Fig 53 Fig 53 9 Une fois...

Страница 137: ...nt tre d truits Le symbole de la poubelle barr e pr sent sur l tiquette de l quipement indique que le pro duit la fin de sa vie utile doit tre ramass s par ment des autres d chets Conform ment l artic...

Страница 138: ......

Страница 139: ......

Страница 140: ...ntial characteristics Palazzetti beh lt sich das Recht vor seine Produkte jederzeit und ohne vorherige Ank ndigung zu ndern um sie zu verbessern ohne ihre grundlegenden Eigenschaften zu beeintr chtige...

Отзывы: