background image

61

ENGLISH

004778140 - 15/01/2020 - PN - Italy

Maintenance

Maintenance operations must be performed by an authorised technical assistance centre.
Before performing any maintenance operation, take the following precautions:
• Make sure that all the parts of the stove are cold.
• Make sure that the ashes are completely extinguished.
• Use personal protective equipment provided for by Directive 89/391/EEC.
• Make sure that the general line switch is turned off.
• Make sure that the power supply cannot be accidentally reactivated. Remove the plug 

from the wall socket.

• Always use appropriate equipment for maintenance.
• Once the maintenance or the repair operations are completed, before re-commissioning 

the stove, install again all the protections and restart all the safety devices.

7.1  Maintenance of the smoke system

To be performed at least once a year, or every 40 tons of burned pellets.
If there are horizontal sections, it is necessary to check and remove any ash and soot deposits 

before they block the passage of the fumes.
In the event of failure or inadequate cleaning, the stove may have functional problems such 

as:


-

bad combustion

7.2  Blackening of the glass


-

blockage of the burn pot with accumulation of ash and pellets


-

deposit of ash and excessive deposits on the exchanger with consequent poor performance.

7.3  Stove maintenance

It must be carried out at least once a year, or each time the stove indicates that maintenance 

is required.
During the maintenance operation, the technician must:


-

clean the fume passage area thoroughly and completely


-

check the condition of all the seals and make sure they work properly


-

check the condition of all internal components and make sure they are clean


-

make sure the smoke outlet connection is sealed and clean


-

remove any deposits of pellet residues in the tank


-

check that there are no pellets or pellet residues in the stove installation compartment


-

make sure that the stove is working properly


-

reset any warnings or alarms.

Содержание ECOFIRE JACKIE IDRO N

Страница 1: ...Verwendung die Anleitungen stets aufmerksam durchlesen Le pr sent manuel fait partie int grante du produit Il est conseill de lire attentivement les consignes avant l installation l entretien ou l ut...

Страница 2: ...hrten Vorzug danken und Ihnen zur Wahl gratulieren Damit Sie Ihren neuen Ecomonoblocco so gut wie m glich benutzen k nnen bitten wir Sie die in dieser Bedienungs und Wartungsanleitung enthaltenen Anga...

Страница 3: ...per il manutentore 2 3 Avvertenze per l utilizzatore 3 Caratteristiche del combustibile 3 1 Caratteristiche del combustibile 3 2 Stoccaggio del pellet 4 Movimentazione e trasporto 4 1 Rimozione dalla...

Страница 4: ...nsulenza o l intervento di personale specializzato PALAZZETTI PALAZZETTI si riserva il diritto di modificare specifiche e caratteristiche tecniche e o funzionali della stufa in qualsiasi momento senza...

Страница 5: ...rate da PALAZZETTI carenti o inadeguate a seguito di eventuali modifiche adeguamenti o applicazione di nuove tecnologie su apparecchi di nuova commercializzazione 1 6 Generalit Informazioni In caso di...

Страница 6: ...ative regolamentari ed amministrative degli stati membri in materia di responsabilit per danno da prodotti difettosi Direttiva 2014 53 UE Riguardante le apparecchiature radio e le apparecchiature term...

Страница 7: ...dicato nel capitolo Manutenzione L utilizzatore della stufa deve essere una persona adulta e responsabile provvista delle conoscenze tecniche necessarie per l uso e la manutenzione ordinaria della stu...

Страница 8: ...emperare alle precauzioni di sicurezza previste per legge ed in particolare a non operare in condizioni avverse deve operare in perfette condizioni psicofisiche e deve verificare che i dispositivi ant...

Страница 9: ...ricolo di incendio non deve essere effettuata da bambini senza sorveglianza L utentenonspecializzatodeveessere tutelato dall accesso a qualunque parte possa esporlo a pericoli Non deve perci essere au...

Страница 10: ...di spegnimento indicata In caso di malfunzionamento della stufa dovuto ad un tiraggio non ottimale della canna fumaria effettuarne la pulizia seguendo la procedura descritta La pulizia della canna fum...

Страница 11: ...bile il funzionamento a legna tradizionale vietato usare la stufa come inceneritore di rifiuti Si consiglia di conservare alcuni sacchi di pellet nel locale di utilizzo della stufa o in un locale atti...

Страница 12: ...vigenti nel paese dove avviene l installazione del prodotto L installazione deve essere effettuata da personale qualificato in osservanza alla norma EN 10683 5 2 Precauzioni per la sicurezza La respo...

Страница 13: ...tti da una base ignifuga sotto la stufa di dimensioni sufficienti Questa base pu essere ad esempio in acciaio ardesia pressata vetro o pietra e deve ricoprire il pavimento nella zona sottostante la st...

Страница 14: ...to a fine libretto Esternamente deve essere messa una griglia di aerazione permanente non richiudibile in zone particolarmente ventose ed esposte alle intemperie prevedere una protezione antipioggia e...

Страница 15: ...evamento dell aria pertanto non necessario fare una classica presa d aria nel locale fig 5 4c A B Ingresso aria C D Uscita fumi collegare l ingresso dell aria comburente della stufa alla presa d aria...

Страница 16: ...massima di 2 3 m con una pendenza verso l alto del 3 5 Fig 5 5 Ancorare le tubazioni con appositi collari alla parete Il raccordo di scarico dei fumi NON DEVE ESSERE collegato ad un camino utilizzato...

Страница 17: ...nale qualificato in osservanza alle norme UNI 10683 EN 1856 1 2 EN 1857 EN 1443 EN 13384 1 3 EN 12391 1 sia per quanto riguarda le dimensioni che per i materiali utilizzati nella sua costruzione Lo sc...

Страница 18: ...all impianto elettrico attraverso la spina in dotazione Fig 6 2 1 Il collegamento elettrico spina deve essere facilmente accessibile anche dopo l installazione della stufa 6 2 1 1 Messa a terra Fig 6...

Страница 19: ...ito di sonda Scollegare la sonda e collegare i due contatti del termostato Fig 6 2 2 importante impostare la stufa nella configurazione 1 seguendo le istruzioni riportate nel paragrafo Configurazione...

Страница 20: ...fa e prolungarla fino al pozzetto per sonda presente sull accumulo Fig 6 2 4 6 2 5 Allacciamento ad un Accumulo senza serpentino possibile far in modo che la stufa mantengaintemperaturaunaccumulo spro...

Страница 21: ...quelli dati in dotazione valvole di sicurezza e scarico termico Per intervenire sull impianto idraulico in modo agevole si deve Aprire la porta svitare le viti di fissaggio del frontale 1 e rimuoverl...

Страница 22: ...ldamento attraverso i tubi di mandata e di ritorno C D Predisporre un tubo di scarico a perdere di diametro opportuno a cui collegare lo scarico della valvola di sicurezza P Se necessario assicurarsi...

Страница 23: ...23 ITALIANO 004778140 15 01 2020 PN Italy Fig 6 3 2b Jackie idro N F P H L G C D...

Страница 24: ...edotto allo scarico impianto J aprire la valvola di sfiato B aprire il rubinetto di scarico K facendo cos fluire l acqua fino al completo riempimento della stufa Chiudere lavalvoladisfiatoeattendere i...

Страница 25: ...25 ITALIANO 004778140 15 01 2020 PN Italy Fig 6 4b Jackie idro N L M J N K D C...

Страница 26: ...stufa manualmente o in modo programmato senza l ausilio di un termostato esterno ma lasciando i due morsetti ponticellati come da impostazione di fabbrica La stufa si spegner anche nell eventualit in...

Страница 27: ...esta configurazione possibile impostare anche la funzione antigelo Configurazione 4 Impostare tale configurazione quando si intende collegare la stufa ad un accumulo senza serpentino La stufa si accen...

Страница 28: ...Komponenten enthalten in den Ofen Composants prevus dans le po le Piezas incluidas en el kit estufa 1 6 1 6 1 6 1 6 1 6 CONFIGURAZIONE 2 CONFIGURATION 2 KONFIGURATION 2 CONFIGURATION 2 CONFIGURACI N...

Страница 29: ...ncluded in the stove Komponenten enthalten in den Ofen Composants prevus dans le po le Piezas incluidas en el kit estufa 1 6 1 6 CONFIGURAZIONE 4 CONFIGURATION 4 KONFIGURATION 4 CONFIGURATION 4 CONFIG...

Страница 30: ...intali di pellet bruciato Se esistono dei tratti orizzontali necessario verificare e asportare l eventuale deposito di cenere e fuliggine prima che le stesse otturino il passaggio dei fumi In caso di...

Страница 31: ...TTIMANE 1 MESE 1 ANNO a Braciere X Cassetto Vano cenere X Vetro X Caldaia X Canotto porta resistenza X Collettore fumi Fig 7 4 X Guarnizioni portina e braciere X Condotto di evacuazione fumi X A cura...

Страница 32: ...aese dove si opera per lo smaltimento dei materiali ed eventualmente per la denuncia di smaltimento Tutte le operazioni di smontaggio per la demolizione devono avvenire a stufa ferma e privata dell en...

Страница 33: ......

Страница 34: ...installer 2 2 Warnings for technical maintenance personnel 2 3 Warnings for the user 3 Fuel characteristics 3 1 Fuel characteristics 3 2 Pellet storage 4 Handling and transportation 4 1 Removal from t...

Страница 35: ...always ask the advice or the intervention of PALAZZETTI specialized personnel PALAZZETTI reserves the right to change specifications and technical and or functional characteristics of the stove at any...

Страница 36: ...icient or inadequate as a result of any modifications adaptations or the application of new technologies on newly marketed appliances 1 6 Overview Information Incaseofexchangeofinformationwith the Man...

Страница 37: ...Directive 1999 44 EC must scrupulously observe the prescriptions contained in this manual and in particular must always operate within the stove s limits of use always carry out constant and diligent...

Страница 38: ...er 1 13 Identification plate The serial number plate on the stove shows all the characteristic data relating to the product including the data of the Manufacturer the serial number and the marking 1 1...

Страница 39: ...they must wear safety gloves they must wear safety shoes they must use tools with electrical insulation they must ensure that the area affected by the phases ofassembly and disassembly is free from ob...

Страница 40: ...ision Non specialized user must be protectedfrom the access to any party that may expose him her to dangers This person must therefore not be allowed to intervene on internal parts at risk electrical...

Страница 41: ...switchoff the stove with the indicated shutdown procedure In the event of stove malfunction due to non optimal flue draft clean it following the procedure described The flue must be cleaned as descri...

Страница 42: ...d or in an adjacent room provided it is at the correct temperature and humidity and at a safe distance at least one meter away from heat sources Wet and or cold pellets 5 C reduce the thermal potentia...

Страница 43: ...compliancewith the EN 10683 standard 5 2 Safety Precautions The responsibility of the works carried out in the area where the stove will be installed falls and remains on the user the latter is also...

Страница 44: ...ed with carpets must be protected by a flame retardant base under the stove of a sufficient size This base can be for example in steel pressed slate glass or stone and must cover the floor in the area...

Страница 45: ...rovided in the product technical sheet at the end of the manual A non closable permanent aeration grid must be placed external in areas that are particularly windy and exposed to weathering provide ra...

Страница 46: ...it is not necessary to create a classic air intake in the room fig 5 4c A B Air inlet C D Fume outlet connect the combustion air inlet of the stove to the air intake with a dedicated duct Fig 5 4d 5 5...

Страница 47: ...have a maximum length of 2 3 m with an upwards slope of 3 5 Fig 5 5 Anchor the pipes with suitable collars to the wall The fume exhaust connection MUST NOT be connected to a fireplace used by other g...

Страница 48: ...he dimensions and the materials used in its construction The exhaust of fumes through a traditional fireplace Fig 5 5 1 can take place provided the state of maintenance of the fireplace is assured In...

Страница 49: ...ection Simply connect the stove to the electrical system using the plug provided Fig 6 2 1 The electrical connection plug must be easily accessible even after installing the stove 6 2 1 1 Earthing The...

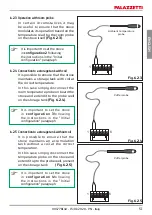
Страница 50: ...stove and is factory fitted with a probe Disconnect the probe and connect the two thermostat contacts Fig 6 2 2 Fig 6 2 2 It is important to set the stove in configuration 1 following the in structio...

Страница 51: ...nection to a storage tank without coil It is possible to ensure that the stove maintains an accumulation tank without a coil at the correct temperature In this case simply disconnect the temperature p...

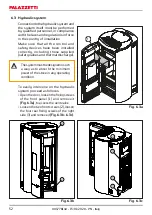
Страница 52: ...e laws and regulations in force in the country of installation Make sure that all the control and safety devices have been installed correctly including those supplied safety valves and thermal discha...

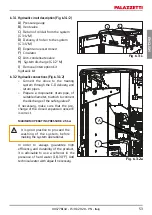
Страница 53: ...ing system through the C D delivery and return pipes Prepare a disposable drain pipe of suitable diameter to which to connect the discharge of the safety valve P If necessary make sure that the pre ch...

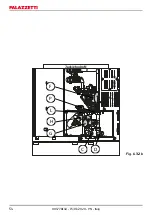
Страница 54: ...54 004778140 15 01 2020 PN Italy Fig 6 3 2b Jackie hydro N F P H L G C D...

Страница 55: ...ng from the water mains to the system drain J open the vent valve open the drain valve K making the water flow until the stove is completely filled Close the vent valve and wait for the minimum operat...

Страница 56: ...56 004778140 15 01 2020 PN Italy Fig 6 4b Jackie hydro N L M J N K D C...

Страница 57: ...ds ignore it and turn off the stove using the switch on the back wait a few seconds and then turn it back on 6 4 1 It is possible to set four different configurations Configuration 1 Set this configur...

Страница 58: ...in this configuration Configuration 4 Set this configuration when it is intended to connect the stove to a storage tank without coil The stove will switch on according to the temperature read by the s...

Страница 59: ...tove Komponenten enthalten in den Ofen Composants prevus dans le po le Piezas incluidas en el kit estufa 1 6 1 6 1 6 1 6 1 6 CONFIGURAZIONE 2 CONFIGURATION 2 KONFIGURATION 2 CONFIGURATION 2 CONFIGURAC...

Страница 60: ...ded in the stove Komponenten enthalten in den Ofen Composants prevus dans le po le Piezas incluidas en el kit estufa 1 6 1 6 CONFIGURAZIONE 4 CONFIGURATION 4 KONFIGURATION 4 CONFIGURATION 4 CONFIGURAC...

Страница 61: ...pellets Iftherearehorizontalsections itisnecessarytocheckandremoveanyashandsootdeposits before they block the passage of the fumes In the event of failure or inadequate cleaning the stove may have fu...

Страница 62: ...WEEK EVERY 2 WEEKS 1 MONTH 1 YEAR a Burn pot X Ash drawer compartment X Glass X Boiler X Resistance sleeve X Fume manifold Fig 7 4 X Door seals and burn pot X Smoke exhaust duct X By an enabled techn...

Страница 63: ...ions in force in the Country where the appliance is working for the disposal of materials and possibly for the disposal notification All disassembly operations for the demolition must take place when...

Страница 64: ......

Страница 65: ...r den Installateur 2 2 Hinweise f r das Wartungspersonal 2 3 Hinweise f r den Benutzer 3 Eigenschaften des Brennstoffs 3 1 Eigenschaften des Brennstoffs 3 2 Lagerung der Pellets 4 Handhabung und Tran...

Страница 66: ...wenn Sie Zweifel haben wenden Sie sich immer an das Fachpersonal von PALAZZETTI das IhnenhelfenoderamGer tReparaturen und Einstellungen vornehmen wird PALAZZETTI beh lt sich das Recht vor Spezifikatio...

Страница 67: ...infolge von eventuellen nderungen Anpassungen oder der Anwendung neuer Technologien auf neuen Ger ten auf dem Markt nicht als mangelhaft oder ungeeignet betrachtet 1 6 Allgemeines Informationen Bei A...

Страница 68: ...n diesem Handbuch genau befolgen insbesondere immer innerhalb der Betriebsgren zen des Ofens arbeiten stets eine regelm ige und sorgf l tige Wartung durchf hren die Benutzung des Ofens nur Personen mi...

Страница 69: ...rden 1 13 Typenschild Das Seriennummernschild auf dem Ofen enth lt alle produktbezogenen Kenndaten einschlie lich der Herstellerdaten der Seriennummer und der Kennzeichnung 1 14 Lieferung des Ofens De...

Страница 70: ...chuhe tragen Unfallverh tungsschuhe tragen elektrisch isoliertes Werkzeug benutzen sicherstellen dass der die Phasen von Montage und Demontage betreffende Bereich frei von Hindernissen ist 2 2 Hinweis...

Страница 71: ...rennter Stromversorgung Die im vorliegenden Handbuch enthaltenen Vorgaben m ssen beachtet werden DieAnweisungenundWarnungen die auf den Schildern auf dem Heizofen angegeben sind m ssen beachtet werden...

Страница 72: ...in den Heizofen mit der angegebenen Abschaltprozedur ausschalten Im Falle einer Fehlfunktion des O f e n s a u f g r u n d e i n e s n i c h t optimalen Abzuges diesen gem der beschriebenen Vorgehensw...

Страница 73: ...fern diese die richtige Temperatur und Luftfeuchtigkeit haben und in einem sicheren Abstand mindestens einen Meter von W rmequellen stehen Feuchte und oder kalte Pellets 5 C haben eine geringere Heizl...

Страница 74: ...eitsvorkehrungen Die Benutzer ist f r die Arbeiten am Aufstellungsort des Ofens verant wortlich er muss auch nun die vorge schlagenen Installationsl sungen am Ort pr fen Der Benutzer muss alle rtliche...

Страница 75: ...ausreichenden Abmessungen gesch tzt werden Dieser Sockel kann beispielsweiseausStahl Pressschiefer Glas oder Stein bestehen und muss den Boden im Bereich unterhalb des Ofens des Rauchgasanschlussrohre...

Страница 76: ...en Datenblatt des Produkts am Ende des Produkthefts beachten Au en muss ein bleibendes nicht verschlie bares L ftungsgitter angebracht werden an besonders windigen und der Witterung ausgesetzten Stell...

Страница 77: ...mpfe und zum Abziehen der Luft kanalisieren Daher ist es nicht erforderlich einen klassischen Lufteinlass im Raum vorzusehen Abb 5 4c A B Lufteinlass C D Rauchauslass Den Verbrennungslufteinlass des...

Страница 78: ...g von 3 5 nach oben haben Abb 5 5 Verankern Sie die Rohre mit geeigneten Manschetten an der Wand Der Abluftanschluss DARF NICHT angeschlossen werden an einen Kamin der von anderen Generatoren benutzt...

Страница 79: ...hl was seine Gr e betrifft als auch das f r seinen Bau verwendete Material Der Rauchabzug durch einen tradi tionellen Schornstein Abb 5 5 1 kann durchgef hrt werden solange der Wartungszustand des Sch...

Страница 80: ...einfach mit dem mit gelieferten Stecker an das Stromnetz anschlie en Abb 6 2 1 Der elektrische Anschluss Stecker muss auch nach der Installation des Ofens leicht zug nglich sein 6 2 1 1 Erdung Abb 6 1...

Страница 81: ...e ausgestattet Die Sonde trennen und die beiden Thermostatkontakte anschlie en Abb 6 2 2 Abb 6 2 2 Es ist wichtig dass der Heizofen in Konfiguration 1 gem den Anweisungen im Abschnitt Anf ngliche Konf...

Страница 82: ...Anschluss an einen Speicher ohne Rohrschlange Esistm glichdenOfensoeinzustellen dass er die Temperatur in einem ohne Rohrschlange ausgestatteten Speicher aufrechterh lt In diesem Fall gen gt es den T...

Страница 83: ...en korrekt installiert wurden Sicherheitsventile und thermische Abf hrung Um auf einfache Weise in die Wasser anlageeingreifenzuk nnen mussman Die T r ffnen die Befestigungs schrauben der Frontplatte...

Страница 84: ...leitungen C D an die Heizungsanlage anschlie en Ein Einweg Abflussrohr mit geeigne tem Durchmesser vorbereiten an das der Auslass des Sicherheitsventils P angeschlossen wird Ggf sicherstellen dass die...

Страница 85: ...85 DEUTSCH 004778140 15 01 2020 PN Italy Abb 6 3 2b Jackie Idro N F P H L G C D...

Страница 86: ...e Wasserrohrleitung an den Anlage abfluss J anschlie en das Entl f tungsventil ffnen den Ablasshahn K ffnen und das Wasser flie en lassen bis der Ofen vollst ndig wieder gef llt ist Das Entl ftungsven...

Страница 87: ...87 DEUTSCH 004778140 15 01 2020 PN Italy Abb 6 4b Jackie Idro N L M J N K D C...

Страница 88: ...werden wobei die beiden Klemmen gem Werkseinstellung berbr ckt bleiben Der Heizofen schaltet sich auch dann aus wenn die Wassertemperatur trotz Modulation weiter ansteigt In diesem Fall wird der Ofen...

Страница 89: ...ion aktiviert werden Konfiguration 4 Diese Konfiguration einstellen wenn der Heizofen an einen Speicher ohne Rohrschlangen angeschlossen werden soll Der Ofen schaltet sich gem der von der Speichersond...

Страница 90: ...Komponenten enthalten in den Ofen Composants prevus dans le po le Piezas incluidas en el kit estufa 1 6 1 6 1 6 1 6 1 6 CONFIGURAZIONE 2 CONFIGURATION 2 KONFIGURATION 2 CONFIGURATION 2 CONFIGURACI N...

Страница 91: ...ncluded in the stove Komponenten enthalten in den Ofen Composants prevus dans le po le Piezas incluidas en el kit estufa 1 6 1 6 CONFIGURAZIONE 4 CONFIGURATION 4 KONFIGURATION 4 CONFIGURATION 4 CONFIG...

Страница 92: ...m ssen Asche und Ru ablagerungen berpr ft und entfernt werden bevor sie den Durchgang des Rauchs blockieren Wird die Reinigung nicht oder nur unzureichend durchgef hrt dann k nnen Funktionsst rungen a...

Страница 93: ...WOCHEN 1 MESE 1 JAHR a Kohlebecken X Aschenlade Fach X Glas X Kessel X Halterung der Widerst nde X Rauchsammler Abb 7 4 X Dichtung der T r und des Kohle beckens X Rauchabzugskanal X Aufgabe des autori...

Страница 94: ...und jedenfalls an die geltenden Vorschriften des Landes in dem gearbeitet wird bez glich der Entsorgung der Materialien und eventuell des Entsorgungsberichts Alle Vorg nge der Demontage f r die Versch...

Страница 95: ......

Страница 96: ...allation du po le 5 4 Air de combustion 5 5 vacuation des fum es 6 Installation 6 1 Mise niveau du po le 6 2 Raccordement aux installations 6 3 Installation hydraulique 6 4 Configuration initiale 7 Pa...

Страница 97: ...sultation ou l intervention du personnel sp cialis PALAZZETTI Palazzetti se r serve le droit de modifier les donn es et caract ristiques techniques et ou fonctionnelles du po le tout moment et sans pr...

Страница 98: ...ations adaptations ou l application de nouvelles technologies sur des produits nouvellement commercialis s 1 6 G n ralit s Informations Pour tout change d informations avec le fabricant du po le pr ci...

Страница 99: ...tilisateur doit respecter scrupuleusement les dispositions du pr sent manuel et notamment toujours travailler dans les limites d emploi du po le toujours effectuer une maintenance constante et attenti...

Страница 100: ...retien 1 13 Plaquette signal tique La plaque d identification plac e sur le po le reporte toutes les donn es caract ristiques relatives au produit y compris les donn es du Fabricant le num ro de s rie...

Страница 101: ...es phases de montage et de d montage est exempte de tout obstacle 2 2 Avertissements pour les techniciens pr pos s l entretien Ne pas effectuer de branchements lectriques volants avec des c bles provi...

Страница 102: ...ectrique Respecter les prescriptions indiqu es dans le pr sent manuel Respecter les instructions et les avertissements signal s sur les plaquettes expos es sur le po les Les plaquettes sont des dispos...

Страница 103: ...ie de la chemin e teindre le po le en suivant la proc dure d arr t indiqu e En cas de dysfonctionnement du po le d un tirage non optimal du conduit des fum es nettoyer le conduit en suivant la proc du...

Страница 104: ...est utilis ou dans une pi ce voisine condition que la temp rature et l humidit soient ad quates et une distance de s curit au moins 1 m tre de toute source de chaleur Les granul s humides et ou froid...

Страница 105: ...2 Pr cautions pour la s curit La responsabilit des travaux ex cut s pour l installation du po le est et reste la charge de l utilisateur qui est tenu d effectuer les contr les relatifs aux solutions d...

Страница 106: ...s par une base ignifuge sous le po le avec des dimensions appropri es Cette base peut tre par exemple en acier en ardoise press e en verre ou en pierre et elle doit recouvrir le plancher dans la zone...

Страница 107: ...ns la fiche technique du produit la fin du manuel A l ext rieur une grille de ventilation permanente et non obturable doit tre install e dans les zones particuli rement expos es aux intemp ries et au...

Страница 108: ...air par cons quent il n est pas n cessaire de pratiquer une prise d air classique dans la pi ce fig 5 4c A B Entr e d air C D vacuation des fum es raccorder l entr e d air de combustion du po le l en...

Страница 109: ...eur maximum de 2 3 m avec une inclinaison vers le haut de 3 5 Fig 5 5 Fixer les tuyaux au mur avec des colliers appropri s Le raccord d vacuation des fum es NE DOIT PAS TRE raccord une chemin e utilis...

Страница 110: ...les dimensions que pour les mat riaux employ s pour sa construction Le conduit d vacuation des fum es travers une chemin e traditionnelle Fig 5 5 1 peut se faire condition de v rifier l tat de mainte...

Страница 111: ...de raccorder le po le l installation lectrique travers la fiche fournie en dotation Fig 6 2 1 Le branchement lectrique fiche doit tre facilement accessible m me apr s l installation du po le 6 2 1 1 M...

Страница 112: ...ncher la sonde et brancher les deux contacts du thermostat Fig 6 2 2 Fig 6 2 2 Il est important de programmer le po le dans la configuration 1 en suivant les instructions report es au paragraphe Confi...

Страница 113: ...e situ e sur le po le et de la prolonger jusqu au puits pour sonde pr sent sur l accumulation thermique Fig 6 2 4 Il est important de programmer le po le dans la configuration 3 en suivant les instruc...

Страница 114: ...correctement y compris ceux fournis en dotation avec le po le soupapes de s curit et vacuation thermique L installation doit tre r alis e de fa on absorber la puissance minimum du po le quelle que soi...

Страница 115: ...e travers les tubes de refoulement et de retour C D Pr disposer un tube d vacuation jetable d un diam tre appropri auquel le refoulement de la soupape de s curit P peut tre raccord Si besoin s assurer...

Страница 116: ...116 004778140 15 01 2020 PN Italy Fig 6 3 2b Fig 6 3 2c Jackie idro N F P H L G C D...

Страница 117: ...inet de vidange de l installation J ouvrir le reniflard ouvrir le robinet de vidange K en faisant ainsi couler l eau jusqu au remplissage total du po le Fermer le reniflard et attendre l obtention de...

Страница 118: ...118 004778140 15 01 2020 PN Italy Fig 6 4b Jackie idro N L M J N K D C...

Страница 119: ...ellement ou de fa on programm e sans l aide d un thermostat externe mais en laissant les deux bornes pontet comme pr dispos lors de la fabrication du po le Le po le s teint aussi dans le cas o la temp...

Страница 120: ...nction anti gel Configuration 4 Programmer cette configuration quand on veut relier le po le une accumulation thermique sans serpentin Le po le s allume en fonction de la temp rature lue par la sonde...

Страница 121: ...stove Komponenten enthalten in den Ofen Composants prevus dans le po le Piezas incluidas en el kit estufa 1 6 1 6 1 6 1 6 1 6 CONFIGURAZIONE 2 CONFIGURATION 2 KONFIGURATION 2 CONFIGURATION 2 CONFIGURA...

Страница 122: ...ded in the stove Komponenten enthalten in den Ofen Composants prevus dans le po le Piezas incluidas en el kit estufa 1 6 1 6 CONFIGURAZIONE 4 CONFIGURATION 4 KONFIGURATION 4 CONFIGURATION 4 CONFIGURAC...

Страница 123: ...ties de conduites horizontales il est n cessaire de v rifier et d enlever les ventuels d p ts de cendres et de suie avant qu ils ne puissent obstruer s rieusement le passage des fum es Si le nettoyage...

Страница 124: ...NES 1 MOIS 1 AN a Brasier X Tiroir compartiment cendre X Vitre X Chaudi re X Manchon porte r sistance X Collecteur fum es Fig 7 4 X Joints portes et brasier X Conduit d vacuation de la fum e X De la p...

Страница 125: ...ans le pays o sera effectu e la mise au rebut des mat riaux et ventuellement la d claration Toutes les op rations de d montage pour la d molition doivent se faire quand le po le est teint et hors tens...

Страница 126: ......

Страница 127: ...al t cnico encargado del mantenimiento 2 3 Advertencias para el usuario 3 Caracter sticas del combustible 3 1 Caracter sticas del combustible 3 2 Almacenaje del pellet 4 Manipulaci n y transporte 4 1...

Страница 128: ...re la asesor a o la intervenci n de personal especializado PALAZZETTI PALAZZETTI se reserva el derecho a modificar especificaciones y caracter sticas t cnicas y o funcionales de la estufa en cualquier...

Страница 129: ...nes o aplicaci n de nuevas tecnolog as sobre los aparatos de nueva comercializaci n 1 6 Generalidades Informaciones Al intercambiar informaci n con el Fabricante de la estufa consultar el n mero de se...

Страница 130: ...a legal en conformidad con la Directiva CEE 1999 44 CE debe observar detalladamente las prescripciones indicadas en el presente manual y en particular siempre operar dentro de los l mites de uso de l...

Страница 131: ...placa de matr cula colocada en la estufa muestra todos los datos caracter sticos relativos al producto incluidos los datos del Fabricante el n mero de matr cula y la marca 13 1 Entrega de la estufa La...

Страница 132: ...enci n de accidentes se deben utilizar equipos con aislamiento el ctrico comprobar que la zona donde se van a realizar las operaciones de montaje y desmontaje est libre de obst culos 2 2 Advertencias...

Страница 133: ...lasprescripcionesindicadas en el presente manual Respetar las instrucciones y las advertencias evidenciadas en las placas expuestas en la estufa Las placas son dispositivos para la prevenci n de accid...

Страница 134: ...el procedimiento de apagado indicado En caso de mal funcionamiento de la estufa debido a un tiro no ideal del humero realizar la limpieza siguiendo el procedimiento descrito La limpieza del humero deb...

Страница 135: ...estufa o en un local contiguo siempre que est a temperatura y humedad adecuadas a una distancia de seguridad por lo menos un metro de fuentes de calor El pellet h medo y ofr o 5 C reduce la potencial...

Страница 136: ...a EN 10683 5 2 Precauciones de seguridad La responsabilidad de las obras realizadas en el espacio de ubicaci n de la estufa es y permanece a cargo del usuario el mismo debe realizar tambi n la ejecuci...

Страница 137: ...estufa de dimensiones adecuadas Esta base puede ser por ejemplo de acero pizarra prensada vidrio o piedra y debe cubrir el pavimento en la zona de abajo de la estufa el tubo de conexi n de los humos...

Страница 138: ...producto al final del manual Externamente debe ser puesta una rejilla de ventilaci n permanente que nopuedacerrarse enzonasconmucho viento y expuestas a la intemperie prever una protecci n contra la...

Страница 139: ...ci n del aire por lo tanto no es necesario realizaruna toma de aire cl sica en el local fig 5 4C A B Entrada aire C D Salida humos Conectar la entrada del aire comburente de la estufa a la toma de air...

Страница 140: ...longitud m xima de 2 3 m con una inclinaci nhaciaarribadel3 5 Fig 5 5 Fijarlas tuber as con collares especiales a la pared El empalme de descarga de los humos NO DEBE SER conectado a una chimenea uti...

Страница 141: ...siones como para los materiales utilizados en la construcci n La descarga de los humos a trav s de una chimenea tradicional Fig 5 5 1 puede ser realizada siempre que se asegure el estado de mantenimie...

Страница 142: ...ci n el ctrica a trav s del enchufe suministrado Fig 6 2 1 La conexi n el ctrica enchufe debe ser f cilmente accesible incluso despu s de la instalaci n de la estufa 13 1 1 1 Puesta a tierra Fig 6 1 F...

Страница 143: ...a y conectar los dos contactos del termostato Fig 6 2 2 Fig 6 2 2 Es importante configurar la estufa en la configuraci n 1 siguiendo las instrucciones que figuran en el p rrafo Configuraci n inicial D...

Страница 144: ...un Acumulador sin serpent n Esposiblehacerquelaestufamantenga en temperatura un acumulador desprovisto de serpent n En este caso es suficiente desconectar la sonda de temperatura a bordo de la estufa...

Страница 145: ...d incluidos los que se han suministrado v lvulas de seguridad y descarga t rmica Para intervenir en la instalaci n hidr ulica de modo f cil se debe Abrir la puerta desatornillar los tornillos de fijac...

Страница 146: ...Preparar un tubo de descarga de di metro adecuado al que se debe conectar la descarga de la v lvula de seguridad P Para las versiones Jackie idro ACS conectar el tubo de entrada del agua sanitaria al...

Страница 147: ...147 ESPA OL 004778140 15 01 2020 PN Italy Fig 6 3 2b Jackie idro N F P H L G C D...

Страница 148: ...a instalaci n J abrir la v lvula de ventilaci n abrir el grifo de descarga K haciendoqueelaguafluyahastaquese llene completamente la estufa Cerrar la v lvula de ventilaci n y esperar que se alcance la...

Страница 149: ...149 ESPA OL 004778140 15 01 2020 PN Italy Fig 6 4b Jackie idro N L M J N K D C...

Страница 150: ...un termostato externo pero dejando las dos terminales puenteadas como en la configuraci n de f brica La estufa se apagar incluso si eventualmente la temperatura del agua contin a a crecer sin importar...

Страница 151: ...n la funci n antihielo Configuraci n 4 Establecer esta configuraci n cuando se pretenda conectar la estufa a un acumulador sin serpent n La estufa se encender en funci n de la temperatura le da por l...

Страница 152: ...e Komponenten enthalten in den Ofen Composants prevus dans le po le Piezas incluidas en el kit estufa 1 6 1 6 1 6 1 6 1 6 CONFIGURAZIONE 2 CONFIGURATION 2 KONFIGURATION 2 CONFIGURATION 2 CONFIGURACI N...

Страница 153: ...ncluded in the stove Komponenten enthalten in den Ofen Composants prevus dans le po le Piezas incluidas en el kit estufa 1 6 1 6 CONFIGURAZIONE 4 CONFIGURATION 4 KONFIGURATION 4 CONFIGURATION 4 CONFIG...

Страница 154: ...les de pellet quemados Si existen tramos horizontales es necesario comprobar y quitar el dispositivo eventual de cenizas y holl n antes de que estos obturen el pasaje de los humos Si la estufa no se l...

Страница 155: ...MES 1 A O a Brasero X Caj n Compartimiento cenizas X Vidrio X Caldera X Manguito puerta resistencia X Colector de humos Fig 7 4 X Guarniciones puerta y brasero X Conducto de evacuaci n humos X A carg...

Страница 156: ...n el Pa s donde se opera para la eliminaci n de los materiales y eventualmente para la denuncia de eliminaci n Todas las operaciones de desmontaje para el desguace se deben realizar con la estufa para...

Страница 157: ......

Страница 158: ......

Страница 159: ......

Страница 160: ...ook and is free to modify the features of its products without prior notice Die Firma Palazzetti bernimmt f r eventuelle Fehler in diesem Heft keine Verantwortung und beh lt sich das Recht vor die Eig...

Отзывы: