background image

14

LED light type 300 Marine 

MA50-09E 2015-1

1

ENGLISH

Art.no.

Rev.no.

Scale

Designed by:

Approved by:

Revised by:  Date

Drawn by:  Date

Drawing number

Assembly drawing no.

Surface treatment

part of ISO 2768-1 

The tolerance class in accordance with this

E

Box 728, SE-194 27 Upplands Väsby, Sweden
Phone +46 8 59411050, Fax +46 8 59086880


ASA 2012-02-07

för MA50-09

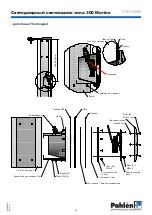
Installationsbild


M11604  

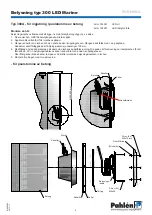
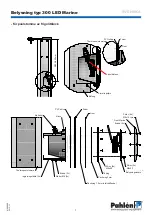
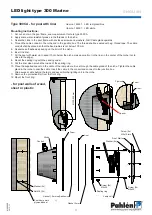
Låsbricka (6x)

M5x10 Torx (6x)

Belysningsinsats

Fästskruv (2x)

Front Marine

Art.no.

Rev.no.

Scale

Designed by:

Approved by:

Revised by:  Date

Drawn by:  Date

Drawing number

Assembly drawing no.

Surface treatment

part of ISO 2768-1 

The tolerance class in accordance with this

E

Box 728, SE-194 27 Upplands Väsby, Sweden
Phone +46 8 59411050, Fax +46 8 59086880


ASA 2012-02-07

för MA50-09

Installationsbild


M11605  

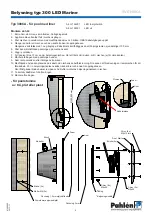
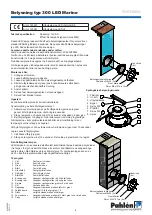
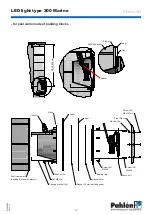
Belysningsinsats

Fästskruv (2x)

Låsbricka (6x)

Front Marine

M5x10 (6x)

Art.no.

Rev.no.

Scale

Designed by:

Approved by:

Revised by:  Date

Drawn by:  Date

Drawing number

Assembly drawing no.

Surface treatment

part of ISO 2768-1 

The tolerance class in accordance with this

E

Box 728, SE-194 27 Upplands Väsby, Sweden
Phone +46 8 59411050, Fax +46 8 59086880

1553002X

ASA 2009-05-26

ASA 2014-06-26


Belysningsinsats LED typ 300


M11563 1

T

h

is

 d

o

c

u

m

e

n

a

n

d

 i

ts

 c

o

n

te

n

ts

 a

re

 t

h

e

 e

x

c

lu

s

iv

e


p

ro

p

e

rt

y

 o

P

a

h

n

s

 a

n

d

 m

a

y

 n

o

b

e

 c

o

p

ie

d

re

p

ro

d

u

c

e

d

tr

a

n

s

m

it

te

d

 o

c

o

m

m

u

n

ic

a

te

d

 t

o

 a

 t

h

ir

d


p

a

rt

y

o

u

s

e

d

 f

o

a

n

y

 p

u

rp

o

s

e

 w

it

h

o

u

w

ri

tt

e

n

 p

e

rm

is

s

io

n

.

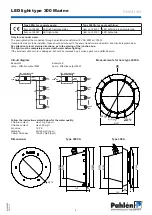
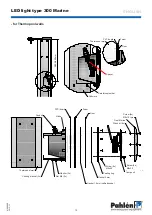
Plastbit

ingår i lampan


Plastdistans

1

8

DIN 933 - M5  x 20

19901221

A4

Skruv M6S M5x20

2

7

12461

12461

POM

Knopp räfflad SR6127 typ 1

2

6

ISO 7045 - M4 x 12 - 4.8 - H

19909215

A4

Skruv MRX M4x10

2

5

M11042

123401

EN 1.4404 (SS2348)

Bygel till LED-lampa

1

4

LED

123241 alt. 123341


LED lampa Spectravision 700, multi alt. vit

1

3

U-list

12272

PVC

U-list PVC GV-1-5, L=550mm

1

2

M11445

15530021


Fästram 300- och LED-lampa

1

1

Drawing.no:

Art_nr

Material

Title/ Name

Qty.

Item.

(3

m

)

Art.nr 
Belysningsinsats

Pos 3 
LED-lampa

Anm

15530025

123241

röd/grön/blå

15530026

123341

vit

Pos 8 är bipackad lampan 

8

2

3

4

5

7

6

1

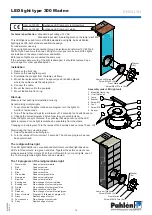
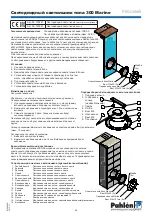
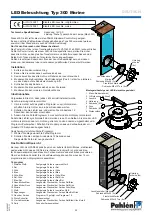
Assembly order LED light unit

1.  Mounting frame ring

2.  U-list (optional)

3. Lamp

4. Bracket

5.  Screw M4

6. Foot

7.  Screw M5

8. Spacer

Item no 123261

Exchange LED lamp unit, red/green/blue

Item no 123361

Exchange LED lamp unit, white

Technical specification 

Standard input voltage: 12V AC


  Standard input watt: See rating plate on the lamp (max 50W)

This LED-light is suited for most PAR56 standard pool lights. Suits all Pahlén  

lighting type 300, both standard and Marine design.

For under water use only.

The pool light should be connected through an isolation transformer 12V 60W alt. 

300W. If you have more than one LED light in your pool, make sure all the lights  

are installed on the same transformer and switch.

Both types of lights are connected the same way.

If the external cable or cord of the light is damaged, it should be replaced by a  

service agent or other qualified person.

Installation

1.  Remove the front ring.

2.  Remove the existing lamp unit.

3.  Dismantle the old light from the lamp unit frame.

4.  Mount the replacement bulb. The spacer (pos 8) shall be placed  

where the cable meets the cable gland.

5.  Connect the cable.

6.  Mount the lamp unit to the poolwall.

7.  Mount the Marine front ring.

Start-up

Make sure that each light is installed correctly.

Synchronizing multiple lights

1.  To synchronize the lights to the same program, turn the lights on,

  wait for a few seconds. 

2.  Turn off the lights and wait for a minimum of 12 seconds, then switch back on.

3.  Change the colour/program 2 times. Now they are synchronized.

Once the lights are synchronized, they will stay that way until one of the LED  

lights is replaced or one light is switched on separately from the others.

Changing colour/program: 

Turn the lamps off and quickly back on (max 10 sec. off).

Memorizing the last colour/program:

1.  Select the desired colour/program.

2.  Turn the lamps off for minimum 12 seconds. The chosen program has now 

  been memorized.

The red/green/blue light

The LED light PAR56 is a very advanced electronic controlled light based on  

LED’s in three colours: red, green and blue. Together these three colours can  

produce several other colours. With the on/off switch for your pool lights, one of  

the 16 pre-programmed light effects can be selected.

The 16 programs of the red/green/blue light:

1   Warm white  

Fixed colour warm white

2   Red  

Fixed colour red

3   Green  

Fixed colour green

4   Blue  

Fixed colour blue

5   Green-blue  

Fixed colour green/blue

6   Red-green  

Fixed colour red/green

7   Blue-red  

Fixed colour blue/red

8   Evening sea  

Slow change of colour red/blue

9   Evening river  

Slow change of colour red/green

10   Riviera  

Slow change of colour green/blue

11   White  

Fixed colour neutral white

12   Rainbow  

Slow change of colour blue/red/green

13   River of colours   Program 12 followed by program 15

14   Disco  

Rapid change of colour

15   Four seasons  

Slow change of colour red/

16  Party  

Rapid change of colour

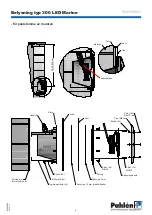
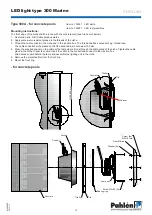
Washer

(6x)

Lamp unit Marine

Screw M5x20 (2x)

Front Marine

Screw M5x10 Torx (6x)

Washer

(6x)

Lamp unit Marine

Screw M5x50 (2x)

Front Marine

Screw M5x10 Torx (6x)

Содержание 300

Страница 1: ...lands Väsby Sweden Tel 46 8 594 110 50 Fax 46 8 590 868 80 e mail info pahlen se www pahlen com Manual User manual Gerbrauchsanleitung Инструкция Manuel d utilisation Manuiale d usa Manual de instrucciones MA50 09 rev 1 2015 11 Swedish design and manufacture since 1967 ...

Страница 2: ......
Страница 3: ...D M11446 0 Ø170 Ø160 140 25 282 Ø 288 Ø Art no Rev no Scale Designed by Approved by Revised by Date Drawn by Date Drawing number Assembly drawing no Surface treatment part of ISO 2768 1 The tolerance class in accordance with this E Box 728 SE 194 27 Upplands Väsby Sweden Phone 46 8 59411050 Fax 46 8 59086880 124X81 ASA 2011 11 03 TS 2012 03 19 Marine Belysning 300A LED M11562 1 Ø172 Ø160 304 288 2...

Страница 4: ...1 The tolerance class in accordance with this E ASA 2011 12 01 Kakel Kakelfix Betong Kabelrör Nisch Front M5x10 Torx 6x Fästbricka 6x Tätring M5x50 2x Typ 300A för ingjutning i poolstomme av betong Art nr 124381 LED vit Art nr 124281 LED röd grön blå Montera så här Belysningsnischens framkant skall ligga i liv med färdig betongvägg A se skiss 1 Fixera nischen OBS Kabelutgången skall riktas uppåt 2...

Страница 5: ...ed liner Art nr 124291 LED röd grön blå Art nr 124391 LED vit Montera så här 1 Borra hål i stommen se måttskiss håltagningsmall 2 Applicera lite vattenfast fett i nischens gängor 3 Fäst nischen i poolstommen med medföljande skruv och bricka OBS Kabelutgången uppåt 4 Gänga i kabelröret i nischen och den andra änden i kopplingsboxen Gängorna skall tätas med t ex gängtape Kabelröret skall förläggas s...

Страница 6: ...elysningsinsats LED Kabelrör Fästbricka 6x Art no Rev no Scale Designed by Approved by Revised by Date Drawn by Date Drawing number Assembly drawing no Surface treatment part of ISO 2768 1 The tolerance class in accordance with this E Box 728 SE 194 27 Upplands Väsby Sweden Phone 46 8 59411050 Fax 46 8 59086880 ASA 2012 02 08 belysning typ 300CA LED Installationsbild för poolstomme av mursten M116...

Страница 7: ...itted or communicated to a third party or used for any purpose without written permission Art no Rev no Scale Designed by Approved by Revised by Date Drawn by Date Drawing number Assembly drawing no Surface treatment part of ISO 2768 1 The tolerance class in accordance with this E Box 728 SE 194 27 Upplands Väsby Sweden Phone 46 8 59411050 Fax 46 8 59086880 TS 2012 01 11 belysning typ 300CA LED In...

Страница 8: ... så här 1 Stäng av strömmen 2 Lossa befintlig belysningsinsats 3 Lossa den gamla lampan från belysningsinsatsens fästram 4 Sätt dit utbyteslampan Hylsan pos 8 skall placeras där kabeln går igenom nischens kabelförskruvning 5 Anslut kabeln 6 Skruva fast belysningsinsatsen mot poolväggen 7 Skruva fast Marine fronten Uppstart Kontrollera att lamporna är korrekt installerade Synkronisering av flera fl...

Страница 9: ... M11446 0 Ø170 Ø160 140 25 282 Ø 288 Ø Art no Rev no Scale Designed by Approved by Revised by Date Drawn by Date Drawing number Assembly drawing no Surface treatment part of ISO 2768 1 The tolerance class in accordance with this E Box 728 SE 194 27 Upplands Väsby Sweden Phone 46 8 59411050 Fax 46 8 59086880 124X81 ASA 2011 11 03 TS 2012 03 19 Marine Belysning 300A LED M11562 1 Ø172 Ø160 304 288 22...

Страница 10: ...in accordance with this E ASA 2011 12 01 Kakel Kakelfix Betong Kabelrör Nisch Front M5x10 Torx 6x Fästbricka 6x Tätring M5x50 2x Type 300A for concrete pools Item no 124381 LED white Item no 124281 LED red green blue Mounting instructions The front edge of the niche shall be in line with the concrete wall see A in sketch below 1 Fixate the niche N B Cable gland upwards 2 Apply some water resistant...

Страница 11: ...white Mounting instructions 1 Cut out a hole in the pool frame see measurement for hole type 300CA 2 Apply some water resistant grease in the threads of the niche 3 Fixate the niche in the pool frame with enclosed screws and washers N B Cable gland upwards 4 Thread the cable conduit in the niche and in the junction box The thread shall be sealed with e g thread tape The cable conduit shall be plac...

Страница 12: ...ty or used for any purpose without written permission Art no Rev no Scale Designed by Approved by Revised by Date Drawn by Date Drawing number Assembly drawing no Surface treatment part of ISO 2768 1 The tolerance class in accordance with this E Box 728 SE 194 27 Upplands Väsby Sweden Phone 46 8 59411050 Fax 46 8 59086880 ASA 2012 02 08 belysning typ 300CA LED Installationsbild för poolstomme av m...

Страница 13: ...uced transmitted or communicated to a third party or used for any purpose without written permission Art no Rev no Scale Designed by Approved by Revised by Date Drawn by Date Drawing number Assembly drawing no Surface treatment part of ISO 2768 1 The tolerance class in accordance with this E Box 728 SE 194 27 Upplands Väsby Sweden Phone 46 8 59411050 Fax 46 8 59086880 TS 2012 01 11 belysning typ 3...

Страница 14: ...ified person Installation 1 Remove the front ring 2 Remove the existing lamp unit 3 Dismantle the old light from the lamp unit frame 4 Mount the replacement bulb The spacer pos 8 shall be placed where the cable meets the cable gland 5 Connect the cable 6 Mount the lamp unit to the poolwall 7 Mount the Marine front ring Start up Make sure that each light is installed correctly Synchronizing multipl...

Страница 15: ...ved by Revised by Date Drawn by Date Drawing number Assembly drawing no Surface treatment part of ISO 2768 1 The tolerance class in accordance with this E Box 728 SE 194 27 Upplands Väsby Sweden Phone 46 8 59411050 Fax 46 8 59086880 124X81 ASA 2011 11 03 TS 2012 03 19 Marine Belysning 300A LED M11562 1 Ø172 Ø160 304 288 22 36 140 Ø288 Ø170 22 140 Ø288 Ø304 Ø160 Ø282 Ø160 25 140 36 Typ 300A für Bet...

Страница 16: ...den Art Nr 124381 LED Beleuchtung weiß Art Nr 124281 LED Beleuchtung rot grün blau Montageanleitung Die Vorderkante der Einbaunische muss auf einer Linie mit der Betonwand liegen siehe A in der untenstehenden Abbildung 1 Fixieren Sie die Einbaunische Achtung Die Kabelverschraubung muss nach oben zeigen 2 Tragen Sie wasserbeständiges Fett auf die Gewinde der Einbaunische auf 3 Fädeln Sie den Kabelk...

Страница 17: ...hmen mithilfe der mitgelieferten Schrauben und Unterlegscheiben Achtung Die Kabelverschraubung muss nach oben zeigen 4 Fädeln Sie den Kabelkanal in die Einbaunische und die Anschlussdose ein Das Gewinde muss abgedichtet werden z B mit Gewindeband Der Kabelkanal ist so zu platzieren dass der Biegeradius nicht weniger als 100 mm beträgt 5 Befestigen Sie die selbstklebende Abdichtung am Rand der Einb...

Страница 18: ...ose without written permission Art no Rev no Scale Designed by Approved by Revised by Date Drawn by Date Drawing number Assembly drawing no Surface treatment part of ISO 2768 1 The tolerance class in accordance with this E Box 728 SE 194 27 Upplands Väsby Sweden Phone 46 8 59411050 Fax 46 8 59086880 ASA 2012 02 08 belysning typ 300CA LED Installationsbild för poolstomme av mursten M11606 0 Poolsto...

Страница 19: ...ted to a third party or used for any purpose without written permission Art no Rev no Scale Designed by Approved by Revised by Date Drawn by Date Drawing number Assembly drawing no Surface treatment part of ISO 2768 1 The tolerance class in accordance with this E Box 728 SE 194 27 Upplands Väsby Sweden Phone 46 8 59411050 Fax 46 8 59086880 TS 2012 01 11 belysning typ 300CA LED Installationsbild fö...

Страница 20: ...ht vom Rahmen der Leuchteneinheit 4 Montieren Sie die Ersatzbirne Das Distanzstück Pos 8 ist dort zu platzieren wo das Kabel auf die Kabelverschraubung trifft 5 Schließen Sie das Kabel an 6 Montieren Sie die Leuchteneinheit an der Poolwand 7 Montieren Sie den vorderen Frontstück Marine Inbetriebnahme Vergewissern Sie sich dass jedes Licht korrekt installiert wurde Synchronisierung mehrerer Lichter...

Страница 21: ...40 36 Circuit diagram for LED lamps 28W L1 TR1 60W alt 300W N E10077 0 2010 06 03 ASA IN 230V AC OUT 12V AC LA1 LA2 LA3 LA10 28W 28W 28W 28W alt alt Circuit diagram for LED lamps L1 TR1 60W alt 300W N E10016 0 2007 07 11ASA IN 230V AC OUT 12V AC LA1 LA2 LA3 LA6 50W 50W 50W 50W 50W alt alt РУССКИЙ Тип 300A для бетонных бассейнов Тип 300CA для бассейна с лайнером Арт 124281 Светодиодная лампа Красны...

Страница 22: ...ce with this E ASA 2011 12 01 Kakel Kakelfix Betong Kabelrör Nisch Front M5x10 Torx 6x Fästbricka 6x Tätring M5x50 2x РУССКИЙ Тип 300A для бетонных бассейнов Арт 124381 Светодиодная лампа Белый Арт 124281 Светодиодная лампа Красный зеленый синий Инструкция по монтажу Передний край ниши должен устанавливаться заподлицо с бетонной стеной см A на схеме ниже 1 Закрепите нишу Уплотнение кабеля направле...

Страница 23: ...Инструкция по монтажу 1 Вырежьте отверстие в каркасе бассейна см размеры отверстия типа 300CA 2 Нанесите небольшое количество герметика на резьбу ниши 3 Закрепите нишу в каркасе бассейна с помощью прилагаемых винтов и шайб N B Уплотнение кабеля направлено вверх 4 Пропустите кабелепровод через нишу и распределительную коробку Резьба должна быть герметизирована например лентой для уплотнения резьбов...

Страница 24: ...hout written permission Art no Rev no Scale Designed by Approved by Revised by Date Drawn by Date Drawing number Assembly drawing no Surface treatment part of ISO 2768 1 The tolerance class in accordance with this E Box 728 SE 194 27 Upplands Väsby Sweden Phone 46 8 59411050 Fax 46 8 59086880 ASA 2012 02 08 belysning typ 300CA LED Installationsbild för poolstomme av mursten M11606 0 Poolstomme mur...

Страница 25: ...ommunicated to a third party or used for any purpose without written permission Art no Rev no Scale Designed by Approved by Revised by Date Drawn by Date Drawing number Assembly drawing no Surface treatment part of ISO 2768 1 The tolerance class in accordance with this E Box 728 SE 194 27 Upplands Väsby Sweden Phone 46 8 59411050 Fax 46 8 59086880 TS 2012 01 11 belysning typ 300CA LED Installation...

Страница 26: ...рый светильник из каркаса осветительного блока 4 Установите новую лампу Установите прокладку поз 8 в том месте где кабель проходит через кабельное уплотнение 5 Подсоедините кабель 6 Установите осветительный блок в стене бассейна 7 Установите переднее кольцо Marine Включение в работу Запуск светильников Убедитесь что каждый светильник установлен правильно Синхронизация нескольких светильников 1 Для...

Отзывы: