20
Controller Guide
Changing Default Temperature
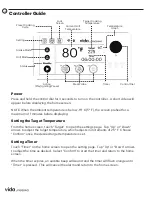
The default temperature, for Smoke and Grill modes, as well as the temperature scale, can be
modified. To do so, tap the gear icon to open the “Settings” screen and then choose “Start Up”.
Select the desired cooking mode of the temperature to adjusted. Using the arrows, adjust to
a new default temperature. When finished, press “Confirm” and return to the settings screen.
NOTE: The default temperature scale is Fahrenheit (F). Change to Celsius (C) by tapping the
degree symbol.
Meat Probe Calibration
If you find the meat probe is not accurate, you can change the calibration from the Settings
screen. Start by placing the meat probe tip into a cup of ice water for at least 5 minutes. Then
insert the meat probe plug into a terminal on the controller. Open settings by tapping the gear
icon. Choose “Calibration”. If the current displayed temperature does not match the ice water
temperature, press “Calibrate”. Press Home to return to the home screen or select any other
tab in the settings menu.
Prime/Purge Auger
If the auger tube is empty (because the grill is new or the auger has been purged for storage
or changing pellet flavors), you can “prime” the auger before use to decrease the ignition time.
Do not prime the auger if it is already full. Doing so will overfill the fire pot resulting in a larger
initial fire which can be hazardous.
To prime the auger, open the settings screen and tap “Auger”. Then select “Load Pellets”. The
auger will automatically run for a designated time to properly load pellets into the auger tube.
To cancel this action while the auger is loading, hit “Cancel”.
When you want to change the pellets or clean the grill for long term storage, you can run the
auger to clear any remaining pellets from the auger tube by choosing “Empty Auger”. Once
the auger stops running, you can remove the pellets from the fire pot using a vacuum.
Preset Cooking Cycles
There are four preset cooking cycles and two custom cycles that simplify cooking by
automatically setting the target temperature for specific meats. Each cycle also includes an
optional timer and meat probe. Select the desired cycle before or after lighting the grill.
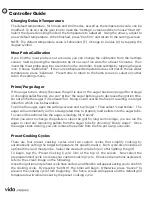
To begin, tap the “Preset Cooking Cycle” icon at the top of the screen. Now select the
preprogrammed cycle or create your custom cooking cycle. Choose other options as desired,
refer to the screen image on the following.
Once the ignition and preheat cycle have ended, a notification will appear asking you to confirm
the cooking cycle. By pressing “Confirm”, the timer will begin. Otherwise, press “Cancel” to
prevent the cooking cycle from beginning. The home screen will appear and the default grill
temperature will remain as set by the preset cooking cycle.
TM
Содержание vida 910-05005
Страница 1: ...Pellet Grill User Manual Model 910 05005 SKU A1 TM...
Страница 5: ...Package Parts List 5 VidabyPADERNO com 1 800 263 9768 9 7 5 3 2 10 8 6 4 1 x2 x2 11 12x2...
Страница 6: ...Package Parts List 6 21 19 17 15 14 22 20 18 16 13 x3 TM x2 23...
Страница 8: ...Assembly 1 2 8 x6 x6 x6 1 4 6 x2 x2 x2 9 TM...
Страница 9: ...Assembly 3 4 9 x10 x10 x10 3 5 8 VidabyPADERNO com 1 800 263 9768...
Страница 10: ...Assembly 5 6 10 x2 x2 x2 x2 x2 x2 7 TM...
Страница 11: ...Assembly 7 8 11 8 12 11 VidabyPADERNO com 1 800 263 9768...
Страница 12: ...Assembly 9 10 12 x6 x6 x6 20 23 x2 x2 x2 15 17 18 TM...
Страница 13: ...Assembly 11 12 13 10 x2 x2 x2 x2 22 TO CLOSE VidabyPADERNO com 1 800 263 9768...
Страница 14: ...Assembly 13 14 14 13 2 TM...
Страница 15: ...15 Assembly 15 16 19 21 VidabyPADERNO com 1 800 263 9768...
Страница 16: ...Assembly 17 16 14 18 16 TM...
Страница 17: ...17 Assembly VidabyPADERNO com 1 800 263 9768...
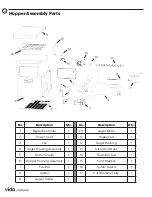
Страница 32: ...Grill Assembly Parts 1 2 3 4 5 6 7 8 9 10 11 12 13 16 17 18 19 14 15 20 21 22 23 24 32 TM...
Страница 35: ...35 VidabyPADERNO com 1 800 263 9768...


