PACOM PPRO-UR-64PDX-DUAL Скачать руководство пользователя страница 8

8

Camera List Area

Following options can be accessed by right-clicking on a 
camera list entry:


Add/Remove Camera

: Adds or removes the selected 

camera. The Add Camera option is inactive if the camera 
has already been added to the screen.


Authentication

: Enter the necessary camera login info. 

This option is inactive for DirectIP™ / Evonet cameras 
because they do not require logins.

Video Display Area

Left-click on the video display area to toggle between split 
screen and single screen modes.
Drag the camera screens around to rearrange them. The 
maximum number of the channels that can be registered 
on the NVR and the current registered camera channels 
display on the upper left corner of each screen.

Apply/Cancel Buttons

While in Camera Registration mode, select 

Apply

 to register 

all changes.
Select 

Cancel

 to exit Camera Registration mode without 

applying the changes.

It is not possible to register a camera that has already 
been registered to a different NVR.

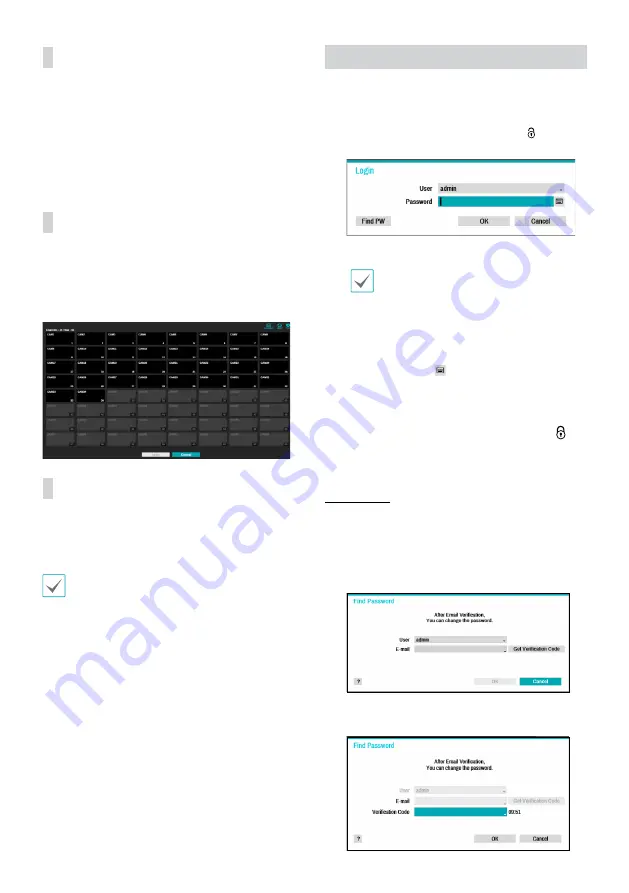
Login

Configuring the NVR's settings and accessing its searching 
and other functions require an authorized user login.

Bring up the Live menu and either press the 

Setup


button on the remote control or click on   (Log in) 
using the mouse.

Select a user, enter the password, and then select 

OK

.

• 

There is no default password for the admin 
account. Select "admin" and then "OK" without 
entering a password to log in.

• 

Leaving the admin account unassigned with 
a password poses a security risk. Please assign 
a password at your earliest convenience. A 
warning message will continue to be displayed 
until a password is assigned.

• 

Click on the   button next to the password 
field using the mouse. This will bring up a 
virtual keyboard you can use to assign a 
password.

To log out, bring up the Live menu and click on   

(Log out) using the mouse.

Find Password

If you do not know the password, select 

FIND


PW 

. You can set a 

new password.

Enter a user, registered email and then select 

Get 

Verification Code

.

Enter Verification Code and select 

OK

.

Содержание PPRO-UR-64PDX-DUAL

Страница 1: ...PPRO UR 64PDX DUAL S99462 64 Channel Network Video Recorder Network Video Recorder Quick Guide ...

Страница 2: ...and refer servicing to qualified service personnel under the following conditions A When the power supply cord or the plug has been damaged B If liquid is spilled or objects have fallen into the equipment C If the equipment has been exposed to rain or water D If the equipment does not operate normally by following the operating instructions adjust only those controls that are covered by the operat...

Страница 3: ...ems Thismarkingshownontheproductoritsliterature indicatesthatitshouldnotbedisposedwithotherhouseholdwastesattheendofits workinglife Topreventpossibleharmtotheenvironmentorhumanhealthfromuncontrolledwastedisposal pleaseseparatethisfromother typesofwastesandrecycleitresponsiblytopromotethesustainablereuseofmaterialresources Householdusersshouldcontacteithertheretailerwheretheypurchasedthisproduct or...

Страница 4: ...w Front Panel W 1 SATA LED 2 Status LEDs 3 Panic Recording Button 4 USB Ports 5 Power LED 6 Front Door Lock 7 Rack Mount Ears Rear Panel 2 3 4 5 6 8 9 0 1 7 1 PowerInPort 2 VideoInPorts SFP 1 2 RJ45 3 5 3 NetworkPort 4 eSATAPorts 5 USB3 0Ports 6 AudioConnectionPorts 7 FactoryResetButton 8 VGAOutPort 9 HDMIOutPort 0 AlarmConnectionPorts RS 485Port RS 232Port For more details on front and rear panel...

Страница 5: ...r Panel D i r e c t I P S w i t c h Network Camera Network Network Camera Keyboard POS Sensor VGA Monitor HDMI Monitor Speaker Microphone Alarm Power DirectIP Gigabit PoE Switch eSATA Storage Device RASplusIP Remote Monitoring ...

Страница 6: ... f Mute Button For more details on remote control buttons refer to the operation manual Getting Started Setup Wizard Setup Wizard only appears during initial booting When you login as an administrator account after initial booting you can use Wizard to go to Live menu and select Wizard For more details on Setup Wizard refer to the operation manual 1 Select a system language Quick Setup Wizard Star...

Страница 7: ...y Scan Used to manually scan for third party cameras that cannot be recognized by the auto scan feature Protocol Select the protocol used by the camera or video encoder you wish to search for Even if the network device uses a protocol supported by the NVR the device itself may not be visible for scanning and registration by the NVR For more information about supported network devices and models co...

Страница 8: ... possible to register a camera that has already been registered to a different NVR Login Configuring the NVR s settings and accessing its searching and other functions require an authorized user login 1 Bring up the Live menu and either press the Setup button on the remote control or click on Log in using the mouse 2 Select a user enter the password and then select OK There is no default password ...

Страница 9: ...le in Live mode 2 Select the Search Mode icon and then select Record Table Search Event Log Search or Thumbnail Search 3 The selected search mode will be initiated WebGuard WebGuard is a program that allows you to view and search video from remote locations over the Internet and can be accessed on a regular web browser such as Internet Explorer System requirements for running WebGuard are as follo...

Страница 10: ...structions in the installation window to proceed with the installation 3 When the installation window appears click Next 4 Select an installation path for the program and click Next 5 When the install confirmation window appears click Next NET Framework and Visual C Runtime Libraries will be installed automatically and it may take a few minutes If NET Framework and Visual C Runtime Libraries are a...

Страница 11: ...Location Select an location for the subject device group When you select a device from the device List on the left it will be added to the Selected Device List on the right Click OK to register the device group 7 Make sure that the device has been added to the device group correctly Click Device Group on the Sites panel and click on next to Device Group When you click on a registered device group ...

Страница 12: ... an additional FEN server press Settings in the start up menu and enter the FEN server information Default site dvrnames net Default port number 10088 For more details contact your FEN server administrator Address Watch Port Search Port Enter the device name used to register the device to FEN If FEN feature is not enabled on the device deselect DVRNS checkbox and enter the device s IP address For ...

Страница 13: ...ormance 16ch Full HD synchronous playback 4ch 4K playback Search Mode Time lapse Event log Thumbnail Motion Text in STORAGE HDD SATA x 8 eSATA x4 Up to 8TB capacity for each eSATA disk RAID 1 5 10 supported Total Capacity 176TB 6TB x 8 Internal 4x4 External Data Export Device USB HDD USB Stick NETWORK Client Connection Gigabit Ethernet Client x1 Video in Connection Gigabit Ethernet Video In x3 SFP...

Страница 14: ...inal block Internal Buzzer Yes Serial Interface RS232 Terminal Block RS485 Terminal Block USB USB2 0x2 USB3 0x1 GENERAL Operating System Embedded Linux Unit Dimensions W x H x D 482 6mm x 88mm x 523 3mm 19 x3 5 x20 6 Unit Weight 9 9kg 21 8lb without HDD Working Temperature 0 Cto40 C Operating Humidity 0 90 Power AC100 240V 50 60Hz 2 0 1 0A Power Input AC 100 240 V 50 60Hz 2 0 1 0A REDUNDANT SMPS P...

Страница 15: ...Proudly distributed by Visit http www hills com au branches to find your nearest Hills office or contact us at 1800 685 487 for more information ...

Отзывы: