background image

User’s Manual 


12

y

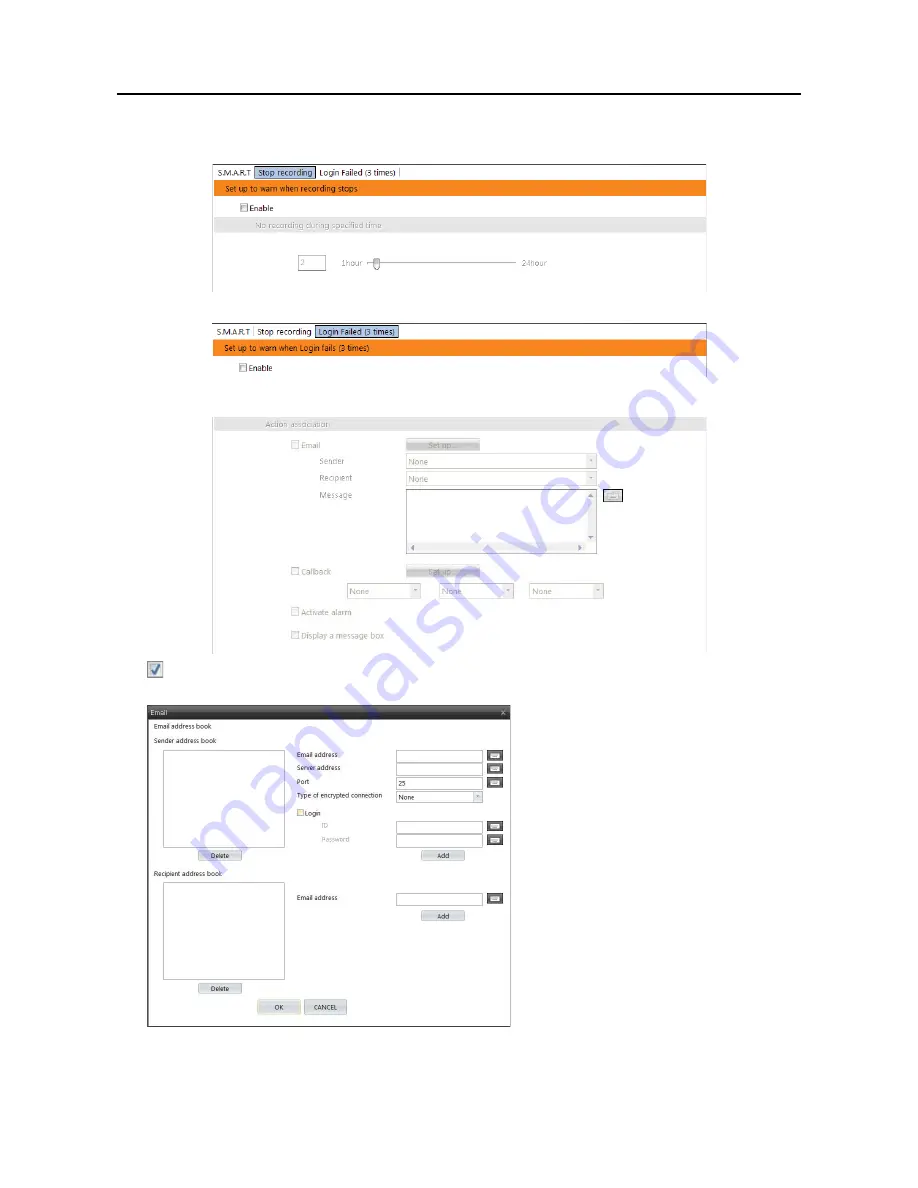
  Stop recording tab – No recording during specified time:

  Causes the system alert when panic recording has 

been stopped by clicking the panic recording button or when recording has not been made during the predefined time.


y

  Login Fail (3 times) tab:

  Causes the system alert when login fails 3 times.


y

  S.M.A.R.T. / Stop recording / Login Fail (3 times) tab – Action association 


– 


Email:

  Sends an email when system alert occurs.  Select a sender and recipient from the drop-down menu below 

the 

Set up...

 button and enter the message.  If any sender or recipient is not registered, click the 

Set up...

 button. 


y

  Sender address book:

  Enter the email 

address and SMTP server address and port 
number.  Select a type if the SMTP server 
uses the type of encrypted connection.  Check 
the 

Login

 box if you want to connect to the 

SMTP server that requires login procedure, 
and enter the ID and password for login.  
Clicking the 

Add

 button adds the sender to 

the sender address book. 

y

 Recipient address book:

  Enter the email 

address.  Clicking the 

Add

 button adds the 

recipient to the recipient address book. 


Содержание PDR16HR-RMT-RT

Страница 1: ......

Страница 2: ......

Страница 3: ...NERATES USES AND CAN RADIATE RADIO FREQUENCY ENERGY AND IF NOT INSTALLED AND USED IN ACCORDANCE WITH THE INSTRUCTION MANUAL MAY CAUSE HARMFUL INTERFERENCE TO RADIO COMMUNICATIONS OPERATION OF THIS EQUIPMENT IN A RESIDENTIAL AREA IS LIKELY TO CAUSE HARMFUL INTERFERENCE IN WHICH CASE USERS WILL BE REQUIRED TO CORRECT THE INTERFERENCE AT THEIR OWN EXPENSE WARNING CHANGES OR MODIFICATIONS NOT EXPRESSL...

Страница 4: ...ce Unplug this equipment from the wall outlet and refer servicing to qualified service personnel under the following conditions A When the power supply cord or the plug has been damaged B If liquid is spilled or objects have fallen into the equipment C If the equipment has been exposed to rain or water D If the equipment does not operate normally by following the operating instructions adjust only...

Страница 5: ...the environment or human health from uncontrolled waste disposal please separate this from other types of wastes and recycle it responsibly to promote the sustainable reuse of material resources Household users should contact either the retailer where they purchased this product or their local government office for details of where and how they can take this item for environmentally safe recycling...

Страница 6: ...User s Manual iv ...

Страница 7: ...rk 10 System alert 11 Time sync 13 OSD 14 Archive 15 System authority 16 Setting Up the Camera 17 Setting Up the Alert 18 Alarm Out 19 Remote Alarm Out 20 Email 21 Callback 22 Setting Up the Event 23 Motion 25 Object 26 Video Loss 27 Alarm In 27 Remote Alarm In 28 Text In 28 Setting Up the Schedule 29 Recording Setup 30 Schedule Setup 31 Setting Up the SPOT 32 Multi Channel 33 Sequence 34 Setting ...

Страница 8: ...p Player 44 Audio Playback 47 Checking Audio Recording Configuration 47 Playing Recorded Audio 47 External Saving 48 Appendix 1 Network Setup LAN 49 Appendix 2 WebGuard 51 Appendix 3 Text In Query 55 Appendix 4 Connector Pin Outs 57 Appendix 5 Troubleshooting 59 Appendix 6 Specifications 60 ...

Страница 9: ...user interface y Main and Spot monitor outputs y On screen graphic display including camera title time and event detection block y Sequence mode available in all screen formats y Hardware watchdog timer function y Programmable motion detection for each camera input using graphic user interface y Various image enhancement functions y Remote monitoring playback and control by using a remote program ...

Страница 10: ...nated device because it will cause poor quality video y Audio In Connect audio sources Line in y Alarm In Connect external alarm in devices y Alarm Out Relay Connect external alarm out devices such as buzzers or lights y RS232 Connect a remote control device for RS232 communication y RS485 Connect a remote control device for RS485 communication y SD SPOT BNC Multi Channel Display Connect a spot mo...

Страница 11: ...ing instructions í Ensure that the rack inside is not sealed í Ensure the air is circulated through the inlet outlet í If you pile up DVRs or other rack mount devices secure room for ventilation or install a vent í For natural air convection place the inlet at the bottom of the rack and the outlet on top í It is strongly recommended that a fan motor is installed at the inlet and the outlet for air...

Страница 12: ...User s Manual 4 ...

Страница 13: ...cameras you must disable cameras which are not connected SYSTEM Set up General menu of SmartGuard otherwise the recording speed might be decreased somewhat FEATURES y Max 16 channels y Max 480 images sec recording 400 images sec PAL y User friendly interface y Scheduling by camera and time y Time lapse or event driven recording y Motion detection and object detection function y Audio recording y P...

Страница 14: ... the system y System Status Displays user ID date and time the remaining hard disk space and the type of hard disk usage Clicking the right mouse button allows you to change the time If you change the time the SmartGuard program restarts and recording stops during the time y Utility Buttons Panic Recording Starts recording video from all cameras regardless of the recording schedule It may be used ...

Страница 15: ...ay Allows you to play back recently recorded video of another DVR PTZ The DVR provides transmission functions and you can control popular PTZ devices and cameras Clicking the PTZ panel button displays the PTZ control buttons as shown below y Auto Panning Menu Wiper Pump Light Aux Displays the On Off status of each function Hovering the mouse cursor over any button displays a setup screen and allow...

Страница 16: ...r s Manual 8 SmartGuard SETUP Setting Up the System y Load Loads a saved setting and apply it to the DVR y Save Saves the current setting y Default Loads the factory default setting and apply it to the DVR ...

Страница 17: ...in the Period box the DVR will automatically delete the video which is older than 30 days from the current day HDD usage When Once is selected the DVR stops recording when the hard disk drive is full When Recycle is selected the DVR continues recording when the hard disk drive is full by overwriting the oldest video y Screen saver Set the screen saver dwell time for the display image The screen sa...

Страница 18: ...ion the DVR cannot be connected with a program or a system that does not support the SSL function Selecting Standard does not use the SSL protocol for video and audio data selecting High uses the SSL protocol for all data NOTE The remote setup to the DVR will be released when changing the SSL setting NOTE Using the SSL function might cause congestion in the system receiving data from the DVR depen...

Страница 19: ...ddress Translation device to which the DVR is connected Use RTSP Enables the RTSP service y Set up network port Click the button and set up network port number y Internet Protocol TCP IP properties See Appendix 1 Network Setup System alert Clicking each tab of S M A R T Stop recording and Login Fail 3 times and enabling each function causes the system alert as follows y S M A R T tab Set up alert ...

Страница 20: ...sender and recipient from the drop down menu below the Set up button and enter the message If any sender or recipient is not registered click the Set up button y Sender address book Enter the email address and SMTP server address and port number Select a type if the SMTP server uses the type of encrypted connection Check the Login box if you want to connect to the SMTP server that requires login p...

Страница 21: ...ronization function synchronizes the time between a DVR and any time server when they are networked Any DVR can run as a time server Also you can use a standard time server provided by each country CAUTION The time synchronization might not be done properly depending on the time server or network conditions Check the time server and network conditions first NOTE Visit http www eecis udel edu mills...

Страница 22: ...le OSD display for each camera by clicking each camera button y Camera OSD Enables or disables camera OSD display Camera Description Displays a camera name which is set at the Location setting of the CAMERA menu State Displays the recording schedule event detection recording status and PTZ on or off Hover Menu Displays the hover menu Time Displays the recorded time of playback video Text In Displa...

Страница 23: ... storage for archiving Enabling Overwrite makes the DVR continue recording when the hard disk drive is full by overwriting the oldest video Disabling Overwrite makes the DVR stop recording when the hard disk drive is full Storage List Displays a list of connected storage devices that is available for archiving y Drive Displays a name of the device y Total Capacity Displays the total capacity of th...

Страница 24: ...tton deletes all storage folders allocated in the selected device Archived video will be deleted when the storage folders are deleted y Exit Clicking the button closes the setup screen NOTE The user can archive recorded video when the user has an authority for Archive The Archive option should be selected at the USER menu System authority y Use local login Login procedure is required to run SmartG...

Страница 25: ...use When using the RS232 port select COM 1 When using the RS485 port select the given COM port number To check the given COM port number please refer to the installed card information displayed on the About dialog box by clicking the Menu button of SmartGuard Baud rate Parity Data bit Stop bit Set the baud rate parity data bit and stop bit y Set Privacy Area Set up the privacy area on the image Th...

Страница 26: ...ant the end of the line Release the mouse button and a group of boxes appears along the line you drew You can draw lines around shapes by repeating this process Rectangle Hold down the left mouse button and drag the cursor in any direction A rectangle appears Once the rectangle is the size you want release the mouse button and the rectangle fills with boxes Fill When using the fill tool clicking t...

Страница 27: ...ut activation period Alarm out is activated during the period only If the From time is later than the To time the alarm out will be activated at the From time of the current date until next day s To time If you set To 08 00 and From 18 00 this means the alarm will be activated over night from 6 00 p m until 8 00 a m the following day y Dwell time Set the alarm out duration y Use audible alert The ...

Страница 28: ...e DVR via TCP networking Click the Test connections button to test the connection to the device y From To Set alarm out activation period Alarm out is activated during the period only If the From time is later than the To time the alarm out will be activated at the From time of the current date until next day s To time If you set To 08 00 and From 18 00 this means the alarm will be activated over ...

Страница 29: ...e SMTP server uses the type of encrypted connection Check the Login box if you want to connect to the SMTP server that requires login procedure and enter the ID and password for login Clicking the Add button adds the sender to the sender address book y Recipient address book Enter the email address Clicking the Add button adds the recipient to the recipient address book ...

Страница 30: ...User s Manual 22 Callback You can set up callback address book y Server address Enter the IP address of the callback server and click the Add button ...

Страница 31: ... other events detected during the dwell time will not be considered as an event and will be ignored y Channel association Records video from multiple cameras when an event occurs at the selected camera or other device y Action association Displays actions to be done when an event occurs Clicking the Set up button allows you to change the settings ...

Страница 32: ...RT Callback menu Event monitoring Displays the event detected video during the dwell time on the monitoring screen when an event occurs If other events occur during the minimum dwell time of the first event the other events will be ignored and the latest event will be displayed once the minimum dwell time of the first event expires Move to preset Clicking the Set up button displays the list of sav...

Страница 33: ... CAMERA menu y Sensitivity Set the motion detection sensitivity The higher the number is the more sensitive it is y Min size Adjust the minimum number of detection blocks that must be activated in order to be considered as a motion detection event If you set to 10 the DVR will only react to the motion when it detects motion activity in at least 10 connected blocks within the selected detection zon...

Страница 34: ...imum number of detection blocks that must be activated in order to be considered as a object detection event If you set to 10 the DVR will only react to the changes when it detects changes activity in at least 10 connected blocks within the selected detection zone The minimum number of blocks Min size should not exceed the selected block numbers for detection When selecting multiple detection area...

Страница 35: ...rs the flare on the images as a video loss event for example light is flashed at the lens Set the flare level by holding down and dragging the pointer The higher the percentage the more sensitive it is Alarm In You can set up alarm in event y 1 to 16 Displays alarm in device number Clicking each button allows you to change alarm in event settings for each camera y Enable Enables alarm in event fun...

Страница 36: ...rchasing the WIBU key and details about it Clicking each button allows you to change text in event settings for each camera y Enable Enables text in event function When the DVR detects text in data from a text in device it considers it as an event y For Each Text in Controller Click the Select Text In System button and select the text in product from the list y Syntax Case Sensitive Text strings a...

Страница 37: ...rer s user manual for Line Delimiter character s Ignore String Enter any text strings to be ignored Refer to the text in product manufacturer s user manual for text strings that the text in product sends during normal transactions so that those text strings will not be considered as text in y Dwell Time Display Dwell Set the dwell time to display the text in information Transaction Timeout Set the...

Страница 38: ...ond Quality Sets the record image quality Higher quality images require more storage space and will reduce the recording capacity of the hard disk drive Resolution Sets the record image size Higher resolution images require more storage space and will reduce the recording capacity of the hard disk drive y Pre event recording Records video prior to event detection when predefined events are detecte...

Страница 39: ...ecording mode by clicking the button When the recording is enabled the recording mode is displayed in the timetable below y Work hour After hour Enable or disable after hour recording by clicking the button When the after hour recording is enabled the DVR records video according to the after hour recording setting y Event recording Enable or disable event recording When the event recording is enab...

Страница 40: ...User s Manual 32 Setting Up the SPOT ...

Страница 41: ... Channel Display port of the DVR rear panel y Set up SD multi spot Set the display on the monitor connected to the SD SPOT Multi Channel Display port of the DVR rear panel Use spot OSD Displays OSD Use S W underscan Reduces the image size to fit images within the monitor screen size when the image size is bigger than the monitor screen size and some parts of the image is cropped Monitoring Without...

Страница 42: ...itors y Spot Sequence Set the sequence order on each monitor y Spot operation Hold spot during single screen mode Video is not sequenced while the screen mode of SmartGuard is set to the single screen mode Include event display Displays event detected image in the single screen mode when an event occurs Show video loss Displays video of the camera that video loss event is detected Monitoring Witho...

Страница 43: ...sword Authority level Select the authority level Only the administrator level user can edit the user s information and their authority setup The authority setup of the Administrator cannot be edited y Delete user Deletes the selected user from the user list Only the administrator level user can delete the user y Authority Set the authority of the selected user y Apply all users in same level Click...

Страница 44: ...User s Manual 36 ...

Страница 45: ...n to the SmartGuard mode click the Menu button and SmartGuard menu of SmartSearch FEATURES y Searches by camera and time y Provides recording status table y Various search functions y Zoom in out function y Print function y Remote playback function y Bookmark function y Saves to video file y Audio playback MAIN GUI Playback Screen ཱ Menu Button ི System Status ཱི Playback Panel ུ Panorama Playback ...

Страница 46: ...her DVR Archive Searches video saved in the archive storage set up in the SmartGuard program SYSTEM Archive menu y Jog Shuttle You can adjust the playback direction and speed by using the jog shuttle The icon in the jog shuttle indicates the current playback direction and speed Video is played backward when the icon is to the left of center and video is played back forward when the icon is to the ...

Страница 47: ...e for the search of motions for the Motion Detection search or event logs for the Event Text In or Alarm In search From To Searches motions or event logs between user defined periods Set the desired find beginning and ending date time in the From and Until boxes From the first day of month Searches motions or event logs from the first day of this month From the first day of week Searches motions o...

Страница 48: ...ng the fill tool clicking the mouse will fill that area of the image with boxes If a shape has been drawn with the line tool clicking inside will fill the area with boxes Clicking outside the area will fill the outer area with boxes If no shapes have been drawn the entire screen will fill with boxes y Find Method Select either Change or Object Change Detects changes at the user defined motion dete...

Страница 49: ... the Name box y Name Enter the text to find y Comp Enter the comparison operator y Value Enter the comparison value NOTE The tab and line can be used for more specific search of the text in data Use a symbol indicating the location of each individual category and indicating the line where the category is located Refer to Appendix 3 Text In Query for details y Tab size Enter the tab size Up to eigh...

Страница 50: ... line Indicates the current playback location of video on the timetable Clicking the mouse on the desired time displays the first image recorded within the time y Yellow separation line Separates segments when time overlap occurs In this case the recorded data in the time range located after the separation line is the latest y The color of the bar Indicates different recording modes sky blue R G B...

Страница 51: ...DEO NOTE The user can save recorded video when the user has an authority with External Save The External Save option should be selected during the SmartGuard USER menu Refer to Chapter 2 SmartGuard Setting Up the User for details Clicking the Export Video File button in the right of the timetable displays the following menu y A B Export Clip File Sets up the section of video to be exported by usin...

Страница 52: ...p the password y Write to CD DVD Saves the video on the CD or DVD directly y Save Range Set the period of video to save y Save path Designate the folder path to save the video y Calc Size Calculates and preview the size of file to save Clicking the Start button starts saving NOTE Refer to the Clip Player section p 44 for playing back the saved video Clip Player You do not need to install any speci...

Страница 53: ...ard and update it to the latest version available If you still have display problems after changing all display settings as described above try replacing the video card Video cards with an ATI chipset are recommended Clicking exits the Player program y Playback Buttons Plays back the current video on the screen Goes to the beginning of the video clip Plays the video clip in fast reverse Goes back ...

Страница 54: ...splays video with text in data if the video was recorded with text in data Single Screen Mode Only y Saves images í Save as Image Saves the current image as a bitmap or JPEG file í Save as Image Actual Size Saves the current video frame as a bitmap or JPEG file in its actual size Single Screen Mode Only í Save as Clip Copy Saves video of desired time range as an executable file í Save as Video Sav...

Страница 55: ...dio is enabled for each camera Playing Recorded Audio 1 Selecting a camera screen in the playback screen displays the button beside the camera title 2 Clicking the button displays the camera screen menu 3 Click the Audio Playback button NOTE Audio of one camera at a time is played back NOTE Audio will NOT be played when the target camera was recorded less than 2 ips of recording speed ...

Страница 56: ...aved files and burns newly added files only Enabling Quick Erase deletes previously saved files more quickly í Eject When Finished Ejects the CD DVD automatically after completing burning or erasing y Erase Disc Deletes all data on the CD DVD y Burn Starts burning the selected files and folders on the CD DVD NOTE The burning might not be successful if the remaining space of the disk is not enough ...

Страница 57: ... up automatically When selecting Use the following IP address enter the IP address Subnet mask Default gateway and DNS server address acquired from your network administrator Setting FEN Function When FEN function is enabled it is not necessary to set up port forwarding manually However remote connection to the DVR might not be available depending on the network connection environment of the DVR o...

Страница 58: ...ed can be used NOTE The FEN For Easy Network function allows you to connect to the DVR from remote sites using either the dynamic IP addresses or the domain name For the FEN function to work properly the DVR should be registered on the FEN server and the FEN server settings should match the settings registered on the FEN server Any changes on the FEN server might cause improper operation NOTE The ...

Страница 59: ... not work with Microsoft Windows 8 metro UI Select between the WEBWATCH Web monitoring and WEBSEARCH Web search modes Enter ID and PASSWORD and click the LOGIN button You will need to enter the DVR IP address in the DVR ADDRESS field when running the WebGuard program by entering http www dvronline net Selecting the Use DVRNS option allows you to enter the DVR name registered on the DVRNS server in...

Страница 60: ...ey Restart your computer to apply the changes If you want to enable the Auto Tuning capability again enter netsh int tcp set global autotuninglevel normal after running the Command Prompt with elevated administrator permissions Restart your computer to apply the changes Web Monitoring Mode WebWatch is a remote web monitoring program that allows you to monitor live video transmitted in real time fr...

Страница 61: ...ending audio Click the button to monitor live audio from the connected remote site through the attached speaker and click the button again stop monitoring live audio Clicking both button and button allows two way communication Clicking the button disables audio communication y Aspect Ratio Changes the image aspect ratio y Anti Aliasing Screen Enhances image display quality by eliminating stair ste...

Страница 62: ...n the screen Selecting allows you to display an image from a specific time ླྀ Click to enter the event search mode which allows you to search for event log entries using specific conditions and play back the images associated with those event entries ཹ Click to set up the image drawing mode and OSD display You can adjust the display speed by changing the image drawing mode and select OSD informatio...

Страница 63: ... eight tabs can be set Query Example I 1 2 3 4 5 6 123456789012345678901234567890123456789012345678901234567890 Item Unit price Qty amount Coke 2 20 1 s 2 20 Fanta 2 20 1 s 2 20 Hotdog 3 50 3 s 10 50 Pepsi 1 95 1 s 1 95 total 16 85 Thank you In the above text in data you can find that the comparison value is located at 17th Unit price mark will be ignored automatically 28th Qty and 40th amount cha...

Страница 64: ... mark will be ignored automatically 28th Qty and 40th amount characters including spaces from the left but the value of amount category is located at the different line from Item In this case you can enter 17 28 and 40 in each Tab size box and enter the tab symbol and line symbol in the Value box for Unit price for Qty and for amount for the next line For example if you want to search for Coke wit...

Страница 65: ...larm Output Relay Output No Connector NC NC Normal Close NO NO Normal Open COM COM Common G GND Ground TTL Output No Connector No Connector 1 AOUT1 Alarm Out 1 14 AOUT2 Alarm Out 2 2 AOUT3 Alarm Out 3 15 AOUT4 Alarm Out 4 3 AOUT5 Alarm Out 5 16 AOUT6 Alarm Out 6 4 AOUT7 Alarm Out 7 17 AOUT8 Alarm Out 8 5 GND Ground 18 GND Ground 6 AOUT9 Alarm Out 9 19 AOUT10 Alarm Out 10 7 AOUT11 Alarm Out 11 20 A...

Страница 66: ...User s Manual 58 Remote Control Device RS 485 No Connector TRX TRX GND Ground ...

Страница 67: ...d Ask your dealer or distributor Problem The logo appears and then freezes Sometimes the screen is black Solution There is a problem with the Main Board Reboot the DVR If it happens often call your dealer or installer Problem The USB serial converter has been connected to the DVR for the POS installation however the dialog box asking the device driver appears Solution When connecting the POS devic...

Страница 68: ...o Out Line out Alarms Terminal block Ethernet Port ii Two RJ 45 1 Gbps Ethernet eSATA Port eSATA RS232 Serial Port DB9 P RS485 Serial Port 1 Half Duplex USB Port 6 USB 2 0 connectors 2 USB 3 0 connectors ii The network connector is not designed to be connected directly with cable or wire intended for outdoor use STORAGE Primary Storage SATA hard disk drive Expandable up to 5 Secondary Storage eSAT...

Страница 69: ... read the Owner s Manual before installing the device x Never place the Equipment in a confined space eg bookcase built in cabinet unless proper ventilation is available It is advised to leave a 10cm space around the unit x To prevent fire or shock hazard do not expose the Equipment to water Ensure that objects filled with liquid eg vases are not placed on or near the Equipment x Avoid keeping or ...

Страница 70: ... must return the Equipment to Pacific Communications The consumer will be responsible for the collection and freight costs of returning the Equipment to Pacific Communications or to any designated Pacific Communications Authorised Service Centre for repair or replacement The consumer will also be responsible for the freight costs to deliver any new or repaired Equipment to the consumer e This warr...

Страница 71: ......

Страница 72: ......

Отзывы: