background image

User’s Manual 

76 

Query Example II 


         1         2         3         4         5         6  
123456789012345678901234567890123456789012345678901234567890 
 
 
    Item       Unit price     Qty       amount 
================================================== 
 Coke         | $    2.20 |     1(s)  


         $      2.20 

 Fanta        | $    2.20 |     1(s)  
                                       $      2.20 
 Hotdog       | $    3.50 |     3(s)  
                                       $     10.50 
 Pepsi        | $    1.95 |     1(s)  
                                       $      1.95 
================================================== 
                             total : $       16.85 
Thank you~~ 

 
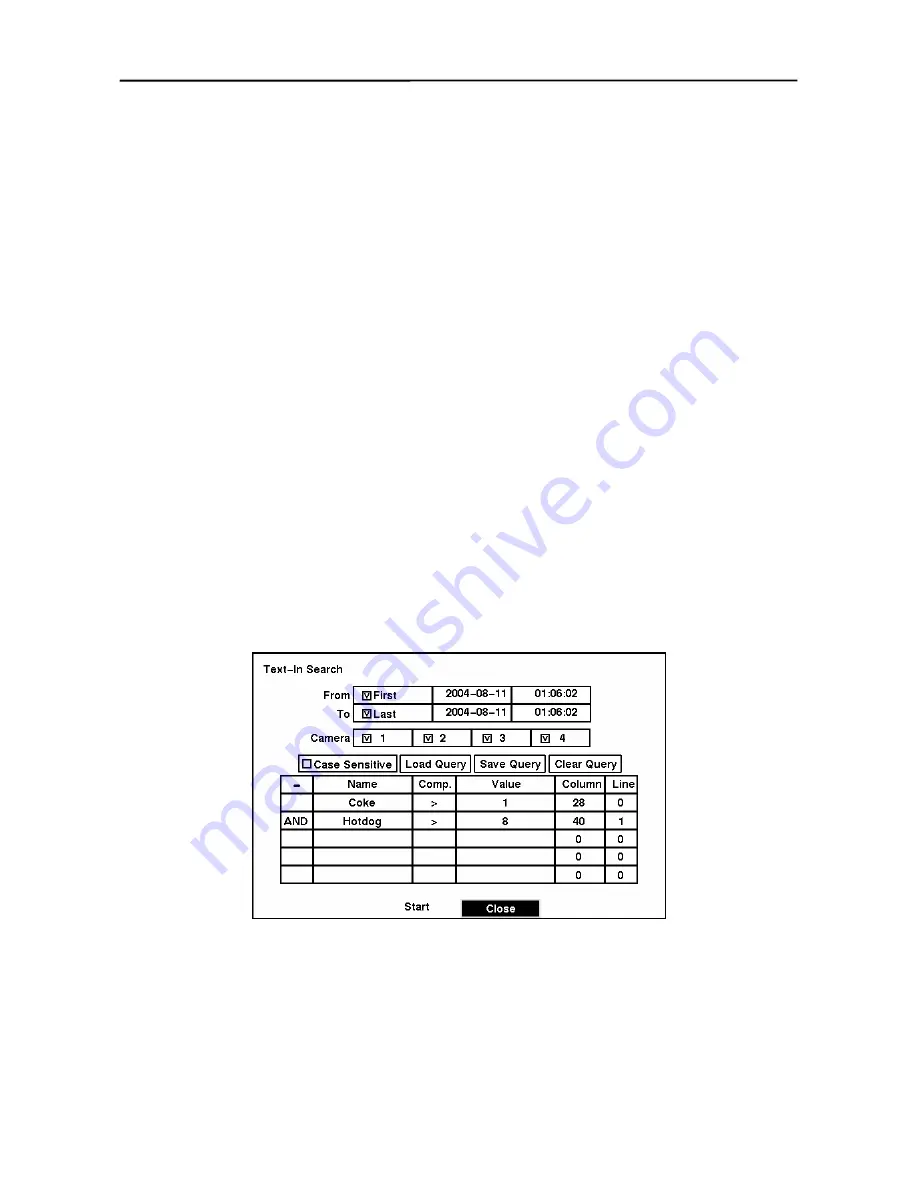
In the above text-in data, you can find that the comparison value is located at 17

th

 (Unit price, $ 

mark will be ignored automatically), 28

th

 (Qty) and 40

th

 (amount) characters (including spaces) 

from the left, but the value of 

amount

 category is located on a different line from 

Item

.  In this case, 

you can enter “

17

”, “

28

” and “

40

” in each 

Column 

box and enter “

1

” in the 

Line

 box for the next 

line. 
 
For example, if you want to search for Coke with a 

Qty 

(Quantity) of more than 1 and Hotdog with 

an 

amount

 totaling over $8, the following search condition can be set.  


Содержание 4-CHANNEL

Страница 1: ......

Страница 2: ......

Страница 3: ...TO PROVIDE REASONABLE PROTECTION AGAINST HARMFUL INTERFERENCE WHEN THE EQUIPMENT IS OPERATED IN A COMMERCIAL ENVIRONMENT THIS EQUIPMENT GENERATES USES AND CAN RADIATE RADIO FREQUENCY ENERGY AND IF NOT INSTALLED AND USED IN ACCORDANCE WITH THE INSTRUCTION MANUAL MAY CAUSE HARMFUL INTERFERENCE TO RADIO COMMUNICATIONS OPERATION OF THIS EQUIPMENT IN A RESIDENTIAL AREA IS LIKELY TO CAUSE HARMFUL INTERF...

Страница 4: ...uipment C If the equipment has been exposed to rain or water D If the equipment does not operate normally by following the operating instructions adjust only those controls that are covered by the operating instructions as an improper adjustment of other controls may result in damage and will often require extensive work by a qualified technician to restore the equipment to its normal operation E ...

Страница 5: ...nitor 5 Connecting the RGB Monitor 5 Connecting to the Network Port 6 Connecting to the RS 232C Port 6 Factory Reset 6 Connecting Alarms 7 AI 1 to 4 Alarm In 7 GND Ground 7 ARI Alarm Reset In 8 Alarm Out 8 Connecting to the RS 485 Port 8 Connecting to the USB Port 9 Connecting the Power Cord 9 Chapter 3 Configuration 11 Front Panel Controls 11 Power LED 11 Alarm LED 11 REC LED 11 Network LED 11 Co...

Страница 6: ...p 38 Alarm In Event Action Record Setup Screen 38 Alarm In Event Action Alarm Out Setup Screen 39 Alarm In Event Action Notify Setup Screen 39 Motion Detector Event Action Record Setup Screen 40 Motion Detector Event Action Alarm Out Setup Screen 41 Motion Detector Event Action Notify Setup Screen 41 Text In Event Action Record Setup Screen 42 Text In Event Action Alarm Out Setup Screen 43 Text In...

Страница 7: ...n 66 Shuttle Ring 66 Jog Dial 66 Digital Zoom Playback Mode 66 Searching Video 67 Date Time Search 68 Calendar Search 68 Event Search 69 Text In Search 71 Appendix A USB Hard Disk Drive Preparation 73 Preparing the USB IDE hard disk drive in Windows 2000 73 Preparing the USB IDE hard disk drive in Windows 98 73 Appendix B Text In Query Examples 75 Query Example I 75 Query Example II 76 Appendix C ...

Страница 8: ...rtual keyboard 17 Figure 24 System Upgrade screen 18 Figure 25 Date Time setup screen 18 Figure 26 Holiday Setup screen 19 Figure 27 Time Sync screen 20 Figure 28 System Check Config screen 21 Figure 29 System Check Alarm Out Notify screen 22 Figure 30 Storage screen 23 Figure 31 S M A R T Setup screen 24 Figure 32 System Log screen 25 Figure 33 Device menu screen 26 Figure 34 Camera setup screen ...

Страница 9: ...Network Setup screen 48 Figure 65 LAN Manual Setup screen 49 Figure 66 Port Number Setup screen 50 Figure 67 LAN DHCP Setup screen 51 Figure 68 LAN ADSL Setup screen 51 Figure 69 Modem Setup screen 52 Figure 70 DVRNS Setup screen 53 Figure 71 Callback Center LAN Setup screen 54 Figure 72 Callback Center Modem Setup screen 55 Figure 73 Password setup screen 56 Figure 74 Config screen 57 Figure 75 C...

Страница 10: ...User s Manual viii ...

Страница 11: ...ources y Multiple Search Engines Date Time Calendar Event y Records up to 120 NTSC Images per Second 100 PAL Images per Second y Loop Through Video Connectors y Continuous Recording in Disk Overwrite Mode y Continues Recording while Archiving Transmitting to Remote Site and during Playback y User friendly Graphical User Interface GUI Menu System y Various Record Modes Time Event Pre event and Pani...

Страница 12: ... can freeze frames fast forward fast reverse slow forward and slow reverse without image streaking or tearing Digital video can be indexed by time or events and you can instantly view video after selecting the time or event Your DVR can be set up for event or time lapse recording You can define times to record and the schedule can change for different days of the week and user defined holidays The...

Страница 13: ...User s Manual y Rack mount Kit y Assembly Screws for Adding Hard Disk Drives Required Installation Tools No special tools are required to install the DVR Refer to the installation manuals for the other items that make up part of your system Figure 2 DVR rear panel Connecting the Video Source Figure 3 Video input connectors Connect the coaxial cables from the video sources to the BNC Video In conne...

Страница 14: ...egulations permit recording audio Figure 5 Audio In and Out connectors Your DVR can record audio Connect the audio source to Audio In Connect Audio Out to your amplifier NOTE The audio input is from an amplified source The DVR does not have amplified audio output so you will need a speaker with an amplifier Setting Unit for CVBS SVHS or VGA output Figure 6 CVBS SVHS VGA switch Set the switch to CV...

Страница 15: ...r switch to the CVBS SVHS NOTE If your monitor has an SVHS input use it because it will give you better quality video display NOTE The Video Out BNC and the SVHS Out connectors may be connected to individual monitors for simultaneous operation Connecting the RGB Monitor Figure 8 VGA connector A VGA port is provided for RGB monitor output Connect the RGB monitor to the VGA connector if required Con...

Страница 16: ...to connect an external modem for remote monitoring configuration and software upgrades text input and to connect a remote control keyboard Use a modem cable with a DB 9S female connector to connect to the DVR See Chapter 3 Configuration for configuring the modem NOTE The DVR is not supplied with a modem cable and many modems are not supplied with cables Make certain you have the correct cable when...

Страница 17: ...elease the reset switch All of the DVR s settings are now at the original settings it had when it left the factory Connecting Alarms Figure 12 Alarm Input connector strips NOTE To make connections on the Alarm Connector Strip press and hold the button and insert the wire in the hole below the button After releasing the button tug gently on the wire to make certain it is connected To disconnect a w...

Страница 18: ...trical switches can be wired to the NC Normally Closed and C Common connectors or NO Normally Open and C Common connectors Permitted current is up to 0 5 A for 125 VAC 1 A for 30 VDC See Chapter 3 Configuration for configuring alarm output Connecting to the RS 485 Port Figure 14 RS 485 Connector The DVR can be controlled remotely by an external device or control system such as a control keyboard u...

Страница 19: ...USB IDE hard disk drive USB CD RW drive or USB flash drive You also can upgrade the software via USB port Connecting the Power Cord Figure 16 Power cord connector Connect the power cord to the DVR and then to the wall outlet WARNING ROUTE POWER CORDS SO THAT THEY ARE NOT A TRIPPING HAZARD MAKE CERTAIN THE POWER CORD WILL NOT BE PINCHED OR ABRADED BY FURNITURE DO NOT INSTALL POWER CORDS UNDER RUGS ...

Страница 20: ...User s Manual 10 ...

Страница 21: ...y operations NOTE A separate Alarm button is not provided Pressing any keys on the front panel resets alarm output including the internal buzzer when the alarm is activated However when you are in the menu or PTZ mode you have to exit the menu or PTZ mode first to reset alarm output Power LED The POWER LED is lit when the DVR is On Alarm LED The ALARM LED is lit when alarm output or internal buzze...

Страница 22: ... returns to the live monitoring mode When a PTZ device is not installed pressing the PTZ button enters the digital zoom mode directly Pressing the PTZ button in the playback mode enters the digital zoom playback mode NOTE When the DVR is in the PTZ mode a white line will display around the image NOTE In the digital zoom mode and digital zoom playback mode a bright small box is laid over the image ...

Страница 23: ...on again toggles the playback speed from and The screen displays and respectively Pressing the Right Arrow button plays video forward at high speed Pressing the button again toggles the playback speed from and The screen displays and respectively Entering Playback mode from Live Monitoring mode can be user password protected Shuttle Ring The Shuttle Ring functions in the Playback mode The Shuttle ...

Страница 24: ...and then the button The factory default password is 4321 There are two Setup screens Quick Setup and Normal Setup The factory default is the Quick Setup screen Quick Setup Screen Figure 19 Quick Setup screen The Quick Setup screen allows you to set up the most commonly used features of your DVR Use the arrow buttons to move through the options Pressing the button lets you make your selections High...

Страница 25: ...where you can set up system information Selecting Storage enters a screen where you can check the storage status Selecting Camera enters a screen where you can set up camera information Selecting Network Setup enters a screen where you can set up network information Selecting Password enters a screen where you will be able to change passwords Selecting Date Time enters a screen where you will be a...

Страница 26: ...and press the button The System Information screen appears Figure 21 System Information screen In the System Information screen you can upgrade the software name the site location assign a unit ID number and select the language to use Highlight Change and press the button The System Information Change screen appears Figure 22 System Information Change screen Highlight the box beside Site Descripti...

Страница 27: ...umber for two or more DVRs that are within the same network Highlight the box beside Language and press button A dropdown menu displays the available languages Highlight the desired language and press the button The box beside H W Version and S W Version field displays the hardware and software version of DVR NOTE You can upgrade the software only in the System Information Change screen To upgrade...

Страница 28: ...fter restarting the unit NOTE Only the system administrator can upgrade the software NOTE You cannot upgrade the software during clip copy You can save your changes by highlighting OK and pressing the button Selecting Cancel exits the screen without saving the changes Date Time Setup Highlight Date Time in the Main menu and press the button The Date Time setup screen appears Figure 25 Date Time se...

Страница 29: ...arted the unit so you may wish to set the time last Highlight the box beside Time Zone and press the button Select the time zone you are in from the list and press the button Highlight the box beside Daylight Saving Time and press the button Pressing the button toggles between On and Off Highlight the Holiday Setup box and press the button You can set up holidays by highlighting Add and pressing t...

Страница 30: ...k displays the DVR s time setting The box beside Server Clock displays the time setting of the time server Highlighting the Update button and pressing the button updates the server clock NOTE The Server Clock will display when the DVR cannot load the time information from the time server The box beside Next Synchronization displays the time when the next synchronization is scheduled If you want to...

Страница 31: ...ighlight the box beside Time Format and press the button The DVR toggles between 12 Hours AM PM and 24 Hours military time You can save your changes by highlighting OK and pressing the button Selecting Cancel exits the screen without saving the changes System Check Screen Highlight System Check in the Main menu and press the button The System Check Config setup screen appears Figure 28 System Chec...

Страница 32: ...stem Check Alarm Out Notify screen displays Figure 29 System Check Alarm Out Notify screen Highlight the box under the Alarm Out heading and press the button A drop menu displays available alarm outputs for the recording problem Highlight the desired alarm output from the external alarm out terminal or internal buzzer and press the button NOTE Alarm Out cannot be set to Check Point System Highligh...

Страница 33: ...ally within 24 hours NOTE The S M A R T Monitoring Information screen appears only in the monitoring mode The C field displays the temperature of the storage device The Usage field displays the device usage The DVR can be set to react to storage problems by activating an internal buzzer or external alarms display the warning message and or notifying a PC running RAS Remote Administration System Hi...

Страница 34: ...Monthly for the checking period NOTE When selecting Weekly and Monthly the Day of Week and Day of Month field will be activated under the Period field Select the check day or check date Highlight the box beside Check Time and adjust the numbers using arrow buttons Highlight the box beside Temperature Threshold and adjust the numbers using arrow buttons Highlight the box beside Sensor Unit and sele...

Страница 35: ...e and data banks were cleared The events are listed from the most recent to the oldest You can scroll through the list a page at a time by selecting the Up and Down arrow buttons and pressing the button You can go directly to an event number by highlighting the event number box left of the UP arrow pressing the button using the arrow buttons to change the number and pressing the button System Shut...

Страница 36: ...etup screen appears Figure 34 Camera setup screen You can turn on or off each camera and also hide the video of the camera number by highlighting the camera Setup heading and pressing the button Select the On Off Covert 1 or Covert 2 from a drop down list NOTE When selecting the Covert 1 the DVR displays the camera title and status icons on the covert video When selecting the Covert 2 the DVR disp...

Страница 37: ...sign IDs to each camera by highlighting the ID heading and pressing the button Change the number by highlighting it and using the arrow buttons to increase and decrease the number The PTZ ID number can be set from 0 to 256 Alarm In Setup Screen Highlight Alarm In in the Main menu and press the button The Alarm In setup screen appears Figure 36 Alarm In setup screen The alarm terminal strip on the ...

Страница 38: ...gs with 1 being the least sensitive and 5 being the most sensitive You can define the area of the image where you want to detect motion e g a doorway Highlight the icon under the Zone heading and press the button The Motion Detection Zone screen will display Figure 38 Motion Detection Zone screen The Motion Detection Zone screen is laid over the video for the selected camera You can set up motion ...

Страница 39: ...s Figure 39 Text In Setup screen NOTE If networking is configured by the external modem the text in cannot be set up Set the DVR for LAN connections and set up text in for RS 232C port NOTE Text in data will not be recorded during clip copy You can set the DVR to display the text in information Highlight the box beside Use Text In and press the button to toggle between On and Off Highlight the box...

Страница 40: ...t in device you will want to turn On Any Character Highlight Any Character and press the button to toggle between On and Off NOTE If Any Character is turned On you will not be able to enter any text in the Start String box Highlight the box beside Transaction End and press the button Use the virtual keyboard to enter the Transaction End string Refer to the device manufacturer s documentation for t...

Страница 41: ...n Timeout and set the length of time to wait for the new text string The DVR will consider a transaction ended if there is no text sting during timeout dwell time after the last text input string You can adjust the timeout dwell from 0 to 300 seconds Highlight the box beside Display Dwell and set the length of time you would like to display text in data You can adjust the display dwell time from 1...

Страница 42: ...he day of the week or Holiday on the left of the screen Select an entire block of time by highlighting the time at the top of the screen Select the entire screen by highlighting the empty box in the upper left corner of the screen Press the button from No Arming no block to On blue block to Event yellow block When set to On the Alarm Out is active during the scheduled time When set to Event the Al...

Страница 43: ...R will NOT record audio when the recording speed is set to less 15 ips 12 5 ips for PAL The DVR may not record audio depending on the Transfer Speed when the RAS Remote Administration System Watch application program is connected RS232 RS485 Setup Screen The RS232 RS485 setup screen allows you to set up the RS 232C and RS 485 ports to communicate with external devices such as remote controls and d...

Страница 44: ...op recording Record Mode Setup Screen Figure 46 Record Mode Setup screen Highlight the box beside Resolution and press the button This toggles between Standard and High NOTE The maximum recording speed is 30 images per second 25 ips for PAL when the resolution is set to Standard However when set to High the recording speed will be decreased to 15 images per second 12 5 ips for PAL Highlight the bo...

Страница 45: ...mages per second 25 ips for PAL when the resolution is set to Standard However when set to High the recording speed will be decreased to 15 images per second 12 5 ips for PAL NOTE When the DVR is recording video a red dot appears on the screen When the DVR is in the Panic Recording mode a white appears in the red dot and the REC LED on the front panel flickers Highlight the first box beside Auto D...

Страница 46: ...eside Time Lapse Recording and pressing the button toggles between On and Off You can set the maximum amount of time lapse video to be stored Once the DVR reaches this amount it will start recording over the oldest time lapse video The time lapse video is stored separate from Event video When Keep the continuous pictures is set to On you can set the time from 1 Hour to the maximum allowed by the s...

Страница 47: ...ime You can save your changes by highlighting OK and pressing the button Selecting Cancel exits the screen without saving the changes Pre Event Recording Setup Screen Figure 49 Pre Event Record Setup screen When the DVR is in the Event Record mode it is possible to have it record images before the event occurs The Pre Event Record screen allows you to define how to handle pre event recording You c...

Страница 48: ...ach sensor can be assigned a schedule camera recording speed video quality and dwell time Figure 50 Alarm In Event Action Record setup screen Highlight the Sched box and press the button A schedule screen appears Set the schedule as described earlier Highlight the Camera box and press the button A camera selection screen appears Select the camera number you would like to associate with the sensor ...

Страница 49: ...and press the button A schedule screen appears Set the schedule as described earlier Highlight the Alarm Out box and select either Beep or the alarm output terminal that you want to associate with the sensor Highlight the Dwell Time box and set the length of time you want the output activated Alarm In Event Action Notify Setup Screen The DVR can be set to notify the remote site when certain events...

Страница 50: ...d camera recording speed video quality and dwell time Figure 53 Motion Detector Event Action Record setup screen Highlight the Sched box and press the button A schedule screen appears Set the schedule as described earlier Highlight the Camera box and press the button A camera selection screen appears Select the camera number you would like to associate with the camera NOTE You can associate multip...

Страница 51: ... and press the button A schedule screen appears Set the schedule as described earlier Highlight the Alarm Out box and either Beep or the alarm output terminal that you want to associate with the motion event Highlight the Dwell Time box and set the length of time you want the output activated Motion Detector Event Action Notify Setup Screen The DVR can be set to notify the remote site when certain...

Страница 52: ... associated camera recording speed video quality and dwell time Figure 56 Text In Event Action Record setup screen Highlight the Sched box and press the button A schedule screen appears Set the schedule as described earlier Highlight the Camera box and press the button A camera selection screen appears Select the camera number you would like to associate with the text in device NOTE You cannot ass...

Страница 53: ...and press the button A schedule screen appears Set the schedule as described earlier Highlight the Alarm Out box and either Beep or the alarm output terminal that you want to associate with the text in device Highlight the Dwell Time box and set the length of time you want the output activated Text In Event Action Notify Setup Screen The DVR can be set to notify the remote site in the case of text...

Страница 54: ...edule associated camera recording speed video quality and dwell time Figure 59 Video Loss Event Action Record setup screen Highlight the Sched box and press the button A schedule screen appears Set the schedule as described earlier Highlight the Camera box and press the button A camera selection screen appears Select the camera number you would like to associate with the camera that has lost video...

Страница 55: ...m Out setup screen Highlight the Sched box and press the button A schedule screen appears Set the schedule as described earlier Highlight the Alarm Out box and either Beep or the alarm output terminal that you want to associate with the camera that has lost video Video Loss Event Action Notify Setup Screen The DVR can be set to notify the remote site in the case of video loss Figure 61 Video Loss ...

Страница 56: ... or camera display on the main monitor OSD On Screen Display Setup The DVR can be set up to display Date Time Title and Status on screen Each feature can be turned on or off and you can adjust the margins Figure 62 OSD Setup screen Highlight the box beside Date and press the button to toggle the date display On and Off Highlight the box beside Time and press the button to toggle the time display O...

Страница 57: ...ed on the main monitor You also can set the video from the event detected camera to be displayed on the main monitor during the preset dwell time Figure 63 Main Monitoring Setup screen Highlight the box beside Sequence Dwell Time and press the button You can adjust the sequence dwell time from 3 to 60 seconds NOTE The DVR does not sequence the camera having video loss Highlight the box beside Even...

Страница 58: ... are for network use They are different from the Admin and User passwords for the DVR itself NOTE The passwords are case sensitive The factory default password for both Administrator and User is 12345678 CAUTION Write the password down and keep it in a safe place Once the password has been reset the default will no longer work If the password is forgotten the unit must be reset using the Factory R...

Страница 59: ...You will need to get the appropriate IP Address Gateway and Subnet Mask from your network administrator Change the numbers by highlighting them and using the Up and Down arrow buttons to increase or decrease the number The factory default LAN settings are IP Address 192 168 1 129 Gateway 192 168 1 254 Subnet Mask 255 255 255 0 Highlight the box beside DNS Server and press the button to enter the I...

Страница 60: ...m restarts automatically after changing the port settings NOTE Do NOT use the same port number for two different programs otherwise the DVR cannot be connected with a PC running RAS CAUTION When changing the port settings you must change the port settings on the PC running RAS as well Refer to the RAS manual for details You can save your changes and return to the Network Setup screen by highlighti...

Страница 61: ...he box beside ID and press the button A virtual keyboard appears allowing you to enter the ID for ADSL connection Highlight the box beside Password and press the button A virtual keyboard appears allowing you to enter the password for ADSL connection NOTE Entering the ID and Password and highlighting OK reads the current IP Address of the DVR configured by the ADSL network NOTE If the DVR is confi...

Страница 62: ...ight the box beside Data Bit and press the button This toggles between 7 bit and 8 bit formats Highlight the box beside Stop Bit and press the button This toggles between 1 and 2 Stop Bits Highlight the box beside Parity and press the button A drop down list appears You can select from None Odd or Even parity You can save your changes by highlighting OK and pressing the button Selecting Cancel exi...

Страница 63: ...rt and enter the port number of the DVRNS server The port number can be set from 10000 to 12000 NOTE The DVRNS server settings on your DVR should match the settings on the registered DVRNS server Any changes on the DVRNS server might cause improper operation Highlight the Use NAT box and press the button to toggle On and Off NOTE When using the NAT Network Address Translation device refer to the N...

Страница 64: ...istered to multiple DVRNS servers Please contact your network administrator when you want to register the DVR to another DVRNS server Callback Center Setup Screen The DVR can be set up to contact a computer running RAS Remote Administration System on a LAN when an event occurs Also it can be set up to dial a pager with a numeric message when an event occurs if you have a modem connected to the DVR...

Страница 65: ...al keyboard appears allowing you to enter the ID Highlight the box beside Password and enter the SMTP password A virtual keyboard appears allowing you to enter the password NOTE Authentication should be turned On and ID and Password should be entered when using an SMTP server requiring user authentication Callback Center Setup by Modem connections Figure 72 Callback Center Modem Setup screen Highl...

Страница 66: ...word is required to turn the system off enter the setup screen load default setups clear all data change system date and time and change the Administrator password A User password is required to enter playback fast forward playback and fast backward playback modes from live monitoring mode and enter the search menu screen in live monitoring mode Highlight Password in the Main menu and press to ent...

Страница 67: ...he button Once the buttons are locked pressing any front panel button will cause a password screen to display You will need to enter the correct password to unlock the keys The Key Lock password is 4321 The Administrator password also can be used to unlock the keys You can save your changes by highlighting OK and pressing button Selecting Cancel exits the screen without saving the changes Config S...

Страница 68: ...File Name box and press the button A virtual keyboard appears Enter a file name for the video you are backing up and select Close The DVR will automatically add the camera number for example 01 and exe to the file name If you want to save the file in a specific folder enter the folder name followed by a For example folder filename Once you have given the video a file name highlight the Start butto...

Страница 69: ...m setup from a remote site NOTE The recording speed will be decreased to 1 ips per camera during CD burning or while the DVR is preparing clip copy data on hard disk drive CAUTION Do NOT use poor quality CD R or CD RW discs or ones that have been scratched or damaged in any way CAUTION Do NOT disconnect the USB cable or the power from the external drive while backing up video If the external drive...

Страница 70: ...in the File Name field Selecting Load will load the selected saved settings and change the DVR settings accordingly NOTE Even after changing the DVR settings by loading saved settings the time related settings Date Time Time Zone and Daylight Saving Time will NOT be changed NOTE If you want to change the network settings check Include network setup Otherwise the network settings will NOT be change...

Страница 71: ...ystem settings that are not related to hard disk drive operation Also the unit can be connected with RAS Watch either via Ethernet or modem The Front Panel controls are described in Chapter 3 Configuration Turning on the Power Once you have installed the DVR following the instructions in Chapter 2 Installation it is ready to record The unit will take approximately 60 seconds to initialize The DVR ...

Страница 72: ...ation will display on the image NOTE The text in displays only in full screen Figure 78 Live Monitoring Text In screen PTZ Mode The DVR will control cameras with Pan Tilt and Zoom capabilities Pressing the PTZ button enters the PTZ mode You can control the camera using front panel control buttons or by setting up presets Press the arrow buttons to pan left and right and tilt the camera up and down...

Страница 73: ... directly to desired views Select Set Preset in the PTZ Menu Select the number you want to assign to the preset and press the button Use the virtual keyboard to enter the preset name and enter the button again to save as preset Figure 80 PTZ Preset screen Preset View Once you have set the camera presets you can go directly to desired views Press the QUAD SEQ button to load the Preset View dialog b...

Страница 74: ...e setup the DVR is recording video and will continue recording until the hard disk drive is full The factory default is Stop when the hard disk drive is full The DVR can be set to continue recording Overwrite once the hard disk drive is full It does this by recording over the oldest video Although you will be able to record without changing the unit from its original factory settings you will want...

Страница 75: ...ll display the text in data if there is any text input The text in information will display on the image NOTE The text in displays only in full screen NOTE Make sure that Text In is turned On during OSD setup if you want to display the text in information on the playback image Figure 82 Playback Text In screen Arrow Buttons Pressing the left arrow button plays video backward at high speed Pressing...

Страница 76: ...hen you release the ring it snaps back to the center position and the video pauses Jog Dial The Jog Dial functions when playback video has been paused By turning the jog dial clockwise you can play video forward image by image By turning the jog dial counterclockwise you play video backward image by image NOTE When playing recorded video at maximum speed with very high image quality playback of re...

Страница 77: ...annel Digital Video Recorder 67 Figure 83 Digital Zoom screen Figure 84 Enlarged Digital Zoom screen Searching Video Pressing the MENU button in the playback mode displays the Search Menu Figure 85 Search Menu ...

Страница 78: ...reen Move the cursor over the date and press the button Adjust the numbers using arrow buttons or Jog Dial Once you have set the date you want to search for video press the button Move the cursor over the time and press the button Adjust the numbers using arrow buttons or Jog Dial Once you have entered the time you want to search for video press the button Once you have set the date and time you w...

Страница 79: ...e and time you want to search highlight the GO button and press the button The selected date and time will display The arrow buttons Jog and Shuttle can now be used to review the surrounding video Event Search Figure 88 Event Log screen The DVR maintains a log of each time the Alarm Input port is activated The Event Log screen displays this list Highlight the event for which you would like to see ...

Страница 80: ... to last recorded images or you can set the start and stop times and dates When you select the Search by Camera select the target cameras and event options When you select the Search by Event select event options for each device Once you set your desired search conditions highlight Find and press the button to display the search results in the Event Log screen Selecting Cancel exits the screen wit...

Страница 81: ... the event Pressing the arrow button will start playing the text in video segment with the text in data on the image Pressing the ENTER PAUSE button pauses the video and pressing the button again returns to live monitoring You can also narrow your event search by selecting the Query button and setting up the new search condition Figure 92 Text In Search screen You can search video from the first t...

Страница 82: ...l keyboard Highlight the Comp box and enter the comparison operator using the virtual keyboard Highlight the Value box and enter the comparison value using the virtual keyboard NOTE The Column and Line can be used for more specific search of the text in data Column indicates the location of each individual category and Line indicates the line where the category is located Change the number of Colu...

Страница 83: ...elected for the file system NOTE The partition size should be less than 32GB because of Windows OS limitations After formatting is complete the USB IDE hard disk drive will be added to My Computer 7 Connect the USB IDE hard disk drive to the DVR Preparing the USB IDE hard disk drive in Windows 98 NOTE Preparing a USB IDE hard disk drive under Windows ME is almost identical to Windows 98 1 Connect ...

Страница 84: ...ESC to exit the screen after the USB IDE hard disk drive partition is created 11 Restart your computer and verify the newly created drive is in My Computer 12 Right click the newly created hard disk drive icon and select Format 13 In the Format Screen select Full as the Format type and click Start 14 After formatting is complete connect the USB IDE hard disk drive to the DVR ...

Страница 85: ...i 1 95 1 s 1 95 total 16 85 Thank you In the above text in data you can find that the comparison value is located at 17th Unit price mark will be ignored automatically 28th Qty and 40th amount characters including spaces from the left In this case you can enter 17 28 and 40 in each Column box For example if you want to search for Coke with a Qty Quantity of more than 1 and Hotdog with an amount to...

Страница 86: ...omparison value is located at 17th Unit price mark will be ignored automatically 28th Qty and 40th amount characters including spaces from the left but the value of amount category is located on a different line from Item In this case you can enter 17 28 and 40 in each Column box and enter 1 in the Line box for the next line For example if you want to search for Coke with a Qty Quantity of more th...

Страница 87: ...is connected to a properly terminated device DVR has stopped recording If hard disk drive is full you will either need to delete video or set the DVR to the Overwrite Mode DVR displays an error message stating that the last recorded image date and time is later than the current date and time setting of the DVR The DVR will automatically reset the time and date of the unit according to the time and...

Страница 88: ...r Pin Outs I O Connector Pin Outs Input Output AI 1 to 4 Alarm Inputs 1 to 4 GND Chassis Ground ARI Alarm Reset In NC Normally Closed C Common NO Normally Open RS485 Connector Pin Outs Master Unit Slave Unit RX TX To TX RX RX TX To TX RX ...

Страница 89: ...Four Channel Digital Video Recorder 79 Appendix E Map of Screens ...

Страница 90: ... threshold Alarm Output 2 relay out terminal block NC NO 0 5A 125VAC 1A 30VDC Alarm Reset Input 1 TTL terminal block Internal Buzzer 80dB at 10cm Network Connectivity 10 100 Base Ethernet RS 232C for external modem Audio Input 4 lines in Audio Output 1 line CONNECTORS Video Input Composite 4 BNC Video Loop Composite 4 BNC Monitor Output Composite 1 BNC SVHS 1 Y C Analog RGB 1 VGA Audio In 4 RCA co...

Страница 91: ...GENERAL Dimensions W x H x D 16 9 x 3 5 x 14 430mm x 88mm x 355mm Unit Weight 17 64 lbs 8 0kg Shipping Weight 22 44 lbs 10 2kg Shipping Dimensions W x H x D 21 3 x 10 2 x 19 7 540mm x 260mm x 500mm Operating Temperature 41 F to 104 F 5 C to 40 C Operating Humidity 0 to 90 Power 100 240 V 50 60Hz 2A Approval FCC CE CB UL Specifications are subject to change without notice ...

Страница 92: ...t or human health from uncontrolled waste disposal please separate this from other types of wastes and recycle it responsibly to promote the sustainable reuse of material resources Household users should contact either the retailer where they purchased this product or their local government office for details of where and how they can take this item for environmentally safe recycling Business user...

Отзывы: