background image

QUICK START GUIDE -  

5

QUICK START GUIDE -  

5

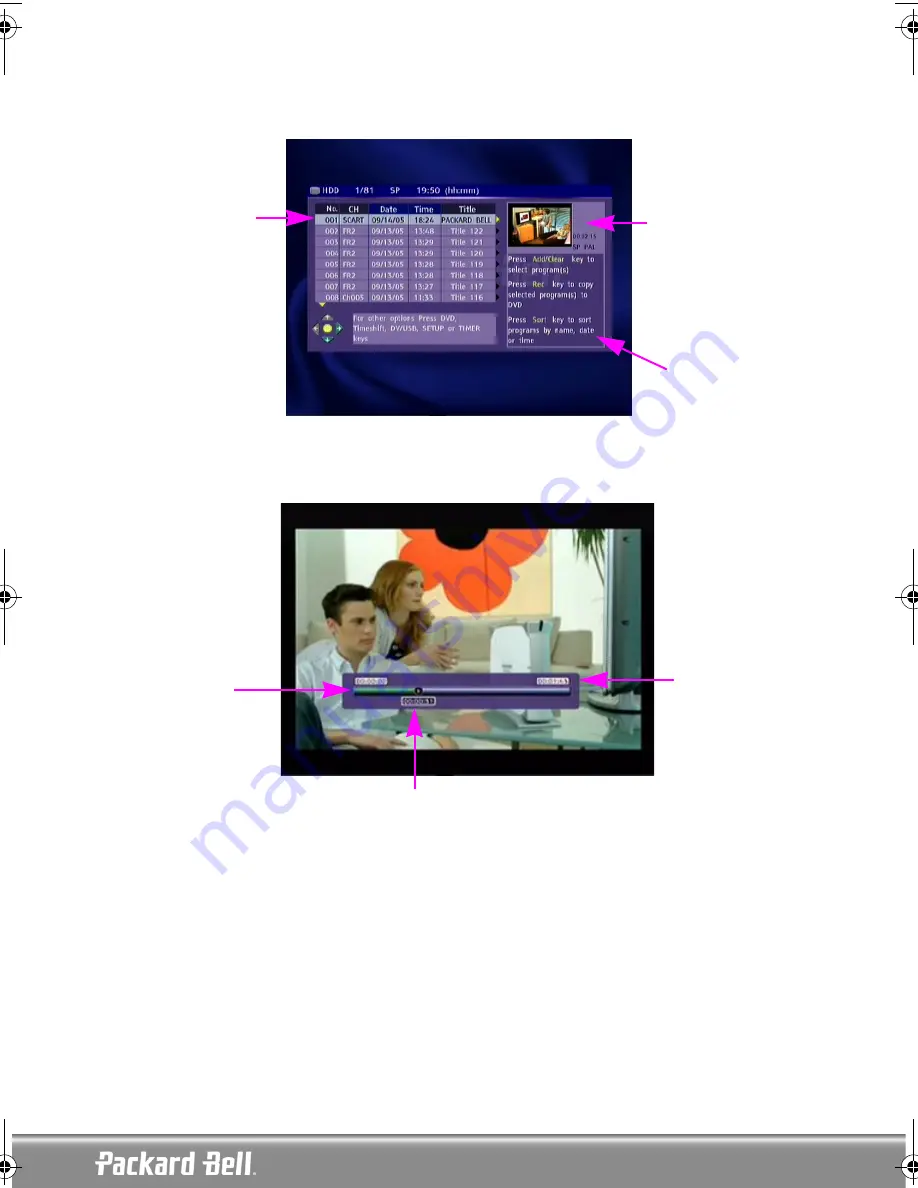
Play a previously recorded program on the HDD

1. Press the [HDD] button until the HDD title list appears.

2. Use the [UP] & [DOWN] buttons to highlight the desired title.

You may press [SORT] to sort the list by title name or date and [PREVIOUS] & [NEXT] to go to the previ-
ous/next page.

3. Press [SELECT] to play the highlighted title

During playback:

Use  the  [PREVIOUS] / [NEXT] / [FRW] / [FFW] buttons for time navigation inside the title.

Currently highlighted title

video preview

On-screen help

Currently hightlighted

title

Title end time

Playback time

Title beginning

QSG_EHR2080_6979000001_UK.fm  Page 5  Monday, September 26, 2005  3:15 PM

Содержание EHR 2080

Страница 1: ...12 Pause live TV 14 Review time shifting buffer play back live TV moments 14 Record live TV in Time Shifting mode 14 Save a program from the Time Shifting buffer 14 Save the entire Time Shifting buffe...

Страница 2: ...ECORDER back panel 2 Antenna in 3 Aerial or cable TV 4 Antenna out Step 3 Connecting to the TV 1 Connect the yellow plug of the A V cable from the CVBS OUT plug yellow on the back of the RECORDER to t...

Страница 3: ...N CLOSE button to close the tray 4 The playback should start automatically If not press DVD 5 Use the NAVIGATION buttons to navigate through the menu and press SELECT to make a selection During playba...

Страница 4: ...DVD or CD with MP3 or JPEG files 1 Press the OPEN CLOSE button on the front panel of the unit to open the tray 2 Place the disc on the tray 3 Press again the OPEN CLOSE button to close the tray The c...

Страница 5: ...sired title You may press SORT to sort the list by title name or date and PREVIOUS NEXT to go to the previ ous next page 3 Press SELECT to play the highlighted title During playback Use the PREVIOUS N...

Страница 6: ...s for the USB device to be recognized by the recorder 3 Use the NAVIGATION buttons to highlight the desired file 4 Press SELECT to play the file HDD TITLE EDITING FEATURE Delete a previously recorded...

Страница 7: ...will pop up Use the LEFT RIGHT buttons to highlight Yes Press SELECT to confirm Note Protected and locked titles can not be deleted Split a previously recorded program into 2 titles 1 Press the HDD b...

Страница 8: ...SELECT when the cursor is at the desired splitting position 8 A confirmation window will pop up Use the LEFT RIGHT buttons to highlight Yes Press SELECT to confirm Note Protected and locked titles ca...

Страница 9: ...REVIOUS NEXT FRW FFW buttons to locate the beginning of the segment you want to hide 7 Press SELECT when the cursor is at the desired position 8 Use the PREVIOUS NEXT FRW FFW buttons to locate the end...

Страница 10: ...N buttons to highlight the desired title 3 Press RIGHT to display the editing menu 4 Use the UP DOWN buttons to highlight Rename 5 Press SELECT to select Rename 6 Enter the new name using the NAVIGATI...

Страница 11: ...ppears 2 Use the UP DOWN buttons to highlight the desired title 3 Press RIGHT to display the editing menu 4 Use the UP DOWN buttons to highlight Protect A small icon under the preview window indicates...

Страница 12: ...sources can be recorded Recordings are made only on the HDD The Time Shifting mode enables the user to pause and control live TV From the moment the Easy HDD Recorder is on the Time Shifting mode it w...

Страница 13: ...g mode Press TIMESHIFT to switch to Time Shifting mode 2 The screen will then show the time progression bar as below 3 As the time will pass the time bar will show the buffer progression as below Note...

Страница 14: ...me Shifting mode 2 Press RECORD to start recording Press RECORD several times to increase the recording time by 30 minutes up to a maximum of 3 hours Save a program from the Time Shifting buffer 1 Swi...

Страница 15: ...d If TV tuner is selected use the UP DOWN buttons to select the desired channel If you are in Time Shifting mode press RECORD If you are in Recording mode make sure Hard Drive is selected If not press...

Страница 16: ...lected 3 Press REC TO to select OPTICAL DVD or HDD 4 You can control the camcorder playback using the HDD remote control 5 Press PLAY to start the camcorder playback and use the PREVIOUS NEXT FRW FFW...

Страница 17: ...take a few seconds for the USB device to be recognized by the recorder 3 Press REC to access the USB archive menu 4 Use the NAVIGATION buttons to highlight the desired file 5 Press ADD CLEAR to select...

Страница 18: ...18 English...

Отзывы: