background image

15

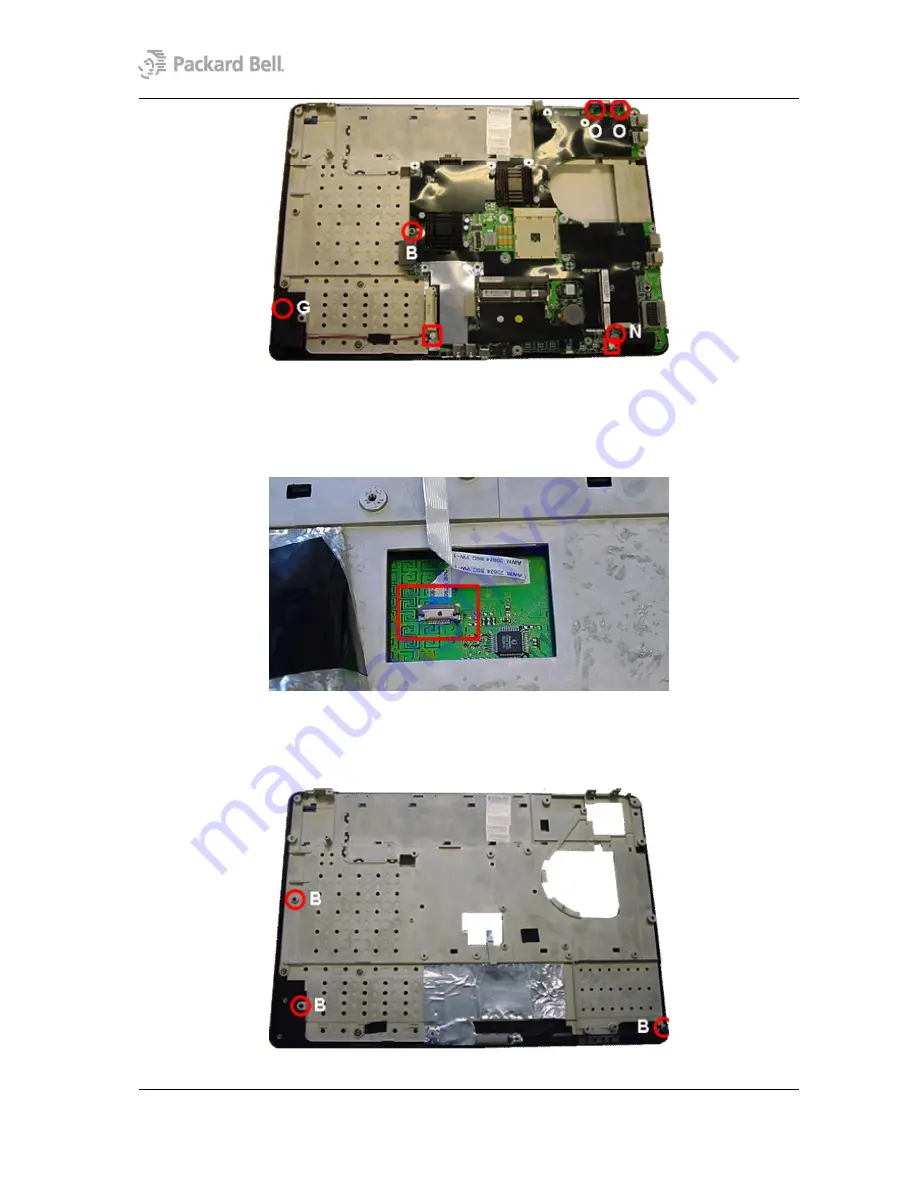
8.  Take away the main board.
9.  Partially remove the foil over the touchpad.
10. Disconnect the touchpad cable.

11. Remove the screws (3xB) and remove the heat plate.
12. Push out the touchpad assembly.

Fig. 26

The main board and speakers.

Fig. 27

The touch pad connector.

Fig. 28

Removing the heat plate.

Содержание EasyNote W7 Series

Страница 1: ...Packard Bell EasyNote W7 Series Dragon SN Disassembly Manual ...

Страница 2: ... 2 Avoid Electrostatic Discharge 2 Power Supply Unit 2 Battery and AC Adapter 4 Removing the Hard Disk Drive 4 Bottom Panel 5 CPU VGA Module and Heat Sink 6 Top Cover 7 Removing the LCD Panel Assembly 9 Disassembling the LCD Panel Assembly 9 Optical Disk Drive 12 Bottom Base Assembly 13 Main Board Assembly 14 Notice 16 ...

Страница 3: ...ve the battery n Do not disassemble the system into parts that are smaller than those specified in the instructions n Label all removed connectors note where the connector goes and in what position it was installed Reassembly Instructions Reassembly is the reverse of the disassembly process Use care to ensure that all cables and screws are returned to their proper positions Check that no tools or ...

Страница 4: ...ctrostatic build up by touching an unpainted metal portion of the computer chassis with one hand Then touch the device you are un installing with the other hand and maintain continuous contact with it until it is un installed in the computer Power Supply Unit Under no circumstances should you attempt to disassemble the power supply The power supply contains no user serviceable parts Inside the pow...

Страница 5: ...de behuizing geopend wordt Zet de computer nooit aan als de behuizing geopend is AVVERTENZA Prima di rimuovere il coperchio del telaio assicurarsi che il sistema sia scollegato dall alimentazione da tutti i collegamenti di comunicazione reti o linee di modem Non avviare il sistema senza aver prima messo a posto il coperchio ...

Страница 6: ...e perform the following steps 1 Remove two screws 2xA from the HDD cover as shown in Fig 1 2 Remove the HDD cover 3 Remove one screw 1xB 4 Slide the HDD to the left away from its connector Then lift it out 5 Remove four screws 4xC from the HDD bracket 6 Remove two screws 2xD from the HDD bracket 7 Remove the HDD bracket and connector Fig 1 The bottom base Fig 2 Removing the hard disk drive ...

Страница 7: ...Remove the memory module 3 Lift out the TV Tuner Mini PCI card from its slot 4 Disconnect the antenna cable and the two data cables 5 Disconnect the TV Tuner data cables from the mainboard 6 Remove the Mini PCI Wireless LAN card and disconnect the antenna cable s Fig 3 Removing the hard disk drive Fig 4 Removing the bottom panel ...

Страница 8: ...t sink from the CPU and the VGA Mobile PCI Express Module MXM follow the steps below 1 Disconnect the CPU fan cable 2 Remove the lock screws 4xE from the CPU heat sink 3 Remove the lock screws 4xR from the VGA module see Fig 5 4 Remove the screws 1xP and 1xS from the heat sink assembly 5 Take away the heat sink Fig 5 Removing the Mini PCI wireless card Fig 6 Removing the heat sink ...

Страница 9: ...r by following the steps below 1 Slide the button bar to the left to unlock it 2 Disconnect the multimedia keyboard flat cable and take away the button bar 3 Remove the screws 4xD from the keyboard 4 Flip keyboards towards you 5 Disconnect the keyboard flat cable Fig 7 Remove VGA module and CPU Fig 8 Removing the button bar Fig 9 Removing the keyboard screws ...

Страница 10: ...e the two hinge covers 8 Disconnect the lid switch connector 9 Remove the screw 1xD and remove the lid switch unit Fig 10 Removing the keyboard flat cable Fig 11 Disconnecting touchpad flat cable Fig 12 The hinge covers Fig 13 Lid switch and hinges ...

Страница 11: ...le the LCD panel follow the steps below 1 Remove the screw covers and screws 2xG 2 Remove the screw covers and screws 4xH 3 Unclip the front bezel by pushing it outwards from the inside 4 Take away the bezel 5 Remove the screws 2xH at the top see Fig 15 6 Remove the screws 3xD from the top supporting bracket 7 Remove the screws 4xJ from the hinges 8 Remove the screws 2xD from the lower supporting ...

Страница 12: ...Fig 16 LCD inverter backlight connecter 11 Remove the lower supporting bracket 12 Take away the LCD display panel and inverter board 13 Disconnect the LCD cable from the inverter board 14 Disconnect the LCD cable from the back of the LCD display panel Fig 17 LCD display cable ...

Страница 13: ... LCD bracket The same goes for the right bracket Fig 18 LCD display cable 16 Take away the top left and right bracket from the LCD display panel 17 Remove the screws 2xD holding the wireless antenna and take away the antenna Fig 19 Wireless antenna ...

Страница 14: ... the screws 2xB and push the optical disk drive out of its bay Fig 20 The screws of the optical disk drive 2 Remove the screws 2xK from the side ODD bracket and remove it 3 Remove the screws 2xK from the rear ODD bracket and remove it Fig 21 The screws of the optical disk drive brackets ...

Страница 15: ...s 4XA from the top cover 2 Then remove the screws 4xJ Note Make sure that during re assembly the clips of the top cover lock into place before fastening the screws 3 Turn over the unit and remove the screws 18xJ 2xB from the bottom base assembly Fig 23 The bottom base assembly Fig 22 The top cover ...

Страница 16: ...or from the modem connector board Main Board Assembly To remove the main board from the top cover follow the steps below 1 Remove the screws 2xO from the VGA connector on the rear 2 Disconnect left speaker connector from main board 3 Remove the screw 1xN 4 Slightly lift main board and slide out left speaker assembly 5 Disconnect right speaker from main board 6 Remove the screw 1xG and take away th...

Страница 17: ...move the foil over the touchpad 10 Disconnect the touchpad cable 11 Remove the screws 3xB and remove the heat plate 12 Push out the touchpad assembly Fig 26 The main board and speakers Fig 27 The touch pad connector Fig 28 Removing the heat plate ...

Страница 18: ...ING PERFORMANCE OR USE OF THIS MATERIAL Copyright 2005 NEC Computers International BV All rights reserved Packard Bell is a trademark of NEC Computers International BV The names of actual companies and products mentioned herein may be trademarks and or registered trademarks of their respective owners The software described in this guide is furnished under a license agreement or nondisclosure agree...

Отзывы: